42
| Removing
the
Optical
Drive
3
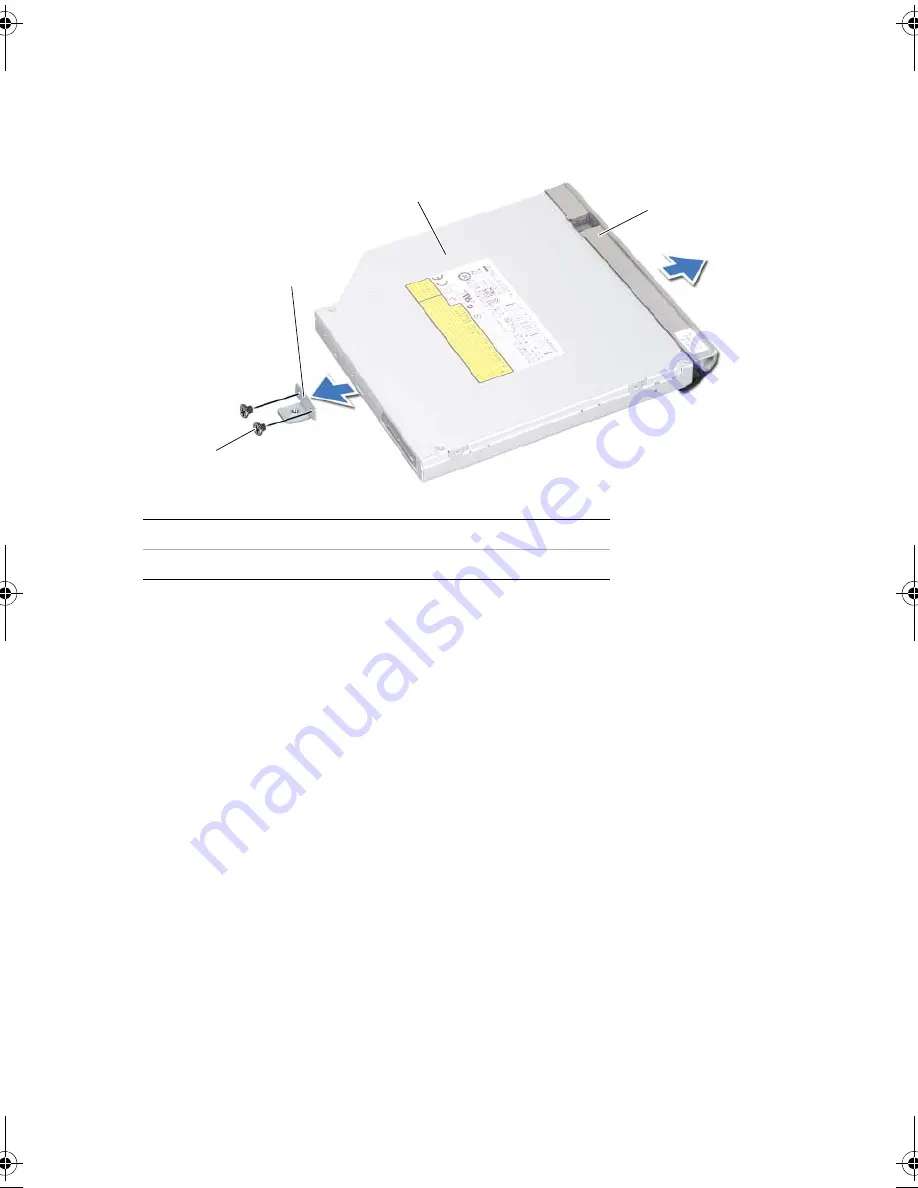
Carefully pry the optical-drive bezel and remove it from the optical-drive assembly.
4
Remove the screws that secure the optical-drive bracket to the optical drive.
5
Remove the optical-drive bracket.
1
screws (2)
2
optical-drive bracket
3
optical drive
4
optical-drive bezel
1
2
4
3
book.book Page 42 Wednesday, April 11, 2012 4:13 PM
Summary of Contents for Inspiron 14R 5420
Page 8: ...8 Contents ...
Page 12: ...12 After Working Inside Your Computer ...
Page 14: ...14 Removing the Switch ...
Page 16: ...16 Replacing the Switch ...
Page 18: ...18 Removing the Battery ...
Page 20: ...20 Replacing the Battery ...
Page 24: ...24 Removing the Keyboard ...
Page 26: ...26 Replacing the Keyboard ...
Page 28: ...28 Removing the Base Cover ...
Page 30: ...30 Replacing the Base Cover ...
Page 32: ...32 Removing the Memory Module s ...
Page 38: ...38 Removing the Hard Drive ...
Page 40: ...40 Replacing the Hard Drive ...
Page 44: ...44 Replacing the Optical Drive ...
Page 48: ...48 Removing the Palm Rest ...
Page 50: ...50 Replacing the Palm Rest ...
Page 56: ...56 Removing the Power Adapter Port ...
Page 58: ...58 Replacing the Power Adapter Port ...
Page 62: ...62 Replacing the Coin Cell Battery ...
Page 64: ...64 Removing the Fan ...
Page 66: ...66 Replacing the Fan ...
Page 68: ...68 Removing the Speakers ...
Page 70: ...70 Replacing the Speakers ...
Page 74: ...74 Removing the Display Assembly ...
Page 76: ...76 Replacing the Display Assembly ...
Page 78: ...78 Removing the Display Bezel ...
Page 80: ...80 Replacing the Display Bezel ...
Page 84: ...84 Replacing the Display Panel ...
Page 88: ...88 Replacing the Display Hinges ...
Page 92: ...92 Removing the Camera Module ...
Page 94: ...94 Replacing the Camera Module ...
Page 102: ...102 Removing the System Board ...
Page 108: ...108 Replacing the Processor Heat Sink ...
Page 110: ...110 Flashing the BIOS ...


