


Removing and Replacing Parts
4-25
5HPRYH WKH 6(& FDUWULGJH DQG KHDW VLQN DVVHPEO\
5HPRYH WKH JXLGH EUDFNHW DVVHPEO\ IRU WKH 6(& FDUWULGJH
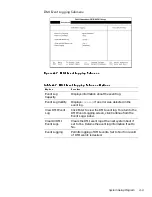
)LJXUH *XLGH%UDFNHW $VVHPEO\ 5HPRYDO
Using a #2 Phillips screwdriver, loosen each of the four nuts (see
Figure 4-24) securing the guide bracket assembly to the system board.
Remove the assembly from the four threaded posts.
NOTE: The four nuts are captive and are retained in the assembly when
loosened. The screws are mounted on the system board.
captive nuts (4)
threaded posts (4)
guide bracket
assembly
SEC cartridge connector
key
Summary of Contents for Dimension XPS R Series
Page 1: ...ZZZ GHOO FRP HOO LPHQVLRQ 36 5 6 VWHPV 6 59 0 18 ...
Page 7: ...ix ...
Page 16: ...1 8 Dell Dimension XPS Rxxx Systems Service Manual LJXUH 3RZHU DEOHV P1 P7 P2 P3 P6 P5 P4 ...
Page 30: ...1 22 Dell Dimension XPS Rxxx Systems Service Manual ...
Page 38: ...2 8 Dell Dimension XPS Rxxx Systems Service Manual ...
Page 44: ...3 6 Dell Dimension XPS Rxxx Systems Service Manual ...


