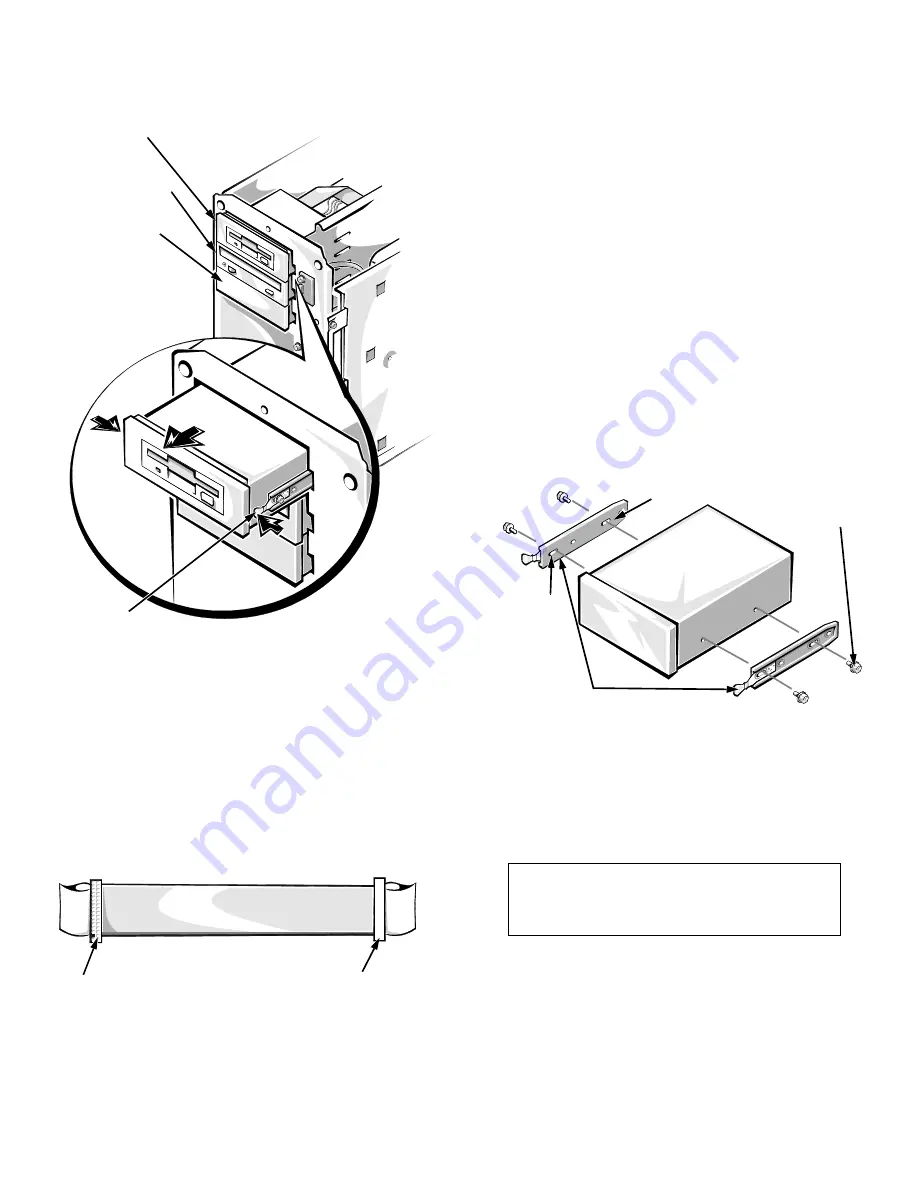
Installing Drives in the External Bays
8-5
Figure 8-7. Drives in the External Bays
The diskette drive interface cable (see Figure 8-8) pro-
vides an interface between the standard diskette drive in the
top bay and the computer’s built-in diskette controller. The
connectors on the cable are identical; however, the ends of
the cable are labeled “CNTL” for the diskette controller con-
nector (FLOPPY) and “DRIVE” for the diskette drive
connector. (To identify the FLOPPY connector, see
Figure 7-1.)
Figure 8-8. Diskette Drive Interface Cable
Installing Diskette Drives That Use the
Diskette Drive Controller
To install a 5.25- or 3.5-inch diskette drive that uses the
built-in diskette drive controller, follow these steps:
1.
Prepare the drive for installation.
Ground yourself by touching an unpainted metal sur-
face on the back of the computer, unpack the drive,
and compare the jumper settings with those in the
drive documentation. Change any settings necessary
for your system’s configuration.
If the drive does not already have drive rails
attached, attach a drive rail to each side of the drive.
Orient the drive rails as shown in Figure 8-9. Secure
each drive rail to the drive with a screw in the first (from
the front) and third slotted screw holes on the drive rail
as shown in Figure 8-9.
Figure 8-9. Attaching Drive Rails
2.
Remove the computer cover and front bezel
according to the instructions in “Removing the
Computer Cover” and “Removing the Front
Bezel” in Chapter 6.
3.
Slide the new drive into its bay until it snaps
securely into place.
If necessary, you can adjust drive alignment by repo-
sitioning one or both rails.
drive in top bay
drive in middle bay
empty lower bay
press
(two places)
controller connector
drive connector
CAUTION: See “Protecting Against Elec-
trostatic Discharge” in the safety
instructions at the front of this guide.
first slot
third slot
mounting
screws (4)
rails
Summary of Contents for Dimension 2200
Page 1: ... HOO 3RZHU GJH 6 VWHPV 86 5 6 8 ...
Page 6: ...viii ...
Page 10: ...xii ...
Page 22: ...xxiv ...
Page 30: ...2 4 Dell PowerEdge 2200 Systems User s Guide ...
Page 64: ...4 18 Dell PowerEdge 2200 Systems User s Guide ...
Page 88: ...6 8 Dell PowerEdge 2200 Systems User s Guide ...
Page 100: ...7 12 Dell PowerEdge 2200 Systems User s Guide ...
Page 118: ...A 4 Dell PowerEdge 2200 Systems User s Guide ...
Page 128: ...B 10 Dell PowerEdge 2200 Systems User s Guide ...
Page 140: ...D 6 Dell PowerEdge Systems 2200 User s Guide ...


