background image

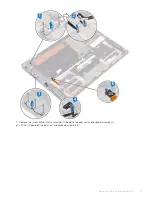
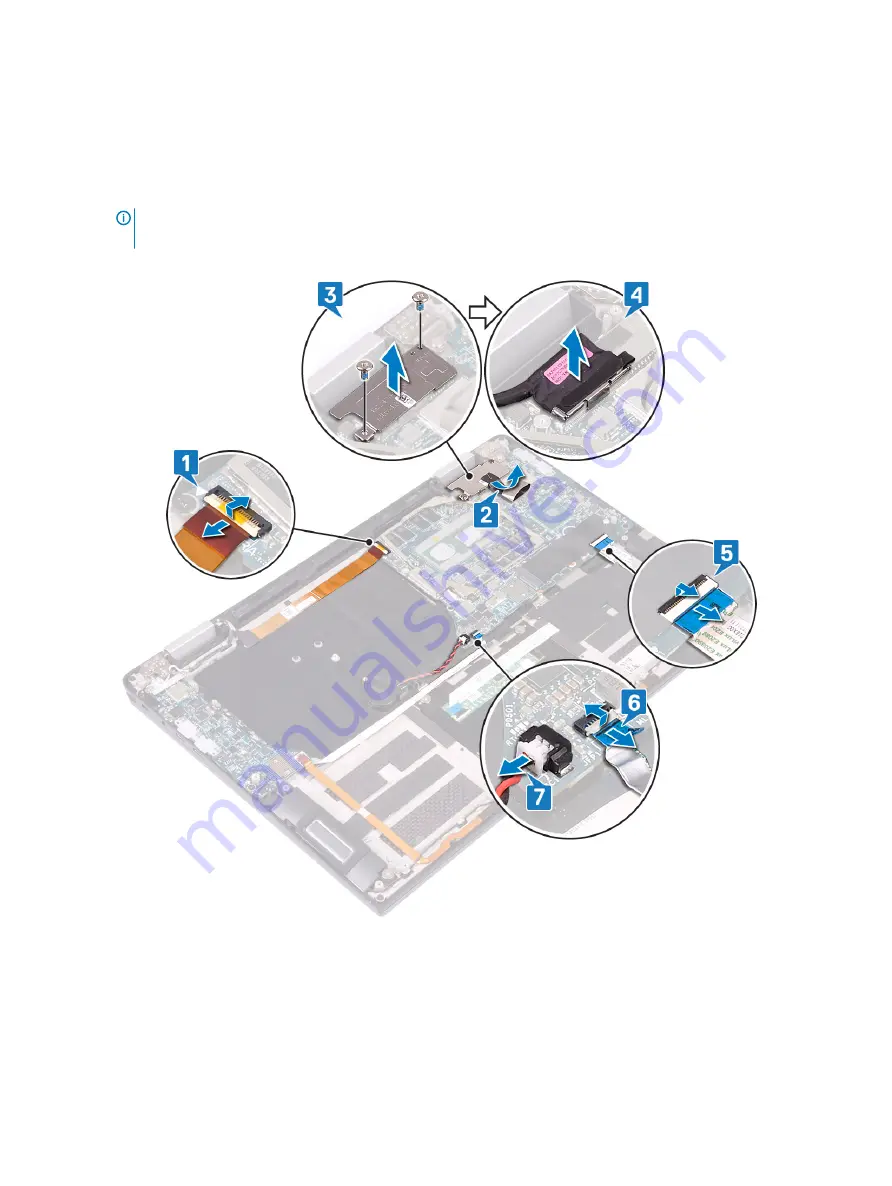
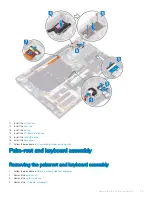
To remove the system board:

a Open the latch and disconnect the camera cable from the system board [1].
b Peel the tape that secures the display-cable bracket to the system board [2].
c Remove the two screws (M1.6x1.8) that secure the display-cable bracket to the system board and lift the bracket off the system 

board [3].

d Using the pull tab, disconnect the display cable from the system board [4].
e Open the latch and disconnect the keyboard-back light cable from the system board [5].
f

Open the latch and disconnect the fingerprint-reader cable from the system board [6].

NOTE: 

Removing the coin-cell battery resets the BIOS setup program's settings to default. It is recommended that 

you note the BIOS setup program's settings before removing the coin-cell battery.

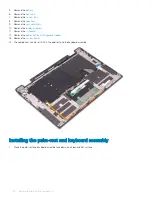
g Disconnect the coin-cell battery cable from the system board [7].

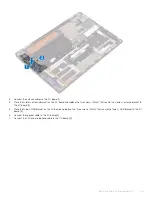
h Remove the three screws (M2x4) that secure the Type-C USB bracket to system board and lift the bracket off the system 

board [1].

i

Remove the two screws (M2x3) that secure the system board to the palm-rest and keyboard assembly [2].

j

Lift the system board off the palm-rest assembly [3].

46

Removing and installing components

Summary of Contents for 5530 Mono Laser

Page 1: ...Dell Precision 5530 2 in 1 Service Manual Regulatory Model P73F Regulatory Type P73F001 ...

Page 2: ...amage to hardware or loss of data and tells you how to avoid the problem WARNING A WARNING indicates a potential for property damage personal injury or death 2018 Dell Inc or its subsidiaries All rights reserved Dell EMC and other trademarks are trademarks of Dell Inc or its subsidiaries Other trademarks may be trademarks of their respective owners 2018 10 Rev A01 ...

Page 3: ... 10 Thunderbolt over Type C 10 Thunderbolt 3 over Type C 11 Key Features of Thunderbolt 3 over USB Type C 11 Thunderbolt Icons 11 3 Removing and installing components 12 Recommended tools 12 Screw list 12 Base cover 13 Removing the base cover 13 Installing the base cover 16 Solid state drive 20 Removing the solid state drive 20 Installing the solid state drive 21 I O board interposers 22 Removing ...

Page 4: ...ving the display assembly 42 Installing the display assembly 43 System board 45 Removing the system board 45 Installing the system board 47 Palm rest and keyboard assembly 49 Removing the palmrest and keyboard assembly 49 Installing the palm rest and keyboard assembly 50 4 Troubleshooting 52 Enhanced Pre Boot System Assessment ePSA diagnostics 52 Running the ePSA Diagnostics 52 System diagnostic l...

Page 5: ...ing a connector on the back of the computer CAUTION Handle components and cards with care Do not touch the components or contacts on a card Hold a card by its edges or by its metal mounting bracket Hold a component such as a processor by its edges not by its pins CAUTION When you disconnect a cable pull on its connector or on its pull tab not on the cable itself Some cables have connectors with lo...

Page 6: ...eriodically touching an unpainted metal surface at the same time as touching a connector on the back of the computer After working inside your computer After you complete any replacement procedure ensure that you connect any external devices cards and cables before turning on your computer 1 Connect any telephone or network cables to your computer CAUTION To connect a network cable first plug the ...

Page 7: ...separate audio cable 3D Defines input output protocols for major 3D video formats paving the way for true 3D gaming and 3D home theater applications Content Type Real time signaling of content types between display and source devices enabling a TV to optimize picture settings based on content type Additional Color Spaces Adds support for additional color models used in digital photography and comp...

Page 8: ...etter accommodate power hungry devices New power management features Full duplex data transfers and support for new transfer types Backward USB 2 0 compatibility New connectors and cable The topics below cover some of the most commonly asked questions regarding USB 3 0 USB 3 1 Gen 1 Speed Currently there are 3 speed modes defined by the latest USB 3 0 USB 3 1 Gen 1 specification They are Super Spe...

Page 9: ...re than promising With its promised 4 8Gbps speed the standard will find its way into some products that previously weren t USB territory like external RAID storage systems Listed below are some of the available SuperSpeed USB 3 0 USB 3 1 Gen 1 products External Desktop USB 3 0 USB 3 1 Gen 1 Hard Drives Portable USB 3 0 USB 3 1 Gen 1 Hard Drives USB 3 0 USB 3 1 Gen 1 Drive Docks Adapters USB 3 0 U...

Page 10: ...ction This could spell the end of all those proprietary laptop charging cables with everything charging via a standard USB connection You could charge your laptop from one of those portable battery packs you charge your smartphones and other portable devices from today You could plug your laptop into an external display connected to a power cable and that external display would charge your laptop ...

Page 11: ...ector and cables It is compact and reversible 2 Thunderbolt 3 supports speed up to 40 Gbps 3 DisplayPort 1 2 compatible with existing DisplayPort monitors devices and cables 4 USB Power Delivery Up to 130W on supported computers Key Features of Thunderbolt 3 over USB Type C 1 Thunderbolt USB DisplayPort and power on USB Type C on a single cable features vary between different products 2 USB Type C...

Page 12: ...t and keyboard assembly Torx head M2x3 8 Battery Palm rest and keyboard assembly M2x5 8 Display assembly Palm rest and keyboard assembly M2 5x4 6 Display cable bracket System board M1 6x1 8 2 Fans Palm rest and keyboard assembly M2x3 4 Fingerprint reader Palm rest and keyboard assembly M1 6x1 8 1 Heat sink System board M2x3 5 I O board Palm rest and keyboard assembly M2x3 1 I O board interposer Pa...

Page 13: ... board M2x4 3 Type C USB bracket System board M2x4 3 Wireless antenna bracket System board M2x4 2 Base cover Removing the base cover 1 Follow the procedure in Before working inside your computer 2 To remove the base cover a Remove the eight torx head screws M2x3 that secure the base cover to the palm rest and keyboard assembly Removing and installing components 13 ...

Page 14: ...ad to cosmetic damage c Pry the base cover starting from the right side of palm rest and keyboard assembly d Pry the base cover from the bottom left corner of the palm rest and keyboard assembly e Pry the base cover from the left side of the palm rest and keyboard assembly f Move the base cover from left to right and lift the base cover from the palm rest and keyboard assembly 14 Removing and inst...

Page 15: ...g Turn off the battery switch Removing and installing components 15 ...

Page 16: ... off the battery switch before you proceed to remove any other component from your computer Installing the base cover 1 Turn on the battery switch it was turned off earlier 16 Removing and installing components ...

Page 17: ...2 Align the screw holes on the base cover with the screw holes on the palm rest and keyboard assembly Removing and installing components 17 ...
Page 18: ... 3 Snap the base cover into the tabs on the palm rest and keyboard assembly 1 2 18 Removing and installing components ...
Page 19: ...4 Replace the eight torx head screws M2x3 that secure the base cover to the palm rest and keyboard assembly Removing and installing components 19 ...
Page 20: ...d state drive Removing the solid state drive 1 Follow the procedure in Before working inside your computer 2 Remove the base cover 3 To remove the solid state drive SSD a Peel and remove the thermal pad from the solid state drive 20 Removing and installing components ...
Page 21: ...te drive from the solid state drive slot 2 Installing the solid state drive 1 Align the notch on the solid state drive with the tab on the solid state drive slot 1 2 At an angle slide the solid state drive into the solid state drive slot 2 3 Replace the screw M2x3 that secures the solid state drive to the system board 3 Removing and installing components 21 ...
Page 22: ...6 Follow the procedure in After working inside your computer I O board interposers Removing the IO board interposer 1 Follow the procedure in Before working inside your computer 2 Remove the base cover 3 To remove the IO board interposer 22 Removing and installing components ...
Page 23: ...d contact with the pins or bottom of the boards instead handle the boards by lifting and holding from the edges or side After removing the interposer boards from the system place them on an ESD mat in a location where contact and movement can be avoided DO NOT push or apply pressure to the pins on the interposer boards and DO NOT use any motion that may scratch the pins such as rotating turning th...

Page 24: ...E When installing the I O board cable align and connect the I O board end to the I O board side and the system board end to the system board side CAUTION Wrong alignment of the cable might cause damage to the connectors 3 Replace the four screws M1 6x5 5 that secure the I O board cable to the system board 2 24 Removing and installing components ...
Page 25: ... sink a Peel the tape that secures the heat sink shield to the system board 1 NOTE The tape on the heat sink shield is necessary to reduce the noise for the system The tape can be reused and has to be adhered when the heat sink shield is installed b Using a plastic scribe release the heat sink shield from the slots on the system board 2 c Lift the heat sink shield off the system board 3 Removing a...

Page 26: ... sink remove the four screws M2x3 that secure the heat sink to the system board 4 e Remove the screw M2x3 that secures the heat sink to the palm rest and keyboard assembly 5 f Lift the heat sink off the system board 6 26 Removing and installing components ...
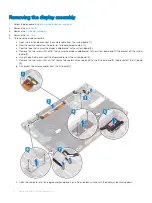
Page 27: ... replace the five screws M2x3 that secure the heat sink to the system board 2 3 Replace the screw M2x3 that secures the heat sink to the palm rest and keyboard assembly 3 4 Place the heat sink shield on the slots on the system board 1 and press down the heat sink shield to snap it into place 2 5 Affix the tape that secures the heat sink shield to the system board 3 Removing and installing componen...

Page 28: ... 3 Remove the I O board interposers 4 To remove the system fans a Remove the coin cell battery cable from the routing guides on the system fans 1 b Disconnect the system fan cable from the system board 2 c Remove the four screws M2x3 that secure the system fans to the palm rest and keyboard assembly 3 d Lift the system fans along with their cable off the system board 4 28 Removing and installing c...

Page 29: ... rest and keyboard assembly 1 2 Replace the four screws M2x3 that secure the system fans to the palm rest and keyboard assembly 2 3 Connect the system fan cable to the system board 3 4 Route the coin cell battery cable through the routing guides on the system fans 4 Removing and installing components 29 ...

Page 30: ...n objects Do not expose the battery to high temperatures or disassemble battery packs and cells Do not apply pressure to the surface of the battery Do not bend the battery Do not use tools of any kind to pry on or against the battery If a battery gets stuck in a device as a result of swelling do not try to free it as puncturing bending or crushing a Lithium ion battery can be dangerous In such an ...

Page 31: ...embly 2 c Lift the battery off the palm rest and keyboard assembly 3 5 Turn the computer over open the display and press the power button for about 5 seconds to ground the computer Installing the battery 1 Place the battery on the palm rest and keyboard assembly and align the screw holes on the battery with the screw holes on the palm rest and keyboard assembly 1 2 Replace the eight screws M2x5 th...

Page 32: ...s 4 Remove the battery 5 To remove the I O board a Remove the two screws M2x4 that secure the wireless antenna bracket to the I O board 1 b Using a plastic scribe disconnect the antenna cables from the I O board 2 c Remove the three screws M2x4 that secure the Type C USB bracket to the I O board 3 d Using a plastic scribe disconnect the speaker cable from the I O board 4 e Disconnect the LED and m...

Page 33: ...f Remove the screw M2x3 that secures the I O board to the palm rest and keyboard assembly 1 g Lift the I O board off the palm rest and keyboard assembly 2 Removing and installing components 33 ...
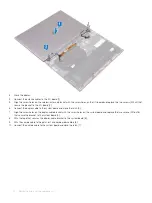
Page 34: ...nment posts align the screw hole on the I O board with the screw hole on the palm rest and keyboard assembly 1 2 Replace the screw M2x3 that secures the I O board to the palm rest and keyboard assembly 2 34 Removing and installing components ...

Page 35: ...hat secure the wireless antenna bracket to the I O board 2 5 Place the Type C USB bracket on the I O board and replace the three screws M2x4 that secure the Type C USB bracket to the I O board 3 6 Connect the speaker cable to the I O board 4 7 Connect the LED and microphone cable to the I O board 5 Removing and installing components 35 ...
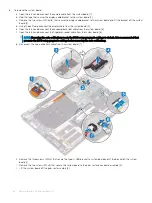
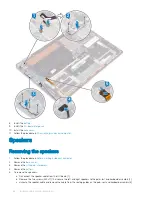
Page 36: ... computer 2 Remove the base cover 3 Remove the I O board interposers 4 Remove the battery 5 To remove the speakers a Disconnect the speaker cable from the I O board 1 b Remove the two screws M2x1 7 that secure the left and right speakers to the palm rest and keyboard assembly 2 c Unroute the speaker cable and remove the cable from the routing guides on the palm rest and keyboard assembly 3 36 Remo...

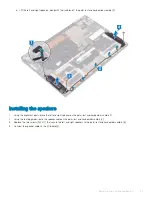
Page 37: ...e the left and right speaker on the palm rest and keyboard assembly 1 2 Using the routing guides route the speaker cable on the palm rest and keyboard assembly 2 3 Replace the two screws M2x1 7 that secure the left and right speakers to the palm rest and keyboard assembly 3 4 Connect the speaker cable to the I O board 4 Removing and installing components 37 ...
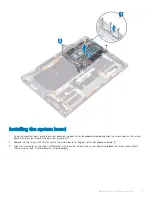
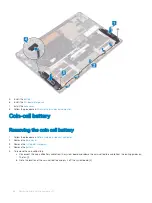
Page 38: ...ure in Before working inside your computer 2 Remove the base cover 3 Remove the I O board interposers 4 Remove the battery 5 To remove the coin cell battery a Disconnect the coin cell battery cable from the system board and release the coin cell battery cable from the routing guides on the fan 1 b Note the location of the coin cell battery and pry it off the system board 2 38 Removing and installi...

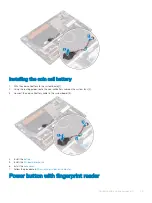
Page 39: ...coin cell battery cable on the system fans 2 3 Connect the coin cell battery cable to the system board 3 4 Install the battery 5 Install the I O board interposers 6 install the base cover 7 Follow the procedure in After working inside your computer Power button with fingerprint reader Removing and installing components 39 ...

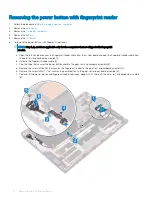
Page 40: ... reader cable from the system board and peel the fingerprint reader cable from the palm rest and keyboard assembly 1 b Unroute the fingerprint reader cable 2 c Peel the tape that secures the power button cable to the palm rest and keyboard assembly 3 d Remove the screw M1 6x1 8 that secures the fingerprint reader to the palm rest and keyboard assembly 4 e Remove the screw M2x1 7 that secures the p...

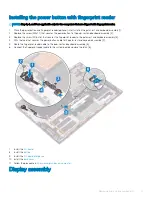
Page 41: ...the screw M1 6x1 8 that secures the fingerprint reader to the palm rest and keyboard assembly 3 4 Affix the tape that secures the power button cable to the palm rest and keyboard assembly 4 5 Route the fingerprint reader cable to the palm rest and keyboard assembly 5 6 Connect the fingerprint reader cable to the system board and close the latch 6 7 Install the I O board 8 Install the battery 9 Ins...

Page 42: ...lay cable bracket to the system board 3 d Remove the two screws M1 6x1 8 that secure the display cable bracket to the system board and lift the bracket off the system board 4 e Using the pull tab disconnect the display cable from the system board 5 f Remove the two screws M2x4 that secure the wireless antenna bracket to the I O board and lift the bracket off the I O board 6 g Disconnect the antenn...

Page 43: ... palm rest assembly 2 Installing the display assembly 1 With the display screen facing down align the screw holes on the display assembly with the screw holes on the palm rest and keyboard assembly 1 2 Replace the six screws M2 5x4 that secure the display assembly to the palm rest and keyboard assembly 2 Removing and installing components 43 ...
Page 44: ...o the system board and close the latch 3 7 Align the screw holes on the display cable bracket with the screw holes on the system board and replace the two screws M1 6x1 8 that secure the bracket to the system board 4 8 Affix the tape that secures the display cable bracket to the system board 5 9 Affix the camera cable to the palm rest and keyboard assembly 6 10 Connect the camera cable to the syst...

Page 45: ...rking inside your computer System board Removing the system board 1 Follow the procedure in Before working inside your computer 2 Remove the base cover 3 Remove the solid state drive 4 Remove the I O board interposers 5 Remove the battery 6 Remove the heat sink 7 Remove the system fans Removing and installing components 45 ...
Page 46: ... board 5 f Open the latch and disconnect the fingerprint reader cable from the system board 6 NOTE Removing the coin cell battery resets the BIOS setup program s settings to default It is recommended that you note the BIOS setup program s settings before removing the coin cell battery g Disconnect the coin cell battery cable from the system board 7 h Remove the three screws M2x4 that secure the Ty...

Page 47: ... with the screw holes on the palm rest assembly 1 2 Replace the two screws M2x3 that secure the system board to the palm rest and keyboard assembly 2 3 Align the screw holes on the Type C USB bracket with the screw holes on the system board and replace the three screws M2x4 that secure the Type C USB bracket to system board 3 Removing and installing components 47 ...
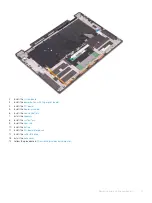
Page 48: ...oard and close the latch 3 7 Connect the display cable to the system board 4 8 Place the display cable bracket on the system board and replace the two screws M1 6x1 8 that secure the bracket to the system board 5 9 Affix the tape that secures the display cable bracket to the system board 6 10 Connect the camera cable to the system board and close the latch 7 48 Removing and installing components ...

Page 49: ...install the base cover 17 Follow the procedure in After working inside your computer Palm rest and keyboard assembly Removing the palmrest and keyboard assembly 1 Follow the procedure in Before working inside your computer 2 Remove the base cover 3 Remove the solid state drive 4 Remove the I O board interposers Removing and installing components 49 ...

Page 50: ...mbly 11 Remove the I O board 12 Remove the power button with fingerprint reader 13 Remove the system board 14 The component you are left with is the palmrest and the keyboard assembly Installing the palm rest and keyboard assembly 1 Place the palm rest and keyboard assembly face down on a clean and flat surface 50 Removing and installing components ...
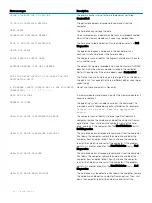
Page 51: ...embly 6 Install the coin cell battery 7 install the speakers 8 Install the system fans 9 Install the heat sink 10 Install the battery 11 Install the I O board interposers 12 Install the solid state drive 13 install the base cover 14 Follow the procedure in After working inside your computer Removing and installing components 51 ...
Page 52: ...either of the methods that are suggested below 1 Power on the computer 2 As the computer boots press the F12 key when the Dell logo is displayed 3 In the boot menu screen use Up Down arrow key to select the Diagnostics option and then press Enter NOTE The Enhanced Pre boot System Assessment window displays listing all devices detected in the computer The diagnostics starts running the tests on all...

Page 53: ...CPU failure 2 2 System board BIOS and ROM failure 2 3 No memory or RAM detected 2 4 Memory or RAM failure 2 5 Invalid memory installed 2 6 System board or chipset error 2 7 LCD failure 3 1 CMOS battery failure 3 2 PCI or video card or chip failure 3 3 Recovery image not found 3 4 Recovery image found but invalid Camera status light Indicates whether the camera is in use Solid white Camera is in us...

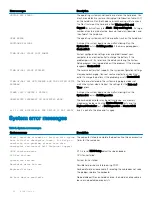
Page 54: ...AILURE A memory module may be loose Reinstall the memory module or if necessary replace it GENERAL FAILURE The operating system is unable to carry out the command The message is usually followed by specific information For example Printer out of paper Take the appropriate action HARD DISK DRIVE CONFIGURATION ERROR The computer cannot identify the drive type Shut down the computer remove the hard d...

Page 55: ...E EXPECTING VALUE A memory module may be faulty or improperly seated Reinstall the memory module or if necessary replace it MEMORY ALLOCATION ERROR The software you are attempting to run is conflicting with the operating system another program or a utility Shut down the computer wait for 30 seconds and then restart it Run the program again If the error message still appears see the software docume...

Page 56: ...ET PLEASE RUN THE SYSTEM SETUP PROGRAM The time or date stored in the system setup program does not match the system clock Correct the settings for the Date and Time options TIMER CHIP COUNTER 2 FAILED A chip on the system board may be malfunctioning Run the System Set tests in Dell Diagnostics UNEXPECTED INTERRUPT IN PROTECTED MODE The keyboard controller may be malfunctioning or a memory module ...

Page 57: ...e power button for 25 seconds and then release the power button Go to how to reset real time clock NOTE If AC power is disconnected from the system during the process or the power button is held longer than 40 seconds the RTC reset process is aborted The RTC reset will reset the BIOS to Defaults un provision Intel vPro and reset the system date and time The following items are unaffected by the RT...

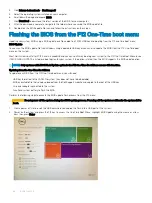
Page 58: ...SH UPDATE is listed as a boot option for your system If the option is listed then the BIOS supports this BIOS update option NOTE Only systems with BIOS Flash Update option in the F12 One Time Boot Menu can use this function Updating from the One Time Boot Menu To update your BIOS from the F12 One Time boot menu you will need USB key formatted to the FAT32 file system key does not have to be bootab...

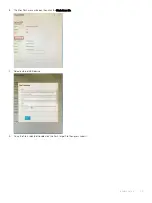
Page 59: ...3 The Bios flash menu will open then click the Flash from file 4 Select external USB device 5 Once the file is selected Double click the flash target file then press submit Troubleshooting 59 ...

Page 60: ...information see the knowledge base article SLN143196 at www dell com support 3 Copy the BIOS setup program file to the bootable USB drive 4 Connect the bootable USB drive to the computer that needs the BIOS update 5 Restart the computer and press F12 when the Dell logo is displayed on the screen 6 Boot to the USB drive from the One Time Boot Menu 7 Type the BIOS setup program filename and press En...

Page 61: ...Turn off the wireless router 4 Wait for 30 seconds 5 Turn on the wireless router 6 Turn on the modem 7 Turn on your computer Flea power release Flea power is the residual static electricity that remains on the computer even after it has been powered off and the battery has been removed The following procedure provides the instructions on how to conduct flea power release 1 Turn off your computer 2...

Page 62: ...port and service options Availability varies by country and product and some services may not be available in your area To contact Dell for sales technical support or customer service issues 1 Go to Dell com support 2 Select your support category 3 Verify your country or region in the Choose a Country Region drop down list at the bottom of the page 4 Select the appropriate service or support link ...

Reviews: