background image

3 - La notice de montage


Assembly instructions/ Montageanleitungen

Meubles vasque LUMINA 80/100 3 t Flaconnier 

Vanity units LUMINA 80/100 with 3 drawers

Waschplatz LUMINA 80/100 sowie mit Apothekerauszug

ø 8-10

N181500_N181501_MEUBLES_VASQUE_LUMINA-80/100_+ FLACONNIER_24/01/2017

Repérez ce dont vous avez besoin

Extract the parts you need

Entnehmen sie die benötigten teile

CHEVILLE 8

706014000035

Réf. 

181500


181501


181502


181507


X 8

X 8

X 4

X 2

X 2

X 2

X 8

1
2

3

4

5

6

7

VIS 5 X 50 TF

706003000126

PLAQUE 273

703001000061

CHEVILLE S10

706014000033

RONDELLE

6 X 24

706011000036

VIS TIREFOND

6 X 50 TH

706003000132

2

3

4

5

6

N° 10

181500

181501

181502

3, boulevard Voltaire - 75011 Paris - Tél. 01 53 36 15 00 - www.decotec-paris.com - Mail : [email protected]

3, boulevard Voltaire - 75011 Paris - Tél. 01 53 36 15 00 - www.decotec-paris.com - Mail : [email protected]

F

GB

D

• 

V

or Montagebeginn den St

r

om abstellen (Scherung ausschalten).

• Stellplatz auswählen und darauf achten, daß die E-Steckdose für das Möbelstück außerhalb des Sicherheitsbe

r

eiches liegt.

• Um eine lange Legensdauer Ih

r

er Möbel sicherzustellen, empfehlen wi

r

, das Badzimmer zu heizen und zu lüften, um hohe Luftfeuchtigkeit zu

  vermeiden. 

W

asserspritzer sollten t

r

ockengewischt we

r

den.

• Damit das Möbelstück Sie vollstens zufriendenstellt, beachten Sie bitte die installations und Pflegevorschriften.

  Bei Nichteinhaltung erlischt der Garantie Anspruch.
• Isolate the electrical supply at the fuse box or consumer unit befo

r

e attempting installation.

• The p

r

oduct must be positionned so that the electric socket is outside the electrical safety zone.

• To maximise the service life of your p

r

oduct, we 

r

ecommend that your bath

r

oom is p

r

operly heated and ventilated. This will p

r

event the build

   up of excess moistu

r

e and steam stagnation. Wipe with water splashes as they occur with clean cloth.

• For you complete satisfaction, ca

r

efully 

r

ead the installation and maintenance instructions p

r

ovided and 

r

etain for 

r

efe

r

ence. Failu

r

e to follow

   the instruction may invalidate the p

r

oduct warranty.

• Mett

r

e l'installation électrique hors tension avant de commencer la pose.

• Choisir l'emplacement du meuble afin que la prise électrique du meuble soit en dehors du volume de sécurité.

• Afin d'acc

r

oît

r

e la longévité de vot

r

e p

r

oduit, nous v

o

us 

r

ecommandons de chauffer et de ventiler vot

r

e salle de bains pou

r

 évite

r

 l'accumulation

  de vapeur et d'essuyer les p

r

ojections d'eau.

• Pour une complète satisfaction, 

r

espectez les consignes d'installation et d'ent

r

etien. Leur non-

r

espect peut entrainer la perte de la garantie

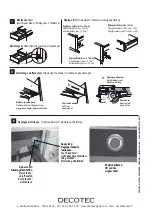
Montage du tiroir

Insert drawer drawer / Montage des  Schubfaches 

Démontage du tiroir / 

Removing the drawer / Aushängen 

Démontage du flaconnier / 

Removing the drawer / Aushängen des Auszuges 

Réglage tiroir / 

Adjustment of drawer / Auszugseinstellung

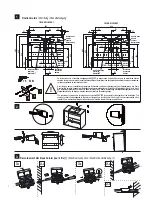
Réglage en hauteur (max. + 3,5 mm)

Height adjustment (max. + 3,5 mm)

Höhenverstellung (max. + 3,5 mm)

Réglage inclinaison (max. + 4 mm)

Tilt angle adjustment of front (max. + 4 mm)

Neigungsverstellung der Front (max. + 4 mm)

Réglage latéral (max. +/- 1,5 mm)

Side adjustment (max. +/-1,5 mm)

Seitenverstellung (max. +/-1,5 mm)

7

8

 810 

+

-

8

7

+

-

8

7

+

-

8

7

 235 


ø 38 

 55 

 465 

 460 

Baisser la patte grise

Pull down below the grey strap

den grauen Regler herunterdrücken

Réglage en hauteur

Height adjustment

Höhenverstellung

 270 

 120 

 75 

700 

 235 

ø 38 

ø 38 

 55 

 465 

 510 

1

2

 270 

 120 

 75 

700 

 995 

 1010 

 1010 

 795 

 900 

 684 

 200 

 221 

221

221

 779,50 

 199,50 

 465 

 270 

 120 

 75 

 55 

 235 

 510 

 250 

Optionnel-Option-Wahl

1

2

3

Monter

Up above

nach oben

Descendre

Down below

nach  unten

175 

2,25 m/sol fini

2,25 m/sol fini ou fond de la baignoir

e

si celui-ci est situé au dessus du sol fini

0,60 m

Hors volumes

Volume 1

Volume 2

Ce meuble CLASSE II IP 44 peut étre mis

dans le volume 2

D

F

GB

Dieser Schrank CLASSE II IP 44 kann

in volumen 2 gestellt werden

This bassin CLASSE II IP 44 can be put

in volume 2

Volume 0

IP X4* 

IP X4* 

IP X7

NON - NO - NEIN

OUI - YES - JA

2  

Espace sous la baignoire

« Volume caché »

230 V

2

3

4

5

80 mm

6

7

8

Dans les locaux d'habitation, des locaux recevant une 

baignoire ou une douche et des prises de courant inférieur 

ou égal à 32A,  le circuit correspondant doit être protégé 

par un dispositif à courant différentiel-résiduel (DDR) 

inférieur ou égal à 30 mA.

230 V      10/16 A

2

3

4

5

80 mm

6

7

8

Prise électrique

Electric socket

Steckdose

Tirer le flaconnier

Pull front

hervorziehen

Les LED sont remplaçable par un professionnel.

LED can be changed by a professional.

Led Können von einem Fachmann geändert werden.

6

Appui court :

Allumage/extinction.

Quick touch :

on/off switch.

Kurz drücken :

Licht an/aus.

Appui long :

Réglage intensité

lumineuse.

Touch and hold :

Light intensity adjustment.

Lang drücken :

Einstellung Lichtstärke.

Position allumée.

ON position.

eingeschaltet.

Réglages électriques  / 

Lights adjustment / Einstellung Lichtstärke.

B-6/02/2018

Summary of Contents for 181500

Page 1: ...rome legs with a ceramic basin worktop or a semi recessed Céramyl basin on a slate composite worktop configure your vanity and play with our color chart to create a bathroom in your image Einen Stil komponieren Einfach wandhängend oder auf 2 verchromte Füße aufgesetzt ein Waschtisch in Keramik oder ein halbeingelassenes Mineralguss Becken auf einer Kunstschieferplatte setzen Sie Ihr Möbel zusammen...

Page 2: ...asque céramique Eclairage LED 95 lumen W 4500 K Variateur d intensité Puissance LED 15 84 W Classe II IP44 Classe énergétique A A A L 100 X P 46 5 X H 70 Poids 77 55 kg 100 2 50 Eco participation Laque 1 81 507 1 1295 00 Décor Bois 1 81 507 3 1275 00 Meuble double vasque L120 3 tiroirs 1 porte à droite vasque céramique Eclairage LED 95 lumen W 4500 K Variateur d intensité Puissance LED 17 76 W Cla...

Page 3: ...Classe énergétique A A A L 100 X P 46 5 X H 70 Poids 71 49 kg 100 2 50 Eco participation Laque 1 81 507 2 1703 00 Décor Bois 1 81 507 4 1530 00 Meuble vasque L120 3 tiroirs 1 porte à droite plateau ardoise vasque Céramyl Eclairage LED 95 lumen W 4500 K Variateur d intensité Puissance LED 17 76 W Classe II IP44 Classe énergétique A A A L 120 X P 46 5 X H 70 Poids 76 49 kg 120 2 50 Eco participation...

Page 4: ... lumen W 4500 k Interrupteur variateur Puissance LED 9 36 W Classe II IP44 CE Classe énergétique A A A L 100 X P 54 X H 70 Poids 59 kg 2 50 Eco participation Laque 1 81 534 1 1102 00 Décor Bois 1 81 534 3 1000 00 COMPLÉMENTS SANS ÉCLAIRAGE LED INTÉGRÉ LUMINA Colonne simple L35 1 porte Charnières à droite ou à gauche 4 tablettes réglables mélaminé décor chêne gris patiné L 35 X P 33 X H 161 Poids 2...

Page 5: ...brillant 1 81 522 1 66 00 1 2 colonne double L70 2 tablettes réglables mélaminé décor chêne gris patiné L 70 X P 33 X H 119 Poids 32 kg 1 92 Eco participation Laque 1 81 512 1 765 00 Décor Bois 1 81 512 3 561 00 Meuble bas simple L35 1 porte Charnières à droite ou à gauche 2 tablettes réglables mélaminé décor chêne gris patiné L 35 X P 33 X H 75 Poids 16 kg 0 96 Eco participation Laque Droite 1 81...

Page 6: ...iture will be applied Glänzende oder extramatte Metallic Lacke Für dieses Finish wird ein Kapitalzuwachs von 10 des öffentlichen Preises HT der Möbel erzielt 2 Les finitions Finishes Die Farbauswahl La robinetterie Taps Die Armaturen Les plans vasques sont toujours livrés avec un perçage pour une robinetterie monotrou Integrated basins come with single hole drilling Die Waschtische werden standard...

Page 7: ...ur with clean cloth For you complete satisfaction carefully read the installation and maintenance instructions provided and retain for reference Failure to follow the instruction may invalidate the product warranty Mettre l installation électrique hors tension avant de commencer la pose Choisir l emplacement du meuble afin que la prise électrique du meuble soit en dehors du volume de sécurité Afin d...

Page 8: ...ovision of screws and wall plugs does not render DECOTEC responsible for the stability of the installation The choice of suitable fixings adapted to the nature of the wall on which the unit will be hung is the sole responsibility of the installer There is a standard fixing kit for Decotec units Therefore there will be some surplus items X 8 2 3 1 900 833 618 630 70 70 510 200 150 1 1 250 630 666 3...

Page 9: ...th rear support crossbar Möbel mit Querträger Querträger Verstrebung auf der Möbelrückseite welche zur Befestigung an der Wand dient Non fourni Not supplied Nicht im Lieferumfang IMPÉRATIF 8 6 5 4 S i l i c o n e 55 402 COUPE A A X 8 B A 6 Montage des pieds optionnel Fixing feet optional Befestigung der Möbelfüsse optional 7 X 8 7 3 3 1 3 2 3 3 3 5 3 4 Raccordement éléctrique bornier pour 3 fils 1...

Page 10: ...angle adjustment of front max 4 mm Neigungsverstellung der Front max 4 mm Réglage latéral max 1 5 mm Side adjustment max 1 5 mm Seitenverstellung max 1 5 mm 7 8 Baisser la patte grise Pull down below the grey strap den grauen Regler herunterdrücken Réglage en hauteur Height adjustment Höhenverstellung 1 2 3 Monter Up above nach oben Descendre Down below nach unten Tirer le flaconnier Pull front he...

Page 11: ...den Damit das Möbelstück Sie vollstens zufriendenstellt beachten Sie bitte die installations und Pflegevorschriften Bei Nichteinhaltung erlischt der Garantie Anspruch Isolate the electrical supply at the fuse box or consumer unit before attempting installation The product must be positionned so that the electric socket is outside the electrical safety zone To maximise the service life of your prod...

Page 12: ...st daher möglich dass nicht alle Teile Verwendung finden The provision of screws and wall plugs does not render DECOTEC responsible for the stability of the installation The choice of suitable fixings adapted to the nature of the wall on which the unit will be hung is the sole responsibility of the installer There is a standard fixing kit for Decotec units Therefore there will be some surplus item...

Page 13: ...erstrebung auf der Möbelrückseite welche zur Befestigung an der Wand dient Non fourni Not supplied Nicht im Lieferumfang IMPÉRATIF 8 6 5 4 S i l i c o n e 55 402 COUPE A A 3 3 1 3 2 3 3 RACCORDEMENT ÉLÉCTRIQUE BORNIER POUR 2 FILS 1 Electrical connection Elektrische Verbindung 1 3 3 1 3 2 3 3 RACCORDEMENT ÉLÉCTRIQUE BORNIER POUR 3 FILS 2 Electrical connection Elektrische Verbindung 2 3 4 3 5 3 4 3 ...

Page 14: ...t an aus Appui long Réglage intensité lumineuse Touch and hold Light intensity adjustment Lang drücken Einstellung Lichtstärke Position allumée ON position eingeschaltet Réglages électriques Lights adjustment Einstellung Lichtstärke Montage du tiroir Insert drawer drawer Montage des Schubfaches Démontage du tiroir Removing the drawer Aushängen Réglage tiroir Adjustment of drawer Auszugseinstellung...

Reviews: