DECOPAC PhotoCake Quick Start Manual Download Page 5

5

PhotoCake® UK Support Tel: +44(0) 345 9012160 I email: [email protected]

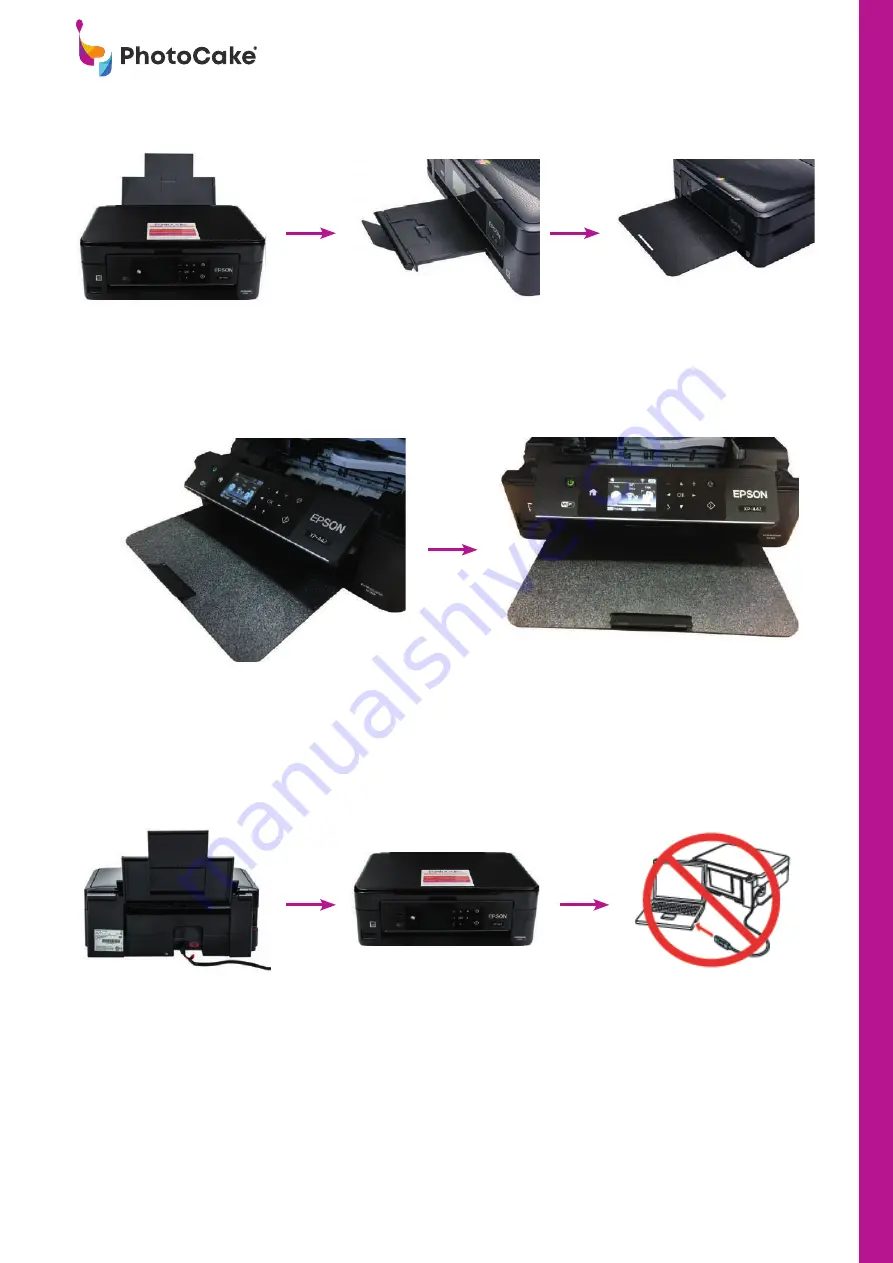
Extend the back input tray, 

push back until this locks 

into place and then slide the 

grey adjuster guide to the 

very left

Pull the stationery output 

tray extension forward from 

the front of the printer.  

Lift the small tab up on the 

end of the extension tray

Place the removable output 

tray  into the printer opening at 

a 45 degree angle (rough side 

facing up)

Make sure the small black tab slots through 

the small envelope opening on the output tray

The output tray should now sit level as 

shown above

Connect the black power cable 

into the back of the printer and 

into the wall socket

Press and hold the Power 

button to turn on the printer 

(this will illuminate green)

IMPORTANT:


To ensure 

your printer functions 

correctly please DO NOT 

connect the printer USB 

cable to the PC until you 

have been prompted to 

during the Epson Printer/

Scanner Driver Installation 
process

Fitting the Output Tray

Powering on the Printer

INSTALLING  PHOTOCAKE®

Summary of Contents for PhotoCake

Page 1: ...Quick Start Guide AUGUST 2019...

Page 2: ...oad the PhotoCake Application you will need your Culpitt com Username and Password Your PhotoCake Welcome email has a link to the PhotoCake Application download page You can only access the download p...

Page 3: ...ails contact PhotoCake Customer Support Technical Requirements TM PROCESSOR HARDRIVE SPACE OF RAM DISPLAY Windows 7 with Service Pack 1 Windows 8 Pro or Enterprise Windows 8 1 Pro or Enterprise or Win...

Page 4: ...ease note The PhotoCake Application does not support image transfer to the PhotoCake Printer via Wi Fi Operating your PhotoCake system without the USB cable will lead to errors including poor image qu...

Page 5: ...angle rough side facing up Make sure the small black tab slots through the small envelope opening on the output tray The output tray should now sit level as shown above Connect the black power cable i...

Page 6: ...and press OK Installing the Ink Cartridges Once the setup process is complete you will be prompted with the following message Remove the ink cartridge from packaging Carefully pull the yellow tab tap...

Page 7: ...Using the buttons next to the LCD screen on the printer move the up arrow to the YES position and press OK You will then be prompted by the following message You will be prompted by the following mess...

Page 8: ...our PC IMPORTANT For PhotoCake to work properly you must download these drivers before you plug the USB cable from the printer into your PC Proceed to the Epson website www epson co uk Click Search Cl...

Page 9: ...click OK Select language Click OK Click Agree then click OK Connect the USB cable and wait until the install is complete This may take several minutes The status symbol on the right will turn green wh...

Page 10: ...I email PCUKSupport culpitt com Installing Scanner Driver on your PC Proceed to the Epson website https www epson co uk Click Search Click Drivers and Support Type in XP442 then Select Expression Hom...

Page 11: ...ept T Cs then click Next Your Scanner Driver is now installed IMPORTANT To ensure your PhotoCake System continues to operate correctly you will need to disable automatic firmware updates Click arrow C...

Page 12: ...e click the buttons circled below as they appear on your screen Click the link on the PhotoCake Welcome email to go to the PhotoCake Application download page on Culpitt com Click the download button...

Page 13: ...60 I email PCUKSupport culpitt com Click the arrow in the bottom right hand of your screen If the download worked you ll see the PhotoCake icon Check the Download has worked Congratulations Your syste...

Page 14: ...otoCake Ink Cartridges in stock so you re always ready to print Remove the ink cartridge from packaging Carefully pull the yellow tab tape from each cartridge Insert each cartridge according to the co...

Page 15: ...applies to the extent permitted by law to any repair replacement part or replacement Product for the remainder of the original warranty period or for ninety days whichever period is longer All replac...

Page 16: ...anty service for your Product please contact PhotoCake Technical Support using the contact information provided below In general you will need to deliver your Product i e printer power cord and USB ca...

Reviews: