background image

4

If necessary, you may calibrate temperature, humidity, and wind readings. (Be 
careful when deciding to calibrate; Davis weather stations are factory-
calibrated for accuracy and may not match less accurate or less local data such 
as reported on television or a web page.) Enter the amount of offset you want 
the temperature or humidity reading to be reported. For example, if you believe 
your outside temperature data is consistently 2 degrees too low, enter +2. If you 
believe the outside humidity data is consistently 5% too high, enter -5. You 
must calibrate the wind direction if your anemometer cannot be mounted so 
that the arm points true north. Enter the direction the arm points, if not zero, in 
degrees from 1° to 359°.

Click 

Save.

3.

Clear Highs and Lows. 

Clear any erroneous highs and lows that were created 

during installation of your station. (For example, while setting up, the wind 
cups and vane were spun. This false “high wind” data should be cleared.) 
Click 

Clear Selected Data

 or, if no erroneous data has accumulated, click 

Cancel

.

4.

My Account

. Enter your account information.

Enter your City, State, Country, and latitude & longitude

Enter a name for your station (this will become your web page title)

Choose a station type from the pull-down menu

Choose whether to show display 24-hour time 

Check the “Keep ‘My Weather’ private” box if you do not want your current 
weather to be seen without a password. (No private information appears on this 
screen.)

5. Click 

Save.

6. You can edit these settings at any time by logging in to your account and 

clicking 

My Account

 then 

[edit] 

(to edit account information or change your 

password); or, in the My Device box: 

Edit Configuration, Edit Settings

, or 

Manage Stored Data.

Note: 

These settings and configurations will be pushed to the Vantage Connect at the first 
update after it is set up and powered. The changes will then be sent to your 
WeatherLink.com page at the 

next 

update. So the changes will not appear on your 

page after at least 2 update intervals. (Update intervals are 5, 15 or 60 minutes 
depending on your service plan). With high network traffic, this may take longer.

Summary of Contents for Vantage Connect

Page 1: ...tage Pro2 Vantage Pro2 Plus Vantage Vue and Weather Envoy Product number 6620 R Vantage Connect USER MANUAL Davis Instruments 3465 Diablo Avenue Hayward CA 94545 2778 U S A 510 732 9229 www davisnet c...

Page 2: ...e following standards have been applied 1 Health Article 3 1 a of the R TTE Directive Applied standard s EC recommendation 1999 519 EC 2 Safety Article 3 1 a of the R TTE Directive Applied standard s...

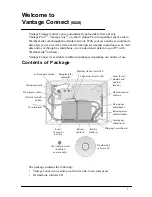
Page 3: ...lable in different packages depending on country of use Contents of Package The package contains the following Vantage Connect in weather proof shelter with 5 watt solar panel WeatherLink software CD...

Page 4: ...see your Davis reseller or purchase a plan during your registration process on WeatherLink com After purchase you will receive an e mail with an Activation Code that you will use to register online Re...

Page 5: ...Measure Enter the transmitter ID number of each of the transmitters that will be reporting to your Vantage Connect up to 8 Choose a station type for each For example Vantage Pro2 ID 1 Leaf and Soil Mo...

Page 6: ...lick Clear Selected Data or if no erroneous data has accumulated click Cancel 4 My Account Enter your account information Enter your City State Country and latitude longitude Enter a name for your sta...

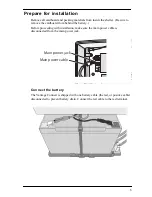
Page 7: ...nd the battery Before proceeding with installation make sure the main power cable is disconnected from the main power jack Connect the battery The Vantage Connect is shipped with one battery cable the...

Page 8: ...mportant that the shelter be mounted so that the solar panel gets the greatest amount of sunshine the solar shelter should be facing south in the northern hemisphere or north in the southern hemispher...

Page 9: ...ing remove power from the Vantage Connect register then repower 1 If using Vantage Connect with a cabled ISS remove the plug from one of the holes in the bottom of the shelter Run the ISS cable up thr...

Page 10: ...Connect is registered on the network powered up and connected to both signals it will begin uploading the latest data to the server Data is uploaded to your page on WeatherLink com along with daily hi...

Page 11: ...on on using the features of WeatherLink software Configure Alarm E mail When an alarm condition is triggered the alarm appears on your WeatherLink com summary page You can also set up e mail alarms fo...

Page 12: ...Make sure status LED is showing normal function otherwise the device has not registered on the network See above to test LEDs Check power to the weather station Make sure all cables are securely plugg...

Page 13: ...or in getting a signal the status LEDs will flash to indicate the type of error For example if the cell status LED lower is flashing and the top LED blinks two times pauses then blinks two times repea...

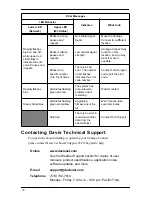
Page 14: ...nt to move if possible Blinks red a specific number 3 to 10 of times There is a cell error The number of red flashes indicates the error code number Contact Tech Support and report the error code Rapi...

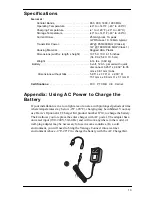
Page 15: ...nsions without tabs 5 95 L x 3 70 H x 2 00 D 151 mm L x 98 mm H x 51 mm D Certifications FCC PTCRB CE Carrier Appendix Using AC Power to Charge the Battery If your installation is in a low light area...

Page 16: ...use harmful interference to radio or television reception which can be determined by turning the equipment on and off the user is encouraged to try to correct the interference by one or more of the fo...

Reviews: