background image

18 

Luminance Adjustment (WAVEFORM MONITOR) 

1. Under the same on set lighting conditions aim the camera back to the white background or ideally a grayscale 

reference chart. 

 
2. Select WAVEFORM mode on the VSM-100 using the NEXT MODE option. 
 
3. Adjust the camera’s IRIS and matrix to reach the desired maximum white level state. There may be a pre-

selected level, such as 600mv as a standard for consistency in brightness. 

 
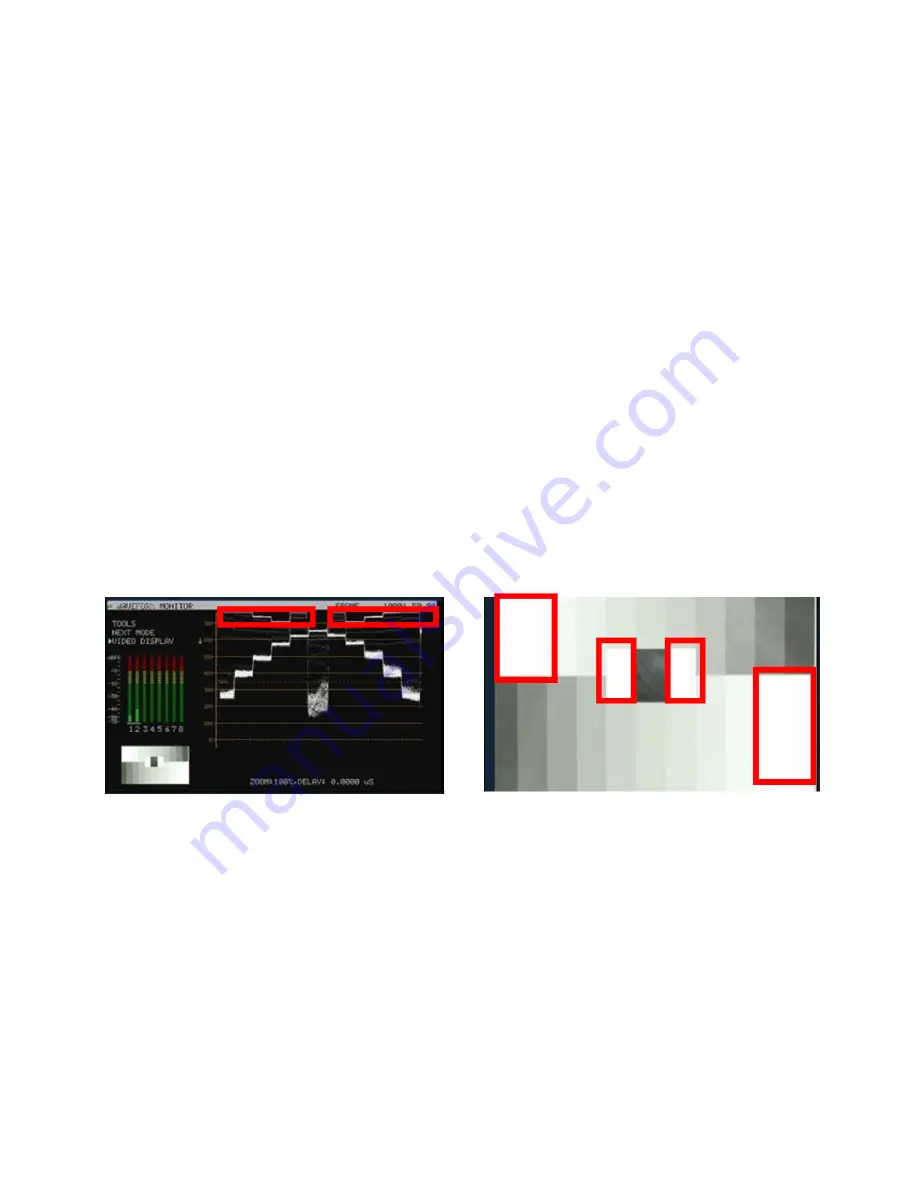
4. If aiming at a precise grayscale chart, the VSM-100 waveform output may resemble an X shaped matrix. The 

steps in this matrix should be evenly distributed in line with the grayscale chart. However, if the matrix is not 
evenly distributed, it means that the Gamma is not correctly set, and will lead to further adjustment of the 
camera. 

 
5. Once the first camera is correctly calibrated select TOOLS> TRACE MEMORY> SAVE TRACE to save the 

calibrated matrix levels from the first camera. 

 
6. Now connect VSM-100 to the second camera on the set. Adjust the white and black balance on the next 

camera as described earlier. 

 
7. Now adjust the grayscale matrix reading from second camera output so that it matches the saved matrix from 

first camera to align the cameras. The same procedure can be repeated for any remaining cameras. 


The grayscale matrix image above is not evenly stepped and shows there are four over-exposed white areas 


Summary of Contents for VSM-100

Page 1: ...VECTOR SCOPE MONITOR VSM 100 Quick Start Guide www datavideo tek com...

Page 2: ...Warranty 3 Disposal 3 Introduction 4 Features 4 What s in the box 4 Connections Control 5 Menu Options Monitor 10 VSM 100 Output Display 12 Menu Control and Options 13 VSM 100 Quick Start Guide 16 Di...

Page 3: ...at the total amperes of all the units that are plugged into a single wall outlet do not exceed 15 amperes 11 Never push objects of any kind into this unit through the cabinet ventilation slots as they...

Page 4: ...a free one year extension to the standard Warranty providing the product is registered with Datavideo within 30 days of purchase For information on how to register please visit www datavideo tek com...

Page 5: ...ector Scope Rugged and compact single unit that requires only an HD SDI or HDMI monitor Menu choice of Vectorscope Histogram Waveform and Parade displays as well as clean Video Display output SDI to H...

Page 6: ...nu and set the functions levels Allow you to control the headphones volume Down Audio Level Button Navigate the on screen menu and set the functions levels Allow you to control the headphones volume B...

Page 7: ...the camera to take the entire test chart as a sample image This step is necessary to make sure that the color saturation of an image reproduced from the camera is consistent and does not tint to any p...

Page 8: ...ous colors are overlapping with the one another MENU Menu dial and push to select button Turn the knob to select the options or adjust the parameter Push the knob to select the options AUDIO CHANNEL S...

Page 9: ...to PC for firmware update Mini USB USB interface for firmware update HD SD SDI INPUT BNC connector for SDI input HD SD SDI OUTPUT BNC connector for SDI output HDMI OUTPUT HDMI digital signal output c...

Page 10: ...C in socket Connect the supplied 12V PSU to this socket The connection can be secured by screwing the outer fastening ring of the DC In plug to the socket Grounding Terminal When connecting this unit...

Page 11: ...utton to setting Safety Zone range 80 90 or OFF Press UP DOWN button exit the setting mode N B To select a different setting 4 3 Screen Cinema Zone use the UP DOWN buttons Follow the same procedure to...

Page 12: ...display on screen value from 0 7 Press ENTER button to setting the OSD blending display on screen Press UP DOWN button moving to the Color Temp setting Press ENTER button to setting the Color Temp 930...

Page 13: ...12 VSM 100 Output Display...

Page 14: ...select EXIT from the current options list The Main Menu options are TOOLS NEXT MODE VIDEO DISPLAY AUDIO VOLUME AUDIO CHANNEL CONFIGURATION NEXT MODE When first switched on the VSM 100 will display in...

Page 15: ...ayed SET UP BARS VECTORSCOPE TOOLS This option allows the Vectorscope Graticule targets for each colour to be switched between the 75 and 100 colour bar positions For most TV broadcast situations the...

Page 16: ...00 firmware revision VIDEO THUMBNAIL Allows the option to switch the video thumbnail on the scope display between 4x3 4 3 or 16x9 16 9 aspect ratio when working with Standard Definition inputs A HD in...

Page 17: ...e background or reference white card 5 If necessary adjust R Red or B Blue GAIN of the camera to move the shown sample points for white video into the center graticule box of the VSM 100 Vectorscope C...

Page 18: ...if the pattern is distributed towards the right 100 it can mean the camera is over exposed If the pattern is distributed towards the left 0 it can mean the camera is under exposed 5 If there are read...

Page 19: ...ted in line with the grayscale chart However if the matrix is not evenly distributed it means that the Gamma is not correctly set and will lead to further adjustment of the camera 5 Once the first cam...

Page 20: ...ra to standardised colour levels such as R 650mv G 600mv B 600mv These adopted set reference points can then ensure image consistency in future production runs and any post production grading 5 Once t...

Page 21: ...ode on the VSM 100 using the NEXT MODE option 3 Now the VECTORSCOPE displays the analyzed colour components If the white balance of one camera had been altered the VECTORSCOPE matrix can be used as a...

Page 22: ...to one another in a straight line iii When White balance is not correctly adjusted the PARADE will show unbalanced trace iv When the lighting is not evenly spread out the PARADE will show traces whic...

Page 23: ...ong cameras i Aiming the camera at Chroma Du Monde Set camera to AUTO ii Select VECTORSCOPE mode on the VSM 100 using the NEXT MODE option iii The VECTORSCOPE matrix displaying on VSM 100 represents t...

Page 24: ...23 Dimension...

Page 25: ...169 8 Impedance 75 Return Loss HD 10 dB 1 5 GHz SD 15 dB 270 MHz Equalization 200 m Belden 8281 cable at 270 Mbps 100 m typical of Belden 1694A at 1 485 Gbps HDMI Supports HDMI v1 1 Input Standards H...

Page 26: ...Limited Tel 44 1457 851 000 Fax 44 1457 850 964 E Mail sales datavideo co uk Datavideo Technologies Co Ltd Tel 886 2 8227 2888 Fax 886 2 8227 2777 E mail service datavideo com tw Datavideo Technologi...

Reviews: