background image

10 


9  Luma Keyer Enable/Disable buttons 

19  Headphone volume control knob 

10  Split selection button 


Switcher Settings


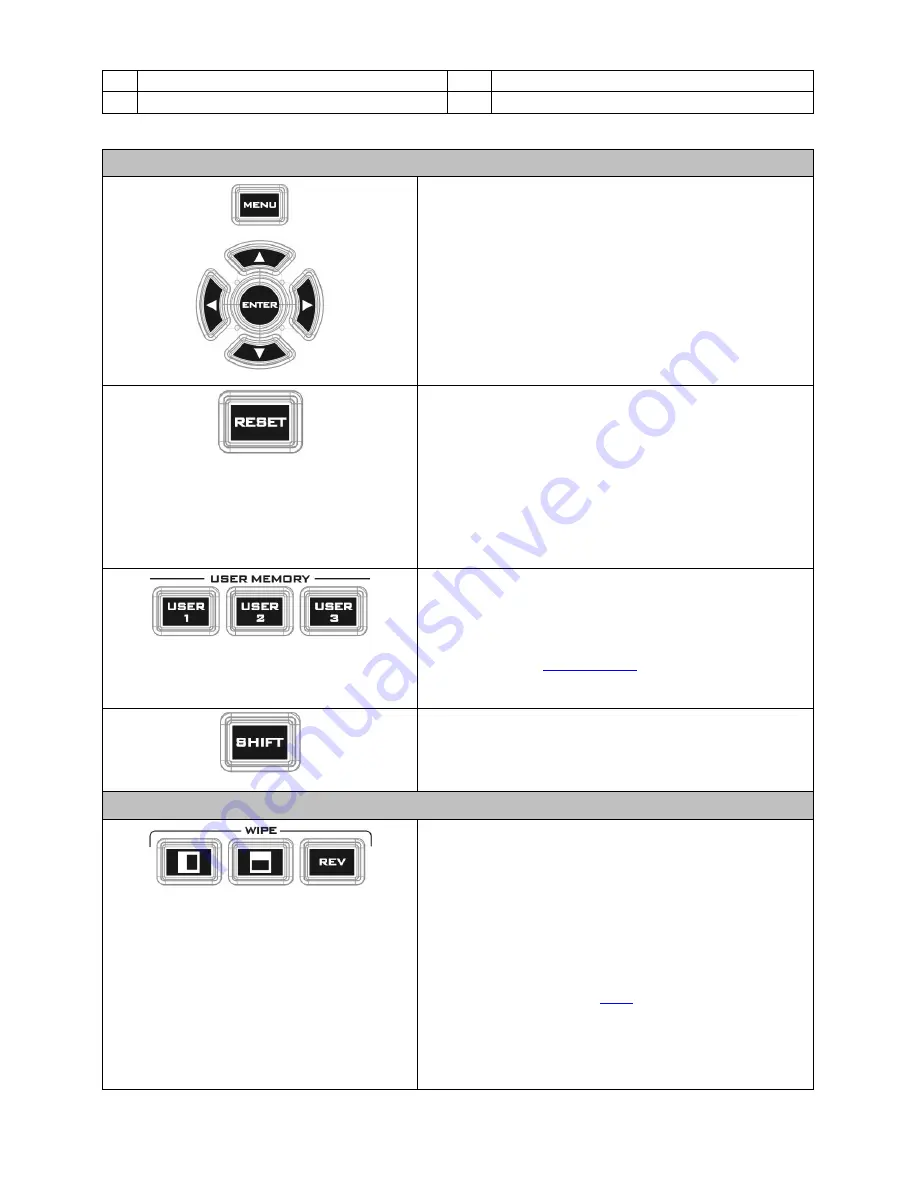
Menu browsing buttons 

Press the 

MENU

 button to gain access to the menu; 

use the up/down/left/right 

arrow buttons

 to browse 

through the menu and press 

ENTER

 button to select an 

option or

 MENU

 button again to exit.


Reset Button 

Mode 1 -  When in Menu Select mode (left hand 

column of the OSD menu), pressing the 'Reset' button 

will reset all current menu items to their factory 

defaults. 


Mode 2 - When in a Sub-Menu, pressing the 'Reset' 

button will reset the current menu line only.


User Memory  

User Memory buttons 1-3 allow the user to quickly 

recall and load previously saved switcher settings with 

a single button press. This includes PIP and Keyer 

settings. See the 

User Memory

 section for more 

information. 


Shift Button 

Pressing the 

Shift

 button will switch USER 1-3 buttons 

to act as USER 4-6 buttons


Transition Effects 


WIPE Transition Effect Selection 

Each Wipe button consists of black and white colors. 

The white represents the current Program image and 

the black represents the WIPE-IN image. There are a 

total of 3 WIPE presets offered on the SE-500HD; the 

WIPE buttons allow the user to make a selection 

directly from the control panel for the first 2 which are 

horizontal and vertical wipes. Center WIPE can be 

selected from the menu (

Start

). 


Pressing the 

REV

 button reverses the direction of the 

WIPE

Summary of Contents for SE-500HD

Page 1: ...1...

Page 2: ...4 3 1 1 Transition Type 14 3 1 2 Transition Speed 14 3 1 3 Wipe Effect 15 3 1 4 WIPE Border Size 15 3 1 5 WIPE Border Color 15 3 1 6 BKG Color 15 3 2 PIP SPLIT 15 3 2 1 PIP Source 16 3 2 2 PIP Size PI...

Page 3: ...anual is intended as a guide only At all times Datavideo Technologies will try to give correct complete and suitable information However Datavideo Technologies cannot exclude that some information in...

Page 4: ...ything to rest on the power cord Do not locate this unit where the power cord will be walked on rolled over or otherwise stressed 9 If an extension cord must be used with this unit make sure that the...

Page 5: ...Hard Drives are only covered for the first 10 000 hours or 1 year whichever comes first Any second year warranty claims must be made to your local Datavideo office or one of its authorized Distributo...

Page 6: ...e RCA audio inputs and RCA audio outputs More features include Luma Keyer PIP Wipe Generator Still stores and Tally 1 1 Features Supports up to Full HD 1080p 4 video Input HDMI x 4 2 Video Output HDMI...

Page 7: ...ram is user assignable program output and Multiview outputs quad view of the four HDMI inputs 2 HDMI Video Input 1 4 The SE 500HD provides four HDMI video input channels for connecting HDMI video sour...

Page 8: ...o the right channel CH 2 thus both channels are MIC 1 input signals NC MIC2 When no MIC signal is connected to the left channel CH 1 and only MIC 2 is connected to the right channel CH 2 MIC 2 signal...

Page 9: ...manual transition 2 RESET button 12 CUT button 3 User Memory 13 AUTO transition button 4 Shift button Program Preview Transition Effects 14 Program row 5 WIPE transition effect selection 15 Preview ro...

Page 10: ...ory buttons 1 3 allow the user to quickly recall and load previously saved switcher settings with a single button press This includes PIP and Keyer settings See the User Memory section for more inform...

Page 11: ...the selected Sub Video Source in a window on the Main Program view with control over window size and placement For PIP configuration please refer to the PIP section PIP PGM Shows the configured PIP o...

Page 12: ...PVW and PGM views can be transitioned at your preferred speed To include the transition effect simply press the WIPE or MIX button after which the Transition Effect will be triggered as you move the...

Page 13: ...t Headphone Jack Headphones jack accepts a stereo mini jack plug for stereo headphones The headphone volume is controlled by the Headphone volume control knob Audio Meters LED style meters which show...

Page 14: ...PE Effect 1 Horizontal 2 Vertical 3 Center 1 WIPE Border Size OFF Small Middle Large Small WIPE Border Color White Yellow Cyan Green Magenta Red Blue Black Red BKG Color White Yellow Cyan Green Magent...

Page 15: ...dth large is the maximum wipe border width 3 1 5 WIPE Border Color In this option you will be allowed to select a color for your wipe border The available colors are listed as follows White Yellow Cya...

Page 16: ...the PIP source the available sources are listed as follows Black Input 1 Input 2 Input 3 Input 4 Background Color Bar Tip To quickly assign the PIP source simply press and hold the PIP PGM button and...

Page 17: ...m out view on the left and the PIP view on the right The Split source i e the program out view can be selected in this option The available split sources are listed as follows Black Input 1 Input 2 In...

Page 18: ...layer and the PIP source will be the lower layer The layer order cannot be changed Option Parameters Parameter Value or Range Default Value Lumakey Lumakey Source Black Input 1 Input 2 Input 3 Input...

Page 19: ...audio of the output video 3 5 3 HDMI Group The HDMI Group allows the user to assign the HDMI audio channel The default audio channel is Channel 1 2 Any audio channel pair of the four audio channel pa...

Page 20: ...he saved setting by selecting Load Tip The user can also press one of the USER memory shortcut buttons 1 3 on the control panel as a quick way of loading those previously saved User configurations Use...

Page 21: ...follows 1080p 60 1080p 59 94 1080p 50 1080i 60 1080i 59 94 1080i 50 720p 60 720p 59 94 720p 50 576i 480i Once done simply go to Save Setup to confirm the selected output resolution Note Please make s...

Page 22: ...t resolution previously configured in the Save Setup option 3 7 3 Save Setup In this option select Save to save the current configuration 3 7 4 Factory Default Reset Once selected the factory default...

Page 23: ...HDMI Input 2 for example 2 Press the MENU button to open the OSD Menu on the four quadrant Multiview display 3 In the Lumakey option set the Lumakey Source to Input 2 4 In this example the logo is aga...

Page 24: ...llector output Tally output of input video Program 1 2 No Function 3 Preview 1 Open collector output Tally output of input video Preview 1 4 RCOM GND Ground Ground 5 Program 4 Open collector output Ta...

Page 25: ...nitor and turn on the SE 500HD power 4 Approximately after 5 seconds the keyboard firmware will be updated and the update status will be indicated by the LED color of the program row buttons Same vers...

Page 26: ...a time from left to right until all buttons are backlit constant green after approximately TWO minutes At this point the monitor will display a four quadrant Multiview display and this indicates that...

Page 27: ...tions If problem still exists please contact your distributor or the service center No Problems Solutions 1 Audio is switched only after the transition is complete It is normal that audio is switched...

Page 28: ...28 Appendix 4 Dimensions All measurements in millimeters mm...

Page 29: ...Mixer Audio Fader 5 VR Variable Resistor 6 Channel 3 Pair Audio Mixer Audio LED Meter 2 Rows Left Right Standards Supported Input Resolution VGA XGA 1024 x 768 SXGA 1280 x 1024 UXGA 1600 x1200 WUXGA...

Page 30: ...30 Service and Support...

Reviews: