


XM-DVR Pro
Dual Channel DVR Page 7 of 32
December 2009 Manual Rev 3.05
Power Supply
•
Power
: Mates with
Power Connection
on the
XM-DVR Pro. Supplies 5VDC for recorder
and 12VDC for cameras and accessories.
•
+VDC: Connects to +10 to 32VDC power
connection rated at a minimum of 30 watts.
•
GND
: Connects to ground associated with
+VDC circuit.
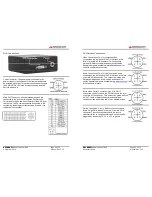
DVI Harness
•
DVI
: Mates with
DVI Connector
on the XM-DVR Pro
•
AV-OUT
: Mates with AV-OUT cable or monitor.
•
SWTCH:
Mates with patch cable or record stop/start switch.
•
CAM-
2: Mates with patch cable, video input cable, or camera.
•
CAM-
1: Mates with patch cable, video input cable, or camera
•
MIC-
1: Mates with patch cable, audio input cable, or microphone
•
MIC-
2: Mates with patch cable, audio input cable, or microphone
XM-DVR Pro
Dual Channel DVR Page 8 of 32
December 2009 Manual Rev 3.05
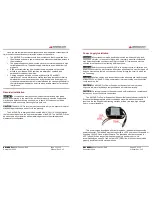
Installation
CAUTION:
Safe and proper installation is the responsibility of the owner and user.
Please follow the connection and installation instructions to insure proper function and
performance.
Before you begin installation, please check that all items were included per the
packing list on page
4.
Lay out all components on a large open surface and
familiarize yourself with the items and their connections.
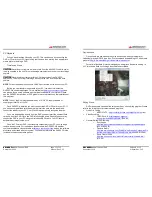
Connections
Please refer to diagram below for proper connection of your XM-DVR Pro and its
components. All connections are indexed and should be hand tightened. Extension
cables can be added to any Datatoys 4-PIN connection.


