background image


21


4.2.3 Selected Files Option 


The 

Selected Files

 option works almost identical to the way it works in the 

Selected 

Files Backup

 function explained earlier in this chapter. To use this option, follow the 

steps below. 

1. 

Choose the 

Selected Files

 option


from within the 

Schedule

 tab. Select the options required 

to program the schedule. Click the 

Next

 arrow. The 

Selected Files 

Explorer-type window 

appears. 

2. 

Select a predefined job list from the 

Existing Lists

 pane. Please see the 

Selected Files 

Backup

 section found earlier in this chapter for instructions on how to create or modify a job 

list. 

3. 

Click the 

Next

 arrow.  

4. 

The job list selected in step 

2

 has now been selected for use in the scheduled backup 

program you are creating.  

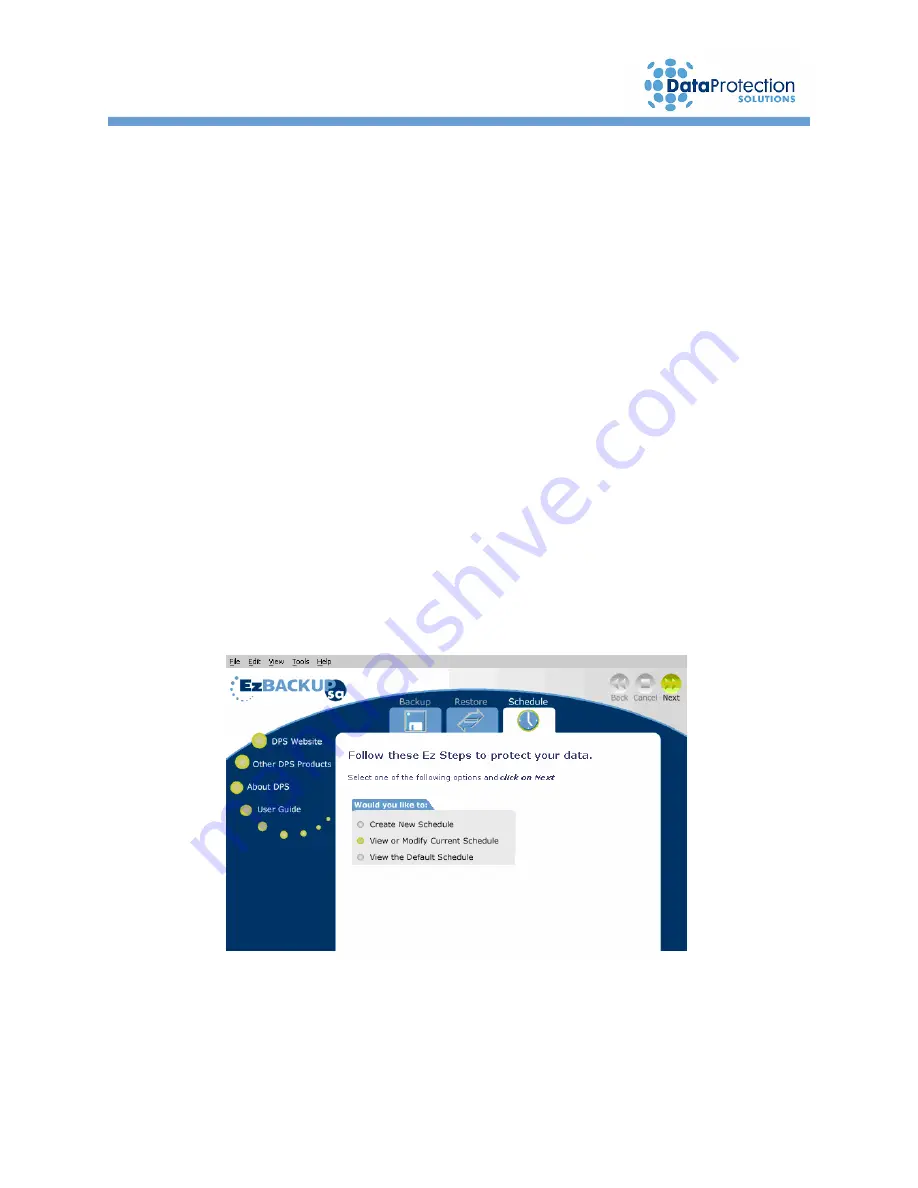
4.2.4 How to Modify a Scheduled Backup Program 


1. 

Click on the 

Schedule

 tab.  Select 

View or Modify Current Schedule

 and click 

Next

.


Summary of Contents for EzBackup sa

Page 1: ......

Page 2: ...ence to radio or television reception which can be determined by turning the equipment off and on the user is encouraged to try to correct the interference by one or more of the following measures Reo...

Page 3: ...osoft NET Framework question if message appears Step through the installation screens and make the appropriate selections based on your preferences 4 Exit all applications It is now necessary to re bo...

Page 4: ...G A FULL IMAGE BACKUP 11 3 1 Default Backup 12 4 USING YOUR EZBACKUP SA BACKUP 13 4 1 Performing a Backup 14 4 1 1 All Files Backup 14 4 1 2 New Modified Files Backup 15 4 1 3 Selected Files Backup 16...

Page 5: ...UP SA RESTORE 24 5 1 Restoring Your Data Files 24 5 2 How to Initiate a Restore 24 5 3 Total System Recovery 26 6 Appendix A 28 7 TROUBLESHOOTING 28 7 1 Problems Solutions 29 7 2 Tips Guidelines 30 7...

Page 6: ...tent with your main or primary drive By using the Installation Backup Restore CD that is included restoring your data is easy All of the functions and features of EzBackup sa are controlled with the f...

Page 7: ...Box Contents 1 EzBackup sa External Drive Unit 1 EzBackup sa Quick Start Guide 1 EzBackup sa Installation Backup Restore CD 1 External Drive Unit Stand 1 USB Cable 1 Wall Mount Power Supply 1 Warranty...

Page 8: ...he small round power supply connector into the 12V power socket on the EzBackup sa as shown in the illustration Plug the power supply into an available outlet on your wall or power strip 4 Turn on you...

Page 9: ...to start the installation Note Select Yes to the Microsoft NET Framework question if message appears 4 Select Yes to the Install EzBackup sa question 5 Step through the installation screens and make t...

Page 10: ...computer on to install the EzBackup sa application If your computer is already on close down all applications 2 Connect your new EzBackup sa to your computer Connect the USB or Firewire cable to the u...

Page 11: ...rt is 1 1 or 2 0 Your EzBackup sa utilizes the included Installation Backup Restore CD to create an Image Backup 1 Insert the included Installation Backup Restore CD into your CD ROM drive Click on Ex...

Page 12: ...12 4 Select Backup Select Yes both times when prompted to confirm the creation of the Image Backup The Image Backup begins and displays a progress window...

Page 13: ...ackup New Modified files backup everyday at 4pm has been set up for you EzBackup sa will ask you if you wish to accept it when you open the application for the first time after installation has been s...

Page 14: ...files that are restricted by the operating system 1 Click on the Backup tab The screen changes to a list of four backup types 2 Click on the first type All Files Click on the Next arrow 3 A dialog box...

Page 15: ...ur last backup These include new applications as well as data files 1 Click on the Backup tab The screen changes to a list of four backup types 2 Click on the second type New Modified Files Click on t...

Page 16: ...tc To create or modify a job list continue with the following steps 1 Click on the Backup tab The screen changes to a list of four backup types 2 Click on the third type Selected Files Click on the Ne...

Page 17: ...ct the Save button to save your list for future use A dialog box will open allowing you to name the list and save 8 Your saved list will appear on pane 3 entitled Existing Lists and is available for u...

Page 18: ...or when the blue button is pressed on the front of the unit Ez Touchsm by Button Pressed does not apply to Linux OS You can enable Ez Touchsm by selecting Upon Detection Backup EzBackup sa also gives...

Page 19: ...s Choose an empty row and double click anywhere in the row to create a backup program in the chosen row 3 The screen changes to reveal numerous options to select for the creation of a scheduled backup...

Page 20: ...button is pressed on the front of the EzBackup sa the EzBackup sa software loads displays on the screen and a New Modified Files backup starts automatically This is very convenient for spur of the mom...

Page 21: ...le Click the Next arrow The Selected Files Explorer type window appears 2 Select a predefined job list from the Existing Lists pane Please see the Selected Files Backup section found earlier in this c...

Page 22: ...feature that can inform you the results of the backups You can select to be notified only when a backup fails when the backup was scheduled but was skipped by the user or after each single backup Thi...

Page 23: ...u start your computer The monitor s function is to detect when the EzBackup sa has been plugged in when the blue button on the unit has been pressed and also to execute any scheduled backups In Window...

Page 24: ...ndow much like an explorer window where drives or folders will be displayed on pane 1 and folders and files will be displayed on pane 2 In most cases and depending on what other devices are connected...

Page 25: ...box will open allowing you to name the list and save 6 Your saved list will appear on pane 3 entitled Existing Lists and is available for use in future restores Items on pane 3 can also be selected f...

Page 26: ...backup was created from or to a new replacement drive Attempting to restore to a different computer may result in system instability and will create an invalid restore Please remember that when perfo...

Page 27: ...you that all internal data will be replaced with EzBackup sa data see message above Select Yes if you are sure 6 The restore process starts and a screen indicating progress is shown Attention A Full...

Page 28: ...ur tech support at 954 925 2889 from 9 00 to 5 00 EST Computer Key Command s Acer F1 F2 CTRL ALT ESC AST CTRL ALT ESC CTRL ALT DEL Compaq 8700 F10 CompUSA DEL Cybermax ESC Dell 400 F3 Dell 400 F1 Dell...

Page 29: ...lugged in all the way Ensure the power supply is well seated in the power outlet it s plugged in to The EzBackup sa might be turned off Make sure that the unit and the fan are on 2 The EzBackup sa uni...

Page 30: ...of seeing it type con and press enter The system will boot up normally but rather than a graphical application you will get a black screen with a text based application Follow the instructions on the...

Page 31: ...peration with the EzBackup sa software 7 3 How to Get Help If you should find that you need help beyond what is offered in this manual or if your EzBackup sa is in need of repair or warranty service p...

Page 32: ...ment utility CD 6 7 9 10 11 26 booting from 11 Microsoft NET Framework See NET Framework See NET Framework minimum system requirements 6 New Modified Files Backup 15 operating system 6 RAM 6 regulator...

Page 33: ......

Reviews: