background image

Tally Dascom 1325 


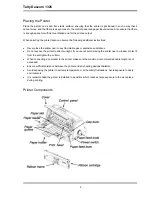
Component Function 

Gap Lever 

Controls printing impact or density. 
Adjusts the print gap lever according to the thickness of paper. 

Paper Guides 

Adjust positioning of single sheet paper. 

Paper Loader 

For single sheet. 

Paper Holder 

For single sheet in larger sizes. 

Paper Slot 

For friction feed (forward). 

Print Head 

24-pin printing mechanism 

Cover 

Protects print head and other components inside, and reduce noise. 

Control Panel 

Shows printer status, for printer setup. 

Paper Feed Lever 

Two positions:     = continuous forms;    = single sheet paper 

Paper Feed Knob 

Manual feed or vertical positioning of paper   

Power Switch 

Power printer ON or OFF 

Ribbon Cartridge 

Install ribbon in the printer. 

Ribbon Frame 

For guiding ribbon installation on print head. 

Tractors 

For feeding and adjustment of continuous forms. 

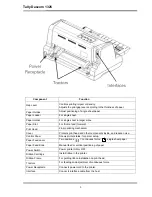
Power Receptacle 

Connects power cord to the printer. 

Interface 

Connects interface cable from the host. 

Summary of Contents for Tally 1325

Page 1: ......

Page 2: ......

Page 3: ...onnected to a socket with the correct mains voltage Always disconnect the printer from the mains before opening the device to perform maintenance work or remedy errors Do not expose the printer to high temperatures direct sunlight or dust Keep all liquids away from the printer Protect the printer from shock impact and vibration Make sure that the printer and computer are switched off before connec...

Page 4: ...r nur an eine Steckdose mit der richtigen Spannung anschließen Wenn Sie den Drucker vom Netz trennen wollen den Drucker ausschalten und immer den Netzstecker an der Steckdose ziehen Den Drucker weder hohen Temperaturen noch direktem Sonnenlicht und Staub aussetzen Keine Flüssigkeiten mit dem Drucker in Berührung bringen Den Drucker keinen Erschütterungen Stößen oder Vibrationen aussetzen Sicherste...

Page 5: ...primante de l alimentation principale mettre l imprimante hors tension et toujours débrancher le connecteur secteur de la prise murale Ne pas exposer l imprimante à des températures élevées à la lumière directe du soleil ou à la poussière Ne pas mettre l imprimante en contact avec des liquides Ne pas exposer l imprimante à des chocs impacts ou vibrations S assurer que l imprimante et l ordinateur ...

Page 6: ...e con tensione adeguata Per scollegare la stampante dalla rete di alimentazione spegnere la stampante e disinserire sempre il connettore di rete dalla presa Non esporre la stampante ad elevate temperature né alla luce solare diretta e alla polvere Evitare il contatto della stampante con liquidi Non esporre la stampante a colpi scosse o vibrazioni Verificare che la stampante e il computer siano spe...

Page 7: ...esora sólo a un enchufe con un voltaje correcto Cuando quiera desconectar la impresora de la red apague la impresora y siempre tire la clavija de alimentación del enchufe No exponga la impresora a temperaturas altas a la luz solar directa y al polvo No ponga la impresora en contacto con fluidos Nunca exponga la impresora a sacudidas choques o vibraciones Asegúrese de que la impresora y el ordenado...

Page 8: ...ществ Включайте принтер в розетку только с соответствующим напряжением Если Вы хотите отключить принтер от напряжения сначала выключите принтер сам и затем выньте штекер из розетки Берегите принтер от нагревания от попадания на него прямых солнечных лучей и пыли Не допускайте попадания жидкости на принтер Нельзя подвергать принтер тряске ударам и вибрации Убедитесь что принтер и компьютер выключен...

Page 9: ... a impressora à tomada elétrica com a voltagem apro priada Quando desligar a impressora da rede desligue sempre a impressora e retire o cabo da tomada Não exponha a impressora a temperaturas altas ou luz solar direta Não aproxime substâncias líquidas da impressora Proteja a impressora de choques impactos e vibrações Desligue a impressora e o computador antes de conectar o cabo da rede A cabeça da ...

Page 10: ...rilime sahip bir prize takın Yazıcıyı şebeke ağından ayırmak istediğinizde yazıcıyı kapatın ve ağ fişini her zaman prizden çıkartın Yazıcıyı ne yüksek ısılı ne de doğrudan güneş ışığına ve toza mâruz kalan mekânlarda bulundurun Yazıcı hiçbir sıvı maddeyle temasta olmamalıdır Yazıcı hiçbir sarsıntıya darbeye veya titreşime mâruz kalmamalıdır Veri kablosu bağlanmadan önce hem yazıcının hem de bilgis...

Page 11: ...cs is a trademark of Centronics Data Computer Corporation DOS is a trademark of Microsoft Corporation SAP is a trademark of SAP AG Windows Windows 7 Windows 95 Windows 98 Windows NT Windows 2000 Windows 2003 2008 Server Windows XP and Windows Vista are trademarks of Microsoft Corporation All other product names and company names appearing in this manual are the registered trademarks or trademarks ...

Page 12: ...Tally Dascom 1325 X ...

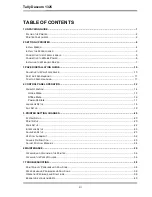
Page 13: ...ING 11 4 CONTROL PANEL OPERATION 12 PANEL OPERATION 14 Online State 15 Offline State 16 Power On State 17 LANGUAGE SETUP 18 SLIP SETUP 19 5 PRINTER SETTING CHANGES 20 SYSTEM SETUP 20 PRINT SETUP 20 PAGE SETUP 22 INTERFACE SETUP 23 ADVANCED SETUP 23 VERTICAL ALIGNMENT 32 CHANGE PIN FUNCTION 33 ADJUST PHYSICAL MARGINS 34 6 MAINTENANCE 36 CLEANING AND VACUUMING THE PRINTER 36 CLEANING THE PAPER ROLLE...

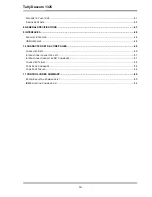
Page 14: ...ARALLEL INTERFACE 48 USB INTERFACE 48 10 CHARACTER SETS CODE PAGES 49 CHARACTER SETS 49 INTERNATIONAL CHARACTER SETS 51 INTERNATIONAL CHARACTER SET COMMANDS 51 CHARACTER TABLES 52 CODE PAGE COMMANDS 54 CODE PAGE TABLES 56 11 CONTROL CODES SUMMARY 80 EPSON EMULATION COMMAND LIST 80 IBM EMULATION COMMAND LIST 82 ...

Page 15: ...ems If you find any transport damage or if any accessories are missing please contact your dealer The following items should be included o Printer o Paper feed knob o Paper feed tray o Power cord o Ribbon cartridge o CD ROM o Installation Guide Remove the packaging materials from the printer as follows 1 Remove the tape on the paper feed lever 2 Remove other visible tape on the printer 3 Open the ...

Page 16: ...er near to any flammable gas or explosive substances Do not expose the printer to direct sunlight If you cannot avoid placing the printer near a window protect it from the sunlight with a curtain When connecting a computer to the printer make sure the maximum recommended cable length is not exceeded Ensure sufficient distance between the printer and any heating devices radiators Avoid exposing the...

Page 17: ...m Cover Protects print head and other components inside and reduce noise Control Panel Shows printer status for printer setup Paper Feed Lever Two positions continuous forms single sheet paper Paper Feed Knob Manual feed or vertical positioning of paper Power Switch Power printer ON or OFF Ribbon Cartridge Install ribbon in the printer Ribbon Frame For guiding ribbon installation on print head Tra...

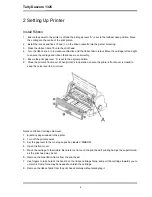
Page 18: ...ion 6 Close the printer s front cover When printer is in operation ensure the printer s front cover is closed to keep the noise level to a minimum Notes on Ribbon Cartridge Removal 1 Eject any paper loaded in the printer 2 Turn off the printer power 3 Set the gap lever to the most open position labeled RIBBON 4 Open the front cover 5 Move the carriage to the middle Be careful not to touch the prin...

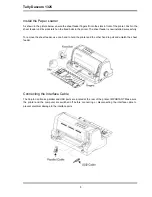
Page 19: ... feeder is now installed successfully To remove the sheet feeder use one hand to hold the printer and the other hand to pull and unlatch the sheet feeder Connecting the Interface Cable The 36 pin Centronics parallel and USB ports are located at the rear of the printer IMPORTANT Make sure the printer and the computer are switched off before connecting or disconnecting the interface cable to prevent...

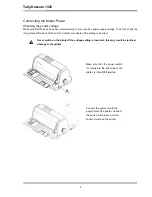
Page 20: ...back of the printer Contact your dealer if the setting is incorrect Never switch on the printer if the voltage setting is incorrect this may result in electrical damage to the printer Make sure that the power switch A located to the right side of the printer is in the OFF position Connect the power cord to the power inlet of the printer Connect the power cord plug to a mains socket Switch on the p...

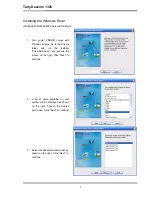
Page 21: ... Go to the Drivers folder and run the Installer DriverSetup exe You will see the screen on the right Click Next to continue 2 A list of ports available on your system will be displayed as shown on the right Choose the desired port to use Click Next to continue 3 Select the desired printer model as shown on the right Click Next to continue ...

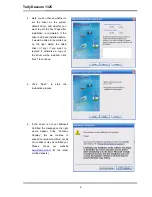
Page 22: ... right Select the listed driver if any if you want to replace it otherwise a copy of the driver will be installed Click Next to continue 5 Click Finish to start the installation process 6 If the driver is not yet Microsoft Certified the message on the right would appear Click Continue Anyway As we continue to expand our product portfolio not all of our drivers may be certified yet Please check our...

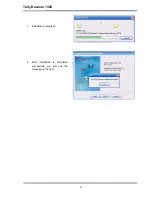
Page 23: ...Tally Dascom 1325 9 7 Installation in progress 8 After installation is completed successfully you will see the message on the right ...

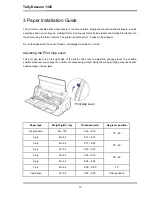
Page 24: ...s damaged wrinkled or curled Adjusting the Print Gap Lever The print gap lever is on the right side of the printer Take care to adjust the print gap lever to a suitable position whenever you change the number of copies being printed Using the wrong print gap may cause print head damage or paper jams Paper type Weight g m2 ply Thickness mm Gap lever position Single sheet 52 100 0 06 0 12 1P 2P 2 pl...

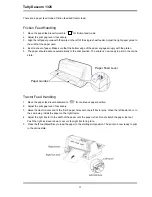
Page 25: ...t position The printer is now ready to print in the online state Tractor Feed Handling 1 Move the paper feed lever backward to for continuous paper position 2 Adjust the print gap lever if necessary 3 Raise the tractor doors and fit the first 3 paper holes onto the left tractor pins Close the left tractor door In the same way install the paper on the right tractor 4 Adjust the right tractor to the...

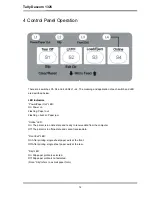
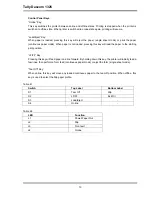
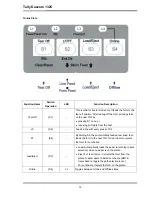
Page 26: ...out Flashing buzzer Paper jam Online LED On The printer is in online state and ready to receive data from the computer Off The printer is in offline state and cannot receive data Front Exit LED On After printing single sheet paper exits at the front Off After printing single sheet paper exits at the rear Slip LED On Slip paper profile is selected Off Slip paper profile is not selected Note Slip re...

Page 27: ...ssing this key will load the paper to the starting print position LF FF Key Pressing this key will feed paper one line forward By holding down this key the printer will initially feed a few lines then perform a form feed continuous paper mode or eject the form single sheet mode Tear Off Key When online this key will move any loaded continuous paper to the tear off position When offline this key is...

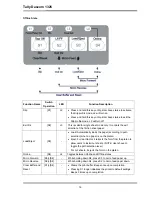
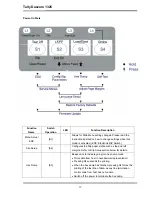
Page 28: ...ection Load Eject switch to Online state micro feed clear buffer and restore factory defaults To enter the Power On state the user holds down a key or a combination of keys while powering up the printer This state provides the following functions Configure Slip paper profile Main Menu setup Hex dump print Main Menu access Service Menu adjust page margins restore factory defaults and firmware updat...

Page 29: ...every press of S2 FF S2 By holding S2 the printer initially feeds a few lines then feeds the form to the next TOF for rear tractor or ejects the form for cut sheets Load Eject S3 Load Automatically loads the paper according to path selection when no paper is on the platen Eject For rear tractor it retracts the form from the platen to allow users to install cut sheets NOTE Users have to toggle the ...

Page 30: ...loads the paper according to path selection when no paper is on the platen Eject For rear tractor it retracts the form from the platen to allow users to install cut sheets NOTE Users have to toggle the path selection lever For cut sheets it ejects the form on the platen Online S4 L4 Toggles between Online and Offline states Micro Forward S3 S4 While holding down S4 press S3 to micro feed paper up ...

Page 31: ...Slip Setup S2 Configures the Slip paper profile such as top and left margins Refer to Slip Setup section below for details Hex Dump S3 Beeps once to indicate going into hex dump mode Prints data from host in hexadecimal representation Pressing S4 suspends the printing When the hex dump has finished pressing S4 forces the printing of the last line of data as any line termination control code from h...

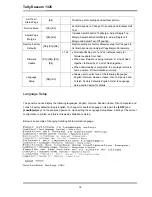
Page 32: ...ng received L1 and L4 flash together followed by L1 and L3 flash together When downloading is completed the carriage returns to home position Printer initializes normally Language Setup S2 S3 Allows user to select one of the following languages English German Russian Italian French Spanish and Turkish Factory default is English Refer to Language Setup section below for details Language Setup The p...

Page 33: ... until the print head starts moving then let go 2 Load paper The printer prints the few lines below Slip Setup LF FF OK Tear Off Back Load Eject Next Online Exit Current Setting Fanfold Top Margin 3 Press the Load Eject key to scroll to the item you want to change The available items are Fanfold Top Margin Fanfold Left Margin Single Top Margin and Single Left Margin To select the item press LF FF ...

Page 34: ... the host printer driver Auto CR IBM Yes No Yes LF LF CR No LF LF Applies to IBM emulation only Auto LF Yes No Yes CR CR LF No CR CR Print Dir Bi Dir Uni Dir Auto Auto Text graphics in bi direction double height in uni direction Uni Dir Prints everything in uni direction Bi dir Prints everything in bi direction Note Top position print direction may be affected by Top Print Dir setting Top Print Di...

Page 35: ...y Spain Japan Norway Denmark II Spain II Latin AM Korea Legal 14 1 international character set selections Code Page 1 CP 437 2 CP 737 3 CP 850 4 CP 851 5 CP 852 6 CP 857 7 CP 858 8 CP 860 9 CP 861 10 CP 863 11 CP 864 12 CP 864 Extended 13 CP 865 14 CP 866 Cyrillic 15 CP 866 Bulgaria 16 CP 1250 17 CP 1251 18 CP 1252 19 CP 1253 20 CP 1254 21 8859 1 22 8859 1 SAP 23 8859 2 24 8859 5 25 8859 7 26 8859...

Page 36: ...d Bottom Margin 0 60 10 60 30 60 Sets the bottom margin for tractor mode Due to mechanical tolerance 0 60 is not guaranteed Single Form Length 3 3 5 11 3 4 5 5 5 6 7 8 8 5 11 70 6 12 14 17 Sets the page length for friction mode Single Top Margin 0 60 10 60 99 60 Sets the top margin for friction mode Due to mechanical tolerance 0 60 is not guaranteed Single Bottom Margin 0 60 10 60 30 60 Sets the b...

Page 37: ...92KB Advanced Setup Advanced Setup Valid Settings Function Auto Load Manual 0 5s 1s 1 5s 2s Specifies the waiting time before loading a cut sheet automatically Manual Auto load mode is off Applies to friction mode only Paper Jam Prevention Yes No Flattens paper edges by carriage movement before printing starts Paper End Detect Yes No Yes Detects paper out and halts printing otherwise ignores paper...

Page 38: ...Italy Spain Japan Norway Denmark II Spain II Latin AM Korea Legal Zeichensatz CP 437 CP 857 Zeichentabelle Graphik Italic Seiten Setup Valid Settings Zeilen Pro Zoll 1 2 3 4 5 6 7 8 Endlos Formularlänge 3 3 5 11 3 4 5 5 5 6 7 8 8 5 11 70 6 12 14 17 Endlos Oberer Rand 0 60 10 60 99 60 Endlos Unterer Rand 0 60 10 60 30 60 Einzel Formularlänge 3 3 5 11 3 4 5 5 5 6 7 8 8 5 11 70 6 12 14 17 Einzel Ober...

Page 39: ...аправление печати загл букв Двунаправленная Однонаправленная Удар Нормальный Сильный IBM AGM Да Нет Настройка печати Valid Settings Дополнительный шрифт OCR B OCR A ORATOR GOTHIC SOUVENIR знаков дюйм 10cpi 12cpi 15cpi 17cpi 20cpi PS Перечеркнутый ноль 0 Ø Высокая скорость Вкл Выкл Скорость графики Нормальная Быстрая Очень быстрая Символы IBM 1 2 Уст 1 Уст 2 Набор знаков USA France Germany UK Denma...

Page 40: ...са Valid Settings Интерфейс Авто Паралел USB Паралел порт Да Нет Время ожидания 10s 30s Назначение RAM Пользов шрифт Буфер Дополнительные установки Valid Settings Автозагрузка Ручная 0 5s 1s 1 5s 2s Датчик движ бумаги Да Нет Датчик конца бумаги Да Нет Контоль длины формы Програмный Игнор Контроль знаков дюйм Програмный Игнор Контроль шрифта Програмный Игнор Контроль качества Програмный Игнор Звук ...

Page 41: ...e Sup Continuo 0 60 10 60 99 60 Margine Inf Continuo 0 60 10 60 30 60 Lunghezza Foglio 3 3 5 11 3 4 5 5 5 6 7 8 8 5 11 70 6 12 14 17 Margine Sup Foglio 0 60 10 60 99 60 Margine Infer Foglio 0 60 10 60 30 60 Rullo Carta Si No Salto Perforazione Si No Autostrappo Manuale 0 5s 1s 2s 3s 4s 5s Uscita Carta Frontale Posteriore Scontrino Si No Menù Interfacc Valid Settings Interfaccia Auto Parallela USB ...

Page 42: ...Spain II Latin AM Korea Legal Jeu de caractèr CP 437 CP 857 Tabl de caract Graphque Italique Setup page Valid Settings Lignes par pouce 1 2 3 4 5 6 7 8 Papier continu Longueur formulaire 3 3 5 11 3 4 5 5 5 6 7 8 8 5 11 70 6 12 14 17 Papier continu Bord supérieure 0 60 10 60 99 60 Papier continu Bord inférieure 0 60 10 60 30 60 Feuille à feuille Longueur formulaire 3 3 5 11 3 4 5 5 5 6 7 8 8 5 11 7...

Page 43: ...r Uni Dir Auto ModoImp Borde Bi Dir Uni Dir Impacto Normal Fuerte IBM AGM Si No Print Setup Valid Settings Fuente Otros OCR B OCR A ORATOR GOTHIC SOUVENIR Tamaño Letra 10cpp 12cpp 15cpp 17cpp 20cpp PS Cero 0 Ø Alta Velocidad Activado Desactivado Imp Grafica Normal Rápido Ultra IBM Juego 1 2 Juego 1 Juego 2 Carácter Local USA Francia Alemania UK Dinamarca Suecia Italia España Japón Noruega Dinamarc...

Page 44: ... Buffer Advanced Setup Valid Settings Auto Carga Manual 0 5s 1s 1 5s 2s Prevención Atascos Si No Detección Fin Papel Si No Control Tamaño Papel Software Ignorar Control Tamaño Letra Software Ignorar Control Fuente Software Ignorar Control Calidad Software Ignorar Alarma Si No Turkish Türkce Sistem Ayarı Valid Settings Benzetim Emulation ESC P2 IBM 2390 Plus Otom Satırbaşı IBM Evet Hayır Otom Satır...

Page 45: ...60 Tek kağıt Form uzunluğu 3 3 5 11 3 4 5 5 5 6 7 8 8 5 11 70 6 12 14 17 Tek kağıt Üst kenar boşluğu 0 60 10 60 99 60 Tek kağıt Alt kenar boşluğu 0 60 10 60 30 60 Rulo kağıt Evet Hayır Delik atlama Evet Hayır Otom Koparma Elle Manuel 0 5s 1s 2s 3s 4s 5s Çıkartma Yönü Önden Arkadan Makbuz Fiş Kapalı Açık Arabirim Ayarları Valid Settings Arabirim Otom Paralel USB I Prime Evet Hayır Otom Arabirim gec...

Page 46: ...ent setting The printer will print as follows Vertical Alignment LF FF OK Tear Off Back Load Eject Next Online Exit Please select Paper Type Single Ply For single ply paper press LF FF key to select For multipart paper press Load Eject key to go to Multipart then press LF FF key to select 5 If single ply is selected for paper type the following will print Single Ply Current Print Mode LQ Press Loa...

Page 47: ... print speed if activated Change Pin Procedure 1 Enter the Service Menu by holding down the Tear Off and LF FF keys while powering up 2 Load paper 3 The printer will print as below Service Menu LF FF OK Tear Off Back Load Eject Next Online Exit Current Menu Vertical Alignment Press Load Eject key to scroll to Change Pin then press LF FF key to select The status of each pin will be printed as follo...

Page 48: ...o tractors LF FF Add Load Eject Reduce Online Exit Each step is 0 5 mm Function of keys Tear Off key Decrease 0 5mm Load Eject key Increase 0 5mm 4 Press LF FF key printer will print Save settings Yes Press Load Eject key to choose Yes or No then press LF FF key to confirm selection and exit Adjust Page Margins mode by pressing Online The print head moves to the left side and the printer beeps twi...

Page 49: ...will print as below Adjust Page Margins LF FF OK Tear Off Back Load Eject Next Online Exit Current Setting Adjust Fanfold Top Margin 4 Press Load Eject key until the current setting is Adjust Tear Off Position Press LF FF key to confirm selection The printer will print as follows Procedure Install fanfold paper to tractors LF FF Add Load Eject Reduce Online Exit Each step is 0 5 mm Function of key...

Page 50: ...rom the printer Make sure that the power is off and then disconnect the printer power cord 2 Using a soft vacuum brush vacuum the exterior of the printer Also vacuum the cut sheet edge 3 Use a soft damp cloth to wipe the exterior of the printer including the cover A mild detergent may be used Do not use solvents kerosene or abrasive cleaning materials that may damage the printer 4 Open the cover o...

Page 51: ...Tally Dascom 1325 37 4 To dry the platen place a dry cloth against the platen and the rollers and manually rotate the paper feed knob ...

Page 52: ...the wrong characters are printed Many or unexpected characters are printed Make sure that the interface cable is securely connected to both the printer and computer Make sure that the printer driver selected in your software is the same as the emulation selected on the printer Check the length of the interface cable Maximum Parallel USB 2 metres Try another interface cable The page is blank Make s...

Page 53: ...uld feed straight Paper slips off the forms tractors or the perforated holes of the paper tear during printing Make sure that the forms tractors are positioned correctly for the width of your paper and that the perforated holes of the paper fit directly over the tractor pins Operating Problems and Solutions Problem Solution The power does not turn on Check whether the mains voltage is correct Make...

Page 54: ...n again the printer to recover any fatal error If the problem cannot be resolved contact your dealer or service partner Error Indications on LEDs Error Description Operation Status Paper Out LED Online LED Tear Off LED Buzzer Sound Paper jammed Suspend Flash Off Flash Once Friction feed Tractor feed Suspend Flash Flash No change Continuously Print head hot Normal No change Flash No change Carriage...

Page 55: ...ings incorrect software settings the interface or the computer HEX DUMP MODE Allows you to determine whether the computer is sending the correct commands to the printer and whether the printer is executing the commands correctly This function is useful to programmers or others who understand how to interpret hex dumps PRINTING ALIGNMENT ADJUSTMENT Allows you to check and if necessary correct the p...

Page 56: ... To load new firmware proceed as follows 1 Switch off the printer Connect your PC to the parallel port on the printer 2 Press and hold down 4 keys S1 S2 S3 S4 while powering on the printer 3 Alternate flashing of L1 and L4 LEDs indicates printer is ready for firmware update 4 Go to the DOS prompt window Copy the firmware file with extension MOT to your printer as follows COPY B filename mot PRN 5 ...

Page 57: ... 120H 36x24 360H 12 CPI 10x24 120H 10x24 120H 30x24 360H 15 CPI 8x16 120H 8x16 120H 24x16 360H 17 1 CPI 7x24 120H 7x24 120H 21x24 360H 20 CPI 6x24 120H 6x24 120H 18x24 360H Proportional Nx24 360H Nx24 360H Nx24 360H Print Head Number of pins 24 pins Firing frequency Normal mode 1500 Hz Pin diameter 0 2 mm Life 400 million strokes pin Draft mode Graphics 8 bit mode 8V x 60H 80H 90H 120H 240H DPI 24...

Page 58: ...15 17 20 CPI Proportional 9 SOUVENIR 10 12 15 17 20 CPI Proportional 10 GOTHIC 10 12 15 17 20 CPI Proportional 11 Script 10 12 15 17 20 CPI Barcodes 1 EAN 13 2 EAN 8 3 Interleaved 2 of 5 4 UPC A 5 UPC E 6 Code 39 7 Code 128 8 POSTNET 9 Codabar 10 Industrial 2 of 5 Code Pages 1 CP 437 2 CP 737 3 CP 850 4 CP 851 5 CP 852 6 CP 857 7 CP 858 8 CP 860 9 CP 861 10 CP 863 11 CP 864 12 CP 864 Extended 13 C...

Page 59: ...850 34 Old Code 860 35 Flarro 863 36 865 Hebrew 37 CP 1257 38 866 Ukraine 39 866 Kazakhstan 40 Kamenicky 41 Mazovia 42 CP 775 43 CRO ASCII 44 Arabic Farsi 45 Arabic Urdo 46 Greek DEC 47 Greek ELOT 928 International Character Sets 1 USA 2 France 3 Germany 4 UK 5 Denmark I 6 Sweden 7 Italy 8 Spain I 9 Japan 10 Norway 11 Denmark II 12 Spain II 13 Latin America 14 Korea 15 Legal ...

Page 60: ...177 max Paper Handling Feeding method Friction and Tractor Paper path Cut sheets Front in front or rear out Fanfold Rear in front out Copy Capability Original 6 copies Emulation ESC P2 IBM 2390 Plus Ribbon Type Cartridge Monochrome Ribbon Life 7 million characters rolling Draft 10 CPI Input Data Buffer Up to 92KB Windows Drivers Windows Server 2000 2003 2008 Windows Vista Windows XP Windows 98 Win...

Page 61: ...and by 10 to 85 RH No condensation Dimensions 404 mm W x 322 mm D x 203 mm H Weight 5 kg Power Supply Unit type Switching mode power supply Power cord Detachable Voltage rating AC 230V 180V 264V 50Hz to 60Hz Stand by Less than 5 9W ESD Comply with IEC801 2 Contact discharge 4kV Air discharge 8kV MTTR 20 minutes MTBF 10000 hours 25 duty cycle ...

Page 62: ...Computer 18 5V Printer Computer 19 30 GND Printer Computer 31 INIT Printer Computer 32 FAULT Printer Computer 33 GND Printer Computer 34 Unused Unused 35 FUSE Printer Computer 36 SLCTIN Printer Computer Parallel Interface Connector Diagram Note Any external devices connected to the parallel port should not draw current exceeding 200 mA from pin 18 otherwise it may affect the printer operation USB ...

Page 63: ...Tally Dascom 1325 49 10 Character sets Code Pages Character Sets Standard Character Set 1 Standard Character Set 2 ...

Page 64: ...Tally Dascom 1325 50 IBM Character Set 1 IBM Character Set 2 ...

Page 65: ...Command USA ESC R CHR 0 France ESC R CHR 1 Germany ESC R CHR 2 UK ESC R CHR 3 Denmark1 ESC R CHR 4 Sweden ESC R CHR 5 Italy ESC R CHR 6 Spain1 ESC R CHR 7 Japan ESC R CHR 8 Norway ESC R CHR 9 Denmark2 ESC R CHR 10 Spain2 ESC R CHR 11 Lat America ESC R CHR 12 Korea ESC R CHR 13 Legal ESC R CHR 64 ...

Page 66: ...Tally Dascom 1325 52 Character Tables Italic ...

Page 67: ...Tally Dascom 1325 53 Graphic 1 Graphic 2 ...

Page 68: ...P860 Portugal 84 CP861 Icelandic 94 CP863 French Canada 85 CP864 Arabic 8C CP864 Arab Extended 95 CP865 Nordic 86 CP866 Cyrillic 8E CP866 Bulgaria 9D Siemens Turkish 9B DEC Turkish 9C CP1250 Win Latin 2 70 CP1251 Win Cyrillic 71 CP1252 Win Latin 1 72 CP1253 Win Greek 73 CP1254 Win Turkish 74 8859 1 Latin 1 25 8859 1 Latin 1 SAP 2B 8859 2 Latin 2 26 8859 5 Cyrillic 2A 8859 7 Greek 2D 8859 9 Turkish...

Page 69: ...x Twinax Hebrew 4F New 437 Hebrew 81 New DIG 850 Hebr 83 Old Code 860 Hebr 98 Flarro 863 Hebrew 99 Table 865 Hebrew 9A CP775 Baltic A6 CP1257 Baltic 77 Mazovia Poland 92 Kamenicky Czech 91 CP866 Ukraine 8F CP866 Kazakhstan 90 ...

Page 70: ...Tally Dascom 1325 56 Code Page Tables CP 437 US CP 737 Greek ...

Page 71: ...Tally Dascom 1325 57 CP 850 Multilingual CP 851 ...

Page 72: ...Tally Dascom 1325 58 CP 852 Eastern Europe CP 857 Turkish ...

Page 73: ...Tally Dascom 1325 59 CP 858 CP 860 Portugal ...

Page 74: ...Tally Dascom 1325 60 CP 861 Iceland CP 863 French Canadian ...

Page 75: ...Tally Dascom 1325 61 CP 864 Arabic CP 864 Arabic Extended ...

Page 76: ...Tally Dascom 1325 62 CP 865 Norway CP 866 Cyrillic ...

Page 77: ...Tally Dascom 1325 63 CP 866 Bulgaria CP 1250 Win Latin 2 ...

Page 78: ...Tally Dascom 1325 64 CP 1251 Win Cyrillic CP 1252 Win Latin 1 ...

Page 79: ...Tally Dascom 1325 65 CP 1253 Win Greek CP 1254 Win Turkish ...

Page 80: ...Tally Dascom 1325 66 8859 1 Latin 1 8859 1 Latin 1 SAP ...

Page 81: ...Tally Dascom 1325 67 ISO 8859 2 ISO Latin 2 ISO 8859 5 Cyrillic ...

Page 82: ...Tally Dascom 1325 68 ISO 8859 7 Latin Greek ISO 8859 9 Turkish ...

Page 83: ...Tally Dascom 1325 69 ISO 8859 15 Euro Code Page 923 BRASCII ...

Page 84: ...Tally Dascom 1325 70 Abicomp Roman 8 ...

Page 85: ...Tally Dascom 1325 71 Coax Twinax Hebrew New 437 Hebrew ...

Page 86: ...Tally Dascom 1325 72 New Dig 850 Hebrew Old Code 860 Hebrew ...

Page 87: ...Tally Dascom 1325 73 Flarro 863 Hebrew 865 Hebrew ...

Page 88: ...Tally Dascom 1325 74 CP 1257 866 Ukraine ...

Page 89: ...Tally Dascom 1325 75 866 Kazakhstan Kamenicky ...

Page 90: ...Tally Dascom 1325 76 Mazovia CP 775 ...

Page 91: ...Tally Dascom 1325 77 CRO ASCII Arabic Farsi ...

Page 92: ...Tally Dascom 1325 78 Arabic Urdo Greek DEC ...

Page 93: ...Tally Dascom 1325 79 Greek ELOT 928 ...

Page 94: ...n Print mode setup ESC n1 n2 m d1 d2 Choose character lineation ESC n1 n2 Select absolute horizontal print position ESC n Set left margin ESC n Select user defined set ESC Define user defined set ESC n m d1 d2 Print data in character style ESC G NUL d Select graphics mode ESC m n1 n2 Select image mode ESC c v h m nL nH d1 d2 Print raster graphics ESC n Select n 360 line spacing ESC n Underline on ...

Page 95: ...ernational character set ESC S n Select superscript subscript ESC T Cancel superscript subscript ESC U n Select unidirectional bidirectional printing mode ESC V NUL n m Select absolute vertical print position ESC W n Turn Double wide mode on off ESC X n1 n2 Select font by pitch and point ESC Y n1 n2 Select 8 pins high speed double density graphics ESC Z n1 n2 Select 8 pins high speed fourfold dens...

Page 96: ...line ESC DC2 Select 10CPI ESC DC3 Offline ESC DC4 Cancel double wide mode one line ESC CAN Cancel buffer ESC FF Form feed ESC EM n Automatically Feed Paper mode ESC Set 12CPI ESC VT Tab vertically ESC 0 Select 1 8 line spacing ESC 1 Select 7 72 line spacing ESC 2 Select 1 6 line spacing or activate ESC A n command ESC 3 n Select n 216 or 1 180 line spacing ESC 4 Set top margin ESC 5 n Automatic Li...

Page 97: ...g mode continuous ESC X n m Set left and right margin ESC Y n1 n2 V1 V2 Vn Select double density graphics ESC Z n1 n2 V1 V2 Vn Select fourfold density graphics ESC n1 n2 m1 m2 Select line ESC n1 n2 m1 m2 m3 m4 Select printing mode ESC I n1 n2 Hf Ls Hs Lf Sm NUL Hc Lc Select font and pitch ESC K n1 n2 init id para1 para2 paran Set initialization condition ESC T n1 n2 n3 n4 Hc Lc Set code page ESC S...

Page 98: ...Tally Dascom 1325 84 ...

Page 99: ......

Page 100: ...2 www dascom com SINGAPORE ASIA PACIFIC DASCOM AP Pte Ltd 63 Hillview Avenue 08 22 Lam Soon Industrial Building Singapore 669569 Phone 65 6760 8833 Fax 65 6760 1066 www dascom com sg All rights reserved Translations reprinting or copying by any means of this manual complete or in part or in any different form requires our explicit approval We reserve the right to make changes to this manual withou...

Reviews: