background image

EN

EN

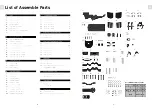
List of Assemble Parts

Assemble Parts Box Layout

4

5

Summary of Contents for TSRf

Page 1: ......

Page 2: ...iser kit adjustment Saddle position adjustment Front brake adjustment Screw torque value guide Complete Bike Assembly Unboxing assembly Take out the bike Assemble the riser kit Assemble the Armpads an...

Page 3: ...unclear please contact the service centre or email to service dare bikes com 3 Storage Any damage to the paint coat or frame structure component caused by UV light rain moisture seawater mud sweat or...

Page 4: ...EN EN List of Assemble Parts Assemble Parts Box Layout 4 5...

Page 5: ...Please use the correct torque wrench and follow the maximum torque value And depending on the situation use commercial oil to in crease parts adhesion To minimize air resistance TSRf contains internal...

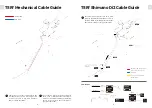
Page 6: ...en When assembling please select the best hole according to your personal needs Shifting cable Brake cable DI2 WIRE MAP TSRf Mechanical Cable Guide TSRf Shimano Di2 Cable Guide Electric wire EW SD50 5...

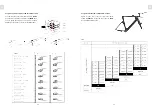
Page 7: ...d out the saddle position Measurement Abbreviation Indication Step 1 Confirm your standover and BR BS value Base on your fitting data use your inside leg length to find out standover Remember your ins...

Page 8: ...e able to find the same letter in CHARTB Then you are given the amount of stem riser needed and the position rear or front to install basebar Step 3 Find out frame s MR and MS value Again use the same...

Page 9: ...th Arm pads D5 and D6 provide 5 forward positions 15mm spacing in between each position Please see the diagram below for your reference There is 100mm of room for you to position the saddle at a seatp...

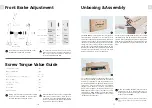
Page 10: ...be purchased separately to allow the box to be transported more easily See more details on www dare bikes com download It is very easy to unpack the carton Please follow the instructions step by step...

Page 11: ...e the bike Use an alternative method to fix the seatpost and frameset For example corrugated paper seat or ideally another person After you assembly your bike please wrap the high density foam with th...

Page 12: ...the arm pad mounts D7 D8 Add the extended plates D5 D6 Letters facing downwards R on the right hand side and L on the left hand side Tighten the bolts and screws again Take out the extended plates D5...

Page 13: ...Firmly press the seat post clamp and insert the seat post Tighten the seat post clamp by 5Nm Adjust the seat post height base on your fitting data FRONT WHEEL INSTALLATION AND DOUBLE CHECK Pull open t...

Page 14: ...out the excess brake line out of the front brake cover to make sure the braking efficiency Recommended Torque Value Suggested torque value is applicable under most circumstances Since such informatio...

Page 15: ...uch re spraying of any part of the bike will invalidate the warranty and DARE will bear no respon sibility for any associated damaged WARRANTY LIFETIME WARRANTY CLAIMS Warranty Terms Conditions The wa...

Page 16: ...used for renting or frequently lending to other riders 11 Those which naturally fade and those which suffer from the peeling of metal surfaces or plastic Man made damage negligence abuse and abnormal...

Reviews: