background image


GIG-124C 

Order code: D2284  


Operating Determinations  


This device is not designed for permanent operation. Consistent operation breaks will ensure that the 
device will serve you for a long time without defects. 


The minimum distance between light-output and the illuminated surface must be more than 0.5 
meter. 


The maximum ambient temperature 

t

a

 = 45°C must never be exceeded. 


The relative humidity must not exceed 50 % with an ambient temperature of 35° C. 


If this device is operated in any other way, than the one described in this manual, the product may 
suffer damages and the


warranty becomes void. 


Any other operation may lead to dangers like short-circuit, burns, electric shock, crash, etc. 


You endanger your own safety and the safety of others! 


Return Procedure 


Returned merchandise must be sent prepaid and in the original packing, call tags will not be issued. 
Package must be clearly labeled with a Return Authorization Number (RMA number). Products returned 
without an RMA number will be refused. Highlite will not accept the returned goods or any responsibility. 
Call Highlite 0031-455667723 or mail 

[email protected]

 and request an RMA prior to shipping the fixture. 

Be prepared to provide the model number, serial number and a brief description of the cause for the 
return. Be sure to properly pack fixture, any shipping damage resulting from inadequate packaging is the 
customer’s responsibility. Highlite reserves the right to use its own discretion to repair or replace 
product(s). As a suggestion, proper UPS packing or double-boxing is always a safe method to use. 
 

Note: If you are given an RMA number, please include the following information on a piece of paper 
inside the box: 

1) Your name 
2) Your address 
3) Your phone number 
4) A brief description of the symptoms 
 

Claims 

 
The client has the obligation to check the delivered goods immediately upon delivery for any short-
comings and/or visible defects, or perform this check after our announcement that the goods are at their 
disposal. Damage incurred in shipping is the responsibility of the shipper; therefore the damage must be 
reported to the carrier upon receipt of merchandise. 
It is the customer's responsibility to notify and submit claims with the shipper in the event that a fixture is 
damaged due to shipping. Transportation damage has to be reported to us within one day after receipt 
of the delivery.  
Any return shipment has to be made post-paid at all times. Return shipments must be accompanied with 
a letter defining the reason for return shipment. Non-prepaid return shipments will be refused, unless 
otherwise agreed in writing. 
Complaints against us must be made known in writing or by fax within 10 working days after receipt of the 
invoice. After this period complaints will not be handled anymore. 
Complaints will only then be considered if the client has so far complied with all parts of the agreement, 
regardless of the agreement of which the obligation is resulting. 


Summary of Contents for GIG-124C

Page 1: ...GIG 124C Highlite International B V Vestastraat 2 6468 EX Kerkrade the Netherlands Order code D2284 MANUAL ENGLISH...

Page 2: ...on of the device 5 Features 5 Overview 5 Installation 6 Introduction 6 Ready to start 6 Control Elements 7 Modules 12 Option One SMP S Order code D2290 12 Option Two SMP R Order code D2291 14 Option T...

Page 3: ...uld there be any consult your dealer and do not use the system To maintain perfect condition and to ensure a safe operation it is absolutely necessary for the user to follow the safety instructions an...

Page 4: ...and the power cord from time to time Please turn off the power switch when changing the power cord or signal cable or select the input mode switch Extreme frequency boosts in connection with a high i...

Page 5: ...he customer s responsibility Highlite reserves the right to use its own discretion to repair or replace product s As a suggestion proper UPS packing or double boxing is always a safe method to use Not...

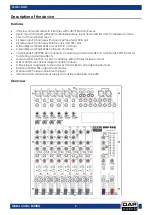
Page 6: ...band EQ and Peak LEDs on each MIC channel 2 band EQ and Peak LEDs on Stereo channels 1 AUX Sends POST PRE per channel for monitoring or external effects 1 AUX Sends POST Fader for monitoring or extern...

Page 7: ...ck inputs assignable to main mix control room phones Outputs etc This unit is very easy to operate but we advise you to go through each section of this manual carefully Ready to start 1 Please check t...

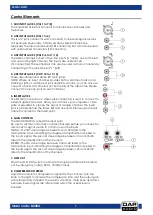
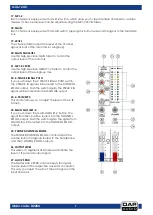
Page 8: ...ssors Here you can hook up a compressor noise gate or equalizer to process the signal of a single channel The insert jack is placed before the fader EQ and aux send Please use an insert cable to conne...

Page 9: ...ader to pre fader This way the volume level of the aux signal is not affected by the channel fader 12 AUX 2 POST The aux buses are used as additional flexible send paths for various applications The A...

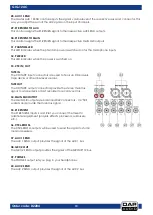
Page 10: ...switch the 2 TRACK IN signal will be routed to the CONTROL ROOM output Push the switch again the 2TRACK IN signal will be routed into the MAIN MIX output 23 2 TK IN MP3 This control allows you to adj...

Page 11: ...are used to hook up CD players tape decks or other line level sources TAPE OUT The CD TAPE output connectors provide the stereo main mix signal to a tape deck or DAT recorder to record your mix 34 MAI...

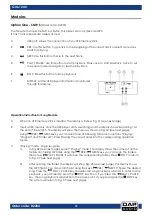
Page 12: ...to the user s requirements Open the cover and connect the module to connector CN6 The optional modules are SMP R SMP S Bluetooth 2 1 The signal for module playback can be assigned to Main Mix by 2TK...

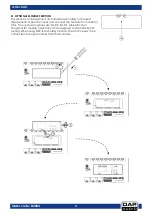
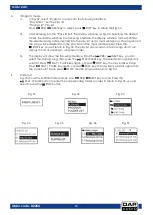
Page 13: ...hows Searching At the end of the search the display will show the menu as shown in Fig 02 see next page Using PRE NEXT keys you can select one of following three menu options Playing Program and Folde...

Page 14: ...the STOP key you will return to Fig 02 The play list can accept up to 20 songs and it will display the list according to song insert order 3 The display will show the following interface Press the PR...

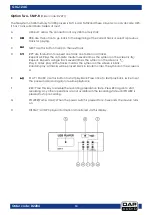
Page 15: ...mbol on the screen is Repeat Repeats a single track several times the symbol on the screen is Play in order play all the tracks in order the symbol on the screen is blank Random play All tracks will b...

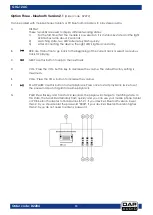
Page 16: ...ct a previous track for playing C NEXT Use this button to skip to the next track D VOL Press the VOL button key to decrease the volume The default factory setting is maximum E VOL Press the VOL button...

Page 17: ...pted signal or no sound at all So you should follow these procedures for every single channel Before connecting mics or instruments make sure that the power of all your system components including the...

Page 18: ...eliability Periodically check your cables A great number of problems faulty contacts ground hum discharges etc are caused entirely by using unsuitable or faulty cables Headphone Unbalanced Balanced Fo...

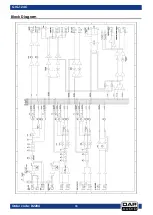
Page 19: ...18 GIG 124C Order code D2284 Block Diagram...

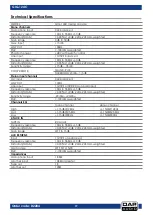
Page 20: ...c input XLR balanced LOW CUT 100Hz Line input 1 4 TRS or TRS RCA un balanced Frequency response 10Hz to 55KHz 3dB Distortion THD N 0 03 at 0dB 22Hz 22KHz A weighted Sensitivity range 20dBu 20dBu SNR 1...

Page 21: ...F to 15dB Fader range OFF to 10dB PHONES CONTROL ROOM range OFF to 15dB Hum Noise 80dB 20Hz 22KHz A weighted 1 channel MAIN level 0dB the other minimum Crosstalk 80dB 0dB 20Hz 22KHz A weighted MAIN le...

Page 22: ...21 GIG 124C Order code D2284 Notes...

Page 23: ...22 GIG 124C Order code D2284 Dimensions...

Page 24: ...2013 DAP Audio...

Reviews: