background image


10 

6 / 7 / 8. Equalizer SECTION (High / Mid / Low)


The mixer’s Equalizer section allows shaping of the incoming audio signal. All mono input channels are 
fitted with 3-band EQ. The upper (

High (6)

) and lower (

Low (8)

) shelving controls have their frequencies 

fixed at 12 KHz and 80 Hz respectively. The Mid range control (

Mid (7)

) has a peaking response frequency 

at 2.5 KHz. All 3 bands have up to 15 dB cut and boost, with a centre detent. Turning the Equalizer to the 
right amplifies the frequency range, turning to the left attenuates the signal. Minor changes to the 
Equalizer control usually produce the best results. Try to avoid excessive enhancement of the MID band. 

 
9. AUX


The aux control allows you to adjust the aux level in the main mix.  
 

10. Pan (Mono Channels)


By using the panorama control you can change the input signal’s position within the stereo image. When 
the panorama control is set to center position, the audio signal is equal for both the left and right output. 
 

Bal (stereo channels) 

By using the balance control you can adjust the balance between the left and the right channel. If you 
use a mono source (input left mono) the control works as a panorama  control and lets you change the 
input signal’s position within the stereo image. 


11. Peak LED 

 The peak indicator shows peak levels in a channel’s incoming signal level. If the red peak LED frequently 
blinks or constantly lights, the corresponding channel is likely to enter clipping and you have to reduce 
the input’s amplification using the gain control. The peak LED lights at a level of 8 dB below clipping. 
Make sure that the Peak LED lights only briefly during dynamic peaks. 
 

12. Level 

The level control allows you to control the volume of a single channel. 
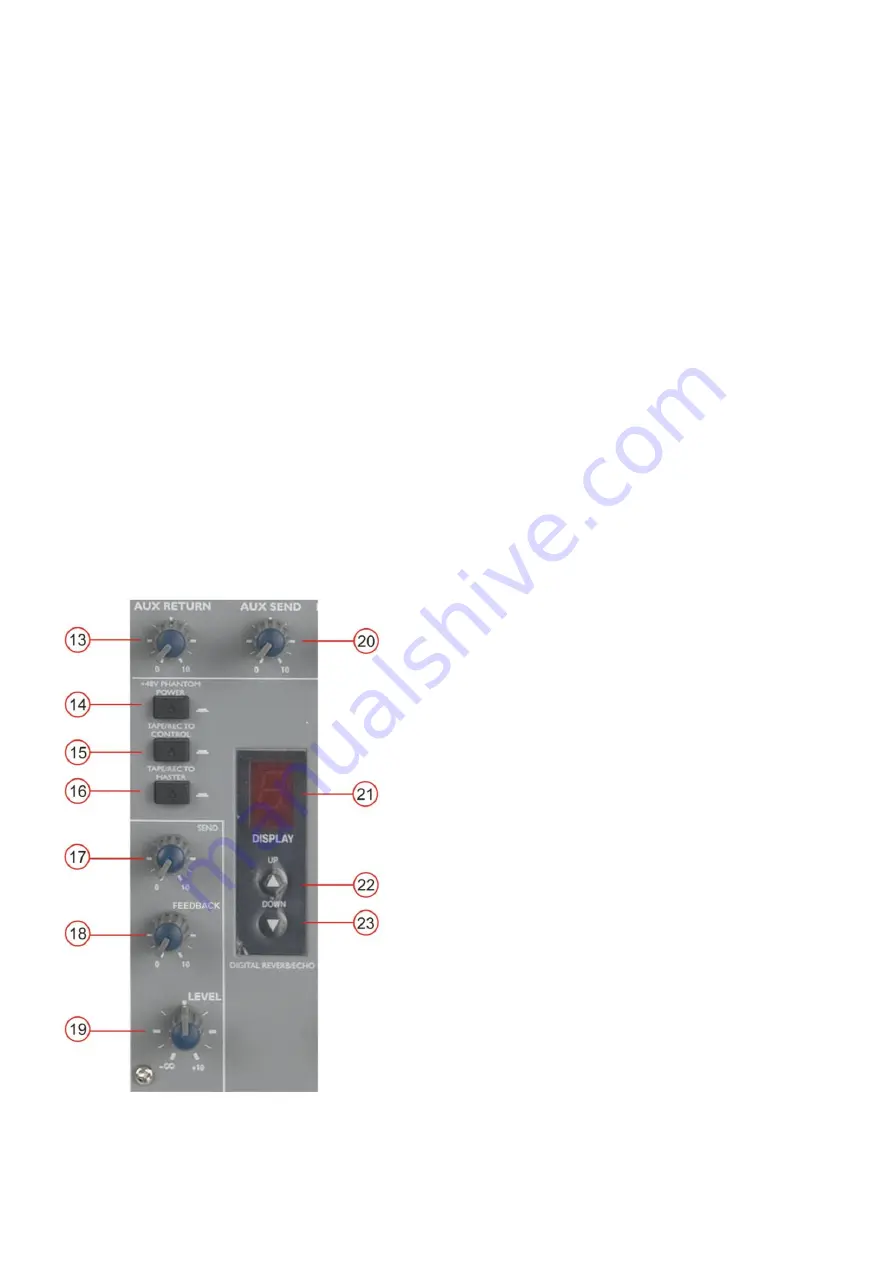


13. Aux return 


This control allows you to control the aux level in the  


main mix.


14. Phantom Power Switch 

Press this button to turn the phantom power +48V on. 
Do not connect any unbalanced microphones with 
the phantom power switched on. The red 

Phantom 

LED (26)

 will light if the phantom power is activated. 


15. Tape/rec to control


Use this button to assign the 

tape in (33)

 input to the 

Phones/Control bus. The level of the 

tape in (33)


input is fixed.    


16. Tape/rec to master


Use this button to assign the 

tape in (33)

 input to the 

master bus. The level of the 

tape in (33)

  input is fixed.  


17. Send


This control allows you to adjust the input for the built 
in DSP echo effect. Make sure not to overload the 
DSP input. 


18. Feedback 

This control allows you to control the effect feedback 
level of the built in echo effect. The number of times 
the delay sound is repeated, increases if the knob is 
turned clockwise.


Summary of Contents for D2260

Page 1: ...GIG 6 ORDERCODE D2260...

Page 2: ...Audio for more excellent audio products We design and manufacture professional audio equipment for the entertainment industry New products are being launched regularly We work hard to keep you our cus...

Page 3: ...rating Determinations 3 Return Procedure 4 Claims 4 Description 5 Features 5 Overview 5 Front panel 6 Back panel 8 Installation 8 Function 9 Set up and operation 13 Connection Cables 13 Maintenance 14...

Page 4: ...er and do not use the system To maintain perfect condition and to ensure a safe operation it is absolutely necessary for the user to follow the safety instructions and warning notes written in this ma...

Page 5: ...cur it is necessary to reduce the input signal level by using the INPUT control To emphasize a frequency range you don t necessarily have to move its respective control upward try lowering surrounding...

Page 6: ...ethod to use Note If you are given an RMA number please include the following information on a piece of paper inside the box 1 Your name 2 Your address 3 Your phone number 4 A brief description of the...

Page 7: ...ersatile mixer with 16 build in DSP echo presets The USB port gives you the possibility to connect a PC or MAC and record your mix or use as external input source It is an ideal mixer for small venues...

Page 8: ...3 Left line input stereo channel 3 6 4 Trim control 5 Right line Input stereo channel 3 6 6 EQ high control range 15 15 dB 7 EQ mid control range 15 15 dB 8 EQ low control range 15 15 dB 9 Aux eff lev...

Page 9: ...to control switch 16 Tape rec to master switch 17 Send control 18 Return control 19 Level control 20 Aux send control 21 Display 22 Up button 23 Down button 24 Headphones control room level 25 Power o...

Page 10: ...L R 36 Phones out Backpanel 37 AC adapter input 38 USB connector 39 Power on off Installation Remove all packing materials from the GIG 6 Check that all foam and plastic padding is removed Connect al...

Page 11: ...Line input When using a mono device always connect it to the Left mono input Note When connecting signal sources please make sure that the corresponding channel level controls and the master mix cont...

Page 12: ...tion within the stereo image 11 Peak LED The peak indicator shows peak levels in a channel s incoming signal level If the red peak LED frequently blinks or constantly lights the corresponding channel...

Page 13: ...ED does not light make sure that the AC adapter is connected properly If the LED still doesn t light up after everything is connected right please contact your DAP audio dealer 26 Phantom Power LED Th...

Page 14: ...and sleeve ground Caution Depending on the type of headphones connected to the phones jack the Powermix is capable of producing very high output levels on the headphones output Therefore make sure to...

Page 15: ...e versa Connection Cables Take care of your cables always holding them by the connectors and avoiding knots and twists when coiling them This gives the advantage of increasing their life and reliabili...

Page 16: ...ectors are thoroughly dry before linking equipment or supplying electric power Troubleshooting DAP Audio GIG 6 This troubleshooting guide is meant to help solve simple problems If a problem occurs car...

Page 17: ...e inputs 20K Ohm Stereo inputs 10K Ohm Aux stereo return 10K Ohm CD Tape stereo input 10K Ohm Gain control Mono channels 30 dB Stereo channels 10 dB Aux FX 10 dB T H D 0 005 Any output 1Khz 14dBu 20Hz...

Page 18: ...16 Appendix 1 GIG 6 block diagram...

Page 19: ...2011 Dap Audio...

Reviews: