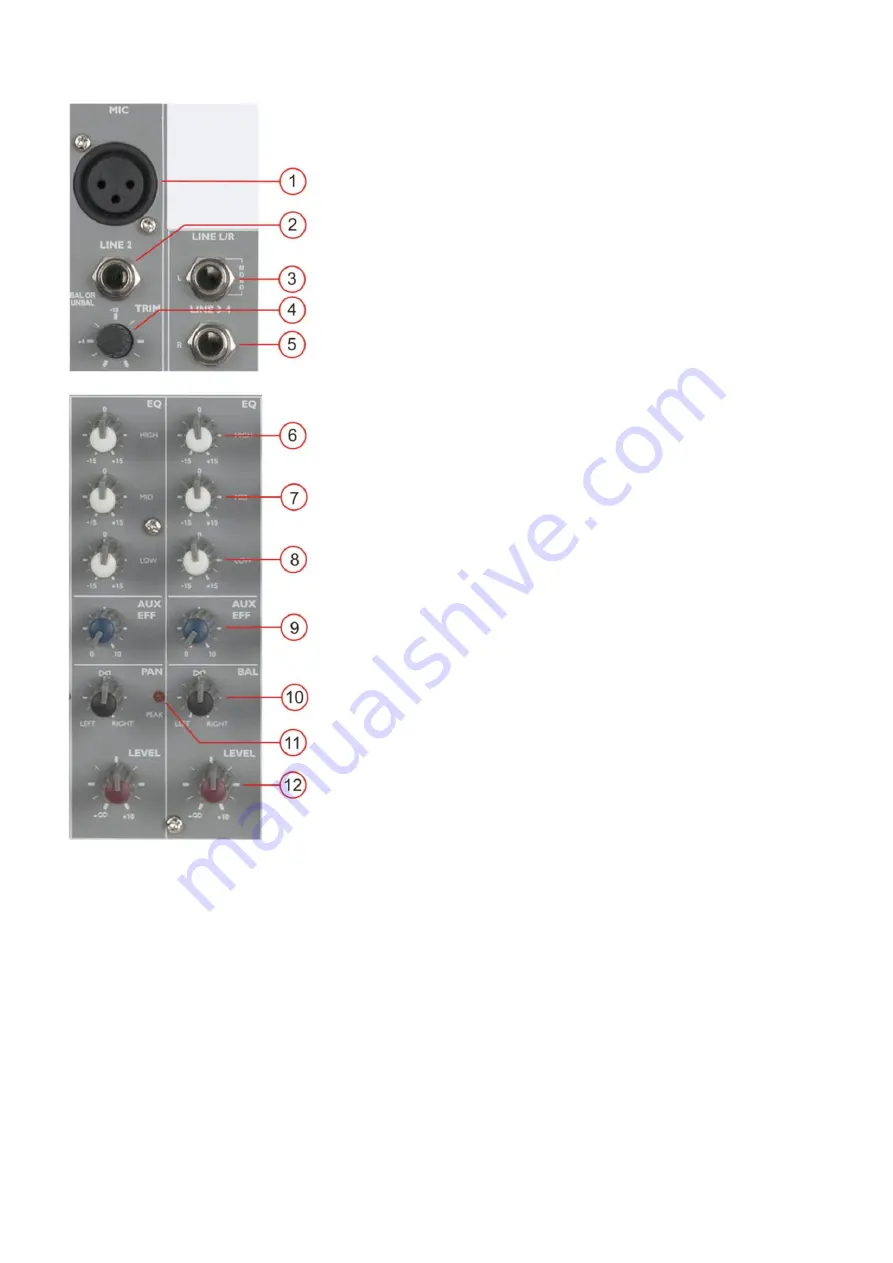
background image


Functions 


1.Mic 


Electronically balanced XLR-type inputs for connecting low- 


impedance microphones. The input provides extremely low noise  


and low hum signal processing. When connecting a microphone  


make sure that the pin assignment is correct. Always make sure to  


read the manual of the microphone you want to connect. The XLR-


inputs are not suitable for connecting line level signals like an  


additional mixing console, FX-unit, etc. You have to use the LINE- 


inputs, when connecting this kind of equipment.


2. Line 


Electronically balanced inputs for connecting a keyboard, CD  


player, mixer, etc. You can connect balanced or unbalanced  


signal sources to the Line input. Do not connect signal devices to a 


channel’s MIC and LINE input at the same time. This will cause  


mutual interference, which results in level reduction. 


Note: When connecting signal sources, please make sure that the  


corresponding channel faders and the master faders are at their  


minimum settings. Otherwise  plug-in noise can occur. 


3/ 5. LINE in  


Unbalanced stereo inputs for connecting a keyboard, CD player,  


mixer, etc. You can connect unbalanced signal sources to the Line 


input. When using a mono device, always connect it to the Left 

(mono)  

input. 


Note: When connecting signal sources, please make sure that the  


corresponding channel level controls and the master mix control 


are at their minimum settings. Otherwise plug-in noise can occur. 


4. Trim  


Mic Channel input level is determined by the Gain control. With the 


Gain control you can adjust the MIC or LINE input-sensitivity, while  


optimally matching the incoming signals to the mixer’s internal  


operation level. The high gain of this mixer is  ideal when dealing  


with very low input levels (i.e. vocal recordings or distant sound  


sources). 


How to set the Input level: 
1)

 Set the trim control and the corresponding level control to their minimum setting.


2)

 Connect the desired sound source (CD player, microphone, etc.) to the corresponding mic or line 

input.


3)

 Play the sound source at its highest volume setting; respectively, sing or speak as loud as possible 

directly into the microphone.


4)

 While doing so, adjust the input level using the gain control, so that during the loudest passages the 

peak LED (11)

 only blinks occasionally.


This basic channel setting leaves you at least 8dB headroom. This means, you have at least 8dB before 
signal clipping. If you want to make further adjustments to the channel’s EQ setting, you should repeat 
step 

3

 and 

4

 again. 


Summary of Contents for D2260

Page 1: ...GIG 6 ORDERCODE D2260...

Page 2: ...Audio for more excellent audio products We design and manufacture professional audio equipment for the entertainment industry New products are being launched regularly We work hard to keep you our cus...

Page 3: ...rating Determinations 3 Return Procedure 4 Claims 4 Description 5 Features 5 Overview 5 Front panel 6 Back panel 8 Installation 8 Function 9 Set up and operation 13 Connection Cables 13 Maintenance 14...

Page 4: ...er and do not use the system To maintain perfect condition and to ensure a safe operation it is absolutely necessary for the user to follow the safety instructions and warning notes written in this ma...

Page 5: ...cur it is necessary to reduce the input signal level by using the INPUT control To emphasize a frequency range you don t necessarily have to move its respective control upward try lowering surrounding...

Page 6: ...ethod to use Note If you are given an RMA number please include the following information on a piece of paper inside the box 1 Your name 2 Your address 3 Your phone number 4 A brief description of the...

Page 7: ...ersatile mixer with 16 build in DSP echo presets The USB port gives you the possibility to connect a PC or MAC and record your mix or use as external input source It is an ideal mixer for small venues...

Page 8: ...3 Left line input stereo channel 3 6 4 Trim control 5 Right line Input stereo channel 3 6 6 EQ high control range 15 15 dB 7 EQ mid control range 15 15 dB 8 EQ low control range 15 15 dB 9 Aux eff lev...

Page 9: ...to control switch 16 Tape rec to master switch 17 Send control 18 Return control 19 Level control 20 Aux send control 21 Display 22 Up button 23 Down button 24 Headphones control room level 25 Power o...

Page 10: ...L R 36 Phones out Backpanel 37 AC adapter input 38 USB connector 39 Power on off Installation Remove all packing materials from the GIG 6 Check that all foam and plastic padding is removed Connect al...

Page 11: ...Line input When using a mono device always connect it to the Left mono input Note When connecting signal sources please make sure that the corresponding channel level controls and the master mix cont...

Page 12: ...tion within the stereo image 11 Peak LED The peak indicator shows peak levels in a channel s incoming signal level If the red peak LED frequently blinks or constantly lights the corresponding channel...

Page 13: ...ED does not light make sure that the AC adapter is connected properly If the LED still doesn t light up after everything is connected right please contact your DAP audio dealer 26 Phantom Power LED Th...

Page 14: ...and sleeve ground Caution Depending on the type of headphones connected to the phones jack the Powermix is capable of producing very high output levels on the headphones output Therefore make sure to...

Page 15: ...e versa Connection Cables Take care of your cables always holding them by the connectors and avoiding knots and twists when coiling them This gives the advantage of increasing their life and reliabili...

Page 16: ...ectors are thoroughly dry before linking equipment or supplying electric power Troubleshooting DAP Audio GIG 6 This troubleshooting guide is meant to help solve simple problems If a problem occurs car...

Page 17: ...e inputs 20K Ohm Stereo inputs 10K Ohm Aux stereo return 10K Ohm CD Tape stereo input 10K Ohm Gain control Mono channels 30 dB Stereo channels 10 dB Aux FX 10 dB T H D 0 005 Any output 1Khz 14dBu 20Hz...

Page 18: ...16 Appendix 1 GIG 6 block diagram...

Page 19: ...2011 Dap Audio...

Reviews: