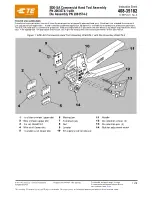
WARNING!
Risk of squeezing!
When the die system closes, there is a risk of getting squeezed
between the die and the work piece.
• Open the crimping tool only so much that the hose may be in-
serted and/or removed easily.
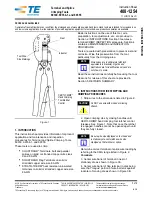
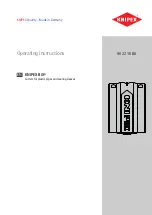
5.3 Changing the crimping dies
Positioning the crimping dies
1.
Completely open the crimping tool.
Slowly open the drainage valve hand wheel.
WARNING!
Risk of squeezing!
When the die system closes, there is a risk of getting squeezed
between the dies.
• Only replace the crimping dies when the machine is switched
off.
2.
Using the retaining bolt, insert the crimping die (2) into the
mounting hole (3) of the base die (1).
3.
Insert all eight crimping dies (2) one after the other.
Summary of Contents for ET4100
Page 1: ......
Page 3: ......
Page 46: ...9 1 Machine overview...
Page 53: ...Retaining bolt Crimping die profile 262 263 239 266 232 237 554 245 246 247 245 114 4 x x x...
Page 54: ...9 6 Hydraulic diagram...
Page 56: ......
Page 58: ......
Page 59: ......
Page 60: ......