AKD 5000
■
Quick Setup
■
Introduction to Quick Setup
This Quick Setup will guide you through EMC correct
installation of the frequency converter by connecting
power, motor and control wiring (fig. 1). Start/stop
of motor is to be done with the switch.
Fig.
1
■
1. Mechanical Installation
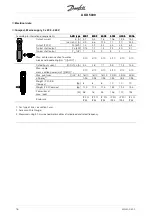
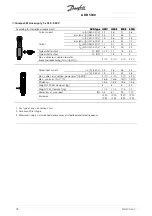
AKD 5000 frequency converters allow side-by-side mounting. The necessary cooling demands a free
air passage of 10 cm above and below the frequency converter (5016-5062 380-500 V and 5008-5027
200-240 V must have 20 cm).
Drill all holes by using the measurements stated in the table. Please note the difference in unit voltage. Place
the frequency converter on the wall. Tighten up all four screws.
All the below listed measurements are in mm
AKD type
A
B
C
a
b
Compact IP 20, 200–240 V (Fig. 4)
5001 - 5003
395
220
160
384
200
5004 - 5006
395
220
200
384
200
5008
560
242
260
540
200
5011 - 5016
700
242
260
680
200
5022 - 5027
800
308
296
780
270
Compact IP 20, 380–500 V (Fig. 4)
5001 - 5005
395
220
160
384
200
5006 - 5011
395
220
200
384
200
5016 - 5022
560
242
260
540
200
5027 - 5032
700
242
260
680
200
Compact IP 54, 200–240 V (Fig. 3)
5001 - 5003
460
282
195
260
258
5004 - 5006
530
282
195
330
258
5008 - 5011
810
350
280
560
326
5016 - 5027
940
400
280
690
375
Compact IP 54, 380–500 V (Fig. 3)
5001 - 5005
460
282
195
260
258
5006 - 5011
530
282
195
330
258
5016 - 5027
810
350
280
560
326
5032 - 5062
940
400
280
690
375
5042 - 5062
800
308
296
780
270
Fig.
2
Fig.
3
Fig.
4
MG.50.R3.02 -
6


