background image

Service Manual 

Series 45 J Frame Open Circuit Axial Piston Pumps

520L0607

 • Rev AI • Sep 2013

13

Features (continued)

Control Options

(continued)

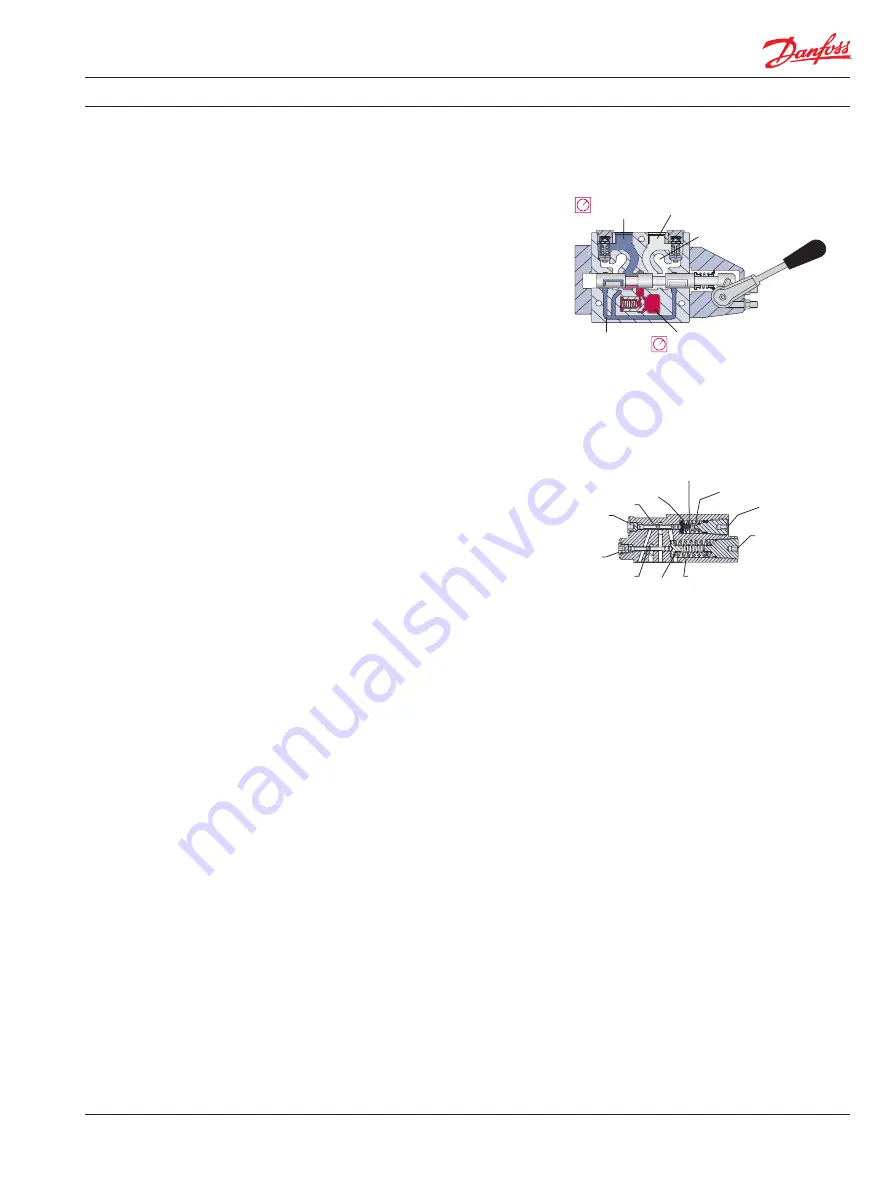
LS control

The LS control design matches pump flow with 

system demand. The LS control senses the flow 

demand of the system as a pressure drop across 

the 

E

xternal 

C

ontrol 

V

alve (ECV). As the ECV 

opens and closes, the pressure delta across the 

valve changes. When opening, the delta 

decreases. When closing, the delta increases. The 

LS control then increases or decreases pump 

flow to the system until the pressure delta 

becomes equal to the LS setting as defined by 

the LS adjusting plug (7) and spring (8).

L oad 

pressur e 

L oad sense 

pressur e 

System 
pressur e 

T ank 

Retur n 

pressur e 

P101 665E 

Typical load-sensing control valve

Pressure drop across external control valve defines 
system demand

The LS control consists of two spool valves that 

connect the servo piston either to pump case or 

system pressure. The PC spool (6) controls the 

pressure-compensating function of the control 

as previously described. The LS spool (9) controls 

the load-sensing function. The PC spool has 

priority over the LS spool.

Through internal porting, system pressure 

(upstream of ECV) is applied to the non-spring 

end of the LS spool, and through hydraulic line 

connected at port X, LS pressure (downstream of 

ECV) is applied to the spring end. This 

arrangement allows the LS spool to act on the 

delta between system pressure and LS pressure. 

The LS spring sets the threshold of operation (LS 

setting).

Because the swashplate is biased to maximum angle, the pump attempts to deliver full flow to the 

hydraulic system. When the flow being delivered exceeds demand, the pressure delta across the ECV 

is great enough to overcome spring force and shift the LS spool porting system pressure to the servo 

piston. The pump de-strokes reducing flow until the delta across the ECV becomes equal to the LS 

setting. When flow being delivered is less than demand, the delta across the ECV drops below the LS 

setting and the LS spring shifts the spool connecting the servo piston to pump case. The pump 

strokes increasing flow until the delta across the ECV becomes equal to the LS setting.

When the external control valve is placed in neutral, it connects the LS signal line to drain. With no LS 

pressure acting on the non-spring end of the LS spool, the pump adjusts stroke to whatever position 

necessary to maintain system pressure at the LS setting. The pump is now in standby mode. 

Because of the series arrangement of the LS and PC spools, the PC spool will override the LS spool. If 

at any time system pressure reaches the PC setting, the PC spool will shift blocking the passage that 

connects the LS spool with the servo piston and porting system pressure to the servo piston causing 

the pump to destroke.

LS spool shifts to port system pressure to servo 
piston

Cross-section LS control

Spool

Spring
guide

Spring

LS adjusting 
plug

LS spring

PC adjusting
plug

Plug

Plug

Spool

Spring
guide

Spring
(PC heavy)

P104 051

Summary of Contents for 45 J Series

Page 1: ...powersolutions danfoss com MAKING MODERN LIVING POSSIBLE Service Manual Series 45 J Frame Open Circuit Axial Piston Pumps...

Page 2: ...foss conversion AI December 2012 9 Displacement limiter is available change to max pressure AH October 2012 various add electric controls AG November 2010 last new last page AF February 2010 last Fix...

Page 3: ...ns 9 Hydraulic parameters 10 Inlet pressure 10 Pressure compensator valve setting 10 Case pressure 10 Hydraulic fluid 10 Fluid viscosity 10 Filtration 10 Auxiliary mounting pads 11 Input shafts 11 Con...

Page 4: ...Rev AI Sep 2013 4 Contents continued Adjustments Minor repair PC control 21 LS control 22 Shaft seal replacement 23 Auxiliary pads 24 LS and PC Controls 25 LS and PC Controls continued 26 Electric Co...

Page 5: ...you are cut by hydraulic fluid Personal safety Warning Protect yourself from injury Use proper safety equipment including safety glasses at all times Introduction Overview Safety Precautions This manu...

Page 6: ...roduct or property Reusable part Non reusable part use a new part Non removable item Option either part may exist Superseded parts are not interchangeable Measurement required Flatness specification P...

Page 7: ...inlet and displaced to the outlet thereby imparting power into the system circuit A small amount of fluid is allowed to leak from the cylinder block valve plate and slipper swashplate interfaces for...

Page 8: ...valve integrated into the side module of the PVG valve The position of the PVG valve sets the demand for flow in the system and communicates this to the pump control by means of a hydraulic signal lo...

Page 9: ...dial Control types PC Remote PC LS LS with internal bleed Shafts Splined 13 tooth 14 tooth 15 tooth Tapered 31 75 mm 1 25 in 1 8 taper Straight 31 75 mm 1 25 in Displacement limiters Available Ratings...

Page 10: ...S continuous minimum 9 58 maximum 110 500 intermittent minimum 6 4 47 maximum cold start 1000 4700 Filtration Required cleanliness level ISO 4406 Class 18 13 or better Refer to Danfoss publications Fl...

Page 11: ...rcuit Pumps Technical Information 520L0676 Auxiliary mounting pads are available for all radial ported Series 45 pumps These pads are typically used for mounting auxiliary hydraulic pumps Since the au...

Page 12: ...metering system pressure to the servo piston PC control The PC control design maintains a constant pressure in the hydraulic circuit as flow varies The PC control modulates pump flow accordingly to m...

Page 13: ...between system pressure and LS pressure The LS spring sets the threshold of operation LS setting Because the swashplate is biased to maximum angle the pump attempts to deliver full flow to the hydrau...

Page 14: ...pump to be operated at any pressure limit between the Load Sense and Pressure Compensation settings by varying the current sent to the solenoid Electric On Off Controls PLUS 1 Compliance All Series 4...

Page 15: ...tect gauges The illustration below shows gauge port locations Recommended pressure gauges and fittings are in the table Gauge port locations Pressure measurement Required Tools Port Locations and Gaug...

Page 16: ...e watching the pressure gauge installed at M1 jog the prime mover or run at the lowest possible speed until system pressure builds to normal levels minimum 11 bar 160 psi Once system pressure is estab...

Page 17: ...he filter Replace all fluid lost during filter change To ensure optimum life of Series 45 products perform regular maintenance of the fluid and filter Contaminated fluid is the main cause of unit fail...

Page 18: ...scription Action Check external system relief valve setting Low external relief valve setting slows down system Adjust external relief valve setting following manufacturer s recommendations External r...

Page 19: ...r to proper level Hydraulic fluid viscosity above acceptable limits Fluid viscosity above acceptable limits or low fluid temperature will not allow the pump to fill or control to operate properly Allo...

Page 20: ...setting presents pressure compensation Adjust external relief valve according to manufacturer s recommendations External relief valve must be set above PC setting to operate properly Inspect PC contr...

Page 21: ...ystem relief valve may require adjustment External system relief valve must be set above the PC setting for proper operation 4 While holding the position of the PC adjusting plug torque the PC set scr...

Page 22: ...to the LS remote PC signal line port X C 2 Start the prime mover and allow fluid to reach normal operating temperature Slowly operate a hydraulic function that will demand approximately half flow from...

Page 23: ...h a packing hook or use a slide hammer type puller to remove the seal Installation 4 Inspect the pump housing and new seal for damage Inspect the sealing area on the shaft for rust wear or contaminati...

Page 24: ...liary mounting pads Installation 4 Lubricate new O ring J090 with petroleum jelly Install the pad adapter to the endcap 5 Install the 4 screws J100 and torque to 48 5 61 N m 35 45 lbf ft 6 Install the...

Page 25: ...gs C114 C115 and seat C113 Discard the C118A O ring 7 Remove the C104 plug C104A O ring and C112 LS spool from the control housing discard the O ring Note orientation of the spool for reassembly Inspe...

Page 26: ...until flush then make another full turn Install and torque the PC set screw C102 to 7 5 10 8 N m 5 5 8 lbf ft For PC only controls skip steps 15 through 17 15 Install the LS spool C112 spherical end f...

Page 27: ...and discard the two interface O rings C154 9 For electric proportional controls only Remove the electric control manifold drain orifice C149 10 Remove plug C153 Remove the cartridge valve nut C125 ele...

Page 28: ...5 5 8 lbf ft 7 Install the electric control manifold drain orifice C149 and torque to 2 3 4 N m 18 30 in lb 8 Install the cartridge valve C150 into the electric control manifold C152 Torque to 25 8 28...

Page 29: ...rol Orifice Reassembly 1 Install the orifice G020 and torque to 2 3 4 N m 18 30 in lb Then install the orifice backup plug G030 and torque to 2 3 4 N m 18 30 in lb 2 Install the PC spool C132 spherica...

Page 30: ...d torque as indicated here This drawing is a composite Your configuration may differ but here is the appropriate wrench size and torque J041A J041 K040 K070A K070 3 8 inch 55 135 N m 40 100 lbf ft 1 4...

Page 31: ...Service Manual Series 45 J Frame Open Circuit Axial Piston Pumps 520L0607 Rev AI Sep 2013 31 Notes...

Page 32: ...ase contact the Danfoss Power Solution representative nearest you Products we offer Bent Axis Motors Closed Circuit Axial Piston Pumps and Motors Displays Electrohydraulic Power Steering Electrohydrau...

Reviews: