background image


4.3.4. ETHERNET (Dual Ethernet port)

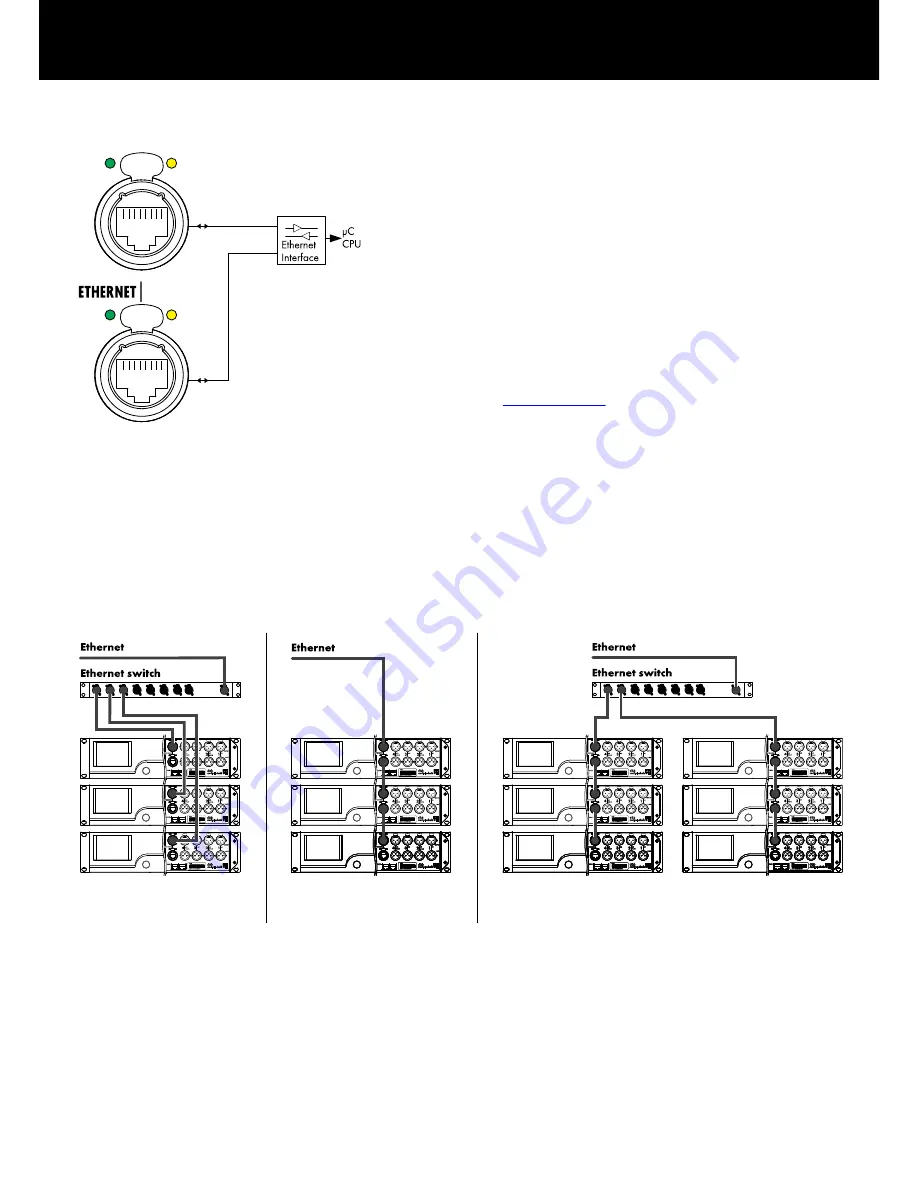
A Dual Ethernet port with a built-in 2-port Ethernet switch

(10/100 Mbit/peer-to-peer) is provided enabling remote control

via Ethernet and allows the following physical network topologies:

Star topology

Recommended standard,

Daisy chain topology

For a maximum of three devices,

or a combination of both topologies.

Note: In a daisy chain topology, if one device fails or is

switched off, this also affects all subsequent devices which are

then no longer connected to the network either.
A detailed description of remote control via Ethernet is given in

the technical information TI 310 (d&b code D5310.EN) which

can be downloaded from the d&b website at

www.dbaudio.com

.

LED indicators
The two LED indicators above the respective connector in use

indicate the following states:

Green

Illuminates permanently when the device is connected

to an active network and flashes as long as a data

stream is transmitted.

Yellow

Is off when the speed is 10 Mbit.

Illuminates permanently when the speed is

100 Mbit.

Network topologies


Star topology


Daisy chain topology for a
maximum of three devices


Combined topology


d&b D80 Manual 1.8 en

18

Summary of Contents for D80

Page 1: ...D D80 Manual 1 8 en ...

Page 2: ...ebsite for the latest version of this manual When reselling this product hand over this manual to the new customer If you supply d b products please draw the attention of your customers to this manual Enclose the relevant manuals with the systems If you require additional manuals for this purpose you can order them from d b d b audiotechnik GmbH Eugen Adolff Strasse 134 D 71522 Backnang Germany T ...

Page 3: ...d the point where it exits from the apparatus 9 The unit is intended for use in a 19 rack Follow the mounting instructions When a rack on wheels is used exercise caution when moving the loaded rack to avoid injury from tipping over 10 Unplug this apparatus during lightning storms or when unused for long periods of time 11 Never connect an output pin to any other amplifier input or output pin or to...

Page 4: ...ons 22 5 User interface 23 5 1 Operating concept 23 5 2 Screen layout and conventions 24 5 3 Screen items and views 24 5 3 1 Function buttons 24 5 3 2 Navigation buttons 24 5 3 3 Input fields 25 5 3 4 Input masks 25 5 3 5 Information fields 25 6 Home screen 26 6 1 Header area Device 27 6 2 Data area Channel strip s 27 7 Channel strip 28 8 Basic settings Quick reference 30 9 Device setup 32 9 1 Dev...

Page 5: ...orrection PFC 65 12 1 2 Automatic mains range selection 65 12 1 3 Mains voltage monitoring 65 12 1 4 Mains inrush current limiter 66 12 1 5 Mains supply requirements 66 12 1 6 Generator operation UPS requirements 67 12 2 Power amplifiers 67 12 3 Cooling fans 68 12 4 Current power draw and thermal dissipation 68 13 Service Maintenance and care 70 13 1 Service 70 13 2 Maintenance and care 70 13 2 1 ...

Page 6: ... all d b loudspeakers and provide comprehensive management and protection capabilities This high performance amplifier provides the power density required for both touring and installation purposes while the powerful signal processing extends the level of functionality of the on board features The user interface of the amplifier consists of two elements a color TFT touch screen providing visual in...

Page 7: ...nction which covers a bandwidth of up to 20 kHz preserves the tonal balance when cable lengths of up to 70 m 230 ft are used Due to its design LoadMatch does not require additional wires and is therefore applicable with any connector type used To provide optimum compensation cable length and cross sectional data as well as the number of loudspeakers connected to the amplifier channel can be entere...

Page 8: ... V 50 60 Hz low range Mains fuse internal Power consumption typical values Standby 9 W Idle 180 W Max power consumption short term RMS 7000 W Audio input connectors INPUT analog A1 A4 3 pin XLR female Pin assignment 1 GND 2 pos 3 neg Input impedance 38 kOhms electronically balanced Common mode rejection CMRR 100 Hz 10 kHz 70 50 dB Maximum input level balanced unbalanced 25 17 dBu 27 dBu 0 dBFS LIN...

Page 9: ...noise or Sine wave 10 Hz 20 kHz Operating conditions Temperature range 10 C 40 C 14 F 104 F continuous operation Temperature range 10 C 50 C 14 F 122 F reduced output power or short term operation Storage temperature 20 C 70 C 4 F 158 F Humidity rel long term average 70 Fan noise emission Rack mounted measured on axis 1 m to front panel A weighting Idle 34 dB A Ambient temperature 22 C 71 6 F Max ...

Page 10: ...d b Code Description 1 1 Z2710 d b D80 Amplifier dependent on chosen output option NL4 or EP5 output connectors Including 2 1 Z2620 xxx Power cord D80 specific to country 3 1 K6007 050 RJ 45 Patch cable 0 5 m 1 6 ft CAT 6 AWG 24 STP shielded twisted pair to be used for daisy chaining multiple amplifiers within a rack 4 1 Z6116 RJ 45 M Terminator for terminating the last device of a CAN Bus segment...

Page 11: ...s Refer to Þ Chapter 4 3 2 Audio INPUT and LINK connectors on page 16 4 ETHERNET Refer to Þ Chapter 4 3 4 ETHERNET Dual Ethernet port on page 18 5 CAN CAN Bus Refer to Þ Chapter 4 3 5 CAN CAN Bus on page 19 Controls and indicators User interface 7 3 5 TFT color touch screen 8 Rotary encoder SCROLL EDIT Refer to Þ Chapter 4 4 Controls and indicators on page 20 and Þ Chapter 5 User interface on page...

Page 12: ... factor to ensure operational safety of the power amplifiers The D80 amplifier is equipped with three internal fans that draw cool air from the front into the housing and channel the warm air towards the back of the device Please ensure that adequate cool airflow is provided Do not block or cover the front panel air intake or the vents on the rear panel If amplifiers are installed in sealed cabine...

Page 13: ...re adequate cooling airflow D80 Touring rack assemblies can be positioned side by side or stacked When combining the Z5330 D80 Touring rack assembly with the Z5310 D12 Touring rack assembly or any other rack assembly that produces an opposing airflow observe the following restrictions D12 D80 Touring rack assemblies can be positioned side by side Do not stack D80 and D12 Touring racks or any other...

Page 14: ... only If there is any sign of obvious damage to the power cord and or mains connector do not use the power cord and replace it before further use Please ensure the mains connector is accessible at any time to disconnect the unit in case of malfunction or danger If the mains plug is not readily accessible due to mounting in a 19 rack then the mains plug for the entire rack must be readily accessibl...

Page 15: ...ains voltage Frequency Current 100 120 V 50 60 Hz 30 A 230 240 V 50 60 Hz 15 16 A Before connecting the device to mains voltage check that the mains voltage and frequency correspond to the specifications on the rating label next to the mains connector socket on the rear panel of the unit A powerCON HC mains connector socket 1 is fitted on the rear panel and an appropriate power cord 2 is supplied ...

Page 16: ...el to input Digital INPUT and LINK D1 2 D3 4 The input connectors 2 D1 2 and 4 D3 4 can be configured as AES EBU AES 3 inputs individually Note When configuring the digital inputs the remaining input and link output connectors 1 A1 and or 3 A3 are disabled The corresponding digital LINK output 2 4 can be used to feed a refreshed input signal to the next device in the signal chain The signal shape ...

Page 17: ...applicable output modes and how to configure the appropriate output mode is given in Þ Chapter 9 3 1 Output mode on page 37 For further information regarding the applicable output modes for each loudspeaker system please refer to the relevant loudspeaker manual 4 CHANNEL OUTPUT NOTICE The 4 CHANNEL OUTPUT connector is only intended as an interface to a rack panel or to loudspeaker multicores and b...

Page 18: ...onger connected to the network either A detailed description of remote control via Ethernet is given in the technical information TI 310 d b code D5310 EN which can be downloaded from the d b website at www dbaudio com LED indicators The two LED indicators above the respective connector in use indicate the following states Green Illuminates permanently when the device is connected to an active net...

Page 19: ...ng either to be used as input or output daisy chaining or for terminating the CAN Bus network Pin assignment The pin assignments of both the RJ 45 sockets and the cable connectors are shown in the graphic opposite Note The connections for the CAN Bus are referenced to common ground The CAN Ground is routed via the cable shielding and is hardwired to PE Within the CAN Bus network shielded cables an...

Page 20: ... of a 3 5 TFT color touch screen 7 with a resolution of 320 x 240 pixels and an additional digital rotary encoder 8 The resistive touch screen responds to pressure and therefore can be operated by a fingertip even when wearing gloves or by an appropriate stylus tip pen NOTICE The touch panel utilizes a thin flexible sheet that may be damaged by sharp objects or heavy treatment Due to the wide rang...

Page 21: ...ly and the power amplifiers are switched off to save energy and the loudspeaker outputs are electronically isolated The display and controls remain active to allow repowering of the device by remote control or by tapping the Power button on the Home screen Note When the device is set to Standby or the mains power is switched off the movement of the loudspeaker cones in the connected cabinets is no...

Page 22: ... mute or unmute a single channel or a pair of channels simply tap the respective Channel mute button Þ The Channel mute button displays the mute status of the relevant channel or pair of channels and the loudspeaker setup loaded Channel unmuted Master mute Mute all 1 To mute all channels simultaneously tap the Power button on the top right of the Home screen Þ A dialog appears allowing you to eith...

Page 23: ...em Access the selected item or function element by pushing the encoder Enter edit values by turning the encoder Confirm entered changed values or leave Edit mode by pushing the encoder Cursor conventions The graphical user interface features two types of cursors the Position and the Edit cursors Position cursor The Position cursor marks the selected Menu item by a white frame Depending on the type...

Page 24: ...screens 5 3 Screen items and views This section describes the different menu items views and function elements characterizing the user interface of the D80 5 3 1 Function buttons Properties The top left of the button shows the function name while the bottom right shows the status of the function In addition the status is also indicated by colors The function is activated by tapping the button on s...

Page 25: ... 4 Input masks Properties Appears automatically anytime you need to enter data to define a particular function The input mask provides you with an alphanumeric or numeric keypad to enter for example a device name or a channel name alphanumeric keypad or an IP address numeric keypad Selection and editing is performed using the touch screen or turning and pushing the encoder 5 3 5 Information fields...

Page 26: ... vertical access to the specific submenus while the tab structure on the right side of each submenu provides a clear horizontal order In addition the Home screen gives direct access to the Remote subscreen The Home screen can be accessed from any screen or menu at any level using the Home button Home screen access chart Hierarchy level 6 Home screen d b D80 Manual 1 8 en 26 ...

Page 27: ... following functions Cancel the sequence Mute all Master mute To unmute the channels use the individual Channel mute buttons Standby In Standby mode the device idles drawing minimal power consumption Only the most essential functions are provided The screen and network remain functional 6 2 Data area Channel strip s The data area features the actual channel strips starting with the input connector...

Page 28: ...Hz and the signal exceeds 57 dBFS Red OVL Overload Illuminates when the analog input signal exceeds 25 dBu or when the digital input signal exceeds 2 dBFS Channel view The Channel view button displays the Channel name If no Channel name has been entered the loudspeaker setup which is currently loaded is displayed In addition the activated function elements are indicated The button provides direct ...

Page 29: ...FS DSP suffers from an internal EQ filter overflow any limiter causes a gain reduction of 12 dB or more the output signal is limited to prevent distortion due to output peak current overload of 70 A Channel mute Þ To mute or unmute a single channel or a pair of channels simply tap the respective Channel mute button Þ The Channel mute button displays the mute status of the relevant channel or pair ...

Page 30: ...nding message will be issued 1 Device setup Þ On the Home screen tap the Device view button Þ This will enter the Device setup subscreen with the Input tab being active 2 Input Input mode Input routing Þ Define your Input mode and Input routing settings for all channels correspondingly Note A detailed description of the Input routing is given in the reference chapter of the Channel setup Þ Chapter...

Page 31: ...n in the reference chapter Þ Chapter 9 4 Remote on page 41 As all the configurations and settings mentioned above can also be defined remotely it depends on how you wish to proceed whether defining the Remote settings is the last or the first step when configuring your basic settings After defining all settings exit the subscreen by tapping the Home button and carry on with the individual channel ...

Page 32: ...Device setup access chart Hierarchy level 9 Device setup d b D80 Manual 1 8 en 32 ...

Page 33: ...t device name in the header of the device setup screen enables you to enter or edit the device name maximum length 15 characters The input mask which appears allows either lower case or upper case characters by toggling the corresponding button abc on the bottom left Wrong entries can be corrected by tapping the Erase button on the bottom right Tapping OK on the top right confirms the entry closes...

Page 34: ...pt either analog or digital input signals The operating mode of the corresponding link output connectors 2 and 4 depends on the set input mode 9 2 1 Input mode Input mode block diagram Analog Analog Both input connector pairs 1 2 and 3 4 are set to Analog an analog audio signal is accepted by inputs 1 2 3 and 4 d b D80 Manual 1 8 en 34 ...

Page 35: ... 3 4 is set to Digital a digital 2 channel audio signal is accepted by input 4 A3 by input 3 is not available Locking to either 48 or 96 kHz is indicated below In this case the sync source is input 4 Clocking To keep latency as short as possible the system does not utilize non clocked asynchronous Sample Rate Converters SRC The clock of the digital audio system is derived from an internal crystal ...

Page 36: ...ack or the Home button Þ The set Output mode will be activated and the corresponding channels will be muted Note Changing the Output mode directly affects the available range of loudspeaker setups On the Home screen the selected Output mode is displayed in the header area below the device name The channel strips below the Header section change depending on the chosen modes as shown below 2 x Dual ...

Page 37: ... A B AMP C D acts as a two channel amplifier stereo amplifier The amplifier channels are connected to their corresponding output connectors AMP A to OUT A while the audio input for each amplifier channel can be assigned via the input routing Each output connector is wired in parallel using the respective pins for TOP or SUB configurations Pin equivalents of NL4 and EP5 connectors in relation to th...

Page 38: ... both output connectors AMP A and AMP B to OUT A and OUT B while the audio input for each amplifier channel can be assigned via the input routing Two output connectors A B C D are wired in parallel using the respective pins for TOP and SUB configurations Pin equivalents of NL4 and EP5 connectors in relation to the output mode are listed in the table below NL4 SPEAKER OUTPUTS A B C D 1 Amp A C pos ...

Page 39: ...n be assigned via the input routing All settings of channel A C and the corresponding input signal are internally linked to channel B D Pin equivalents of NL4 and EP5 connectors in relation to the output mode are listed in the table below NL4 SPEAKER OUTPUTS A B C D 1 Amp A C pos LF 1 Amp A C neg LF 2 Amp B D pos MF HF 2 Amp B D neg MF HF EP5 SPEAKER OUTPUTS A B C D 1 Amp A C pos LF 2 Amp A C neg ...

Page 40: ...onfigurations such as AMP A B Þ Dual Channel AMP C D Þ 2 Way Active AMP A B Þ Dual Channel AMP C D Þ Mix TOP SUB AMP A B Þ Mix TOP SUB AMP C D Þ 2 Way Active as well as all other combinations are also possible Mixed configuration example AMP A B Þ Dual Channel AMP C D Þ 2 Way Active d b D80 Manual 1 8 en 40 ...

Page 41: ... a CAN network up to eight subnets can be defined values 0 to 7 Note In case of a Subnet mismatch the following message is issued at the bottom of the screen Remote ID exceeds 7 63 CAN disabled Device ID Using the two digit device ID for each subnet you can define a total of 63 devices values 1 to 63 9 4 2 Ethernet settings IP mode Tapping the field allows the following settings Auto DHCP When the...

Page 42: ...the Back button on the top left cancels any entry and switches back to the Remote screen keeping the previous entry Conn Shows which of the etherCON connectors is connected busy MAC Displays the fixed MAC address of the device Status Provides status information on the network 9 5 More Selecting the More tab provides further subscreens such as Preferences Info Levels Mains current limiter 9 5 1 Pre...

Page 43: ...on references can be changed An indication for this is when tapping a dedicated button the adjacent button is activated Or when individual buttons are no longer operable In such cases the Touch screen should be recalibrated To calibrate the Touch screen proceed as follows 1 Select Touch screen calibration Þ The Screen calibration menu will be opened guiding you through the calibration procedure 2 ...

Page 44: ...onfirms any new settings and exits the subscreen A corresponding message is displayed The device will be switched to the screen selected for Lock mode Unlocking the device If you attempt to change the status of the device while it is in Lock mode the following message will be issued Press encoder for 2s to unlock To unlock the device proceed as follows Press Press and hold the encoder for a minimu...

Page 45: ...be issued 9 5 1 3 Preferences More Selecting the More tab opens the corresponding subscreen which provides the following options Buzzer Enables the following settings Off The internal buzzer is switched off On The internal buzzer is switched on and serves as an acoustic signal in case of a device or channel error Single The internal buzzer generates an intermittent single tone Melody The internal ...

Page 46: ...will be prompted and the reset will start immediately 1 Switch off the device 2 Press and hold the encoder and repower the device Þ Long confirmation beep 3 Release the encoder and briefly press the encoder again within 2 sec Þ Short confirmation beep The device will boot up and will switch to the Home screen A corresponding message will be issued 9 5 2 Info Selecting Info provides basic informati...

Page 47: ...s Output Current output voltages of the individual amplifier channels Gainred Headr Relationship between headroom Headr and gain reduction Gainred with peak hold for 1 sec Display ranges Gainred 0 dB Þ 32 dB Headr 32 dB Þ 0 dB Impedance Current load impedance values for the individual amplifier channels Power Power currently delivered by the individual amplifier channels Temperature Current temper...

Page 48: ...he Mains Current Limiter function allows to set the maximum mains current draw of the device within the range of 95 to 50 of the nominal limit The Nominal current limit depends on the mains voltage range 16 A in high range 30 A in low range This may be useful when the onsite conditions require two devices to be operated per phase conductor or if the onsite circuit breaker is not sufficiently dimen...

Page 49: ...of all channels All U I Output voltage and current of all channels Y scale Scale of the measuring values in FS Full Scale 1 0 FS represents the maximum output voltage or output current Application examples The scope function is a useful tool for determining the signal quality determining a phase shift between the channels getting a rough impression of the crest factor checking the output channels ...

Page 50: ...Channel setup access chart Hierarchy level 10 Channel setup d b D80 Manual 1 8 en 50 ...

Page 51: ...e within the unit while setting up the user definable EQ as well as keeping an eye on the Input routing 10 1 Channel name Selecting the centered Information field button Edit channel name in the header of the Channel setup screen enables you to enter or edit the Channel name maximum length 15 characters The input mask which appears allows either lower case or upper case characters by toggling the ...

Page 52: ... Off status or the set values of the Configuration switches are indicated by the entry on the Channel view button of the corresponding channel strip as shown in the graphic opposite Note A detailed description of the filters available for each loudspeaker is given in the relevant loudspeaker manuals A detailed description of the CSA function Cardioid Subwoofer Array is given in the technical infor...

Page 53: ... to confirm the reset or cancel the sequence by tapping the Back button On the Home screen the On Off status of the equalizer is indicated by the entry EQ on the Channel view button of the corresponding channel strip as shown in the graphic opposite EQ layer curve Apart from the overall frequency response the following functions and status indicators are provided Header section EQ n On Off On Off ...

Page 54: ...equency center corner frequency adjustable from 20 Hz to 20 kHz On the top right of the Frequency FRQ input field the increment is displayed as an octave value When you tap the field for the first time the frequency increment is set to 1 6 octave When you tap the field again you can toggle between 1 6 and 1 96 octave increments To confirm the set frequency press the encoder Q BW Q of the filter ad...

Page 55: ... Input routing opens the corresponding subscreen The input sources can be selected individually per amplifier channel or pair of amplifier channels depending on the output mode setting 1 to 4 input sources can be selected per amplifier channel The first input source can be selected freely from all available input channels defined by input mode The second channel of the subsequent pair must be set ...

Page 56: ...epending on the loudspeaker cabinet connected the column header of the table for the Z values will change correspondingly provided the respective loudspeaker setup is loaded Status Brief indication of the current status of the calibration or check process In case of an error the status is indicated in red LF The calibration and check results for the LF section LF R The calibration and check result...

Page 57: ...setup A System check will only return valid impedance values when the amplifier had been either calibrated before with the respective load connected or a valid calibration file had been loaded using R1 10 8 Speaker Selecting Speaker opens the Speaker setup subscreen which enables the selection of loudspeaker setups for the applicable d b loudspeakers depending on the selected output mode The setup...

Page 58: ...set when you tap the Clear Clear all device settings button a dialog will pop up prompting you to confirm the reset or cancel the sequence by tapping the Back button Selecting the Clear button clears resets the following loudspeaker related settings of the respective channel Configuration switches Filter_1 Filter_2 Filter_3 are reset Level is set to 0 dB Delay settings are reset the selected unit ...

Page 59: ...speaker specific setups a LINEAR setup is also available allowing the D80 to be used as a linear power amplifier Note CUT in LINEAR setup Butterworth 2nd order 12 dB oct Corner frequency 110 Hz Amplifier gain 0 dB 31 dB d b D80 Manual 1 8 en 59 ...

Page 60: ...y connector type used To provide optimum compensation LoadMatch requires the entry of the following three parameters Cable length Length of the cable in meters in steps of 5 m Þ The corresponding length in ft is displayed on the bottom left of the input field Speaker count Number of cabinets connected Cross section Cross section in square millimeters mm2 in steps of 0 5 mm2 up to a maximum of 10 0...

Page 61: ...frequency generator on select either Sine or Pink noise depending on the desired signal Frequency The frequency is adjustable from 10 Hz to 20 kHz On the top right of the Frequency FRQ input field the increment is displayed as an octave value When you tap the field for the first time the frequency increment is set to 1 6 octave When you tap the field again you can toggle between 1 6 and 1 96 octav...

Page 62: ...a the Web Remote interface proceed as follows 1 Establish a connection between the etherCON connector of the amplifier and the router Þ Multiple amplifiers may be daisy chained to connect to one single port of the router After a while the Remote tab of the amplifier screen will display the IP address the DHCP server has assigned to the device 2 Type this address into the address field of the brows...

Page 63: ...00 records Once the maximum number of records is reached the system starts deleting the first ones Þ Ring buffer The number of records displayed depends on the size of the browser window Located on the right hand side of the record list are various Navigation buttons allowing you to scroll through the list using the Page Up Down or Line Up Down buttons or by directly jumping to the Latest record I...

Page 64: ...t Save to store the Event log data locally Þ Your web browser will display the corresponding dialog and the file will be saved as Event log to the local download directory you have specified in the download settings of your browser Commands This functionality is intended for service purposes only Licenses and Copyright Selecting the d b logo at the top left opens the Licenses and Copyright informa...

Page 65: ...s voltages other than the nominal voltages specified above the device switches to the adequate mode for either Protection or Operation The voltage thresholds are dependent on the slope of the mains voltage change Undervoltage Undefined Overvoltage The Main Power Supply is switched off In undervoltage state the auxiliary mains supply for device control only operates to a limited extend 0 Ü 75 Ü 133...

Page 66: ...e to the built in regulated power supply However the dynamic character of common audio signals may cause short time power peaks being twice as high as the average values The resulting higher current draw causes an increased voltage drop on the mains line which may reduce the available output power if it gets too high To ensure safe and stable operation observe the following recommendations and spe...

Page 67: ...tire system Assume a short time power draw of 7 kVA per D80 This is particularly important when using a UPS without dedicated short time overload capability Run the generator or UPS at 220 to 240 V if available 50 or 60 Hz is not an issue 12 2 Power amplifiers The power amplifiers fitted to the D80 utilize Class D technology similar to a switch mode power supply Compared to the known linear amplif...

Page 68: ...50 Hz 0 5 Ω Source impedance Mode Level Load Line current ARMS Power factor Input power W Output power sum W Power loss W Thermal dissipation BTU hr Thermal dissipation kCal hr POWER switch off 0 14 0 08 2 0 2 7 2 Standby 0 18 0 26 10 0 10 34 9 On idling 0 85 0 83 162 0 162 553 139 Signal CF 12 dB cont 4 Ω Ch 12 50 0 98 2780 2150 630 2150 542 Signal CF 9 dB cont 4 Ω Ch 18 00 0 98 4140 3136 1004 34...

Page 69: ...h 30 00 0 98 3600 2600 1000 3412 860 Signal CF 9 dB max 4 Ω Ch 54 00 0 99 6400 4000 2400 100 VAC 60 Hz 0 2 Ω Source impedance Mode Level Load Line current ARMS Power factor Input power W Output power sum W Power loss W Thermal dissipation BTU hr Thermal dissipation kCal hr POWER switch off 0 08 0 07 1 0 1 2 0 Standby 0 17 0 50 9 0 9 31 8 On idling 1 82 0 91 163 0 163 556 140 Signal CF 12 dB cont 4...

Page 70: ...e housing is damaged 13 2 Maintenance and care During normal operation the amplifier provides trouble free service Due to the cooling concept no dust filters are required thus no exchange or cleaning is necessary After a period of time the touch screen may require cleaning or calibration For this purpose proceed as follows 13 2 1 Touch screen cleaning If the touch screen requires cleaning use a so...

Page 71: ...ted Or when individual buttons are no longer operable In such cases the Touch screen should be recalibrated Calibration To calibrate the Touch screen proceed as follows 1 From the Home screen go to Device setup Þ More Þ Preferences Þ Display 2 Select Touch screen calibration Þ The Screen calibration menu will be opened guiding you through the calibration procedure 3 Follow the on screen instructio...

Page 72: ...ts If there are any further questions concerning the disposal of this product please contact d b audiotechnik 14 3 Licenses and Copyright This device includes software components released under different open source licenses These components are supplied together with the d b firmware A list of the components and a full text version of all licenses and copyrights can be accessed using the amplifie...

Page 73: ...thms using sine wave signals A DC resistance measurement using a multimeter may produce different results D80 amplifiers apply audible low level signals in the Low frequency region range using dedicated frequencies for each cabinet type for a few seconds reducing the impact of ambient temperature and mechanical aging of the driver components on the impedance values System Z LF D80 Z HF Z MF LF rea...

Page 74: ...5X SUB tbc E3 16 21 E4 17 11 E5 16 12 E6 24 20 E8 13 16 E9 9 13 F1222 8 5 15 J8 J12 5 5 15 8 J SUB 3 6 J INFRA 2 5 4 5 M2 3 5 8 M4 7 13 M6 8 13 MAX 7 15 MAX12 7 5 14 Q1 7 10 7 12 Q SUB 6 5 T10 14 16 T SUB 6 5 V8 12 8 18 V SUB 5 8 Y7P 10P 9 20 Y8 12 10 20 Y SUB 6 5 d b D80 Manual 1 8 en 74 ...

Page 75: ...r DSP Various 21 Invalid DSP Data Invalid DSP database Position d Error d Invalid DSP data DSP Software error 25 Program error u Program error d AWL error d in AWL d line d Program error DSP Various 28 SMPS comm error SMPS communication error status 04X SMPS communication fault DSP SMPS DSP or SMPS defect cable defect 29 SMPS firmware mismatch SMPS firmware V d 02d 02d not suitable for hardware id...

Page 76: ...ternal Mains Mains voltage is was too low or SMPS defect 45 Amp comm error Amp communication error status 04X Amp communication fault DSP Amp DSP or Amp defect 46 Amp firmware is too old Amp firmware version 4 2d is too old required is 4 2d Amp firmware version is older than required Amp Amp software error 50 Invalid device para Channel c invalid device parameters device ident d Invalid device par...

Page 77: ...wer uw Overcurrent on output External Cabling Short circuit 92 Amp temperature error Channel c Amp temperature error d C filter temp d C power uw Amp temperature error DSP Software fault on DSP 93 Filter overtemp d C Channel c Amp filter over temperature d C power uw Amp over temperature of output filters Amp Poor cooling 94 Amp clock fault Channel c Amp clock fault 3dkHz power uw Amp clock fault ...

Page 78: ...or CAN error d remote flags 02X dbCan flags 02X CAN error Remote ID External CAN cabling CAN cabling or multiple Remote IDs 122 CAN warning CAN warning d remote flags 02X dbCan flags 02X CAN warning External CAN cabling CAN cabling or multiple Remote IDs d b D80 Manual 1 8 en 78 ...

Page 79: ......

Page 80: ...D2020 EN 01 03 2015 d b audiotechnik GmbH www dbaudio com ...

Reviews: