370 S 370 S L 370 PP 370 PP L
22
On occasion you may need to recalibrate your blade protection device. Common problems that may create the need for
recalibration may be.
A: Low incoming voltage. When your incoming voltage is below the specified machine voltage, your amps being
consumed by the machine will increase. This will not effect the operation of the machine, but it may cause the blade protection
device to activate premature.
B: Voltage fluctuation of incoming power.
Warning signs of the need to recalibrate will be.
A: The blade protection will shut machine down when ever blade is started.
B: The blade protection device will active as soon as blade contacts work.
C: The blade protection device will active, while cutting, assuming the blade speed, blade pitch, blade condition, and
head feed rate is correct, and amp setting is set sufficient.
D: Another key to determine is if low incoming voltage is present is if machine will not stay powered up after turning
on the main power switch of the machine.
Note
: If the condition described in “D” above exists, another adjustment may be required. In the electrical panel you will find
a thermo overload. The overload will have a small adjusting wheel with amp rating shown on it. This overload (using this
adjusting wheel) will need to be adjusted. Moving this wheel one indicator line at a time will Increase the overload until
machine will power up normally.
CAUTION!!!
Do not mistake vise timers for this over load. (You will find the two vise timers mounted side by side, and should not be
adjusted, unless there is a need to speed up or slow down the timing of the vises.)
CALIBRATION
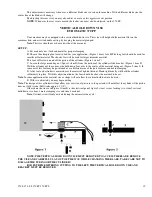
To calibrate the device, you will need to open the rear access door of the electrical panel. In the middle of the door
panel you will find a square inductive pick up, with a hole in the middle of this block that has wire running through the hole.
(See figure below) On the side of this block you will find two wires, connected to two of the four taps. To calibrate remove the
bottom wire only (wire B on the illustration), and place it on tap labeled 3. Start the saw and watch the LED’s on the device.
With the amp setting set at approx. halfway, the amp reading on the top line should be approx. two LED’s lit on the low speed.
If the amps on the top line are still too high move the tap to the number 4 tap.
Note
: Move the wire to the higher numbered taps, only as much as needed. If device does not activate after
adjustment during severe operation, recalibrate to the next lowest tap number.
Setting Length with the DRO 370PP
Note:
Power to the DRO module is battery powered. This battery has a 7 to 10 year life expectancy. This battery can be
purchased at most electronics store. If display blinks, or does not display replace battery.
Step 1.
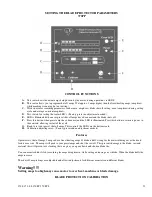
Setting the counter (DRO) at zero
Switch the cycle mode switch to the semi-automatic mode.
Summary of Contents for Euromatic 370 S
Page 9: ...370 S 370 S L 370 PP 370 PP L 9...
Page 10: ...370 S 370 S L 370 PP 370 PP L 10 Actual control panel layout may vari...
Page 32: ...370 S 370 S L 370 PP 370 PP L 32...
Page 33: ...370 S 370 S L 370 PP 370 PP L 33...
Page 38: ...ALIMENTAZIONE 230V 60Hz 230V 60Hz POWER SUPPLY POWER SUPPLY...
Page 39: ...HL4 ILLUMINAZIONE LAMA POWER SUPPLY...
Page 40: ...LAMPEGGIATORE LAMA IN MOTO 24VAC MORSA 24VAC EMERGENCIES...
Page 44: ...9 11 2 4 5 10 3 6 7 8 1 CH1 LC4HR424ACJ KA5 RITORNO CARRO COUNTER...
Page 45: ...TERMINAL...
Page 49: ...10 2 2019 Euromatic 370 2 Head Cylinder Unit Ref 005...
Page 51: ...10 2 2019 Euromatic 370 4 Bedplate Unit Ref 008...
Page 53: ...10 2 2019 Euromatic 370 6 Head Unit Ref 002...
Page 55: ...10 2 2019 Euromatic 370 8 Vise Unit Ref 004...
Page 57: ...10 2 2019 Euromatic 370 10 Group Feeder P R...
Page 59: ...10 2 2019 Euromatic 370 12 Group Alimentador P P Ref 014b Alimentador Ref 014b...


