370 S 370 S L 370 PP 370 PP L
23
Warning!!!!
The feeder vise must be placed in the forward position (This switch is located on the far right hand
side of the lower control panel)
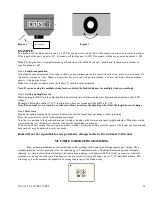
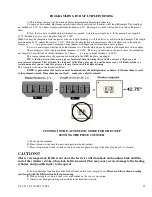
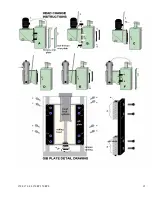
Loosen the lock handle located by the bearing support. See Figure 1 below.
Turning the feeder vise hand wheel in a counter clockwise direction, “dead head” the feeder vise against the screws end limit.
The digital counter can now be set at zero with the feeder vise “dead headed” loosen the set screw in the collar of the counter.
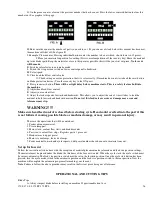
Rotate the collar until there are all zeros in the counter window. Tighten set screw (Figure 4).
Figure 1
Adding blade thickness in counter (DRO)
Note
: By entering the blade thickness to the counter the need to add this thickness dimension to the cut length can be
eliminated.
When ever the blade is changed it is recommended to check the thickness, as it may change after resharpening.
This parameter setting only needs to be added once.
Move the feeder vise to the forward position.
Loosen the lock handle, located by the bearing support. See Figure 1.
Turn the feeder vise hand wheel in a counter clockwise direction, “dead head” the feeder vise against the screws end limit.
Determine the thickness of the blade, back the feeder vise off (turning the adjusting wheel clockwise) until the LCD reads the
blade thickness. When this dimension has been met, Loosen the set screw in the collar (Figure2) and rotate the collar (Figure 3)
until the display reads all zeros in the counters window. Tighten this set screw. You now have the blade thickness added in the
length of cut equation.
Summary of Contents for Euromatic 370 PP
Page 9: ...370 S 370 S L 370 PP 370 PP L 9 ...
Page 10: ...370 S 370 S L 370 PP 370 PP L 10 Actual control panel layout may vari ...
Page 32: ...370 S 370 S L 370 PP 370 PP L 32 ...
Page 33: ...370 S 370 S L 370 PP 370 PP L 33 ...
Page 38: ...ALIMENTAZIONE 230V 60Hz 230V 60Hz POWER SUPPLY POWER SUPPLY ...
Page 39: ...HL4 ILLUMINAZIONE LAMA POWER SUPPLY ...
Page 40: ...LAMPEGGIATORE LAMA IN MOTO 24VAC MORSA 24VAC EMERGENCIES ...
Page 44: ...9 11 2 4 5 10 3 6 7 8 1 CH1 LC4HR424ACJ KA5 RITORNO CARRO COUNTER ...
Page 45: ...TERMINAL ...
Page 49: ...10 2 2019 Euromatic 370 2 Head Cylinder Unit Ref 005 ...
Page 51: ...10 2 2019 Euromatic 370 4 Bedplate Unit Ref 008 ...
Page 53: ...10 2 2019 Euromatic 370 6 Head Unit Ref 002 ...
Page 55: ...10 2 2019 Euromatic 370 8 Vise Unit Ref 004 ...
Page 57: ...10 2 2019 Euromatic 370 10 Group Feeder P R ...
Page 59: ...10 2 2019 Euromatic 370 12 Group Alimentador P P Ref 014b Alimentador Ref 014b ...


