15
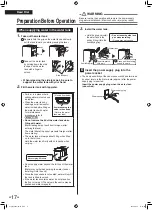
Preparation Before Operation
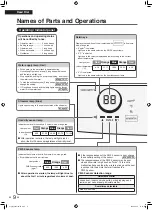
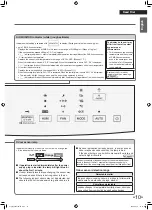
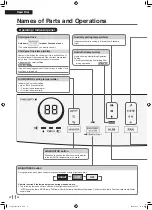
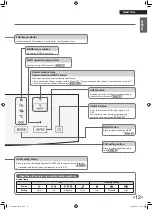
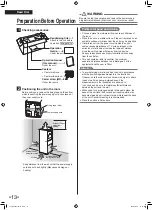
Read First
WARNING
Be sure to stop the operation and remove the power supply
plug before installation. (Electric shock or injury may result)
2.
Remove the humidifying tray.
Lift up slightly and
pull out
Humidifying tray
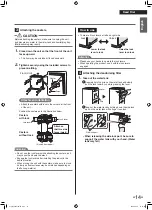
3.
Remove the filter fixing unit.
1
Slide the fixing tab on the filter fixing unit to
side to
unlock.
Fixing tab
2
Lift up the grip in the upper part of the filter fixing unit
and pull toward you.
Grip
Filter fixing unit
4.
Remove the deodorising filter from the bag.
•
The deodorising filter has no front or back.
Deodorising filter
Wear gloves when working.
(Dust from the deodorising
filter may make your hands
dirty.)
• Observe local waste separation rules when disposing
of the deodorising filter bag and desiccant.
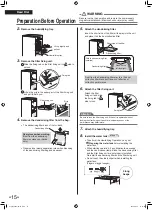
5.
Attach the deodorising filter.
Insert the short-side of the filter all the way into the unit
and place it on the dust collection filter.
Deodorising filter
Short-side of the filter
Deodorising filter
[With the deodorising filter
installed]
Gaps on the
left and right
Dust from the deodorising filter may turn the dust
collection filter black, but it does not affect dust
collection performance.
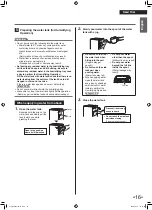
6.
Attach the filter fixing unit.
Attach the filter
fixing unit and slide
the fixing tab to
side to lock.
Fixing tab
Attention
Be sure to lock the filter fixing unit. If the unit is operated without
locking the filter fixing unit, abnormal noise may occur or the
performance may deteriorate.
7.
Attach the humidifying tray.
8.
Install the water tank.
►
Page 17
• To perform the Humidifying Operation, carry out
5
Preparing the water tank
before installing the
water tank.
•
When starting operation, if a notification tone sounds
and the odour sensor lamp blinks, the deodorising filter
and the filter fixing unit are not properly installed.
Re-install the deodorising filter and the filter fixing unit.
• Do not touch the side lock part when installing the
water tank.
(Fingers may get caught)
3 long
beeps
01_EN_3P693798-1B.indd 15
2023/06/26 13:33:59

