background image

E(D/B)(H/L)Q011~016BB

Unit and options for air to water heat pump system

4PW67905-1A – 2013.02

Operation manual

12

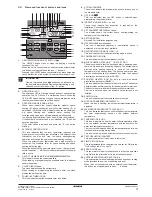
Consulting programmed actions

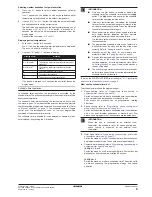
Consulting space heating or domestic water heating actions

Consulting space heating or domestic water heating is carried out as
follows.

1

Press the 

<

 button.

The actual mode is blinking.

2

Use the 

pi

 and 

pj

 buttons to select the mode you want

to program (space heating 

h

 or domestic water heating 

w

)

3

Press the 

<

 button to confirm the selected mode.

The actual day is blinking.

4

Select the day you would like to consult by means of the 

pi

and 

pj

 buttons.

The selected day is blinking.

5

Press the 

<

 button to confirm the selected day.

The first programmed action of the selected day appears.

6

Use the 

pi

 and 

pj

 buttons to consult the other

programmed actions of that day.

This is called the readout mode. Empty program actions (e.g. 3
and 4) are not displayed.
By pressing the 

pr

 button several times, you return to previous

steps in this procedure and finally return to normal operation.

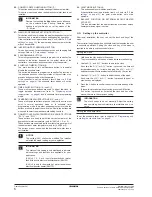
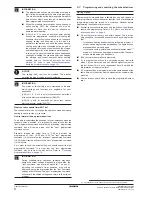
Consulting space cooling, quiet mode, or booster heater
mode

(1)

Consulting space cooling, quiet mode, or booster heater mode

(2)

 is

carried out as follows.

1

Press the 

<

 button.

The actual mode is blinking.

2

Use the 

pi

 and 

pj

 buttons to select the mode you want

to consult (space cooling 

c

, quiet mode 

s

, or booster heater

mode 

m

(3)

).

The selected mode is blinking.

3

Press the 

<

 button to confirm the selected mode.

The first programmed action is displayed.

4

Use the 

pi

 and 

pj

 buttons to consult the programmed

actions.

This is called the readout mode. Empty program actions (e.g. 3
and 4) are not displayed.
By pressing the 

pr

 button several times, you return to previous

steps in this procedure and finally return to normal operation.

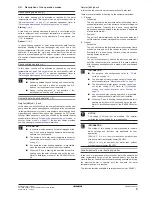
Tips and tricks

Programming the next day(s)

After confirming the programmed actions of a specific day (i.e. after
pressing the 

<

 button for 5 seconds), press the 

pr

 button once. You

can now select another day by using the 

pi

 and 

pj

 buttons

and restart consulting and programming.

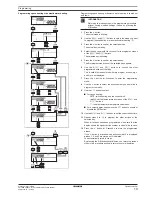
Copying programmed actions to next day

In heating/domestic water heating program it is possible to copy all
programmed actions of a specific day to the next day (e.g. copy all
programmed actions from "

1

" to "

2

").

To copy programmed actions to the next day, proceed as follows:

1

Press the 

<

 button.

The actual mode is blinking.

2

Use the 

pi

 and 

pj

 buttons to select the mode you want

to program.

The selected mode is blinking.
You can leave programming by pressing the 

pr

 button.

3

Press the 

<

 button to confirm the selected mode.

The actual day is blinking.

4

Select the day you would like to copy to the next day by means
of the 

pi

 and 

pj

 buttons.

The selected day is blinking.
You can return to step 

2

 by pressing the 

pr

 button.

5

Press the 

<

 and 

pr

 buttons simultaneously for 5 seconds.

After 5 seconds the display will show the next day (e.g. "

2

" if

"

1

" was selected first). This indicates that the day has been

copied.
You can return to step 

2

 by pressing the 

pr

 button.

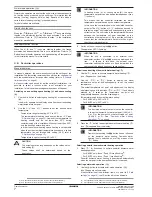
Deleting one or more programmed actions

Deleting one or more programmed actions is done at the same time
as storing the programmed actions.

When all actions for one day have been programmed, make sure that
the display shows the highest action number you would like to save.
By pressing the 

<

 button for 5 seconds, you store all actions except

those with a higher action number than the one that is displayed.

E.g. when the 

<

 button is pressed when action number 3 is

displayed, actions 1, 2 and 3 are stored but 4 is deleted.

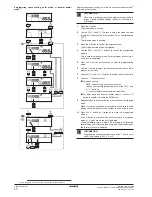
Deleting a mode

1

Press the 

<

 button.

The actual mode is blinking.

2

Use the 

pi

 and 

pj

 buttons to select the mode you want

to delete (space cooling 

c

, quiet mode 

s

, or booster heating

mode 

m

(4)

).

The selected mode is blinking.

3

Press the 

<

 and 

ba

 button simultaneously for 5 seconds to

delete the selected mode.

Deleting a day of the week (space heating or domestic water
heating mode)

1

Press the 

<

 button.

The actual mode is blinking.

2

Use the 

pi

 and 

pj

 buttons to select the mode you want

to delete (space heating 

h

 or domestic water heating 

w

).

The selected mode is blinking.

3

Press the 

<

 button to confirm the selected mode.

The actual day is blinking.

4

Select the day you would like to delete by means of the 

pi

and 

pj

 buttons.

The selected day is blinking.

5

Press the 

<

 and 

ba

 button simultaneously for 5 seconds to

delete the selected day.

INFORMATION

Returning to previous steps in this procedure is done by
pressing the 

pr

 button.

(1) Only applicable for tank with built-in electrical booster heater (EKHW*).
(2) Only applicable for tank with built-in electrical booster heater (EKHW*).

INFORMATION

Returning to previous steps in this procedure is done by
pressing the 

pr

 button.

(3) Only applicable for tank with built-in electrical booster heater (EKHW*).

(4) Only applicable for tank with built-in electrical booster heater (EKHW*).

Summary of Contents for EDHQ011BB6V3

Page 1: ...B6W1 EDLQ011BB6V3 EDLQ014BB6V3 EDLQ016BB6V3 EDLQ011BB6W1 EDLQ014BB6W1 EDLQ016BB6W1 EBHQ011BB6V3 EBHQ014BB6V3 EBHQ016BB6V3 EBHQ011BB6W1 EBHQ014BB6W1 EBHQ016BB6W1 EBLQ011BB6V3 EBLQ014BB6V3 EBLQ016BB6V3...

Page 2: ...ed according to their severity and probability of occurrence Some types of danger are represented by special symbols 1 2 Meaning of used terms Installation manual Instruction manual speci ed for a ce...

Page 3: ...er EKHTS in 2 different sizes 200 and 260 litre Solar kit for domestic hot water tank option For information concerning the EKSOLHW solar kit refer to the installation manual of that kit Room thermost...

Page 4: ...o dissipate this gas safely it is recommended that a hot tap be turned on for several minutes at a sink basin or bath but not at a dishwasher clothes washer or other appliance During this procedure th...

Page 5: ...aler 11 SET TEMPERATURE DISPLAY 9 The display shows the current space heating cooling set temperature of the installation 12 SETTING Not used For installation purposes only 13 NOT AVAILABLE n This ico...

Page 6: ...storage set point of the domestic hot water temperature only for 4 03 4 or 5 The buttons are not used when the domestic hot water tank is not installed 34 QUIET MODE BUTTON s This button enables or di...

Page 7: ...t upon user request 2 Reheat Scheduled The unit will heat up the domestic water tank starting from a scheduled time and untill the reheat set point is reached Preferally this is done during the time o...

Page 8: ...ctual temperature set point only appears on the display after pressing one of the buttons wi or wj If no button is pressed for 5 seconds the temperature set point will automatically disappear from the...

Page 9: ...ion with a set point weather dependent or manually set Four actions can be programmed These actions are repeated daily 3 Quiet mode refer to Programming space cooling quiet mode or booster heater mode...

Page 10: ...t a requirement but will simplify the interpretation of the program later If 2 or more actions are programmed for the same day and at the same time only the action with the highest action number will...

Page 11: ...e programming mode 8 Use the button to select the action number you would like to program or to modify 9 Use the ba button to select For space heating x switch heating and the controller off 9 set the...

Page 12: ...o select For space cooling x switch cooling and the controller off 9 set the temperature by means of the bi and bj buttons a to select automatic temperature calculation For quiet mode and booster heat...

Page 13: ...ton The actual mode is blinking 2 Use the pi and pj buttons to select the mode you want to program The selected mode is blinking You can leave programming by pressing the pr button 3 Press the button...

Page 14: ...p 2 through 4 to change other eld settings as required 7 When nished press the z button to exit FIELD SET MODE Detailed description 0 User permission level If required certain user interface buttons c...

Page 15: ...Hi2_Ti the target outgoing water temperature when the outdoor temperature equals or rises above the high ambient temperature Hi2_A Note that the Hi2_Ti value should be lower than Lo2_Ti as for warmer...

Page 16: ...esis Example 1 Scheduled storage 6 03 1 scheduled reheat 6 05 1 disinfection function 2 01 1 activated A Scheduled storage operation activated at 6 04 heat up domestic hot water untill domestic hot wa...

Page 17: ...tivating automatic storage during night default setting If it seems that the domestic hot water night storage operation is not suf cient for your needs an additional scheduled reheat during daytime ca...

Page 18: ...refer to the installation manual of that kit d Local shift value weather dependent Local shift value weather dependent The local shift value weather dependent eld setting is only relevant in case weat...

Page 19: ...Fri Mon Sun All 01 Status 1 ON 0 1 02 Start time 23 00 0 00 23 00 1 00 hour 03 Set point only in combination with domestic hot water tank without electrical booster heater EKHTS 60 xed 5 C 03 Set poi...

Page 20: ...tallation related setting 9 Heating and cooling set point ranges 00 Heating set point upper limit 55 37 55 1 C 01 Heating set point lower limit 25 15 37 1 C 02 Cooling set point upper limit 22 18 22 1...

Page 21: ...Not applicable Do not change the default value E Unit information readout 00 Software version Read only 01 EEPROM version Read only 02 Unit model identi cation Do not change the default value dependi...

Page 22: ...avoid injury give the piping time to return to normal temperature or be sure to wear proper gloves Do not touch any switch with wet ngers Touching a switch with wet ngers can cause electrical shock W...

Page 23: ...shall not be mixed with unsorted household waste Do not try to dismantle the system yourself the dismantling of the system treatment of the refrigerant of oil and other parts must be done by a quali...

Page 24: ......

Page 25: ......

Page 26: ......

Page 27: ......

Page 28: ...4PW67905 1A 2013 02 Copyright 2011 Daikin 4PW67905 1 A 0000000T...

Reviews: