Daikin CTXJ25TVMAW Operation Manual Download Page 21

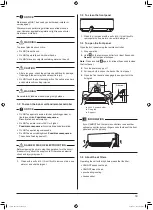
7-9  To remove the front panel

 INFORMATION

Remove the front panel only in case it MUST be replaced.

1. 

Open the front panel. See “7-4 To open the front panel” on 

page 18.

2. 

Open the panel locks located on the back side of the panel 
(1 on each side).

a

a

Panel lock

3. 

Push the right arm lightly to the right to disconnect the 
shaft from the shaft slot on the right side.

a

c

b

Arm

Shaft

Shaft slot

4. 

Disconnect the front panel shaft from the shaft slot on the 
left side.

a

c

b

Arm

Shaft slot

Shaft

5. 

Remove the front panel.

6. 

To re-install the front panel perform the steps in the opposite 
order.

7-10 

Take following items into account before a long 

idle period

Operate the unit several hours in 

fan only

 mode to dry the inside 

of the unit.

1. 

Press 

 and select 

 operation.

• 

When a multi outdoor unit is connected, make sure the 
HEAT operation is not being used in other rooms before you 
use the FAN operation. Refer to page 16.

2. 

Press 

 and start operation.

3. 

After operation stops, turn the circuit breaker off.

4. 

Clean the air filters and replace them in their original position.

5. 

Remove the batteries from the remote controller.

• 

When starting to use the air conditioner again, make sure that the 
drain hose outlet is not blocked, then turn on the circuit breaker. 
An operational check of each component will be carried out 
automatically. (Also, put the batteries into the remote controller.)

 INFORMATION

It is recommended to have periodical maintenance performed 
by a specialist. For specialist maintenance, contact your dealer. 
Maintenance costs shall be borne by the user.

In certain operating conditions the inside of the unit may get dirty 
after several seasons of use. This results in poor performance.
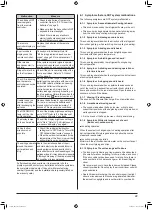
8.  Troubleshooting

If one of the following malfunctions occur, take the measures 
shown below and contact your dealer.

 WARNING

Stop operation and shut off the power if anything 

unusual occurs (burning smells etc.).

Leaving the unit running under such circumstances may cause 

breakage, electric shock or fire. Contact your dealer.

The system MUST be repaired by a qualified service person:

Malfunction

Measure

If a safety device such as a fuse, a 
circuit breaker or an earth leakage 
circuit breaker frequently actuates 
or the ON/OFF switch does NOT 
properly work.

Turn OFF the main power 
switch.

Water is leaking from the indoor unit If the drain hose is crushed 

or clogged, water from the 
indoor unit may be unable 
to drain and start leaking. 
Stop operation of the unit 
immediately and contact 
your dealer.

The operation switch does NOT 
work well.

Turn OFF the power 
supply.

If the remote controller display 
indicates the unit number, the 

operation lamp flashes and the 

malfunction code appears.

Notify your installer and 
report the malfunction 
code.

If the system does NOT properly operate except for the above 
mentioned cases and none of the above mentioned malfunctions 
is evident, investigate the system according to the following 
procedures.

 20

01_EN_3P620957-1.indd   20

26-Jun-20   10:17:46 AM

Summary of Contents for CTXJ25TVMAW

Page 1: ...r round comfort Enjoy year round comfort Enjoy year round comfort DAIKIN ROOM AIR CONDITIONER OPERATION MANUAL MODELS CTXJ25TVMAW CTXJ35TVMAW CTXJ50TVMAW CTXJ60TVMAW CTXJ25TVMAK CTXJ35TVMAK CTXJ50TVMA...

Page 2: ...QUIET operation 17 6 1 4 COOL HEAT mode lock 17 6 1 5 Priority room setting Not available on some models 17 7 Maintenance and service 17 7 1 Overview Maintenance and service 17 7 2 To clean the indoor...

Page 3: ...us gas Do not use the air conditioner until a qualified service person confirms that the leakage has been repaired Do not attempt to install or repair the air conditioner yourself Improper workmanship...

Page 4: ...n adverse influence on the performance product quality and life of the air conditioner This appliance is not intended to be used by persons with reduced physical sensory or mental capabilities or with...

Page 5: ...h2sec d a g m h c b n l f e i j k p o a Signal transmitter b LCD display c Temperature adjustment button d ON OFF button e Vertical swing button and menu push 2 seconds f Horizontal swing button g Com...

Page 6: ...s with tap water and seek the attention of a medical professional Keep batteries out of reach of children In the event that batteries are swallowed seek the immediate attention of a medical profession...

Page 7: ...selected setting press Result The brightness setting is changed Note The display automatically returns to the default screen after 60 seconds To return to the default screen sooner press twice 3 5 To...

Page 8: ...y is in the room Powerful To cool down or heat up the room quickly Feature Tasks ON timer OFF timer To automatically turn ON or OFF the system Weekly timer To automatically turn ON or OFF the system o...

Page 9: ...side to side Stays in a fixed position CAUTION ALWAYS use a remote controller to adjust the position of the flaps and louvres When the flaps and louvres are swinging and you move them forcibly by han...

Page 10: ...selected function takes priority If the Vertical automatic swing is selected Comfort airflow operation will be cancelled To turn ON OFFVertical airflow function 1 Press for at least 2 seconds Result T...

Page 11: ...efficient operation by limiting the maximum power consumption value This function is useful for cases in which attention should be paid to ensure a circuit breaker will not trip when the product runs...

Page 12: ...use OFF timer and ON timer in combination INFORMATION Programme the timer again in case of A circuit breaker has turned the unit off A power failure After replacing batteries in the remote controller...

Page 13: ...remote controller at the indoor unit and check for a receiving tone when setting the Weekly timer operation See 2 2 3 To operate the remote controller on page 5 INFORMATION The clock MUST be set corre...

Page 14: ...ll reservations are set to your needs 1 Press Result The day of the week and the reservation number of the current day are displayed 2 Press or to select the day of the week and reservation number to...

Page 15: ...bile Controller application 1 Open Google Play for appliances using Android App Store for appliances using iOS 2 Search for Daikin Mobile Controller 3 Follow the directions on the screen to install 4...

Page 16: ...smartphone to the home network To reset the connection setting to the factory default Reset the connection setting to the factory default in case you want to switch between the WPS and the AP connect...

Page 17: ...the room temperature properly for a comfortable environment Avoid excessive heating or cooling Notice that it may take some time for the room temperature to reach the set temperature Consider using th...

Page 18: ...e of the priority room takes precedence you can select a different operation mode from other rooms Example Room A is the priority room in this example When COOL operation is selected in room A while o...

Page 19: ...ELECTROCUTION Before cleaning be sure to stop the operation turn the circuit breaker off or pull out the supply cord Otherwise an electric shock and injury may result 1 Clean with a soft cloth If it i...

Page 20: ...FORMATION Clean the filter with water every 6 months 1 Remove the dust from the filter with a vacuum cleaner INFORMATION Replace the filter every 3 years Dispose of the old filter as non flammable was...

Page 21: ...RMATION It is recommended to have periodical maintenance performed by a specialist For specialist maintenance contact your dealer Maintenance costs shall be borne by the user In certain operating cond...

Page 22: ...to set the temperature on page 7 Check if the airflow direction setting is appropriate Refer to 4 3 3 Airflow direction on page 8 Check if the air inlet or outlet of the outdoor or indoor unit is NOT...

Page 23: ...possible to fix the problem yourself contact your installer and state the symptoms the complete model name of the unit with manufacturing number if possible and the installation date possibly listed o...

Page 24: ...ription Indoor unit PCB abnormality Freeze up protection or high pressure control Fan motor DC motor abnormality Streamer unit error Indoor heat exchanger thermistor abnormality Opening or closing fro...

Page 25: ...wireless adapter connection status on page 14 Try to resetting to the factory default and repeat the setting See To reset the connection setting to the factory default on page 15 9 Disposal NOTICE Do...

Page 26: ...MEMO 25 01_EN_3P620957 1 indd 25 26 Jun 20 10 17 50 AM...

Page 27: ...01_EN_3P620957 1 indd 26 26 Jun 20 10 17 50 AM...

Page 28: ...3P620957 1 M20N052 2006 HT The two dimensional bar code is a manufacturing code 00_CV_3P620957 1 indd 2 23 Jun 20 11 21 05 AM...

Reviews: