background image

12

Tel: +44 (0)1457 874 999  |  Fax: +44 (0)1457 829 201  |  Email: [email protected]  |  Online: www.cop-eu.com

Select the card type from the dropdown box, there are multiple types available:

If using keypad entry, enter an unlock password for the new user. Passwords must be numerical and a maximum of 6 digits.

General

Standard User

VIP

VIP User

Guest

Temporary User, when used a limit can be set to how many times the 

card can be used

Patrol

Used for patrol logging without unlocking doors

Blacklist

Used to alert when a specifi c user accesses an area

Duress

A secondary card given to a user in case of duress. When 

scanned an alert can be triggered

Enter how long the new user is required access. A permanent user could be given a number of years, whereas an agency or 

temporary contract user could only be given a period of months or weeks.

If required an image of the user can be uploaded to the Smart PSS software. This image will then appear along with the user details 

in the access console when the user accesses a given area.

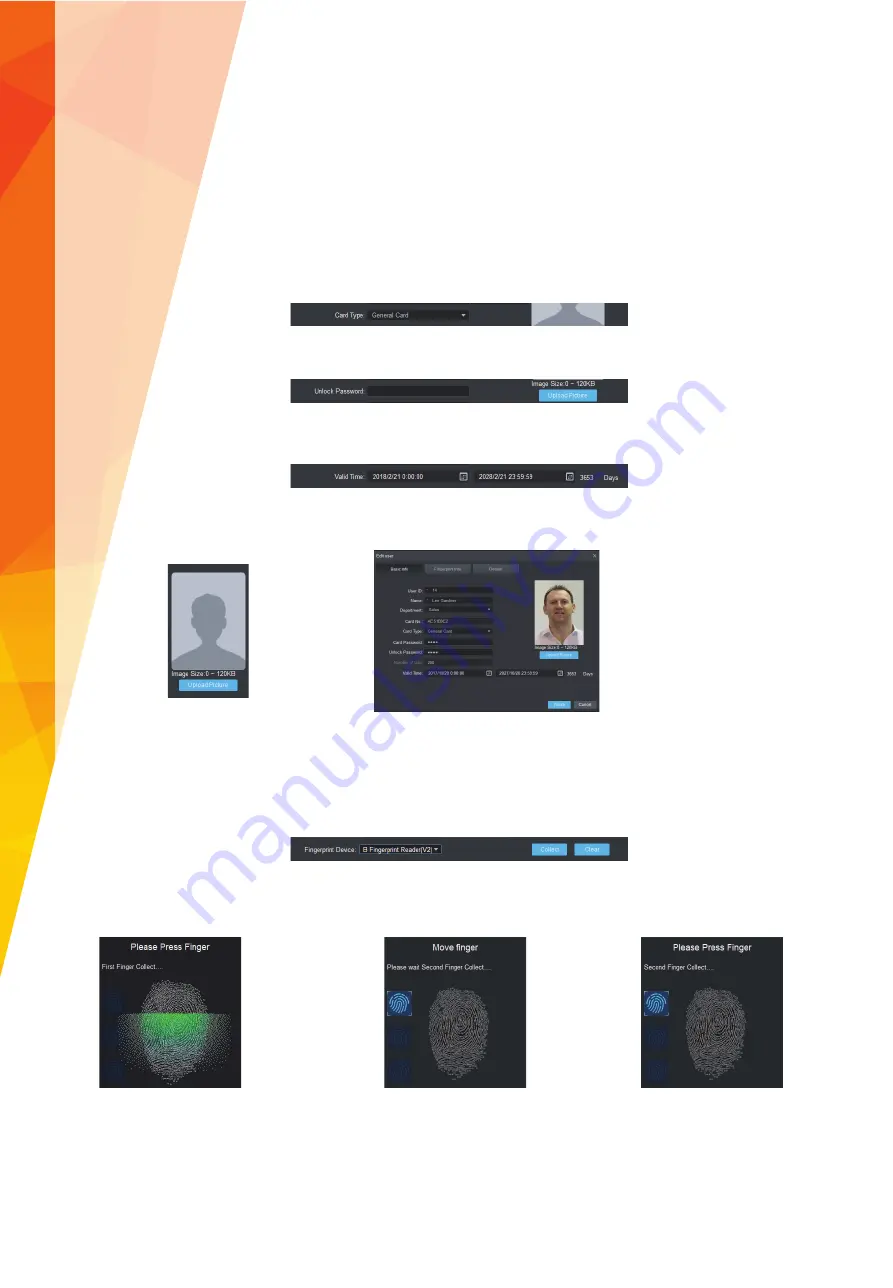
If using biometric fi ngerprint readers, select the 

Fingerprint Info

 tab to add a user fi ngerprint.

In the 

Fingerprint Device

 dropdown box, select the fi ngerprint reader that will be used to add the users fi ngerprint. This can be the 

ASM102-V2 USB reader or a fi ngerprint reader that is part of the system. 

Click the Collect button to start recording the users fi ngerprint and follow the onscreen prompts.

1. Place fi nger on fi ngerprint sensor

2. Remove fi nger

3. Place fi nger on fi ngerprint sensor

Summary of Contents for ASI1212D

Page 1: ...el 44 0 1457 874 999 fax 44 0 1457 829 201 email sales cop eu com web www cop eu com ACCESS CONTROL QUICK INSTALL GUIDE Please read this document before installation V1 Official UK distribution partne...

Page 2: ...n be used in multiple installations scenarios with options for one door two door or four door controllers and one way or two way access The example below is based on a one door one way system Lock Rea...

Page 3: ...ler Brown Cable Wiegand LED connection to controller Green Cable Wiegand D0 connection to controller White Cable Wiegand D1 connection to controller Blue Cable Wiegand case tamper connection to contro...

Page 4: ...controller with built in keypad card ngerprint readers This unit supports a single door with the option to add an external reader for use as a two way system The example below is based on a one way sy...

Page 5: ...used Purple Cable RS485 Yellow Cable RS485 Brown Cable Alarm Input Ground Green Cable Alarm Input White Cable Alarm Output Blue Cable Alarm Output Ground Black Cable Bell Red Cable Bell Connector 3 RJ...

Page 6: ...lick the install buttton to install the tool on your computer Once the Toolbox has been installed an account must be registered before the con guration tools can be installed After installing and regi...

Page 7: ...ay the admin login screen Enter the admin password followed by OK Default Settings Username admin Password 88888888 IP Address 192 168 1 108 2 Press the Up Down arrows to cycle through the menu option...

Page 8: ...his password is used for logging into the software only and is not the password of the controller It is important to keep this password safe as failure to remember the password will result in not bein...

Page 9: ...roller such as IP address Username Password the default port number is 37777 click Save to store the connection details The added controller should now show in the device list with the current status...

Page 10: ...the Access icon from the Smart PSS home screen Once the access section has been opened the following screen will be shown The number of doors displayed depends on the controller type if a four door co...

Page 11: ...ely any card readers connected to the controller can be used to scan a user card for enrolment purposes To choose the type of reader to be used select a reader device from the Card Issuer dropdown box...

Page 12: ...long the new user is required access A permanent user could be given a number of years whereas an agency or temporary contract user could only be given a period of months or weeks If required an image...

Page 13: ...n making sure that the user places their nger tip over the sensor at central to the sensor Select the details tab to enter additional user information such as Gender Title DOB contact information It i...

Page 14: ...a single door list or multiple lists From the dropdown menu select Access Level Click the add button to create a new door list Enter a name for the doorlist a timezone can also be selected to limit ac...

Page 15: ...ndow pane to display the users from that department click on the icon to adjust the users access rights Select the access menu icon Select a department from the left window pane to display the users f...

Page 16: ...here to create a speci c time period where the door will remain locked such as weekends Keep Open Timezone A timezone can be con gured and selected here to create a speci c time period where the door...

Page 17: ...ssback Select the access menu icon Click the Add button Select a controller from the dropdown list enter a reference name Select the anti passback con guration from the available options click OK to s...

Page 18: ...ecting the View button from the access console page and selecting the cameras to view from the left window pane When incorporating Dahua access control and Dahua CCTV within SmartPSS it is possible to...

Page 19: ...ify tab select whether SmartPSS should play a sound or not when the event occurs Select the link video tab and then choose which cameras should be pushed when the event occurs by double clicking on th...

Page 20: ...COP UK Delph New Road Dobcross OL3 5BG England...

Reviews: