background image

S0607080K

Page 153

Transmission and Torque Converter 
(ZF 4WG-310)

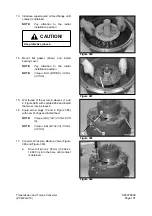
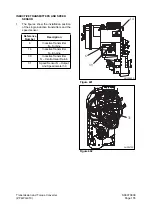
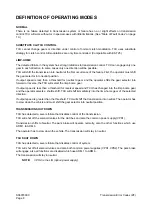
22.

Introduce converter bell using lifting device
until contact is obtained.

NOTE:

Slight rotary motions of the
input shaft will facilitate the
sliding in. Protect the splines
from damage. Pay attention to
the radial installation position.

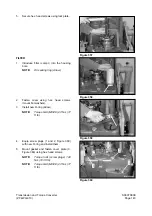
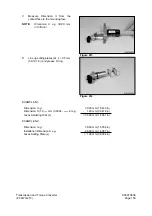
CONVERTER

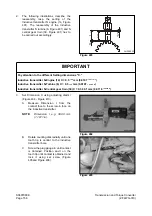
1.

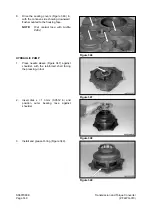
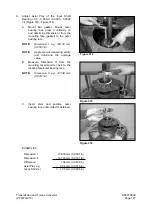
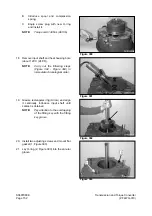
Fasten diaphragms (3x) on converter,
using hex. head screws (mount plain
washer).

NOTE:

Insert hex. head screws with
Loctite #243.

NOTE:

Torque limit (M10/8.8) 4.69
kg•m (33.93 ft lb).

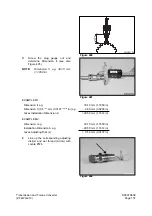
2.

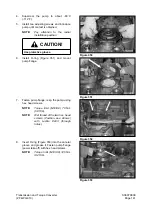
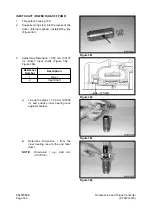
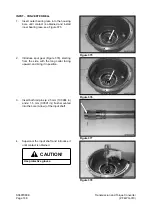
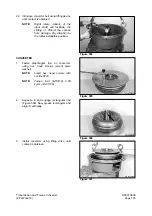
Squeeze in and engage rectangular ring
(Figure 396). Now, grease rectangular and
align it centrically.

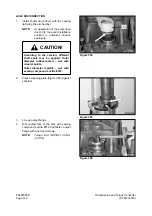
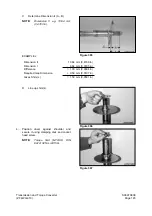
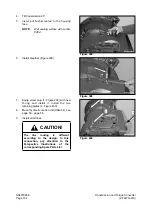
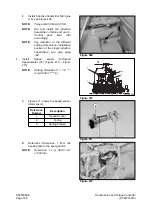
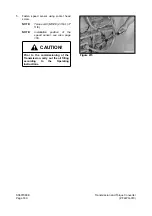
3.

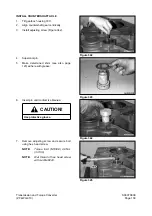
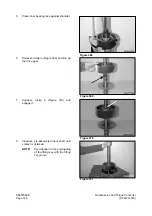
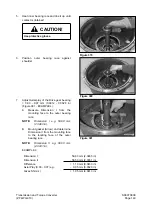
Install converter using lifting drive until
contact is obtained.

Figure 394 

Figure 395 

Figure 396 

Figure 397 

Summary of Contents for Mega 500-V

Page 1: ...that consumers periodically contact their distributors for recent documentation on purchased equipment This documentation may include attachments and optional equipment that is not available in your machine s package Please call your distributor for additional items that you may require Illustrations used throughout this manual are used only as a representation of the actual piece of equipment and...

Page 2: ...ture Counterweight S0403040K Fuel Transfer Pump S0405500 Hydraulic Oil Tank S0406040K Lower Structure and Chassis Center Joint Articulation Joint S0502020K Engine and Drive Train Axle ZF AP 420R S0602170K Air Conditioner S0605050K Transmission and Torque Converter ZF 4WG 310 S0607080K Transmission Error Codes ZF S0607900C Hydraulics Accumulator S0703000 Cylinders S0705010 Main Pump Denison T6DMY S...

Page 3: ...shiba S0709455K Pilot Control Valve S0709476K Flow Amplifier Danfoss S0709665K Power Steering Unit S0709730K Restriction Valve S0709750K Hydraulic Schematic Mega 500 V S0793060K Electrical System Electrical System S0802190K Electrical Schematic Mega 500 V S0893060K Attachments ...

Page 4: ...1SAFETY ...

Page 5: ...ose contained within this section Always use tools and equipment that is in good working order Use lifting and hoisting equipment capable of safely handling load Remember that ultimately safety is your own personal responsibility MODEL SERIAL NUMBER RANGE Mega 200 V 1001 and Up Mega 250 V 1001 and Up Mega 300 V 1001 and Up Mega 400 V 1001 and Up Mega 500 V 1001 and Up Copyright 2001 Daewoo Novembe...

Page 6: ...Operator of a Daewoo Wheel Loader 3 General Safety Essentials 6 Location of Safety Labels 6 Unauthorized Modifications 6 General Hazard Information 7 Before Starting Engine 15 Machine Operation 18 Maintenance 25 Battery 33 Towing 35 Shipping and Transportation 36 ...

Page 7: ...horized Modifications on page 6 4 General Hazard Information on page 7 5 Before Starting Engine on page 15 6 Machine Operation on page 18 7 Maintenance on page 25 8 Battery on page 33 9 Towing on page 35 10 Shipping and Transportation on page 36 DANGER Unsafe use of the wheel loader could lead to serious injury or death Operating procedures maintenance and equipment practices or traveling or shipp...

Page 8: ...ions given in this manual apply only to intended uses of the machine If you use your machine for any unintended uses that are not specifically prohibited you must be sure that it is safe for any others In no event should you or others engage in prohibited uses or actions as described in this manual Daewoo delivers machines that comply with all applicable regulations and standards of the country to...

Page 9: ... some procedures contact a DAEWOO distributor SAFETY ALERT SYMBOL Be Prepared Get to Know All Operating and Safety Instructions This is the Safety Alert Symbol Wherever it appears in this manual or on safety signs on the machine you should be alert to potential for personal injury or accidents Always observe safety precautions and follow recommended procedures CAUTION This word is used on safety m...

Page 10: ... warning signs Make sure that all of the warning signs are legible Clean the warning signs or replace the warning signs if you cannot read the words Replace the illustrations if the illustrations are not visible When you clean the warning signs use a cloth water and soap Do not use solvent gasoline or other harsh chemicals to clean the safety signs Solvents gasoline or other harsh chemicals could ...

Page 11: ...en working with another operator or with a person on work site traffic duty be sure that all personnel know the nature of the work and understand all hand signals that are to be used Always observe strictly any other rules related to safety SAFETY FEATURES Be sure that all guards and covers are installed in their proper position Have guards and covers repaired immediately if damaged Be sure that y...

Page 12: ... Never bring any dangerous objects such as flammable or explosive items into the operator s cab To ensure safety do not use the radio or music headphones when operating the machine There is danger that this may lead to a serious accident When operating the machine do not put your hands or head out of the window When standing up from the operator s seat always place transmission neutral lock lever ...

Page 13: ...or component with the wind at your back whenever possible Always observe any rules and regulations related to the work site and working environment MOUNTING AND DISMOUNTING Before getting on or off the machine if there is any oil grease or mud on the handrails steps or track shoes wipe it off immediately Always keep these parts clean Repair any damage and tighten any loose bolts Never get on or of...

Page 14: ... the fuel nozzle in constant contact with the neck of the fuel filling nozzle to provide a ground Keep fuel and other fluid reservoir caps tight and do not start the engine until caps have been secured PRECAUTIONS WHEN HANDLING FLUIDS AT HIGH TEMPERATURE Immediately after operations are stopped the coolant engine oil and hydraulic oil are at high temperature and the radiator and hydraulic tank are...

Page 15: ... C fire extinguisher be mounted in the cab Check and service the fire extinguisher at regular intervals and make sure that all work site crew members are adequately trained in its use Provide a first aid kit in the storage compartment and keep another at the work site Check the kit periodically and make any additions if necessary Know what to do in case of injury from fire Keep emergency numbers f...

Page 16: ...ounting or relocating fasteners Any serious impact or damage to system requires a complete integrity reevaluation Reinstallation recertification and or replacement of system may be necessary INSTALL ADDITIONAL SAFETY EQUIPMENT IF CONDITIONS REQUIRE Laminate glass protection for the front side or rear windows may also be recommended depending upon particular site conditions Contact your Daewoo dist...

Page 17: ...be in Operation and Maintenance Manual The accumulator is charged with high pressure nitrogen gas so it is extremely dangerous if it is handled in the wrong way Always observe the following precautions Do not drill or make any holes in the accumulator or expose it any flame fire or heat source Do not weld on the accumulator or try attaching anything to it When carrying out disassembly or maintenan...

Page 18: ... of an emergency situation which requires the breaking of glass to exit from the operator s cab Grip the handle firmly and use the sharp point to break the glass WARNING Protect your eyes when breaking the glass Model Tool Location Mega 200 V Lower Right Side Mega 250 V Lower Right Side Mega 300 V Lower Left Side Mega 400 V Lower Left Side Mega 500 V Lower Left Side Figure 12 LEFT SIDE Figure 13 R...

Page 19: ...n the vicinity of the boom could represent a potential hazard or cause the operator to react suddenly and cause an accident Use a spotter or signal person working near bridges phone lines work site scaffolds or other obstructions Minimum levels of insurance coverage work permits or certification physical barriers around the work site or restricted hours of operation may be mandated by governing au...

Page 20: ...eck that the safety lever is in LOCKED position If any abnormalities are found in the above checks carry out repairs immediately ENGINE STARTING Walk around your machine before getting in operator s cab Look for evidence of leaking fluid loose fasteners misaligned assemblies or any other indications of possible equipment hazard All equipment covers and machinery safety guards must be in place to p...

Page 21: ... If the machine is used without repairing the problems it may lead to unexpected injury or failure Clear all personnel from directly around machine and from the area Clear all obstacles from the machine s path Beware of hazards Be sure that all windows are clean Secure the doors and the windows in the open position or in the shut position Adjust the rear view mirrors for best visibility close to t...

Page 22: ... not let anyone operate machine unless they ve been fully and completely trained in safety and in operation of the machine SEAT BELTS SHOULD BE USED AT ALL TIMES Whenever engine is running operator should be seated at the control station with seat belt properly engaged MOVEMENT ALARMS If wheel loader is equipped with an audible travel movement alarm test alarm on a daily basis Audible alarm should...

Page 23: ... in the area When traveling on rough ground travel at low speed and avoid sudden changes in direction Always keep to the permissible water depth When traveling over bridges or structures on private land check first that the bridge or structure can withstand the weight of the machine When traveling on public roads check with the local authorities and follow their instructions SLOPING TERRAIN REQUIR...

Page 24: ...RITIES Below ground hazards also include natural gas lines water mains tunnels and buried foundations Know what s underneath work site before starting to dig BE AWARE OF HEIGHT OBSTACLES Any type of object in vicinity of boom could represent a potential hazard or cause operator to react suddenly and cause an accident Use a spotter or signal person working near bridges phone lines work site scaffol...

Page 25: ...ainfalls or during spring thaws STAY ALERT FOR PEOPLE MOVING THROUGH WORK AREA When loading a truck you should always know where the driver is Avoid loading over the cab of a truck even if the driver is in a safe spot Someone else could have gone inside for any number of reasons Avoid working where unseen passersby might be Slow down work cycle and use slower travel speeds in congested or populate...

Page 26: ...by mistake Use the machine only for its main purpose Using it for other purposes will cause failures To ensure an ample view do as follows When working in dark areas attach working lights and front lights to the machine If necessary set up lighting at the work site Stop operations when the visibility is poor such as in fog mist snow and rain Wait for the visibility to improve to a level which caus...

Page 27: ...re likely to cause severe stress in very cold temperatures Reducing work cycle rate and work load may be necessary When the temperature rises frozen road surfaces become soft so the machine travel becomes unstable In cold weather do not touch metal surfaces with your bare hands If you touch a metal surface in extremely cold weather your skin may freeze to the metal surface PARKING MACHINE Avoid ma...

Page 28: ... Engage all lock down security equipment that may have been installed on machine NEVER LET ANYONE RIDE ON ATTACHMENT Never let anyone ride on any work attachment such as the bucket crusher grapple or clamshell grab bucket There is a danger of the person falling and suffering serious injury IMPORTANT When hydraulic system maintenance or service work must be performed be aware that accumulators in s...

Page 29: ...n your eyes or that you may slip and injure yourself When washing the machine do the following Wear shoes with non slip soles to prevent yourself from slipping and falling on wet places Wear safety glasses and protective clothing when washing the machine with high pressure steam Take action to prevent touching high pressure water and cutting your skin or having mud fly into your eyes Do not spray ...

Page 30: ... or fuel that is spilled onto hot surfaces or onto electrical components can cause a fire Store all fuels and all lubricants in properly marked containers and away from all unauthorized persons Store oily rags and other flammable material in a protective container Do not smoke while you refuel the machine or while you are in a refueling area Do not smoke in battery charging areas or in areas the c...

Page 31: ... to cool before you drain the cooling system Hot oil and hot components can cause personal injury Do not allow hot oil or hot components to contact the skin Remove the hydraulic tank filter plug only after the engine has been stopped Make sure that the hydraulic tank filter plug is cool before you remove it with your bare hand Remove the hydraulic tank filter plug slowly to relieve pressure Reliev...

Page 32: ...n tubes that contain flammable fluids Do not flame cut on pipes or on tubes that contain flammable fluids Before you weld on pipes or on tubes or before you flame cut on pipes or on tubes clean the pipes or tubes thoroughly with a nonflammable solvent If heat is applied directly to rubber hoses or piping under pressure they may suddenly break so cover them with a fireproof covering Wear protective...

Page 33: ...re is a gust of wind CRUSHING PREVENTION AND CUTTING PREVENTION You should always have at least two people working together if the engine must be run during service One person needs to remain in the operator s seat ready to work the controls or stop the machine and shut off the engine Unless you are instructed otherwise never attempt adjustments while the machine is moving or while the engine is r...

Page 34: ... engine lube oil gearbox lubricant or other fluids require change wait for fluid temperatures to decrease to a moderate level before removing drain plugs NOTE Oil will drain more quickly and completely if it is warm Do not drain fluids at temperatures exceeding 95 C 203 F however do not allow full cool down HYDRAULIC CYLINDER SEALS REQUIRE PERIODIC REPLACEMENT Check cylinder drift rate at regular ...

Page 35: ...ngers Do not bend high pressure lines Do not strike high pressure lines Do not install lines tubes or hoses that are bent or damaged Make sure that all clamps guards and heat shields are installed correctly to prevent vibration rubbing against other parts and excessive heat during operation If any of the following conditions are found replace the part Damage or leakage from hose end Wear damage cu...

Page 36: ...e gradual bends DISPOSE OF ALL PETROLEUM BASED OILS AND FLUIDS PROPERLY Physical contact with used motor oil may pose a health risk Wipe oil from your hands promptly and wash off any remaining residue Used motor oil is an environmental contaminant and may only be disposed of at approved collection facilities To prevent pollution of the environment always do the following Never dump waste oil in a ...

Page 37: ... surface of the battery wipe it with a clean damp cloth Never use gasoline thinner or any other organic solvent or detergent Tighten the battery caps securely Explosive battery gas can be set off by sparks from incidental contact or static discharge Turn OFF all switches and engine when working on batteries Keep battery terminals tight Contact between a loose terminal and post can create an explos...

Page 38: ...les while required battery connections are made 24 volt battery units consisting of two series connected twelve volt batteries have a cable connecting one positive terminal on one of the 12 volt batteries to a negative terminal on the other battery Booster or charger cable connections must be made between the non series connected positive terminals and between the negative terminal of the booster ...

Page 39: ... determine the signals to use and follow these signals correctly If the engine on the problem machine will not start or there is a failure in the brake system always contact your Daewoo distributor Never go between the towing machine and the towed machine during the towing operation It is dangerous to carry out towing on slopes so select a place where the slope is gradual If there is no place wher...

Page 40: ...or particular conditions at work site Refer to the section Transportation section of operation manual SUMMARY OF SAFETY PRECAUTIONS FOR LIFTING To make safe lifts the following items must be evaluated by operator and work site crew Condition of ground support Wheel loader configuration and attachments Weight lifting height and lifting radius Safe rigging of load Proper handling of suspended load T...

Page 41: ...1SPECIFICATIONS ...

Page 42: ...d safe shop practices outlined in the front of this manual or those contained within this section Always use tools and equipment that is in good working order Use lifting and hoisting equipment capable of safely handling load Remember that ultimately safety is your own personal responsibility MODEL SERIAL NUMBER RANGE Mega 500 V 1001 and Up Copyright 2001 Daewoo May 2001 ...

Page 43: ... V TABLE OF CONTENTS General Description 3 General Specifications 5 Engine Performance Curves 6 Working Range and Dimensions 8 Working Capacities 11 Bucket Capacity 11 Tipping Load 11 Material Weight 11 Approximate Weight of Workload Materials 11 ...

Page 44: ...s for Mega 500 V GENERAL DESCRIPTION Figure 1 identifies the location of major machine components 1 2 3 4 5 6 7 9 10 8 11 12 13 14 15 16 17 18 19 20 21 22 23 24 25 26 27 28 29 30 31 32 33 34 35 36 37 38 39 40 41 42 HA5O3001 Figure 1 ...

Page 45: ...Wheel Cover 14 Steering Wheel 15 Tops 16 Work Lever 17 Seat 18 Rear Wheel Cover 19 Pre cleaner 20 Air Cleaner 21 Muffler 22 Engine 23 Fan 24 Radiator 25 Grill 26 Fuel Tank 27 Fuel Filler Pipe 28 Engine Oil Filler Pipe 29 Engine Oil Level Gauge 30 Rear Axle Pivot 31 Rear Axle 32 Transmission Oil Filter 33 Wheel Chock 34 Transmission 35 Center Pin 36 Steering Wheel Cylinder 37 Boom Cylinder 38 Drive...

Page 46: ...m 1 128 ft lb 1 400 rpm Transmission Full Automatic Power Shift Full Automatic Power Shift Speeds 4 Forward 3 Reverse Brake Systems Travel Brakes 4 Wheel Wet Disk Parking Brake SHAR Dry Disc Type Performance Travel Speed 7 35 km h 4 35 21 75 MPH Steering Angle 40 Min Tire Turning Radius 6 140 mm 242 Safe Operating Load 8 640 kg 19 047 lb Max Breakout Force 27 000 kg 59 525 lb Bucket Rise Time 6 5 ...

Page 47: ...S0203070K Page 6 Specifications for Mega 500 V ENGINE PERFORMANCE CURVES AHS3720L Figure 2 ...

Page 48: ...rcury Temperature 20 C 68 F W Cooling Fan Alternator 24 V 70 amp Exhaust System Complete attached Air Cleaner Installed Performance standard KS R1004 Power Maximum rpm 320 ps 2 100 rpm 316 hp 2 100 rpm Maximum Torque 156 kg m 1 400 rpm 1 128 ft lb 1 400 rpm Fuel Consumption 158 g ps h ...

Page 49: ...ecifications for Mega 500 V WORKING RANGE AND DIMENSIONS Figure 3 illustrates exterior machine dimensions and working range of machine when it is equipped with a standard bucket A E G I H D F C I H B a b AHO0830L Figure 3 ...

Page 50: ...rall Height C 3 780 mm 12 5 Bucket Width D 3 480 mm 11 5 Wheel Base E 3 600 mm 11 10 Tread F 2 420 mm 7 11 Ground Clearance G 490 mm 1 7 Dump Height to tooth H 3 080 mm 10 1 Dump Distance to Bucket Edge I 1 380 mm 4 6 Dump Height to Bucket Pivot 4 470 mm 14 8 Bucket Angle Raised a 47 Bucket Angle b Lowered at carry 48 Tire Size 29 5 25 22 PR L3 ...

Page 51: ...onal Pallet or Log Fork AHS3690L b a E F B C D A Figure 4 Reference Number Dimension A 1 785 mm 5 10 B 2 185 mm 7 2 C 4 260 mm 13 12 D 9 870 mm 32 5 E 1 800 5 11 F 1 025 3 4 a 16 b 22 Reference Number Dimension AHS3740L B b A a Figure 5 Reference Number Dimension A 2 016 mm 6 7 B 2 785 mm 9 2 a 45 b 33 Reference Number Dimension ...

Page 52: ...es weight of a cubic meter cubic yard of many types of workload materials APPROXIMATE WEIGHT OF WORKLOAD MATERIALS MATERIAL LOW WEIGHT OR DENSITY 1 100 KG M3 1 850 LB YD3 OR LESS MEDIUM WEIGHT OR DENSITY 1 600 KG M3 2 700 LB YD3 OR LESS HIGH WEIGHT OR DENSITY 2 000 KG M3 3 370 LB YD3 OR LESS Charcoal 401 kg m3 695 lb yd3 Coke blast furnace size 433 kg m3 729 lb yd3 Coke foundry size 449 kg m3 756 ...

Page 53: ...0 lb yd3 Gypsum crushed to 3 inch size 1 522 kg m3 2 565 lb yd3 Gravel DRY packed fragments 1 810 kg m3 3 051 lb yd3 Gravel WET packed fragments 1 922 kg m3 3 240 lb yd3 Limestone graded above 2 1 282 kg m3 2 160 lb yd3 Limestone graded 1 1 2 or 2 1 362 kg m3 2 295 lb yd3 Limestone crushed 1 522 kg m3 2 565 lb yd3 Limestone fine 1 602 kg m3 2 705 lb yd3 Phosphate rock 1 282 kg m3 2 160 lb yd3 MATE...

Page 54: ...PORTANT Weights are approximations of estimated average volume and mass Exposure to rain snow or ground water settling or compaction due to overhead weight and chemical or industrial processing or changes due to thermal or chemical transformations could all increase value of weights listed in table MATERIAL LOW WEIGHT OR DENSITY 1 100 KG M3 1 850 LB YD3 OR LESS MEDIUM WEIGHT OR DENSITY 1 600 KG M3...

Page 55: ...S0203070K Page 14 Specifications for Mega 500 V ...

Page 56: ...1GENERAL MAINTENANCE ...

Page 57: ...ecommendations and safe shop practices outlined in the front of this manual or those contained within this section Always use tools and equipment that is in good working order Use lifting and hoisting equipment capable of safely handling load Remember that ultimately safety is your own personal responsibility MODEL SERIAL NUMBER RANGE ALL MODELS ALL RANGES Copyright 2000 Daewoo December 2000 ...

Page 58: ...ons and Guidelines 3 Hydraulic System General Precautions 4 Maintenance Service and Repair Procedure 5 General Precautions 5 Hydraulic System Cleanliness and Oil Leaks 6 Maintenance Precautions for Hydraulic System Service 6 Oil Leakage Precautions 6 Cleaning and Inspection 7 General Guidelines 7 Bearing inspection 8 ...

Page 59: ... repairs on these types of steel are performed with the proper procedures and equipment If repairs are performed incorrectly structural weakening or other damage to the machine that is not always readily visible could be caused Always consult Daewoo After Sales Service before welding on integral components loader arm frames car body track frames turntable attachment etc of the machine It is possib...

Page 60: ... fluid is recommended Vibration irregular or difficult movement or unusual noise from any part of the hydraulic system could be an indication of air in the system and many other types of problems As a general precaution and to help minimize the risk of potential long term damage allow the engine to run at no load idle speed immediately after initial start up Hydraulic fluid will circulate releasin...

Page 61: ...ation of air leaking into the circuit Refer to the appropriate Troubleshooting section for component or unit for procedures or it may be evidence of a defective pump The gear type pilot pump could be defective causing low pilot pressure or a main pump broken shoe or piston could be responsible NOTE If equipped indicated operating pressure as shown on the multidisplay digital gauge on the Instrumen...

Page 62: ...s of flanges manifolds and piping Do not allow cleaning solvents or other fluids to mix with the oil in the system Use clean oil to flush any traces of solvent or other residue before reassembly If metal or rubber fragments are found in the system flush and replace all fluid in the system and troubleshoot the circuit to identify the source of contamination OIL LEAKAGE PRECAUTIONS Oil that is visib...

Page 63: ... across bearing to avoid spinning bearings that are not lubricated DO NOT SPIN BEARINGS WHEN DRYING bearings may be rotated slowly by hand to facilitate drying process 3 Carefully inspect all bearing rollers cages and cups for wear chipping or nicks to determine condition Do not replace a bearing cone or cup individually without replacing mating cup or cone at the same time After inspection dip be...

Page 64: ...always carefully examine the condition of the bearings and all of its components for wear and damage Once the bearing is removed clean all parts thoroughly using a suitable cleaning solution If the bearing is excessively dirty soak the bearing assembly in a light solution and move the bearing around until all lubricants and or foreign materials are dissolved and the parts are thoroughly clean When...

Page 65: ...th even surfaces with no discoloration or marks Bent Cage Cage damage due to improper handling or tool usage Replace bearing Galling Metal smears on roller ends due to overheat lubricant failure or overload Replace bearing check seals and check for proper lubrication Figure 2 Figure 3 Figure 4 Figure 5 ...

Page 66: ...ray or grayish black in color with related etching away of material usually at roller spacing Replace bearings check seals and check for proper lubrication Misalignment Outer race misalignment due to foreign object Clean related parts and replace bearing Make sure races are properly seated Indentations Surface depressions on race and rollers caused by hard particles of foreign materials Clean all ...

Page 67: ...nder impact loading or vibration while the bearing is not rotating Replace bearing if rough or noisy Cage Wear Wear around outside diameter of cage and roller pockets caused by abrasive material and inefficient lubrication Replace bearings check seals Abrasive Roller Wear Pattern on races and rollers caused by fine abrasives Clean all parts and housings check seals and bearings and replace if leak...

Page 68: ...ce if leaking Smears Smearing of metal due to slippage caused by poor fitting lubrication overheating overloads or handling damage Replace bearings clean related parts and check for proper fit and lubrication Replace shaft if damaged Frettage Corrosion set up by small relative movement of parts with no lubrication Replace bearing Clean all related parts Check seals and check for proper lubrication...

Page 69: ...e made A file drawn over a tempered part will grab and cut metal whereas a file drawn over a hard part will glide readily with no metal cutting Replace bearing if over heating damage is indicated Check seals and other related parts for damage Stain Discoloration Discoloration can range from light brown to black caused by incorrect lubrication or moisture if the stain can be removed by light polish...

Page 70: ...S0302000 Page 14 General Maintenance Procedures Return to Master Table of Contents ...

Page 71: ... shop practices outlined in the front of this manual or those contained within this section Always use tools and equipment that is in good working order Use lifting and hoisting equipment capable of safely handling load Remember that ultimately safety is your own personal responsibility MODEL SERIAL NUMBER RANGE ALL MODELS ALL RANGES Copyright 2000 Daewoo December 2000 ...

Page 72: ...rd Metric Fasteners 3 Torque Values for Standard U S Fasteners 4 Type 8 Phosphate Coated Hardware 6 Torque Values for Hose Clamps 7 Torque Values for Split Flanges 8 Torque Wrench Extension Tools 9 Torque Multiplication 9 Other Uses for Torque Wrench Extension Tools 10 Tightening Torque Specifications Metric 10 ...

Page 73: ... 33 11 50 83 17 12 00 86 79 17 00 122 96 20 00 144 66 M14 x 1 5 4 10 29 65 4 30 31 10 6 60 47 73 5 70 41 22 8 30 60 03 7 50 54 24 11 10 80 28 12 50 90 41 13 00 94 02 18 50 11 26 22 00 158 12 M16 x Std 5 60 40 50 6 00 43 39 9 00 65 09 8 00 57 86 11 50 83 17 10 50 75 94 15 50 112 11 17 90 129 47 18 50 133 81 26 00 188 05 31 00 224 22 M16 x 1 5 6 20 44 84 6 50 47 01 9 70 70 16 8 60 62 20 12 50 90 41 ...

Page 74: ...hed jam nuts are used 0 70 when Molykote white lead or similar mixtures are used as lubricants 0 75 when parkerized bolts or nuts are used 0 85 when cadmium plated bolts or nuts and zinc bolts w waxed zinc nuts are used 0 90 when hardened surfaces are used under the nut or bolt head NOTE When reusing bolts and nuts in service use minimum torque values TYPE S A E GRADE DESCRIPTION BOLT HEAD MARKING...

Page 75: ...L DASHES ON HEAD FOOT POUNDS ft lb NEWTON METER Nm FOOT POUNDS ft lb NEWTON METER Nm 1 4 20 1 4 28 5 16 18 5 16 24 3 8 16 3 8 24 7 16 14 7 16 20 1 2 13 1 2 20 9 16 12 9 16 18 5 8 11 5 8 18 3 4 10 3 4 16 7 8 9 7 8 14 1 8 1 14 1 1 8 7 1 1 8 12 1 1 4 7 1 1 4 12 1 3 8 6 1 3 8 12 1 1 2 6 1 1 2 12 1 3 4 5 2 4 1 2 6 7 13 15 24 27 38 42 58 65 84 93 115 130 205 240 305 334 455 510 610 685 860 955 1130 1290...

Page 76: ...ondition The torques shown below also apply to the following 1 Phosphate coated bolts used in tapped holes in steel or gray iron 2 Phosphate coated bolts used with phosphate coated prevailing torque nuts nuts with distorted threads or plastic inserts 3 Phosphate coated bolts used with copper plated weld nuts Markings on bolt heads or nuts indicate material grade ONLY and are NOT to be used to dete...

Page 77: ...erating lever boots hydraulic system etc CLAMP TYPE AND SIZE TORQUE 5 in lb 0 1 kg m RADIATOR AIR CLEANER BOOTS ETC HYDRAULIC SYSTEM KILOGRAM METER kg m INCH POUNDS in lb KILOGRAM METER kg m INCH POUNDS in lb T Bolt Any Diameter Worm Drive 1 3 4 in Open Diameter and Under Worm Drive Over 1 3 4 in Open Diameter Worm Drive All Ultra Tite 0 6 0 7 0 2 0 3 0 5 0 6 1 1 1 2 55 65 20 30 40 50 95 105 0 5 0...

Page 78: ...NOTE Over torquing bolts will damage the flanges and or bolts which may cause leakage Inside diameter of flange on end of hydraulic tube or hose fitting NOTE Values stated in chart are for Standard Pressure Series Code 61 Split Flanges FLANGE SIZE BOLT SIZE BOLT TORQUE KILOGRAM METER kg m FOOT POUNDS ft lb 1 2 3 4 1 1 1 4 1 1 2 2 2 1 2 3 3 1 2 5 16 3 8 3 8 7 16 1 2 1 2 1 2 5 8 5 8 2 1 2 5 3 0 3 7 ...

Page 79: ...and the back handle end of the torque wrench doubles the tightening force on the bolt It also halves the indicated reading on the scale or dial of the torque wrench To accurately adjust or convert indicated scale or dial readings use the following formula I A x T A B where I Indicated force shown on the torque wrench scale or dial T Tightening force applied to the nut or bolt actual Torque A Lengt...

Page 80: ... degree of precision and accuracy To allow the assembly or mechanism to accept a torque wrench welding a nut or other adapter on the end of a linkage shaft or other leverage point will allow turning the shaft or assembly manually TIGHTENING TORQUE SPECIFICATIONS METRIC For coated threads prelubricated assemblies CAUTION Disassembly overhaul and replacement of components on the machine installation...

Page 81: ...ger Red Heat 260 C 500 F Remove HOT 210 Product Application Color Removal Required Setup 545 No filler non clog formula for high pressure hydraulic systems Over application will not restrict or foul system components Purple Hand tools 4 Hours or 1 2 hour with Locquic T Primer 656 Solvent resistant higher viscosity tapered thread sealer White Hand tools 4 Hours or 1 2 hour with Locquic T Primer Pro...

Page 82: ... strength and all cold temperature applications 620 For high temperatures to 232 C 450 F Green Same as 609 above 680 For high strength bonds and tight clearance gaps to 0 00008 mm 0 002 Green Same as 609 above Product Application Color Notes 380 Black Max instant adhesive for shock and vibration resistant bonds Black May take 120 hours to reach full cure strength 454 Adhesive for porous surfaces C...

Page 83: ...1UPPER STRUCTURE ...

Page 84: ...tlined in the front of this manual or those contained within this section Always use tools and equipment that is in good working order Use lifting and hoisting equipment capable of safely handling load Remember that ultimately safety is your own personal responsibility MODEL SERIAL NUMBER RANGE Mega 500 V 1001 and Up Copyright 2001 Daewoo May 2001 ...

Page 85: ...S0403040K Page 2 Counterweight TABLE OF CONTENTS Specifications 3 Counterweight 3 ...

Page 86: ...S0403040K Page 3 Counterweight SPECIFICATIONS NOTE Weight COUNTERWEIGHT NOTE 1 110 kg m 796 ft lb Mega 500 V 1 920 kg 4 233 lb AHS3700L Figure 1 ...

Page 87: ...S0403040K Page 4 Counterweight ...

Page 88: ...ltimately safety is your own personal responsibility MODEL SERIAL NUMBER RANGE Mega 130 0001 and Up Mega 160 0001 and Up Mega 200 III 1001 and Up Mega 200 V 1001 and Up Mega 250 III 1001 and Up Mega 250 V 1001 and Up Mega 300 V 1001 and Up Mega 400 III PLUS 1001 and Up Mega 400 V 1001 and Up Mega 500 V 1001 and Up Solar 130LC V 0001 and Up Solar 130W V 0001 and Up Solar 170LC V 1001 and Up Solar 1...

Page 89: ...l Description 3 Theory of Operation 3 Troubleshooting 4 Replacement of Rotor and Vane 4 Replacement of Rear Cover 5 Replacement of Armature 6 Solar 290LC V 0001 and Up Solar 290LL 1001 and Up Solar 330LC V 1001 and Up Solar 400LC V 1001 and Up Solar 450LC V 1001 and Up MODEL SERIAL NUMBER RANGE ...

Page 90: ...ERAL DESCRIPTION THEORY OF OPERATION Fuel pump consists of motor pump switch and hose assembly Figure 1 Reference Number Description 1 Motor 2 Pump 2 1 Pump Cover 2 2 Rotor and Vane 3 Inlet Hose 4 Outlet Hose 5 Check Valve 6 Strainer Cap Reference Number Description Figure 2 ...

Page 91: ... If reading is zero or very close to zero the motor is bad and must be replaced On units equipped with a toggle switch check the resistance through the toggle switch while the switch is in the ON position If continuity is not present the switch is bad Be sure to check resistance through the motor REPLACEMENT OF ROTOR AND VANE If dirt or other foreign materials enter pump during operation it can be...

Page 92: ... COVER Brush assembly and a thermal limiter are installed in the rear cover If you find any damage replace them with new ones Loosen the switch cover and screw M5 x L95 from the rear cover Remove cover At reassembly of rear cover widen the space of brush and insert it to the armature Then fit the hole of screw in the housing Be careful when installing screw The cover screw may be attracted by the ...

Page 93: ...h cover and rear cover than remove the armature from the housing Loosen the pump cover and remove the rotor and vane Insert a new armature into the housing Refer to Replacement of Rear Cover on page 5 for installation of rear cover Fit the rotor in the shaft flute of armature Insert vane to the rotor being careful for the direction Refer to Replacement of Rotor and Vane on page 4 Figure 8 ...

Page 94: ...ices outlined in the front of this manual or those contained within this section Always use tools and equipment that is in good working order Use lifting and hoisting equipment capable of safely handling load Remember that ultimately safety is your own personal responsibility MODEL SERIAL NUMBER RANGE Mega 500 V 1001 and Up Copyright 2001 Daewoo May 2001 ...

Page 95: ...S0406040K Page 2 Hydraulic Oil Tank TABLE OF CONTENTS General Description 3 Parts List 3 Specifications 4 ...

Page 96: ... Tank GENERAL DESCRIPTION PARTS LIST SECTION B SECTION A AHS3710L Figure 1 Reference Number Description 1 Return Filter 2 By pass Valve 3 Spring 4 Suction Filter 5 Air Breather 6 Level Gauge 7 Drain Plug Reference Number Description ...

Page 97: ... Pressurized Sealing Capacity System 300 liters 79 U S gal Air breather Open Pressure 0 40 kg cm2 5 7 psi Vacuum pressure 0 035 kg cm2 900 l min 0 5 psi 238 gpm Return Filter Filtration rating 10 µ Pressure drop 0 2 kg cm2 600 l min 3 psi 159 gpm Suction Filter 177 µ ...

Page 98: ...1LOWER STRUCTURE AND CHASSIS ...

Page 99: ... and safe shop practices outlined in the front of this manual or those contained within this section Always use tools and equipment that is in good working order Use lifting and hoisting equipment capable of safely handling load Remember that ultimately safety is your own personal responsibility MODEL SERIAL NUMBER RANGE Mega 500 V 1001 and Up Copyright 2001 Daewoo May 2001 ...

Page 100: ...S0502020K Page 2 Center Joint Articulation Joint TABLE OF CONTENTS General Description 3 Maintenance Standard 4 ...

Page 101: ...around which the loader pivots for steering CAUTION When the loader is steered the area near the center hinge pins becomes so narrow that you might get caught between the front and rear frames Before trying to service the loader make sure to set the frame lock plate Prior to moving traveling the loader make sure the frame lock plate is set to the original position Figure 1 ...

Page 102: ...S0502020K Page 4 Center Joint Articulation Joint MAINTENANCE STANDARD Figure 2 UPPER HINGE 8 18 7 9 13 15 6 11 2 1 3 13 14 4 17 16 5 12 LOWER HINGE AHS3730L ...

Page 103: ... 0 023 0 088 7 Clearance between upper hinge pin and rear frame 100 0 030 0 076 0 054 0 0 030 0 130 8 Clearance between upper hinge pin and bearing 100 0 030 0 076 0 0 015 0 015 0 076 9 Clearance between front frame and upper hinge bearing 180 0 0 025 0 048 0 088 0 023 0 088 11 Height of lower hinge spacer small 42 0 0 12 Height of lower hinge spacer large 81 5 0 0 13 Shim thickness for lower hing...

Page 104: ...S0502020K Page 6 Center Joint Articulation Joint ...

Page 105: ...1ENGINE AND DRIVE TRAIN ...

Page 106: ... outlined in the front of this manual or those contained within this section Always use tools and equipment that is in good working order Use lifting and hoisting equipment capable of safely handling load Remember that ultimately safety is your own personal responsibility MODEL SERIAL NUMBER RANGE Mega 500 V 1001 and Up Copyright 2001 Daewoo May 2001 ...

Page 107: ...Check 8 Oil Change Intervals Generally 8 Brake 8 Point of Grease Lubrication 8 List of Lubricants TE ML 05 9 Examples of Gear tooth contact Patterns for the Gleason Gear tooth System 11 Special Tools 15 Final Drive 16 AP 407 409 16 AP 411 415 18 AP 417 420 20 Differential Version Screwed Bearing Caps 22 Differential Carrier CK 22 Differential Carrier RK 24 Differential Carrier DK 26 Differential V...

Page 108: ...61 Complete Internal Gear Carrier 62 Internal Gear Carrier 64 Adjusting Plate Clearance According To Table 67 Determine Sun gear Shaft Play 70 Illustrated Table 73 Differential Reassembly Version Screwed Bearing Caps 74 Determine Thickness of Shim 74 Adjust Rolling Resistance of Drive Pinion Bearing 78 Differential 81 Determine Plate Clearance 84 Adjustment of Bearing Preload and Backlash 86 Illus...

Page 109: ... Reassembly Version Screwed and Cast on Bearing Caps 106 Determine Thickness of Shim 106 Adjustment of Drive Pinion Bearing Rolling Resistance 108 Differential 112 Determination of Plate Clearance 115 Adjustment of Bearing Preload and Backlash 117 Illustrated Table 120 ...

Page 110: ...netary gear train Planetary gear train Overall Reduction Ratio 27 1 27 1 Axle Load Travel Condition 14 900 kg 32 850 lb 14 000 kg 30 860 lb Axle Load Working Condition 27 000 kg 59 520 lb 10 500 kg 23 150 lb Brake Type Wet disc Multidisk brake with hydraulic control Wet disc Multidisk brake with hydraulic control Brake Torque 3 960 kg 50 kg cm2 8 730 lb 711 psi 3 960 kg 50 kg cm2 8 730 lb 711 psi ...

Page 111: ... 34 68 27 0 4 79 M 10 x 1 25 M 12 x 1 25 M 12 x 1 5 49 87 83 72 125 122 84 150 145 M 12 M 14 M 16 79 125 195 117 185 280 135 215 330 M 14 x 1 5 M 16 x 1 5 M 18 x 1 5 135 205 310 200 300 440 235 360 520 M 18 M 20 M 22 280 390 530 390 560 750 460 650 880 M 18 x 2 M 20 x 1 5 M 22 x 1 5 290 430 580 420 620 820 490 720 960 M 24 M 27 M 30 670 1 000 1 350 960 1 400 1 900 1 120 1 650 2 250 M 24 x 1 5 M 24...

Page 112: ... 8 M 10 M 12 32 61 108 44 84 148 M 12 x 1 25 M 12 x 1 5 M 14 x 1 5 118 113 185 163 155 254 M 14 M 16 M 18 169 263 358 233 362 493 M 16 x 1 5 M 18 x 1 5 M 20 x 2 280 405 536 385 556 737 M 20 508 698 Metric ISO Standard Thread DIN 13 See page 60 Metric ISO Fine Thread DIN 13 See page 60 Size 12 9 Size 12 9 M 5 M 6 M 8 10 5 17 5 42 0 M 8 x 1 M 10 x 1 25 M 10 x 1 46 86 91 M 10 M 12 M 14 81 140 225 M 1...

Page 113: ...n the center Differential carrier not installed in a ZF Axle Fill up oil 20 mm 0 7874 in below the middle of the crown wheel Oil Level Check After a few minutes if oil level has dropped fill up to the correct level until level remains constant Oil level check monthly Especially before you start a vehicle with new or repaired axles or their components resp Oil Change Intervals Generally 1st oil cha...

Page 114: ... composition of trade names of approved products and of differences between Germany and other countries Axles Approved Lubricants Axles and axle center reduction gears Wheel hubs and half shafts Axle differentials Gear oils with or without limited slip additives API GL 5 MIL L 2105 D SAE 80 W 90 SAE 85 W 90 SAE 85 W 140 SAE 90 For commercial products see A12 and A13 Axles and axle center reduction...

Page 115: ...ltidisk self locking differentials a slight noise could be noted when oil without limited slip additives have been filled in This noise can be regarded as harmless In case of heavy noise or when the tire is jerking use EP gear lubricants with Limited Slip additives You will find the corresponding products on the list of lubricants TE ML 05 for the above mentioned units ...

Page 116: ...R EXAMPLES OF GEAR TOOTH CONTACT PATTERNS FOR THE GLEASON GEAR TOOTH SYSTEM Ideals Tooth contact Pattern I E Pinion Distance Is Correct Coast side concave Drive side convex Pinion Distance must be increased Figure 2 Figure 3 Figure 4 ...

Page 117: ...S0602170K Page 12 Axle ZF AP 420R Pinion distance must be decreased Figure 5 Figure 6 Figure 7 Figure 8 ...

Page 118: ...S0602170K Page 13 Axle ZF AP 420R Figure 9 ...

Page 119: ...S0602170K Page 14 Axle ZF AP 420R ...

Page 120: ...of these tools are common tools used by most service personnel It is advised that the service person review these illustrations and make their determination of what is required in their particular case All tools are listed throughout the text of the manual with an S Name of the tool and a ZF part number All tools are available through ZF ...

Page 121: ...S0602170K Page 16 Axle ZF AP 420R FINAL DRIVE AP 407 409 Figure 10 ...

Page 122: ...ting bracket Figure 31 5870 281 016 Expanding claw Figure 32 Figure 123 5870 281 034 Spring hook Figure 34 5870 028 006 Grab sleeve super Figure 34 5870 028 010 Grab sleeve super Figure 103 5870 204 026 Adjusting screw Ml8 set of 2 Figure 104 5870 610 001 Wheel stud puller Basic set 5870 610 002 Insert M22 x 1 5 Figure 105 5870 050 004 Driver Figure 105 5870 050 010 Driver 5870 260 004 Driver Figu...

Page 123: ...S0602170K Page 18 Axle ZF AP 420R AP 411 415 Figure 11 ...

Page 124: ...cket Figure 31 5870 281 016 Expanding claw Figure 32 Figure 123 5870 281 034 Spring hook Figure 34 5870 028 007 Grab sleeve super Figure 103 5870 204 044 Adjusting screw M20 x 1 5 set of 2 Figure 104 5870 610 001 Wheel stud puller Basic set 5870 610 002 Insert M22 x 1 5 Figure 105 5870 050 004 Driver 5870 260 004 Driver Figure 105 5870 050 011 Driver 5870 260 004 Driver Figure 110 Figure 115 Figur...

Page 125: ...S0602170K Page 20 Axle ZF AP 420R AP 417 420 Figure 12 ...

Page 126: ...5 5870 345 036 Pry bar set of 2 Figure 30 Figure 110 5870 281 033 Lifting bracket Figure 31 5870 281 016 Expanding claw Figure 32 Figure 123 5870 281 034 Spring hook Figure 34 5870 028 008 Grab sleeve super Figure 34 5870 028 011 Grab sleeve super Figure 103 5870 204 045 Adjusting screw M24 set of 2 Figure 104 5870 610 001 Wheel stud puller Basic set 5870 610 002 Basic set M22 x 1 5 Figure 105 587...

Page 127: ...S0602170K Page 22 Axle ZF AP 420R DIFFERENTIAL VERSION SCREWED BEARING CAPS Differential Carrier CK Figure 13 ...

Page 128: ... bar set of 2 Figure 47 5870 026 001 Grab sleeve Super 5870 506 058 Pressure piece 5870 026 100 Back off insert Figure 47 5870 027 025 Grab sleeve Super 5870 506 058 Pressure piece 5870 027 000 Basic set Figure 53 Figure 164 Figure 166 Figure 169 5870 240 025 Clamping yoke Figure 58 5870 027 004 Grab sleeve Super Figure 154 5870 500 001 Measuring shaft 5870 500 028 Adjusting piece 5870 351 016 Mea...

Page 129: ...S0602170K Page 24 Axle ZF AP 420R Differential Carrier RK Figure 14 ...

Page 130: ...on 5870 027 000 Basic set Figure 47 5870 287 002 HP Pump 5870 287 008 Hydro cylinder LZM 25 200 5870 285 018 Sleeve M110 x 3 M68 x 2 5870 285 015 Bayonet catch M125 x 3 Figure 53 Figure 164 Figure 166 Figure 169 5870 240 025 Clamping yoke Figure 58 5870 029 008 Grab sleeve Super 5870 285 017 Pressing ring M125 x 3 Figure 154 5870 500 001 Measuring shaft 5870 500 008 Adjusting piece set of 2 5870 3...

Page 131: ...S0602170K Page 26 Axle ZF AP 420R Differential Carrier DK ...

Page 132: ...70 506 058 Pressure piece 5870 026 100 Back off insert Figure 47 5870 027 025 Grab sleeve Super 5870 506 058 Pressure piece 5870 027 000 Basic set Figure 53 Figure 164 Figure 166 Figure 169 5870 240 025 Clamping yoke Figure 58 5870 027 004 Grab sleeve Super 5870 027 000 Basic set Figure 154 5870 500 001 Measuring shaft 5870 500 028 Adjusting piece set of 2 5870 351 016 Measuring pin 5870 351 012 S...

Page 133: ...S0602170K Page 28 Axle ZF AP 420R DIFFERENTIAL VERSION CAST ON BEARING CAPS Differential Carrier DK Figure 15 ...

Page 134: ...ab sleeve Super JM 714 249 5870 027 000 Basic set Figure 70 5870 345 036 Pry bar set of 2 Figure 76 Figure 208 Figure 212 5870 240 025 Clamping yoke Figure 81 5870 027 021 Grab sleeve Super 31 313 Figure 198 5870 500 001 Measuring shaft 5870 500 006 Adjusting piece set of 2 5870 351 016 Measuring pin 5870 351 013 Stop washer Figure 202 5870 058 060 Drive Figure 204 5870 340 001 Measuring ring Figu...

Page 135: ...S0602170K Page 30 Axle ZF AP 420R Differential Carrier HK Figure 16 ...

Page 136: ... 5870 345 036 Pry bar set of 2 Figure 76 Figure 208 Figure 212 5870 240 025 Clamping yoke Figure 198 5870 500 001 Measuring shaft 5870 500 007 Adjusting piece set of 2 5870 351 016 Measuring pin 5870 351 018 Stop washer Figure 76 Figure 208 Figure 212 5870 401 093 Hook spanner Figure 81 5870 027 021 Grab sleeve Super JW 7049 Figure 204 5870 340 026 Measuring ring Figure 211 5870 048 089 Driver Fig...

Page 137: ...S0602170K Page 32 Axle ZF AP 420R DIFFERENTIAL VERSION CAST ON AND SCREWED BEARING CAPS Differential Carrier LK Figure 17 ...

Page 138: ...uper 5870 027 000 Basic set Figure 96 Figure 254 Figure 256 Figure 259 5870 240 025 Clamping yoke Figure 96 Figure 254 Figure 256 Figure 259 5870 401 093 Hook spanner 5870 912 015 Centering disk Figure 101 5870 027 023 Grab sleeve Super 5870 027 000 Basic set Figure 244 5870 500 001 Measuring shaft 5870 500 030 Adjusting piece set of 2 5870 500 022 Adjusting piece set of 2 5870 351 016 Measuring p...

Page 139: ...GID AXLE AP 407 420 DISASSEMBLY Figure 18 shows the total view of the axle NOTE See Special Tools on page 15 FINAL DRIVE 1 Remove oil drain plug and drain oil 2 Remove hex head screws and lift off the planetary carrier Figure 18 Figure 19 Figure 20 ...

Page 140: ...ust washer NOTE See Special Tools on page 15 5 Pull sun gear along with inner plate carrier from the stab shaft resp out of the plate pack 6 Remove locking screws and remove ring from the inner plate carrier 7 Squeeze out circlip NOTE See Special Tools on page 15 Figure 21 Figure 22 Figure 23 Figure 24 ...

Page 141: ...P 420R 8 Remove backing plate and plate pack 9 Remove thrust washer 10 Remove lock plate NOTE See Special Tools on page 15 11 Loosen and remove slotted nut NOTE See Special Tools on page 15 Figure 25 Figure 26 Figure 27 Figure 28 ...

Page 142: ...te complete hub from hub carrier NOTE See Special Tools on page 15 14 Lift internal gear and internal gear carrier out of the hub 15 Remove released spacer NOTE See Special Tools on page 15 16 Unhook return springs NOTE See Special Tools on page 15 Figure 29 Figure 30 Figure 31 Figure 32 ...

Page 143: ... page 15 18 Pull off tapered roller bearing from the internal gear carrier NOTE See Special Tools on page 15 19 Pry shaft seal out of the hub and remove the inner bearing race NOTE See Special Tools on page 15 20 If required drive out and remove the two outer bearing races Figure 33 Figure 34 Figure 35 Figure 36 ...

Page 144: ...S0602170K Page 39 Axle ZF AP 420R 21 Remove bleeder valve 22 Remove hex head screws and separate the hub carrier from the axle housing Figure 37 Figure 38 ...

Page 145: ...he axle housing 2 Remove hex head screws and separate planetary carrier from the hubs using eye hook NOTE See Special Tools on page 15 3 Pull inner plate carrier along with sun gear from the stub shaft 4 Pull stub shaft out of the axle housing Squeeze out circlip and remove the plate pack NOTE This step is necessary to make the later installation of the inner plate carrier possible NOTE See Specia...

Page 146: ...page 15 6 Fasten the differential carrier in the assembly jig 7 Remove lock wire and drive roll pins out NOTE See Special Tools on page 15 8 Loosen adjusting nuts NOTE See Special Tools on page 15 9 Remove hex head screws and remove the two bearing caps NOTE Match mark bearing caps with housings see Arrow Figure 42 Figure 43 Figure 44 Figure 45 ...

Page 147: ...NTIAL 1 Pull the two inner bearing races of the tapered roller bearing from the differential case halves NOTE See Special Tools on page 15 2 Match mark housing cover with differential 3 Clamp the differential case halves remove the locking screws 4 Back off the cover NOTE Pay attention to the released thrust washer Figure 46 Figure 47 Figure 48 Figure 49 ...

Page 148: ...ential case 6 Press crown wheel from the differential case DRIVE UNIT 1 Unlock slotted nut or hex head screw according to the Version and remove lock plate 2 Loosen slotted nut or hex nut according to the Version and remove it along with washer NOTE See Special Tools on page 15 Figure 50 Figure 51 Figure 52 Figure 53 ...

Page 149: ... Pull off the drive flange 4 Pry out the shaft seal 5 Press drive pinion out of the axle carrier NOTE Pay attention to the released tapered roller bearing 6 Remove spacer from the drive pinion end Figure 54 Figure 55 Figure 56 Figure 57 ...

Page 150: ...ZF AP 420R 7 Press tapered roller bearing from the drive pinion using grab sleeve see Arrow NOTE See Special Tools on page 15 8 If necessary drive the two outer bearing races out of the axle carrier bores Figure 58 Figure 59 ...

Page 151: ...er from the axle housing see Figure 60 Figure 63 1 Drain oil from the final drive and the axle housing 2 Remove hex head screws and separate planetary carrier from the hubs using eye bolt NOTE See Special Tools on page 15 3 Pull inner plate carrier along with sun gear from the stub shaft 4 Pull stub shaft out of the axle housing Figure 60 Figure 61 Figure 62 ...

Page 152: ...al Tools on page 15 6 Remove hex head screws and separate differential carrier from the axle housing using back off screws NOTE See Special Tools on page 15 DIFFERENTIAL 1 Fasten the differential carrier in the assembly jig 2 Drive out the roll pin on the crown wheel side NOTE See Special Tools on page 15 3 Loosen and remove adjusting nut Figure 63 Figure 64 Figure 65 Figure 66 ...

Page 153: ...e the crown wheel side remove adjusting nut and outer bearing race See Figure 68 7 Pull off inner bearing race from the housing cover resp differential case NOTE See Special Tools on page 15 8 Match mark housing cover with differential case 9 Remove locking screws NOTE See Special Tools on page 15 Figure 67 Figure 68 Figure 69 Figure 70 ...

Page 154: ... carrier 11 Lift differential carrier out of the axle carrier 12 Take all components of the multidisk self locking differential out of the differential case 13 Clamp the differential housing 14 Remove locking screws and separate the crown wheel from the differential case Figure 71 Figure 72 Figure 73 Figure 74 ...

Page 155: ... or hex nut according to the Version and remove lock plate 2 Loosen slotted nut or hex nut according to the Version and remove it along with washer NOTE See Special Tools on page 15 3 Pull off drive flange 4 Pry out shaft seal Figure 75 Figure 76 Figure 77 Figure 78 ...

Page 156: ...on to the released tapered roller bearing If necessary drive the two outer bearing races out of the axle carrier bores 6 Pull spacer from the drive pinion end 7 Press tapered roller bearing from drive pinion using grab sleeved See Arrow NOTE See Special Tools on page 15 Figure 79 Figure 80 Figure 81 ...

Page 157: ...e and the axle housing 2 Remove hex head screws and separate planetary carrier from the hub using eye bolt NOTE See Special Tools on page 15 3 Pull inner plate carrier along with the sun gear from the stub shaft 4 Pull stub shaft out of the axle housings squeeze out circlip and remove the plate pack NOTE This step is necessary to allow the later installation of the inner plate carrier NOTE See Spe...

Page 158: ... axle housing NOTE See Special Tools on page 15 6 Fasten differential carrier in the assembly jig 7 Drive out the roll pin NOTE See Special Tools on page 15 8 Remove lock wire and lock plate 9 Loosen and remove the two adjusting nuts NOTE See Special Tools on page 15 Figure 85 Figure 86 Figure 87 Figure 88 ...

Page 159: ...rier NOTE Pay attention to the released outer bearing races NOTE See Special Tools on page 15 DIFFERENTIAL 1 Pull off the two inner bearing races from the housing cover resp differential case NOTE See Special Tools on page 15 2 Match mark housing cover with differential case 3 Remove locking screws Figure 89 Figure 90 Figure 91 Figure 92 ...

Page 160: ... Clamp the differential case half 6 Remove locking screws and separate the crown wheel from the differential case DRIVE UNIT 1 Unlock slotted nut and remove lock plate 2 Loosen slotted nut or hex nut according to the Version and remove it along with washer NOTE See Special Tools on page 15 Figure 93 Figure 94 Figure 95 Figure 96 ...

Page 161: ...20R 3 Pull off drive flange 4 Pry out shaft seal 5 Press drive flange out of the axle carrier NOTE Pay attention to the released tapered roller bearing 6 Pull spacer from the drive pinion end Figure 97 Figure 98 Figure 99 Figure 100 ...

Page 162: ...Page 57 Axle ZF AP 420R 7 Separate the tapered roller bearing from the drive pinion NOTE See Special Tools on page 15 8 If necessary drive the two outer bearing races out of the axle carrier Figure 101 Figure 102 ...

Page 163: ...on page 6 NOTE See Special Tools on page 15 2 Pull the wheel studs into the hub bores using a special device NOTE See Special Tools on page 15 3 Drive both outer bearing races firmly against shoulder NOTE See Special Tools on page 15 CAUTION Pay attention to the installation position Cover flange mounted surface with sealing compound Figure 103 Figure 104 Figure 105 ...

Page 164: ...rrier 6 Heat inner bearing race and place it firmly against shoulder 7 Assemble spacer s 5 4 mm 0 2126 in empirical value NOTE If hub carriers hub and internal gear carrier are not replaced we recommend to install the existing spacer again Decisive however is the rolling resistance of the wheel bearing See Figure 112 Figure 106 Figure 107 Figure 108 Figure 109 ...

Page 165: ...al Tools on page 15 Check Rolling Resistance of Wheel Bearing T F x R from that result Tractive Force T Rolling resistance in Nm Newton meter F Tractive Force in N Newton R Radius in m meter NOTE See Special Tools on page 15 1 Nominal value Bearing rolling moment NOTE AP 407 409 411 415 11 18 Nm 8 1 13 3 ft lb AP 417 420 14 20 Nm 10 3 14 7 ft lb NOTE For already run in bearings try to find the low...

Page 166: ...NOTE Installation depth 7 0 7 8 mm 0 2756 0 3071 in is determined by the special tool If necessary according to the Version heat cover plate before assemble the hub and install it NOTE See Special Tools on page 15 3 Carefully guide hub over the hub carrier end against shoulder NOTE See Special Tools on page 15 Figure 113 Figure 114 Figure 115 ...

Page 167: ...ts Stick on support ribbons at two points using Loctite 496 3 The support ribbons must adhere exactly around the whole circumference Remove any sticking residues 4 Install packing rings 2 and U section lings 3 NOTE Pay attention to the installation position see Figure 116 Reference Number Description 1 Backup Ring 2 Packing Ring 3 U section Ring Figure 116 Figure 117 Figure 118 ...

Page 168: ...tion position openings for return springs With installed condition the support ribbon openings must face upwards 7 Press piston carefully against shoulder using clamping plate S and two leg puller S NOTE See Special Tools on page 15 8 Engage return springs with lug facing outwards on the circlip and assemble it in the internal gear carrier NOTE Pay attention to the radial installation position of ...

Page 169: ...carrier and grease it slightly 11 Mark the location of the oil supply holes on the face see Arrow INTERNAL GEAR CARRIER 1 Screw installer S over the threads of the hub carrier 2 Assemble the spacer determined in Figure 109 NOTE See Special Tools on page 15 3 Guide O ring over the hub carrier and insert it into the groove 4 Mark the radial location of the oil supply bores on the face see Arrows Fig...

Page 170: ...f the hub to make a correct reassembly of the internal gear internal gear carrier possible and to avoid a damage of the two O rings 6 Tighten slotted nut while continuously turning of the hub NOTE Torque limit AP 407 409 800 1 000 Nm 590 740 ft lb AP 411 415 1 300 1 500 Nm 960 1 105 ft lb AP 417 420 2 000 2 200 Nm 1 475 1 620 ft lb NOTE See Special Tools on page 15 7 Install lock plate and secure ...

Page 171: ...420R 9 Attach oil seal to inner plate carrier NOTE Torque limit AP 407 420 50 Nm 37 ft lb 10 Install thrust washer 11 Guide the inner plate carriers along with the sun gear on the stub shaft splines Figure 131 Figure 132 Figure 133 ...

Page 172: ...attention to the correct location of the piston against the internal gear carrier NOTE See Special Tools on page 15 4 Measure dimension B from the flange mounted surface hub to the inner plane surface of the circlip Dimension B e g 75 20 mm 2 9606 in 5 Outer plate 4 x 4 5 mm 0 1575 x 0 1772 in Dimension C e g 18 00 mm 0 7087 in Number of inner plate Number of friction faces Plate clearance piston ...

Page 173: ...late clearance according the table See page 67 is not obtained correct with corresponding outer plates If necessary mount thinner outer plates on the piston side resp backing plate side Dimension A 121 50 mm 4 7835 in Dimension B 75 20 mm 2 9606 in Dimension C 18 00 mm 0 7080 in Dimension D 13 50 mm 0 5315 in Dimension E 12 00 mm 0 4724 in Difference Plate clearance 2 80 mm 0 1102 in Figure 137 Fi...

Page 174: ...tarting with one outer plate 9 Figure 140 shows the required arrangement of the outer plates 10 Insert backing plate stepped plane surface is facing outwards 11 Hold plate pack into position using circlip NOTE See Special Tools on page 15 Figure 139 Figure 140 Figure 141 Figure 142 ...

Page 175: ...3 Squeeze in circlip Determine Sun gear Shaft Play Normal value 0 3 0 6 mm 0 0118 0 0236 in try to fine the higher value 1 Place sun gear and plate carrier against shoulder Dimension A e g 6 00 mm 0 2362 in 2 Determine dimension B from the flange mounted surface to the thrust washer Dimension B e g 5 50 mm 0 2165 in NOTE For the measurement lay thrust washer into the planetary carrier Figure 143 F...

Page 176: ...g into the ring groove of the planetary carrier Arrow 4 Assemble planetary carrier until contact is obtained 5 Tighten hex head screws NOTE See Torque Limits for Screws on page 6 Dimension A 6 00 mm 0 2362 in Dimension B 5 50 mm 0 2165 in Required end play of the sun gear shaft 0 50 mm 0 0197 in Figure 147 Figure 148 Figure 149 ...

Page 177: ...limit 50 Nm 37 ft lb NOTE Before the Axle is put into service follow the Lubrication Instructions on page 8 CAUTION Bleed the brake After having applied the brake for about 10 times carry out the following pressure test Using a suitable pressure apparatus Lukas or similar with stopcock build up an actuating pressure of 120 bar Close the stopcock and pressurize the brake for 5 minutes with this pre...

Page 178: ...S0602170K Page 73 Axle ZF AP 420R ILLUSTRATED TABLE Figure 152 ...

Page 179: ...IM NOTE The following measuring operations must be carried out with utmost care Inexact measurements would cause an incorrect contact pattern and require replacement of the drive pinion and the differential partial after the contact pattern has been taken See Examples of Gear tooth contact Patterns for the Gleason Gear tooth System on page 11 1 Install adjusting pieces 3 and temporarily fasten the...

Page 180: ...mension b e g 0 70 mm 0 0276 in NOTE See Special Tools on page 15 EXAMPLE I 3 Measure bearing width Bearing width e g 33 50 mm 1 3189 in Dimension a measuring piston 166 80 mm 6 5669 in Dimension b 0 70 mm 0 0276 in Dimension C 1 2 measuring shaft 15 00 mm 0 5906 in Gives Dimension X 182 50 mm 7 1850 in Figure 154 Figure 155 ...

Page 181: ... housing bore 7 Freeze outer bearing race and press it firmly against shoulder 8 Install the drive flange side outer bearing race correspondingly NOTE See Special Tools on page 15 Bearing width 33 50 mm 1 3189 in Pinion dimension 147 80 mm 5 8189 in Gives Dimension X 1 181 30 mm 7 1378 in Dimension X 182 50 mm 7 1457 in Dimension X 1 182 30 mm 7 1772 in Difference Shim thickness s 1 20 mm 0 0472 i...

Page 182: ...S0602170K Page 77 Axle ZF AP 420R 9 Heat inner bearing race guide it over the drive pinion end until contact is obtained NOTE Pay attention to a correct contact reset after the cooling Figure 159 ...

Page 183: ...Nominal Value 1 Lay measuring ring over the drive pinion collar NOTE Configuration and description of the measuring ring See Figure 161 NOTE See Special Tools on page 15 DK CK 1 1 2 3 Nm 9 7 20 3 in lb HK 1 5 3 0 Nm 13 2 17 7 in lb LK RK 3 0 4 5 Nm 17 7 39 8 in lb Figure 160 Figure 161 ...

Page 184: ...inner bearing race until contact is obtained 4 Guide drive flange over the drive pinion splines 5 Install washer and tighten slotted nut until the required rolling resistance is obtained NOTE When tightening make several full revolutions of the drive pinion in both directions and check the rolling resistance continuously NOTE See Special Tools on page 15 6 Remove slotted nut pull off drive flange ...

Page 185: ...the measuring ring over the drive pinion end Install drive pinion again 8 Replace drive flange install washer and tighten slotted nut NOTE Torque limit RK 1 100 Nm 810 ft lb LK 1 200 Nm 885 ft lb CK 700 Nm 515 ft lb NOTE When tightening mate several full revolutions of the drive pinion in both directions 9 Check rolling resistance NOTE If the required rolling resistance is not obtained correct aga...

Page 186: ...NOTE The securing of the slotted nuts resp hex nut according to the Version is carried out after the contact pattern is taken NOTE See Special Tools on page 15 DIFFERENTIAL 1 Heat the crown wheel center and temporarily fasten it into position CAUTION Pay attention to the contact If the shaft seal outer diameter is lubber coated the sealing face must be wetted with mineral spirits Otherwise use sea...

Page 187: ...rive pin 4 Assemble alternating outer and inner plates starting with one outer plate NOTE Number and installation position of the outer and inner plates see corresponding spare parts list according tO the Version The total height thickness of the plate pack must be equal on both differential sides Plate thickness of outer plates may be different 5 Mount pressure ring Figure 171 Figure 172 Figure 1...

Page 188: ...plete differential spider 8 Install the second side gear NOTE Pay attention to the radial installation position of the pressure ring 9 Install the second pressure ring and insert all drive pins NOTE Pay attention to the radial installation position of the pressure ring Figure 175 Figure 176 Figure 177 Figure 178 ...

Page 189: ... A e g 3 40 mm 0 1339 in 2 Housing cover Determine dimension B from the contact face outer plate to the flange mounted surface Dimension B e g 3 10 mm 0 1220 in NOTE The proscribed end play plate clearance is 0 2 0 8 mm 0 0079 0 0315 in whilst the lower value should be found The end play is corrected by installing outer plates of corresponding thickness whilst the plate thickness must be equal on ...

Page 190: ...y attention to the installation position see Figure 182 Only use of the locking screws one time Do not reuse them NOTE See Torque Limits for Screws on page 6 C Heat the two inner bearing races and place them against shoulder D Install the two outer bearing races and insert the differential assembly into the housing E Secure the differential using the adjusting nuts NOTE See Special Tools on page 1...

Page 191: ...e until the required backlash see value engraved on the crown wheel outer diameter is obtained NOTE See Special Tools on page 15 2 Screw in the adjusting nut opposite the crown wheel side until the differential bearing is free of play Now tighten adjusting nut further for 2 notches to obtain the required bearing preload of the differential bearing 3 4 Nm 26 5 35 4 in lb 3 Check backlash again and ...

Page 192: ...e drive pinion back and forth C Check the contact pattern and compare it with Examples of Gear tooth contact Patterns for the Gleason Gear tooth System on page 11 D In case of a greater contact pattern deviation a spacing error has been made during the reassembly of the drive pinion which must be corrected E Lock the two adjusting nuts using roll pins resp cotter pins according to the version F Se...

Page 193: ...e differential carrier against the axle housing until contact is obtained NOTE See Special Tools on page 15 K Fasten differential carrier on the axle housing using hex head screws NOTE Cover hex head screws with sealing compound Loctite 573 NOTE See Torque Limits for Screws on page 6 NOTE Now install the stub shafts again and complete the final drive NOTE Before the axle is put into service follow...

Page 194: ...S0602170K Page 89 Axle ZF AP 420R ILLUSTRATED TABLE Figure 196 ...

Page 195: ...ure 197 DETERMINE THICKNESS OF SHIM NOTE The following measuring operations must be carried out with utmost care Inexact measurements would cause an incorrect contact pattern and require a replacement of the drive pinion and the differential partial after the contact pattern has been taken See Examples of Gear tooth contact Patterns for the Gleason Gear tooth System on page 11 1 Install adjusting ...

Page 196: ...th feeler gauge Dimension b e g 0 70 mm 0 0276 in EXAMPLE I 3 Measure bearing width Bearing width e g 42 45 mm 1 6713 in Dimension a measuring pin 226 00 mm 8 8976 in Dimension b 0 70 mm 0 0276 in Dimension c 1 2 measuring shaft 15 00 mm 0 5906 in Gives Dimension X 241 70 mm 9 5157 in Figure 198 Figure 199 ...

Page 197: ...eeze outer bearing race and press it firmly against shoulder 7 Install the drive flange side outer bearing race correspondingly NOTE See Special Tools on page 15 Bearing width 42 45 mm 1 6712 in Pinion dimension 197 90 mm 7 7913 in Gives Dimension X1 240 35 mm 9 4626 in Dimension X 241 70 mm 9 5157 in Dimension X1 240 35 mm 9 4626 in Difference Shim thickness s 1 35 mm 0 0531 in Figure 200 Figure ...

Page 198: ...S0602170K Page 93 Axle ZF AP 420R 8 Heat inner bearing race guide it over the drive pinion end until contact is obtained Figure 203 ...

Page 199: ...E Nominal Value 1 Lay measuring ring over the drive pinion collar NOTE Configuration and description of the measuring ring See Figure 205 NOTE See Special Tools on page 15 DK CK 1 1 2 3 Nm 9 7 20 3 in lb HK 1 5 3 0 Nm 13 2 17 7 in lb LK RK 3 0 4 5 Nm 17 7 39 8 in lb Figure 204 Figure 205 ...

Page 200: ...ier and assemble the heated inner bearing race until contact is obtained 4 Tighten washer and tighten slotted nut the required rolling resistance is obtained NOTE When tightening make several full revolutions of the drive pinion in both directions and check the rolling resistance continuously NOTE See Special Tools on page 15 5 Loosen slotted nut tighten drive flange and remove the pinion again Fi...

Page 201: ...515 ft lb NOTE When tightening make several full revolutions of the drive pinion in both directions 8 Check rolling resistance NOTE If the required rolling resistance is not obtained correct again with a corresponding spacer 9 Install shaft seal 10 If the outer diameter of the shaft seal is rubber coated wet the sealing lip with mineral spirits otherwise use the sealing compound Loctite 586 Fill c...

Page 202: ...s carried out after the contact pattern is taken DIFFERENTIAL 1 Heat the crown wheel and place it against the differential case half until contact is obtained 2 Clamp differential case using press 3 Tighten locking screws NOTE Only single use of the locking screws is admitted 4 Press inner bearing race firmly against shoulder 5 Lay the two thrust washers into the differential case half NOTE Mount ...

Page 203: ...s starting with one outer plate NOTE For number and installation position of outer and inner plates see corresponding List of Spare Parts according to the Version The total height thickness of the plate pack must be equal on both differential sides Plate thickness of outer plates may be different 9 Replace pressure ring Figure 216 Figure 217 Figure 218 Figure 219 ...

Page 204: ... plates at the same time 11 Insert the differential spider assembly 12 Install second side gear 13 Install second pressure ring and insert all drive pins NOTE Pay attention to the radial installation position of the pressure ring Figure 220 Figure 221 Figure 222 Figure 223 ...

Page 205: ...e g 4 00 mm 0 1575 in 2 Housing cover Determine dimension B from the contact face outer plate to the flange mounted surface Dimension B e g 3 80 mm 0 1496 in NOTE The proscribed end play plate clearance is 0 2 0 8 mm 0 0079 0 0315 in whilst the lower value should be found The end play is corrected by the installation of outer plates of corresponding thickness whilst the plate thickness must be equ...

Page 206: ... NOTE Mount brass washer on top with the lubricating groove facing the side gear 5 Lay housing cover over the differential case NOTE Pay attention to the installation position see Figure 229 6 Fasten the housing cover using locking screws NOTE Only use locking screws one time Do not reuse them NOTE See Special Tools on page 15 Figure 227 Figure 228 Figure 229 Figure 230 ...

Page 207: ...ert the crown wheel side outer bearing race into the bearing bore and temporarily hold it in position with the second adjusting nut Adjustment of Bearing Preload and Backlash 1 Attach dial indicator right angled on the outer diameter of the tooth flank crown wheel 2 Adjust adjusting nut on the crown wheel side until the required backlash see value engraved on the crown wheel outer diameter is obta...

Page 208: ...ace crown wheel make at least one revolution of the crown wheel and record the run out NOTE Admitted run out max 0 08 mm 0 0031 in NOTE See Special Tools on page 15 7 Check contact pattern on the crown wheel A Cover some tooth flanks of the crown wheel with gear marking compound B Roll the clown wheel over the drive pinion back and forth C Take the contact pattern and compare it with Examples of G...

Page 209: ...Screw in the two adjusting screws and place the differential carrier against the axle housing until contact is obtained NOTE See Special Tools on page 15 J Fasten differential carrier on the axle housing using hex head screws NOTE Cover threads of hex head screws with sealing compound NOTE Now install stub shafts again and complete the final drive NOTE Before the Axle is put into Service follow th...

Page 210: ...S0602170K Page 105 Axle ZF AP 420R ILLUSTRATED TABLE Figure 242 ...

Page 211: ...se an incorrect contact pattern and require a replacement of the drive pinion and the differential partial after the contact pattern has been taken 1 Install adjusting pieces 3 and temporarily fasten the two bearing caps Install stop washer 2 and measuring pin 1 and introduce measuring shaft 4 see Figure 243 Special Tools 2 Determine gap Dimension b between measuring piston and measuring shaft wit...

Page 212: ... in EXAMPLE II EXAMPLE III 5 Lay shim according to the Example s 1 20 mm 0 0472 in into the housing bore Bearing width 42 45 mm 1 6713 in Pinion dimension 197 85 mm 7 7894 in Gives Dimension X 1 240 30 mm 9 4606 in Dimension X 241 50 mm 9 5079 in Dimension X 1 240 30 mm 9 4606 in Difference Shim thickness s 1 20 mm 0 0472 in Figure 245 Figure 246 Figure 247 ...

Page 213: ... race guide it over the drive pinion end until contact is obtained ADJUSTMENT OF DRIVE PINION BEARING ROLLING RESISTANCE Nominal Value 1 Lay measuring ring over the drive pinion collar NOTE Configuration and description of the measuring ring see Figure 251 NOTE See Special Tools on page 15 DK CK 1 1 2 3 Nm 9 7 20 3 in lb HK 1 5 3 0 Nm 13 2 17 7 in lb LK RK 3 0 4 5 Nm 17 7 39 8 in lb Figure 248 Fig...

Page 214: ...g to the Version insert hex head screws into the drive flange bores and press dust shield over the drive flange collar 3 Insert drive pinion into the axle carrier and assemble heated inner bearing race until contact is obtained Figure 251 Figure 252 Figure 253 ...

Page 215: ...ff drive flange and remove pinion again 6 Remove measuring ring and determine dimension X see Figure 251 Dimension X e g s 7 97 mm 0 3138 in NOTE Dimension X corresponds to the thickness of the spacer to be installed NOTE Lay spacer e g S 7 97 mm 0 3138 in instead of the measuring ring over the drive pinion end Install drive pinion again 7 Replace drive flange mount washer and tighten slotted nut ...

Page 216: ...ts Otherwise use the sealing compound Loctite 586 NOTE Fill the cavity between sealing lip and dust lip with grease NOTE See Special Tools on page 15 10 Replace drive flange 11 Assemble washer and tighten slotted nut resp hex nut according to the Version finally NOTE Torque limit DK CK 700 Nm 515 ft lb RK 1 100 Nm 810 ft lb HK LK 1 200 Nm 885 ft lb NOTE The securing of the slotted nut resp hex nut...

Page 217: ...king screws NOTE See Torque Limits for Screws on page 6 NOTE Only single use of the locking screws is admitted 3 Press the inner bearing race firmly against shoulder 4 Lay the two thrust washers into the differential case half NOTE Mount brass washer on top with the lubricating groove facing the side gear 5 Lay snap ring into the ring groove see Figure 263 Figure 260 Figure 261 Figure 262 Figure 2...

Page 218: ...r and installation position of outer and inner plates see corresponding list of spare parts The total height thickness of the plate pack must be equal on both differential sides Plate thickness of outer plates may be different 8 Replace pressure ring 9 Insert side gear and assemble inner plates at the same time Figure 264 Figure 265 Figure 266 Figure 267 ...

Page 219: ...re ring and insert all drive pins NOTE Pay attention to the radial installation position of the pressure ring 13 Assemble alternating inner and outer plates starting with one inner plate NOTE Number and installation position of inner and outer plates see corresponding list of spare parts Figure 268 Figure 269 Figure 270 Figure 271 ...

Page 220: ...nd play plate clearance is 0 2 0 8 mm 0 0079 0 0315 in whilst the lower value should be found The end play is corrected by the installation of outer plates of corresponding thickness whilst the plate thickness must be equal on both differential sides EXAMPLE 3 Make the two thrust washers adhere with grease in the housing cover NOTE Mount the brass washer on top wish the lubricating groove facing t...

Page 221: ...see Figure 275 Only single use of locking screws is admitted 5 Heat inner bearing race and position it on the housing cover until contact is obtained 6 Insert 1st outer bearing race into the housing and hold it temporarily using adjusting nut 7 Mount 2nd outer bearing race and insert the differential assembly into the axle carrier NOTE See Special Tools on page 15 Figure 275 Figure 276 Figure 277 ...

Page 222: ...ide until the required backlash see value engraved on the crown wheel outer diameter is obtained NOTE See Special Tools on page 15 3 Screw in adjusting nut opposite the crown wheel side until the differential bearing is free of play 4 Now tighten adjusting nut further for 2 notches to obtain the required bearing preload of the differential bearing 3 4 Nm 26 5 35 4 in lb Check backlash again and co...

Page 223: ...marking compound 9 Roll the crown wheel over the drive pinion back and forth 10 Check the contact pattern and compare it with Examples of Gear tooth contact Patterns for the Gleason Gear tooth System on page 11 11 In case of a greater contact pattern deviation a spacing error has been made during the reassembly of the drive pinions which must be corrected 12 Secure adjusting nut 13 Secure adjustin...

Page 224: ...ace with sealing compound Loctite 573 17 Screw in the two adjusting screws and place the differential carrier against the axle housing until contact is obtained NOTE See Torque Limits for Screws on page 6 NOTE Now install stub shafts again and complete the final drive Before the Axle is put into Service follow the Lubrication Instructions on page 8 Figure 287 Figure 288 ...

Page 225: ...S0602170K Page 120 Axle ZF AP 420R ILLUSTRATED TABLE Figure 289 ...

Page 226: ...ined within this section Always use tools and equipment that is in good working order Use lifting and hoisting equipment capable of safely handling load Remember that ultimately safety is your own personal responsibility MODEL SERIAL NUMBER RANGE Mega 130 0001 and Up Mega 160 0001 and Up Mega 200 V 1001 and Up Mega 250 V 1001 and Up Mega 300 V 1001 and Up Mega 400 V 1001 and Up Mega 500 V 1001 and...

Page 227: ...rol and Display 8 Air Discharge According to Path Selection 9 Air conditioning System Circuit Diagram 12 Troubleshooting 14 Weight of R134a Gas Used In Machines 17 Refrigerant System Repairs 18 Refrigerant Safe Handling Procedures 18 Repair and Replacement Procedure 19 Refrigerant Recovery 21 Vacuuming Refrigerant System 21 Leakage Check 22 Refrigerant Charging 23 Inspecting System For Leakage 25 ...

Page 228: ...ut dirt and dust particles from air being circulated into the operator s cab This filter 1 Figure 2 should be cleaned out at approximately every 500 hours and replaced with a new one every 1000 hours NOTE In the event that the unit is being operated in a dusty environment cleaning and replacement should be performed more frequently NOTE Refer to appropriate operation and maintenance manual for lat...

Page 229: ...o Master Table of Contents REFRIGERANT CIRCULATION 1 2 3 4 5 6 HBOI020L 7 Figure 3 Reference Number Description 1 Evaporator 2 Expansion Valve 3 Condenser 4 Condenser Fan 5 Compressor 6 Blower Fan 7 Receiver Dryer Reference Number Description ...

Page 230: ...e heat from the air surrounding the evaporator creating a cooling effect and changes from the gas to the liquid state The refrigerant once again flows into the compressor in the gaseous state and the process is repeated Shading Temperature Refrigerant State High High Pressure Gas High High Pressure Liquid Low Low Pressure Liquid High High Pressure Gas Liquid Low Low Pressure Gas WARNING Refrigeran...

Page 231: ...MID SW HI SW COOL SW WARM SW INPUT CONTROL PANEL OUTPUT A C CONTROL PANEL DISPLAY LOW SPEED RELAY TEMPERATURE SENSOR MID SPEED RELAY HIGH SPEED RELAY BLOWER MOTOR VENT ACTUATOR DEF ACTUATOR INTAKE ACTUATOR COMP RELAY CONDENSER FAN RELAY MIX DOOR VENT CONTROL FOOT DEF RECYCLE FRESH AIR CONTROL COMPRESSOR CONDENSER FAN TEMPERATURE CONTROL ACTUATOR HDA6048L TEMP CONTROL ACTUATOR Figure 5 ...

Page 232: ...re control switch consists of a 24 step variable selector The display uses 7 Green Red two color LED s to display the selected temperature Blower Fan Speed Control OFF Switch LOW Switch MID Switch HI Switch Compressor Control Temperature Sensor 100 50 0 MAX HOT MAX COOL HDA6049L Figure 6 HI RELAY MID RELAY LOW RELAY OFF LOW MID HI HDA6050L Figure 7 COMP OFF COMP ON 1 5 C 4 0 C HDA6051L Figure 8 ...

Page 233: ...n Green Green Green Green 3 28 V 0 2 8 Red Red Green Green Green Green Green 3 11 V 0 2 9 Red Red Red Green Green Green Green 2 93 V 0 2 10 Red Red Red Green Green Green Green 2 76 V 0 2 11 Red Red Red Green Green Green Green 2 59 V 0 2 12 Red Red Red Red Green Green Green 2 41 V 0 2 13 Red Red Red Red Green Green Green 2 24 V 0 2 14 Red Red Red Red Green Green Green 2 07 V 0 2 15 Red Red Red Red ...

Page 234: ...RGE ACCORDING TO PATH SELECTION Vent Figure 9 AJS0540L Reference Number Description 1 Select Switch 2 Front Vent 2 1 Front Vent R 2 2 Front Vent L 3 Rear Vent 3 1 Rear Vent R 3 2 Rear Vent L 4 Heater Core 5 Evaporator Core 6 Air Filter 7 Blower Motor Reference Number Description ...

Page 235: ...Air Conditioner Return to Master Table of Contents Foot AJS0550L Figure 10 Reference Number Description 1 Select Switch 2 Foot Vent 4 Heater Core 5 Evaporator Core 6 Air Filter 7 Blower Motor Reference Number Description ...

Page 236: ...onditioner Return to Master Table of Contents Defroster AJS0560L Figure 11 Reference Number Description 1 Select Switch 2 Defroster Vent 4 Heater Core 5 Evaporator Core 6 Air Filter 7 Blower Motor Reference Number Description ...

Page 237: ...S0605050K Page 12 Air Conditioner Return to Master Table of Contents AIR CONDITIONING SYSTEM CIRCUIT DIAGRAM AJS0570L Figure 12 ...

Page 238: ...ay 8 Condenser Fan Motor 9 Compressor Relay 10 Foot Defrost Control Actuator 11 Receiver Drier 12 Diode 13 Compressor 14 A C Control Panel 15 A C Unit 15 1 Blower Motor 15 2 Resister 15 3 High Speed Relay 15 4 Mid Speed Relay 15 5 Low Speed Relay 15 6 Recirculate Fresh Air Control Actuator 15 7 Vent Actuator 15 8 Temperature Control Actuator 15 9 Temperature Sensor Evaporator Reference Number Desc...

Page 239: ...tion Item Remedy 1 Check for traces of refrigerant oil Yes Reassemble using correct tightening torque No Go to next step 2 Using a leak detection device or soapy water check for refrigerant leakage at all major components and joints Yes Repair leaking component No Recharge system to correct pressure 2 High Pressure Over 23 kg cm2 327 psi Low Pressure Approximately 2 5 3 0 kg cm2 36 43 psi Possible...

Page 240: ...re 1 5 3 3 kg cm2 21 47 psi Yes Moisture in system replace receiver dryer No Contaminated system replace expansion valve Replace evaporator core assembly 5 High Pressure Over 6 18 kg cm2 85 256 psi Low Pressure 500 mmHg Negative Pressure Dial indicator needle unstable Possible Cause Moisture in system has iced up the expansion valve NOTE When the absorbed moisture freezes the pressure readings may...

Page 241: ...r Return to Master Table of Contents 7 High Pressure Over 7 11 kg cm2 100 156 psi Low Pressure 4 6 kg cm2 57 85 psi Possible Cause Low refrigerant pressure due to poor compressor compression Inspect and replace compressor if necessary ...

Page 242: ...olar 130LC V 850 20 grams 30 0 7 oz Solar 130W III 950 20 grams 33 0 7 oz Solar 130W V 850 20 grams 30 0 7 oz Solar 170LC V 850 20 grams 30 0 7 oz Solar 170W III 1100 20 grams 38 0 7 oz Solar 200W III 1100 20 grams 38 0 7 oz Solar 200W V 850 20 grams 30 0 7 oz Solar 220LC III 950 20 grams 33 0 7 oz Solar 220LC V 850 20 grams 30 0 7 oz Solar 220LL 850 20 grams 30 0 7 oz Solar 250LC V 850 20 grams 3...

Page 243: ...ew refrigerant system standards require new tools equipment and parts DO NOT attempt to use equipment use in servicing the old refrigerant system WARNING Always wear protective glasses and gloves when handling refrigerant If refrigerant comes in contact with the skin or eyes immediately flush with clean running water and consult a physician Select a clean and well ventilated area to work The refri...

Page 244: ...When charging the refrigerant system with the engine running do not open the high pressure valve on the manifold gauge as the reverse flow of high pressure refrigerant will rupture the hose 10 When releasing the high pressure hose after completing the charging process quickly disconnect the hose to minimize refrigerant released to the air REPAIR AND REPLACEMENT PROCEDURE 1 Work Procedure A Before ...

Page 245: ...TES CHECK SYSTEM FOR AIR LEAKAGE VACUUM SYSTEM OVER 20 MINUTES CHARGE SYSTEM APPROXIMATELY 100 g CHECK SYSTEM FOR REFRIGERANT LEAKAGE CHARGE SYSTEM TO PROPER LEVEL Standard Capacity less Initial Charge CHECK SYSTEM FOR REFRIGERANT LEAKAGE CHECK FOR PROPER REFRIGERANT LEVEL RUN SYSTEM RECOVER REFRIGERANT IN CHARGING HOSE REMOVE REPAIR TOOLS REPAIR HDA6067L Figure 15 ...

Page 246: ...til the manifold gauge dials indicates 0 kg cm2 0 psi VACUUMING REFRIGERANT SYSTEM 1 Vacuuming Procedure NOTE When the A C system has been exposed to the air it must be vacuumed out Perform vacuum process for 30 minutes for complete moisture and air evacuation A Attach the manifold gauges and vacuum pump to the refrigerant system as shown B Turn on the vacuum pump and open both valves C When the l...

Page 247: ...in retracted and the mounting disk is in the raised position B Attach the manifold gauge center hose to the valve assembly C Turn the disc in the clockwise direction and securely mount valve onto refrigerant container D Turn the valve handle in the clockwise direction and puncture the container seal with the pin E Once the can has been punctured turn the handle in the counter clockwise direction s...

Page 248: ...unces of refrigerant with the engine off Then using the manifold gauges as a guide fully charge the system with the engine running When exchanging refrigerant containers press the manifold gauge low side valve to eliminate air from the charging hose 2 Charge the system by opening the manifold gauge low side valve Initial charge amount 100 g 3 5 ounces Reference Number Description 1 Refrigerant Lea...

Page 249: ... side valve 6 Shut off engine and close refrigerant supply container adapter valve Disconnect manifold gauge hoses from vehicle WARNING When charging refrigerant system with the engine running Always keep refrigerant supply container in the upright position Never open the high side pressure valve Gauge Dial Standard Reading High Side Gauge 13 20 kg cm2 185 285 psi Low Side Gauge 1 5 3 5 kg cm2 21 ...

Page 250: ...pressure side Compressor outlet condenser inlet receiver dryer inlet air conditioner unit inlet 2 Low pressure side Compressor inlet air conditioner unit outlet 3 Compressor Compressor shaft area bolt hole area and magnetic clutch area 4 Receiver dryer Pressure switch and plug area 5 Connection valve area Inspect all valve areas Verify all valves are capped to prevent leaking Check for foreign mat...

Page 251: ...S0605050K Page 26 Air Conditioner Return to Master Table of Contents ...

Page 252: ...fety recommendations and safe shop practices outlined in the front of this manual or those contained within this section Always use tools and equipment that is in good working order Use lifting and hoisting equipment capable of safely handling load Remember that ultimately safety is your own personal responsibility MODEL SERIAL NUMBER RANGE Mega 500 V 1001 and Up Copyright 2001 Daewoo May 2001 ...

Page 253: ...nit 15 Transmission Control Valve 16 Transmission Oil Temperature Sensor 16 Engine Pick Up Sensor 17 Central Gear Pick Up Sensor 17 Turbine Pick Up Sensor 17 Output Speed Sensor 18 Shift Lever Switch DW 3 18 Auto Select Switch 19 Display 19 Transmission Faults Codes 21 Fault Display 21 CAN Message 21 Description of Fault Codes 21 Abbreviations 22 Definition of Operation Modes 22 Normal 22 Substitu...

Page 254: ...ond Gear 32 Reverse Third Gear 33 Downshift 34 Overview 34 Kick down Forward Second Gear to Forward First Gear Auto Selector Switch O Manual Mode 34 Downshift Auto Selector Switch I Auto Mode 36 Transmission Cut Off 38 Installation View 40 Inner Section 40 Front View 42 Side View 43 Rear View 44 Hydraulic Control Unit HSG 94 46 Disassembly 47 Reassembly 51 Transmission Disassembly 59 Converter Inp...

Page 255: ...utch K3 91 Reassemble Multi disk Clutch KR K2 96 Multi disk Clutch KR 98 Multi disk Clutch K2 103 Reassemble Multi disk Clutch KV K1 110 Multi disk Clutch KV 112 Multi disk Clutch K4 117 Install Countershaft Gear and Multi disk Clutches 123 Pre assemble and Mount Housing Cover 128 Install Countershaft Axle 139 Hydraulic Pump 140 Axle Disconnection 142 Filter 143 Input Shaft Power Take off Pump 144...

Page 256: ...closed in the front axle housing 9 Each end of the front axle housing contains reduction gearing 10 Each end of the front axle housing also contains a service brake 11 Rear drive shaft 5 drives the rear differential 12 The rear differential is enclosed in the rear axle housing 13 Each end of the rear axle housing contains reduction gearing 10 Each end of the rear axle housing also contains a servi...

Page 257: ... that control the forward and reverse gears Item Mega 500 V Torque Converter Model 4WG 310 Full Auto Type 3 Element 1 Stage Single phase E G mounted with flexible plate Oil Cooler Water cooled multiplate and Air cooled Charging Pump 130 l min at 2 000 rpm Hydraulic Pump P T O 1 1 T C Size 370 mm 14 5669 in Stall Ratio 2 985 Safety Relief 11 Bar 160 psi Transmission Type Full Power Shift Counter sh...

Page 258: ...in at nEngine 2000 min 1 This pump is sucking the oil via the coarse filter out of the oil sump and delivers it via the ZF Fine filter the filters is fitted externally from the transmission to the main pressure valve ZF Fine filter Filtration ratio according to ISO 4572 β30 75 β15 25 β10 5 0 Filter surface at least 2 x 6 700 cm2 13 400 cm2 Dust capacity according to ISO 4572 at least 17 g The six ...

Page 259: ...ram 4WG 310 Forward 1st Speed on page 11 SCHEDULE OF MEASURING POINTS AND CONNECTION 4WG 310 The marked positions e g 53 correspond with the positions on the Oil Circuit Diagram 4WG 310 Forward 1st Speed on page 11 The measurements have to be carried out at hot transmission about 80 90 C No Denomination of the Position Connection Marking on the Valve Block Measuring Points for Pressure Oil and Tem...

Page 260: ...mitters and Speed Sensor 5 Inductive Transmitter n Turbine M18 x 1 5 9 Inductive Transmitter n Central Gear Train M18 x 1 5 13 Speed Sensor n Output and Speedometer 14 Inductive Transmitter n Engine M18 x 1 5 No Denomination of the Position Connection Marking on the Valve Block ...

Page 261: ...S0607080K Page 10 Transmission and Torque Converter ZF 4WG 310 Figure 2 ...

Page 262: ... WGV Converter Back Pressure Valve 5 bar 73 psi WSV Converter Safety Valve 11 bar 160 psi HDV Main Pressure Valve 16 2 bar 232 29 psi RV 9 Pressure Reducing Valve 9 bar 131 psi NFS Follow on Slide D Vibration Damper B Orifice P1 Proportional Valve Clutch KR P2 Proportional Valve Clutch K4 P3 Proportional Valve Clutch K1 P4 Proportional Valve Clutch K3 P5 Proportional Valve Clutch KV P6 Proportiona...

Page 263: ...TION RETURN INTO THE SUMP ZF FINE FILTER FILTER GRADE ACCORDING ISO 4572 β30 75 β15 25 β10 5 0 DUST CAPACITY ACCORDING ISO 4572 min 17g FILTER SURFACE cm 2 x 6 700 13 400 2 TRANSMISSION PUMP p 16 2 bar Q 130 l min at n ENGINE 2000 min 1 p 1 COARSE FILTER MESH WIDTH µm 450 FILTER SURFACE cm 1000 2 BYPASS VALVE p 1 5bar WT SCOPE OF SUPPLY CUSTOMER P1 P2 P3 P4 P5 P6 AJS0871L Figure 4 ...

Page 264: ...S0607080K Page 13 Transmission and Torque Converter ZF 4WG 310 ...

Page 265: ...S0607080K Page 14 Transmission and Torque Converter ZF 4WG 310 TRANSMISSION ELECTRIC COMPONENTS 21 10 19 20 15 16 9 11 12 5 6 4 2 3 7 8 14 17 13 18 1 AJS0190L Figure 5 ...

Page 266: ...mber Description 1 Transmission Control Unit TCU 2 Transmission Control Valve 3 Transmission Oil Temperature Sensor 4 Engine Pick Up Sensor 5 Central Gear Pick up Sensor 6 Turbine Pick up Sensor 7 Output Speed Sensor 8 Shift Lever Switch 9 Auto Select Switch 10 Display 11 Transmission Cutoff Switch 12 Transmission Cutoff Pressure Switch 13 Downshift Switch 14 Safety Starter Switch 15 Fuse Box 16 P...

Page 267: ...ained temperature sensor detects the temperature of the control valve and transmits the electrical signal to the TCU and serves TCU determines gears to change Neutral At temperature less than 30 C 22 F 1st or 2nd gear At temperature less than 10 C 14 F Normal Operation At temperature greater than 10 C 14 F TRANSMISSION OIL TEMPERATURE SENSOR 1 Detecting a oil temperature of transmission and send a...

Page 268: ...v CENTRAL GEAR PICK UP SENSOR 1 Detect a revolution of central gear array 2 Specification Resistance 1050Ω 10 at 20 C 68 F Fasten torque 30 Nm 22 ft lb Gap 0 5 0 3 mm 0 0197 0 0118 in Output 91 Pulse Rev TURBINE PICK UP SENSOR 1 Detect a revolution of gear array in turbine side 2 Specification Resistance 1050Ω 10 at 20 C 68 F Fasten torque 30 Nm 22 ft lb Gap 0 5 0 3 mm 0 0197 0 0118 in Output 59 P...

Page 269: ...TCH DW 3 1 Forward Reverse and Shift F Forward N Neutral R Reverse 1 2 3 4 Shift Step Forward shift range 1 4 Reverse shift range 1 3 2 Kick Down Down Shift Switch KD Kick Down Switch 3 Lever Lock Key N Neutral The lever is not moved D Driving The lever is released 4 Switch Circuit AJS0260L 3 2 SIG 1 40 1 5 Figure 12 AJS0270L F N R KD SHIFT SWITCH LEVER LOCK KEY N D Figure 13 AJS0280L B G L V R Gr...

Page 270: ...ng takes place between gears Forward 2nd 3rd 4th Reverse 2nd 3rd 4 When the switch is in the O Manual position travel mode is switched to MANUAL and allows operator to choose speeds manually DISPLAY Fault codes are given in a separate section Transmission Error Codes ZF AJS0290L TERMINAL COLOR AD6 GREY AD5 PINK AD4 YELLOW VP RED AD7 VIOLET AD1 BLUE AD2 GREEN AD3 BLACK X2 X1 D C B A D C B A Figure ...

Page 271: ...S0607080K Page 20 Transmission and Torque Converter ZF 4WG 310 ...

Page 272: ...ted fault in the specified CAN message while the fault is active If more than one fault is detected the fault code scrolls DESCRIPTION OF FAULT CODES First Number Meaning of Number 1 Hex Digital Input Signal 2 Hex Analog Input Signal 3 Hex Speed Signal 4 Hex Can Signal Error 5 Hex Can Signal Error 6 Hex Can Signal Error 7 Hex Analog Current Output Signal 8 Hex Analog Current Output Signal 9 Hex Di...

Page 273: ...home gear If output speed is less than a threshold for reversal speed and TCU has changed into the limp home gear and the operator selects a shuttle shift TCU will shift immediately into the limp home gear of the selected direction If output speed is greater than the threshold TCU will shift the transmission into neutral The operator has to slow down the vehicle and must shift the gear selector in...

Page 274: ...G short cut to ground R12 R R1G 0 R2G R or R1G R R2G 0 for S C to ground G is connected to vehicle ground short cut to battery R12 R R1G 0 R2G R or R1G R R2G 0 for S C to battery G is connected to battery voltage Cable open circuit R12 R1P R1C R2P R2C short cut to ground R12 0 R1C R2C 0 R1P R2P short cut to battery R12 0 R1C R2C R1P R2P 0 R 2 1 G HBOE640I Figure 19 P power supply 1 2 TCU Actuator ...

Page 275: ...S0607080K Page 24 Transmission and Torque Converter ZF 4WG 310 TRANSMISSION ELECTRICAL CIRCUITS TRANSMISSION CONTROLLER CIRCUIT AHS0130L Figure 21 ...

Page 276: ...ission Selector Switch 3 Transmission Control Valve 4 Fuse Box 1 5 Auto Selector Switch 6 Transmission Cutoff Selector Switch 7 Transmission Cutoff Pressure Switch 8 Display 9 Downshift Switch 10 Safety Starter Switch 11 Output Speed Sensor 12 Speed Pick up 13 LIS Select Switch 14 LIS Solenoid 15 Speedometer 16 Parking Brake Switch 17 Control Unit 18 Starter Controller 19 Fuse Box 2 Reference Numb...

Page 277: ...ctor Switch 3 Transmission Control Valve 4 Fuse Box 5 Auto Selector Switch 6 Transmission Cutoff Selector Switch 7 Transmission Cutoff Pressure Switch 8 Display 9 Downshift Switch 10 Safety Start Switch 11 Output Speed Sensor 12 Speed Pick up 13 LIS Select Switch 14 LIS Solenoid 15 Speedometer 16 Parking Brake Switch 17 Control Unit 18 Starter Controller Reference Number Description ...

Page 278: ...L Figure 23 Reference Number Description 1 Transmission Controller 2 Transmission Selector Switch 3 Transmission Control Valve 4 Fuse Box 5 Auto Selector Switch 6 Transmission Cutoff Selector Switch 7 Transmission Cutoff Pressure Switch 8 Display 9 Downshift Switch 10 Safety Start Switch 11 Output Speed Sensor 12 Speed Pick up 13 LIS Select Switch 14 LIS Solenoid 15 Speedometer 16 Parking Brake Sw...

Page 279: ...ransmission Controller 2 Transmission Selector Switch 3 Transmission Control Valve 4 Fuse Box 5 Auto Selector Switch 6 Transmission Cutoff Selector Switch 7 Transmission Cutoff Pressure Switch 8 Display 9 Downshift Switch 10 Safety Start Switch 11 Output Speed Sensor 12 Speed Pick up 13 LIS Select Switch 14 LIS Solenoid 15 Speedometer 16 Parking Brake Switch 17 Control Unit 18 Starter Controller R...

Page 280: ...ansmission Controller 2 Transmission Selector Switch 3 Transmission Control Valve 4 Fuse Box 5 Auto Selector Switch 6 Transmission Cutoff Selector Switch 7 Transmission Cutoff Pressure Switch 8 Display 9 Downshift Switch 10 Safety Start Switch 11 Output Speed Sensor 12 Speed Pick up 13 LIS Select Switch 14 LIS Solenoid 15 Speedometer 16 Parking Brake Switch 17 Control Unit 18 Starter Controller Re...

Page 281: ...ransmission Controller 2 Transmission Selector Switch 3 Transmission Control Valve 4 Fuse Box 5 Auto Selector Switch 6 Transmission Cutoff Selector Switch 7 Transmission Cutoff Pressure Switch 8 Display 9 Downshift Switch 10 Safety Start Switch 11 Output Speed Sensor 12 Speed Pick up 13 LIS Select Switch 14 LIS Solenoid 15 Speedometer 16 Parking Brake Switch 17 Control Unit 18 Starter Controller R...

Page 282: ...ansmission Controller 2 Transmission Selector Switch 3 Transmission Control Valve 4 Fuse Box 5 Auto Selector Switch 6 Transmission Cutoff Selector Switch 7 Transmission Cutoff Pressure Switch 8 Display 9 Downshift Switch 10 Safety Start Switch 11 Output Speed Sensor 12 Speed Pick up 13 LIS Select Switch 14 LIS Solenoid 15 Speedometer 16 Parking Brake Switch 17 Control Unit 18 Starter Controller Re...

Page 283: ...ransmission Controller 2 Transmission Selector Switch 3 Transmission Control Valve 4 Fuse Box 5 Auto Selector Switch 6 Transmission Cutoff Selector Switch 7 Transmission Cutoff Pressure Switch 8 Display 9 Downshift Switch 10 Safety Start Switch 11 Output Speed Sensor 12 Speed Pick up 13 LIS Select Switch 14 LIS Solenoid 15 Speedometer 16 Parking Brake Switch 17 Control Unit 18 Starter Controller R...

Page 284: ...ansmission Controller 2 Transmission Selector Switch 3 Transmission Control Valve 4 Fuse Box 5 Auto Selector Switch 6 Transmission Cutoff Selector Switch 7 Transmission Cutoff Pressure Switch 8 Display 9 Downshift Switch 10 Safety Start Switch 11 Output Speed Sensor 12 Speed Pick up 13 LIS Select Switch 14 LIS Solenoid 15 Speedometer 16 Parking Brake Switch 17 Control Unit 18 Starter Controller Re...

Page 285: ...depressed during the machine moving downshifting takes place automatically As a result fast digging and moving is possible But at the manual mode the kick down can only be activated 3 If a change or traveling direction takes place or the downshift switch is depressed a second time downshifting is released automatically Kick down Forward Second Gear to Forward First Gear Auto Selector Switch O Manu...

Page 286: ... time the transmission pulse signal of the 22 terminal is interrupted and solenoid valve Y5 and Y6 are energized and the transmission returns to the forward second gear Reference Number Description 1 Transmission Controller 2 Transmission Selector Switch 3 Transmission Control Valve 4 Fuse Box 5 Auto Selector Switch 6 Transmission Cutoff Selector Switch 7 Transmission Cutoff Pressure Switch 8 Disp...

Page 287: ...is activated a pulse signal is sent to the 22 terminal of transmission controller This signal shifts the transmission to the next lowest gear AHS0230L Figure 33 Reference Number Description 1 Transmission Controller 2 Transmission Selector Switch 3 Transmission Control Valve 4 Fuse Box 5 Auto Selector Switch 6 Transmission Cutoff Selector Switch 7 Transmission Cutoff Pressure Switch 8 Display 9 Do...

Page 288: ...TE The fourth to the third gear changes without any rpm change when the downshift switch is pressed NOTE The third to the second gear and the third to the first gear changes occur when the rpm is reduced 200 300 rpm from current setting Automatic Gear Selection Downshift Switch Activated Fourth Gear Downshift to Third Gear Third Gear Downshift to Second Gear Second Gear Downshift to First Gear Fir...

Page 289: ...ller All current being supplied to the transmission solenoid valves Y1 thru Y6 is cut off and the transmission is in NEUTRAL NOTE To protect transmission transmission cutoff switch does not function in third and fourth gears CAUTION When the machine is traveling or working in the place of inclination the transmission cutoff switch Figure 34 must be placed in position O for the purse of using engin...

Page 290: ...ion Control Valve 4 Fuse Box 5 Auto Selector Switch 6 Transmission Cutoff Selector Switch 7 Transmission Cutoff Pressure Switch 8 Display 9 Downshift Switch 10 Safety Start Switch 11 Output Speed Sensor 12 Speed Pick up 13 LIS Select Switch 14 LIS Solenoid 15 Speedometer 16 Parking Brake Switch 17 Control Unit 18 Starter Controller Reference Number Description ...

Page 291: ...S0607080K Page 40 Transmission and Torque Converter ZF 4WG 310 INSTALLATION VIEW INNER SECTION Figure 36 ...

Page 292: ...tion Direct Mounting 2 Converter 3 Breather 4 Drive 5 Electro hydraulic Shift Control 6 1st Power Take Off 7 Converter Charge and Control Pressure Pump 8 Clutch K1 9 Clutch K2 10 Clutch K3 11 Output Front Axle 12 Output Rear Axle 13 Layshaft 14 Clutch K4 15 Clutch Kr 16 Clutch Kv Reference Number Description ...

Page 293: ...Lifting Lugs 2 Breather 3 Electro hydraulic Shift Control 4 Diaphragms Direct Mounting 5 Converter 6 Output Flange Converter side 7 Coarse Filter 8 Oil Drain Plug 9 Attachment Possibility for Oil Filter Tube with Oil Dipstick Converter side 10 Oil Filler Tube with Oil Dipstick Rear side Reference Number Description ...

Page 294: ... 1 Diaphragms for Direct Mounting 2 Converter 3 Converter Bell 4 Lifting Lug 5 Breather 6 Electro hydraulic Shift Control 7 Output Flange Rear side 8 Oil Filler Tube with Oil Dipstick Rear side 9 Cover 10 Gearbox Housing 11 Output Flange Converter side 12 Transmission Suspension M20 Reference Number Description ...

Page 295: ...ssure Oil Line Clutch K1 6 Pressure Oil Line Clutch K4 7 Pressure Oil Line Clutch K3 8 Lubricating Oil Line S1 Clutch KR K2 9 Attachment Possibility for Emergency Steering Pump 10 Oil Filter Tube With Oil Dipstick 11 Model Identification Plate 12 Output Flange Rear side 13 Lubricating Oil Line S2 Clutch K4 K3 14 Pressure Oil Line Clutch KR 15 Pressure Oil Line Clutch K2 Reference Number Descriptio...

Page 296: ...S0607080K Page 45 Transmission and Torque Converter ZF 4WG 310 ...

Page 297: ...0 HYDRAULIC CONTROL UNIT HSG 94 Figure 40 shows a sectional view of the HSG 94 IMPORTANT Different versions in relation to the position of the cable harness are possible In this connection pay attention to the Specifications of the Vehicle Manufacturer Figure 40 ...

Page 298: ...S0607080K Page 47 Transmission and Torque Converter ZF 4WG 310 Section A A DISASSEMBLY 1 Loosen socket head screws and remove selector housing Figure 41 Figure 42 ...

Page 299: ...ead screws and separate intermediate plate and gaskets and intermediate sheet from gearbox housing 4 Mark installation position of the cable harness to the valve block 5 Loosen socket head screws 6 Separate duct plate gaskets and intermediate sheet from the valve block 7 Remove retaining clip Figure 43 Figure 44 Figure 45 Figure 46 ...

Page 300: ...Demount pressure regulator and remove cable harness 11 Loosen socket head screws remove retaining plates and demount pressure regulator 12 Loosen two socket head screws and locate the housing provisionally using adjusting screws Housing is spring loaded Now loosen the remaining socket head screws Figure 47 Figure 48 Figure 49 Figure 50 ...

Page 301: ...d Torque Converter ZF 4WG 310 13 Separate housing from valve body by uniform loosening of the adjusting screws 14 Remove components 15 Remove opposite pressure regulators housing and components accordingly Figure 51 Figure 52 Figure 53 ...

Page 302: ...ncave side facing upward until contact is obtained NOTE Installation position see arrows 1 Figure 55 shows the following components 2 Install components according to Figure 55 NOTE Preload compression spring of the follow on slides and locate spool provisionally using cylindrical pins Ø 5 0 mm 0 1969 in assembly aid See Figure 56 Reference Number Description 1 Vibration Damper 3x Spool and Compres...

Page 303: ...asket Arrow and housing cover Figure 57 Now bring housing cover using adjusting screws uniformly against shoulder Figure 58 5 Preload spool and remove the cylindrical pins assembly aid again 6 Fasten housing cover using socket head screws NOTE Torque limit 5 5 Nm 4 ft lb Figure 57 Figure 58 Figure 59 Figure 60 ...

Page 304: ...ding to Figure 62 C Preload compression springs of the follow on slides and secure the spools provisionally with cylindrical pins aid see arrows D Install two adjusting screws E Line up flat gasket 1 Figure 63 and housing cover and bring them uniformly against shoulder using adjusting screws F Now fasten housing cover using socket head screws NOTE Torque limit 5 5 Nm 4 ft lb G Remove cylindrical p...

Page 305: ...OTE Torque limit 5 5 Nm 4 ft lb J Install cable harness and connect pressure regulators 6x NOTE Pay attention to installation position of cable harness see markings Figure 43 K Mount flat gasket Figure 66 L Introduce female connector with the groove facing the guide nose of the cover until contact is obtained M Fasten cover with socket head screws NOTE Torque limit 0 56 kg m 4 06 ft lb N Locate th...

Page 306: ...see Figure 68 and Figure 71 9 Intermediate plate version with screens A Insert screens 6x flash mounted into bore of intermediate plate see Figure 69 NOTE Pay attention to installation position screens are facing upward facing duct plate B Mount intermediate plate with the strainers facing upward C Mount gasket II Figure 68 Figure 69 Figure 70 Figure 71 ...

Page 307: ...with new O rings and install them NOTE Torque limit 6 Nm 4 4 ft lb 10 Attach Hydraulic control unit HSG 94 Figure 74 Figure 84 A Screw orifice into the housing bore Figure 74 and secure it using center punch B Install connecting fittings 1 6 C Install screw plugs 7 NOTE Torque limit Screw plugs M10x1 6 Nm 4 4 ft lb NOTE Install always new O rings Figure 72 Figure 73 Figure 74 Figure 75 ...

Page 308: ...gasket E Mount intermediate plate F Mount 2nd gasket G Mount plate and fasten it uniformly using socket head screws NOTE Torque limit M8 10 9 23 Nm 17 ft lb CAUTION At the following steps Figure 75 Figure 81 pay attention to the installation positions of the different gaskets Figure 76 Figure 77 Figure 78 Figure 79 ...

Page 309: ...g screws M6 I Mount gasket Figure 80 J Fasten complete valve block uniformly with socket head screws 2 pieces M6 x 105 and 21 pieces M6 x 80 mm NOTE Torque limit 9 5 Nm 7 ft lb CAUTION Pay attention to the position of the two socket head screws M6 x 105 see Allows Figure 80 Figure 81 ...

Page 310: ...TRANSMISSION DISASSEMBLY 1 Fasten transmission on an appropriate support stand 2 Disassemble complete shift control remove pressure lines and duct plate CONVERTER INPUT 1 Separate torque converter from transmission using lifting device Figure 82 Figure 83 Figure 84 ...

Page 311: ...onverter out of the converter bell using lifting device 3 Pull oil feed flange out of converter bell using special device S 4 Remove converter safety valve ball and spring see Figure 87 5 Loosen screw connection M8 and M12 Separate converter bell from the transmission using lifting device Figure 85 Figure 86 Figure 87 Figure 88 ...

Page 312: ...F 4WG 310 6 Remove shim 7 Remove both rectangular rings Figure 90 8 Press input shaft out of the spur gear bearing 9 Remove released inner bearing race and spur gear 10 Press inner bearing race from the input shaft Figure 89 Figure 90 Figure 91 Figure 92 ...

Page 313: ...pressure backup valve DRIVE SHAFT PUMP POWER TAKE OFF 1 Pull the complete input shaft out of the gearbox housing resp out of the pump 2 Squeeze rectangular ring out Figure 95 3 Separate spur gear from the shaft and squeeze circlip out Figure 96 Figure 93 Figure 94 Figure 95 Figure 96 ...

Page 314: ...ner bearing race from spur gear 6 Pull inner bearing race and drive from shaft NOTE Support puller on end face drive shaft Pay attention to released shims 7 Separate inner bearing race from driver NOTE Pay attention to released shim 8 If necessary squeeze snap rings 3x out Figure 97 Figure 98 Figure 99 Figure 100 ...

Page 315: ... socket head screws M8 and position Puller device s 4 Pull transmission pump out of housing bore NOTE Tapping housing face is a help during extraction operation OUTPUT LAYSHAFT ASSEMBLY 1 Loosen screw connection and remove brake caliper 2 Unlock and loosen hex head screws tap brake disk loose and separate it from output shaft Figure 101 Figure 102 Figure 103 Figure 104 ...

Page 316: ...que Converter ZF 4WG 310 3 Pry shaft seal out of housing bore 4 Tilt gearbox housing 5 Remove sealing covers Figure 106 6 Loosen hex head screws 7 Pull idler shaft using puller out of housing bore Figure 105 Figure 106 Figure 107 Figure 108 ...

Page 317: ...Loosen hex head screws and pull bearing cover K1 KV out of housing bore 10 Loosen hex head screws and remove bearing cover KR K2 and K3 K4 11 Squeeze rectangular rings 3 pieces axle out see Figure 111 12 Squeeze snap ring and remove released washers Figure 109 Figure 110 Figure 111 Figure 112 ...

Page 318: ...ee Figure 113 14 Loosen hex head screws and separate housing cover from gearbox housing using forcing screws and lifting device 15 Unlock and loosen hex head screws 16 Remove output flange and pry shaft seal out of housing 17 Loosen hex head screws and remove oil baffle Figure 113 Figure 114 Figure 115 Figure 116 ...

Page 319: ...smission and Torque Converter ZF 4WG 310 18 Remove output gear along with shaft 19 Separate output shaft from spur gear 20 Pull inner bearing race from output gear 21 Remove plate Figure 117 Figure 118 Figure 119 Figure 120 ...

Page 320: ...DISK CLUTCHES 1 Disassemble clutch K4 K3 KR K2 and KV K1 using lifting device NOTE At the disassembly of the clutch K4 K3 lift clutch KR K2 slightly and displace it in arrow direction see Figure 122 2 Figure 123 shows the clutches in disassembled condition 3 Remove countershaft gear Figure 121 Figure 122 Figure 123 Figure 124 ...

Page 321: ...310 POWER TAKE OFF 1 Squeeze circlip out and remove shims 2 Lift output shaft using pry bar until the outer bearing race is free 3 Take output shaft out of the housing 4 Pull outer bearing race out of the housing bore Figure 125 Figure 126 Figure 127 Figure 128 ...

Page 322: ...ess opposite inner bearing race from the shaft NOTE The separation of shaft and gear is not possible shrink fit MULTIDISK CLUTCH K3 K4 1 Fasten clutch using clamping ring S on the assembly car 2 Pull roller bearing from plate carrier 3 Separate spur gear K3 from plate carrier Figure 129 Figure 130 Figure 131 Figure 132 ...

Page 323: ...out 6 Disassemble end shim and plate pack K3 7 Tilt plate carrier 90 8 Loosen slotted nut 9 Tilt plate carrier 90 10 Pull off the tapered roller bearing CAUTION Slotted nut is secured with Loctite To prevent a damage of the thread heat the slotted nut before loosen it about 120 C 248 F Figure 133 Figure 134 Figure 135 Figure 136 ...

Page 324: ...orque Converter ZF 4WG 310 11 Pull spur gear K4 from plate carrier 12 Remove adjusting ring 13 Pull off tapered roller bearing 14 Squeeze snap ring out 15 Disassemble end shim and plate pack K4 Figure 137 Figure 138 Figure 139 Figure 140 ...

Page 325: ...nts K3 side accordingly 18 Separate both pistons using compressed air from the plate carrier MULTIDISK CLUTCH KR K2 1 Fasten clutch using clamping ring Figure 143 on the assembly car 2 Tilt plate carrier 90 3 Loosen slotted nut CAUTION Slotted nut is secured with Loctite To prevent a damage of the thread heat the slotted nut before loosen it about 120 C 248 F Figure 141 Figure 142 Figure 143 Figur...

Page 326: ...oller bearing from plate carrier 5 Press spur gear K2 from the plate carrier 6 Secure plate carrier using clamping ring S 7 Remove shim 8 Pull tapered roller bearing from plate carrier CAUTION Pay attention to the released plate carrier Figure 145 Figure 146 Figure 147 Figure 148 ...

Page 327: ...K2 11 Tilt plate carrier 90 12 Loosen slotted nut 13 Pull tapered roller bearing from plate carrier 14 Pull tapered roller bearing from plate carrier CAUTION Slotted nut is secured with Loctite To prevent a damage of the thread heat the slotted nut before loosen it about 120 C 248 F Figure 149 Figure 150 Figure 151 Figure 152 ...

Page 328: ...aring from plate carrier 19 Disassemble both pistons as described at Figure 141and Figure 142 MULTIDISK CLUTCH KV K1 1 Fasten clutch using clamping ring on the assembly car 2 Loosen slotted nut Figure 156 CAUTION Slotted nut is secured with Loctite To prevent a damage of the thread heat the slotted nut before loosen it about 120 C 248 F Figure 153 Figure 154 Figure 155 Figure 156 ...

Page 329: ... Pull spur gear K1 from plate carrier 6 Figure 160 shows the spur gear bearing K1 7 The bearing 1 is only as sub assembly available CAUTION If the disassembly of the plate pack side ball bearing Arrow resp Figure 162 and Figure 163 is necessary the complete bearing 1 must be replaced Figure 157 Figure 158 Figure 159 Figure 160 ...

Page 330: ...erter ZF 4WG 310 8 Remove bush 9 Pull ball bearing from plate carrier Figure 162 and Figure 164 NOTE Pay attention to the released balls 10 Squeeze snap ring out 11 Disassemble end shim and plate pack K1 Figure 161 Figure 162 Figure 163 Figure 164 ...

Page 331: ...otted nut 14 Pull tapered roller bearing from plate carrier 15 Pull spur gear KV from plate carrier 16 Remove shim and ring CAUTION Slotted nut is secured with Loctite To prevent a damage of the thread heat the slotted nut before loosen it about 120 C 248 F Figure 165 Figure 166 Figure 167 Figure 168 ...

Page 332: ...Torque Converter ZF 4WG 310 17 Pull tapered roller bearing from plate carrier Figure 169 18 Squeeze snap ring out 19 Disassemble end shim and plate pack KV 20 Disassemble both pistons as described at Figure 141 and Figure 142 Figure 169 ...

Page 333: ...nto the housing bore until contact is obtained and fasten it POWER TAKE OFF 1 Supercool the shaft about 80 C 112 F heat gear about 120 C 248 F and line it up resp press it against shoulder CAUTION According to the transmission version differences concerning number and length of the studs are possible See in this connection the corresponding Spare Parts List Figure 170 Figure 171 Figure 172 ...

Page 334: ... against shoulder 4 Insert outer bearing race Figure 174 into the housing bore until contact is obtained 5 Position pre assembled PTO shaft in the housing and insert outer bearing race until contact is obtained 6 Adjust Axial play Power take off bearing max 0 10 mm 0 0039 in using shim s and circlip Figure 173 Figure 174 Figure 175 Figure 176 ...

Page 335: ...4 1 Lift plate carrier with the K4 side facing downward into the clamping ring S and secure it Now tilt plate carrier 180 2 Insert both roll pins 6x24 and 3 5x24 flush mounted into the end face side bore of the plate carrier see Arrow in Figure 178 3 Tilt plate carrier 180 4 Wet both roll pins Figure 179 with Loctite 262 and install them IMPORTANT Do not damage the centric orifice hole 0 8 mm 0 03...

Page 336: ...rt both O rings scrollfree into the ring grooves of the piston see Figure 181 7 Oil O rings and piston bearing surfaces 8 Insert piston K3 uniformly until contact is obtained NOTE Pay attention to the installation position of the piston see Figure 182 9 Introduce intermediate washer and compression spring Figure 180 Figure 181 Figure 182 Figure 183 ...

Page 337: ... clamping ring 12 Preload compression spring using Special device S and squeeze snap ring into the annular groove of the plate carrier see Figure 186 13 Install purge valve spool and compression spring on the opposite side Clutch K4 accordingly see Figure 180 Figure 185 14 Now lift plate carrier with the K4 side facing downward into the clamping ring and secure it Tilt plate carrier 180 Figure 184...

Page 338: ...arrier see Figure 186 K4 Dimension X short plate carrier side K3 Dimension Y long plate carrier side Item Denomination Quantity s mm Comment 1 Plate Carrier 1 2 Piston 1 3 Outer Plate 2 1 85 0 0728 in One side Coated 4 Outer Plate 5 2 5 0 0984 in Coated On Both Sides 5 Inner Plate 5 3 5 0 1378 in 6 Inner Plate 1 2 5 4 0 0 0984 0 1575 in Optional 7 Snap Ring 1 2 55 3 10 0 1004 0 1220 in Optional 8 ...

Page 339: ...ut 100 N 10 kg and set dial indicator to Zero Figure 189 D Now press end shim against the snap ring upward and read the plate clearance on the dial indicator E After the performed adjustment of the plate clearance disassemble the plate pack oil the plates according to ZF List of lubricants TE ML 03 and install them again IMPORTANT In case of a deviation from the required plate clearance 2 2 2 4 mm...

Page 340: ...ording to Figure 190 Preload tapered roller bearing with about 50 000 N 5 5 ton and determine axial play with dial indicator NOTE In case of deviations from the required axial play correct with corresponding shim Item 3 Figure 190 D Heat inner bearing race and line it up until contact is obtained Reference Number Description 1 Inner Bearing Race 2 Outer Bearing Race 3 Shim Optional Empirical Value...

Page 341: ...roove facing upward F Introduce spur gear until all inner plates are accommodated G Heat inner bearing race spur gear bearing and position it against shoulder H Heat inner bearing race spur gear bearing and position it against shoulder CAUTION Use protective gloves CAUTION Use protective gloves Figure 193 Figure 194 Figure 195 Figure 196 ...

Page 342: ... 197 K4 Dimension X short plate carrier side K3 Dimension Y long plate carrier side Item Denomination Quantity s mm Comment 1 Plate Carrier 1 2 Piston 1 3 Outer Plate 2 1 85 0 0728 in One side Coated 4 Outer Plate 8 2 5 0 0984 in Coated On Both Sides 5 Inner Plate 3 2 5 0 0984 in 6 Inner Plate 5 3 0 0 1181 in 7 Inner Plate 1 2 5 4 0 0 0984 0 1575 in Optional 8 Snap Ring 1 2 55 3 10 0 1004 0 1220 i...

Page 343: ...0 kg and set the dial indicator to Zero Figure 200 D Now press the end shim against the snap ring upward and read the plate clearance on the dial indicator E After the performed adjustment of the plate clearance disassemble the plate pack oil plates according to ZF List of lubricants TE ML 03 and install them again IMPORTANT In case of a deviation from the required plate clearance 2 2 2 4 mm 0 086...

Page 344: ...000 N 10 ton Figure 202 5 Lift plate carrier with the K4 side facing downward into the clamping ring S and secure it 6 Tilt plate carrier 90 7 Wet thread of slotted nut with Loctite 262 and install slotted nut Figure 203 NOTE Install slotted nut with the collar 60 mm 2 3622 in facing the inner bearing race CAUTION Use protective gloves CAUTION Support on the lower and on the upper inner bearing ra...

Page 345: ...10 8 Insert outer bearing race into the spur gear K3 until contact is obtained 9 Heat roller bearing and position it against shoulder 10 Tighten slotted nut 11 Introduce inner bearing race CAUTION Use protective gloves Figure 204 Figure 205 Figure 206 Figure 207 ...

Page 346: ...nverter ZF 4WG 310 12 Check function of clutch using compressed air NOTE At correctly installed components the closing resp opening of the clutches is clearly audible 13 Squeeze in and engage rectangular rings 3x Figure 209 Figure 208 Figure 209 ...

Page 347: ...180 3 Insert both roll pins 6x24 and 3 5x24 flush mounted into the spur gear side bore Figure 210 of the plate carrier 4 Tilt plate carrier 180 5 Wet both set screws Figure 211 with Loctite 262 and install them 6 Insert purge valve Figure 212 flush mounted with the chamfer facing downward 7 Lay both O rings scrollfree into the ring grooves of the piston see Arrows Figure 210 Figure 211 Figure 212 ...

Page 348: ...r Arrow facing upward over the compression spring and line up the snap ring 11 Lift plate carrier out of the clamping ring S Preload compression spring using Special device S and squeeze snap ring into the annular groove of the plate carrier Arrow see Figure 217 12 Install purge valve spool and compression spring on the opposite side KR clutch accordingly as Figure 212 Figure 217 13 Now lift plate...

Page 349: ...late carrier see Figure 218 KR Dimension Y long plate carrier side K2 Dimension X short plate carrier side Item Denomination Quantity s mm Comment 1 Plate Carrier 1 2 Piston 1 3 Outer Plate 2 1 85 0 0728 in One side Coated 4 Outer Plate 11 2 5 0 0984 in Coated On Both Sides 5 Inner Plate 11 2 5 0 0984 in 6 Inner Plate 1 3 0 0 1181 in Optional 7 Snap Ring 1 2 5 4 0 0 0984 0 1575 in Optional 8 End S...

Page 350: ...bout 100 N 10 kg and set the dial indicator to Zero Now press the end shim against the snap ring upward and read the plate clearance on the dial indicator D After the performed adjustment of the plate clearance disassemble the plate pack oil plates according to ZF List of lubricants TE ML 03 and install them again IMPORTANT In case of deviations from the required plate clearance 2 8 3 0 mm 0 1102 ...

Page 351: ...s of spur gear KR B Check Axial play Spur gear bearing 0 0 0 05 mm 0 0 0 0020 in C Place spur gear over the inner bearing race D Introduce shims 2 pieces s 3 0 0 1181 in and s 3 10 mm 0 1220 in Reference Number Description 1 Inner Bearing Race 2 Shim s 3 0 and s 3 10 mm 6 10 mm Empirical Value 3 Spur Gear 4 Inner Bearing Race Figure 222 Figure 223 Figure 224 ...

Page 352: ... and determine the axial play with dial indicator NOTE In case of deviations from the required axial play correct with corresponding shims Item 2 Figure 222 G Heat inner bearing race and position it against shoulder H Introduce the spur gear until all inner plates are accommodated CAUTION Use protective gloves Figure 225 Figure 226 Figure 227 Figure 228 ...

Page 353: ...ned shims see Figure 223 to Figure 226 J Heat inner bearing race spur gear bearing and position it against shoulder K Heat inner bearing race spur gear bearing and position it against shoulder CAUTION Use protective gloves CAUTION Use protective gloves Figure 229 Figure 230 Figure 231 ...

Page 354: ...e 232 KR Dimension Y long plate carrier side K2 Dimension X short plate carrier side Item Denomination Quantity s mm Comment 1 Plate Carrier 1 2 Piston 1 3 Outer Plate 2 1 85 0 0728 in One side Coated 4 Outer Plate 8 2 5 0 0984 in Coated On Both Sides 5 Inner Plate 3 2 5 0 0984 in 6 Inner Plate 5 3 0 0 1181 in 7 Inner Plate 1 2 5 4 0 0 0984 0 1575 in Optional 8 Snap Ring 1 2 55 3 10 0 1004 0 1220 ...

Page 355: ... 10 kg and set the dial indicator to Zero D Now press the end shim against the snap ring upward and read the plate clearance on the dial indicator E After the performed adjustment of the plate clearance disassemble the plate pack oil the plates according to ZF List of lubricants TE ML 03 and install them again IMPORTANT In case of deviations from the required plate clearance 2 6 2 8 mm 0 1024 0 11...

Page 356: ...join both parts together using hydraulic press until the snap ring snaps into the annular groove of the gear wheel 2 B Adjust Axial play Spur gear bearing 0 05 0 15 mm 0 0020 0 0059 in Figure 237 Example C C Figure 237 shows the components of the spur gear bearing D Place spur gear over the inner bearing race Reference Number Description 1 Bearings Inner Race 2 Shim Optional 3 Spur Gear Compl 4 In...

Page 357: ...nsion NOTE Dimension I e g 76 270 mm 3 0028 in G Determine Dimension II shaft dimension NOTE Dimension II e g 74 14 mm 3 0028 in EXAMPLE C Dimension I e g 76 27 mm 3 0028 in Dimension II e g 74 14 mm 2 9189 in Difference 2 13 mm 0 0839 in Axial Play e g 0 07 mm 0 0028 in Gives Shim 2 20 mm 0 0866 in Figure 239 Figure 240 Figure 241 ...

Page 358: ...s obtained 4 Introduce spur gear until all inner plates are accommodated 5 Line up shim e g s 2 20 mm 0 0866 in see Example page 106 6 Heat inner bearing race spur gear bearing and line it up until contact is obtained CAUTION Use protective gloves CAUTION Use protective gloves Figure 242 Figure 243 Figure 244 Figure 245 ...

Page 359: ... Tilt clutch 90 B K2 Side Wet thread of slotted nut with Loctite 262 and install it Figure 317 NOTE Install slotted nut with the chamfer facing the inner bearing race NOTE Torque limit 800 Nm 590 ft lb C KR Side Wet thread of slotted nut with Loctite 262 and install it NOTE Install slotted nut with the collar 70 mm 2 7560 in facing the inner bearing race NOTE Torque limit 800 Nm 590 ft lb CAUTION ...

Page 360: ...er ZF 4WG 310 D D Check function of clutches K3 and K4 using compressed air Figure 250 NOTE At correctly installed components the closing resp opening of the clutches is clearly audible E Squeeze in and engage rectangular ring 3x see Arrows Figure 250 ...

Page 361: ...r 180 3 Insert both roll pins 6x24 and 3 5x24 flush mounted into the end face side bore of the plate carrier Figure 251 4 Tilt plate carrier 180 5 Wet both set screws Figure 252 with Loctite 262 and install them 6 Drive purge valve Arrow flush mounted in with the chamfer facing downward 7 Lay both O rings scrollfree into the ring grooves of the piston see Figure 254 Figure 251 Figure 252 Figure 25...

Page 362: ...re 257 facing upward over the compression spring and line up the snap ring 12 Lift the plate carrier out of the clamping ring Preload compression spring using Special device S and squeeze snap ring into the annular groove of the plate carrier Arrow seeFigure 258 13 Install purge valve spool and compression spring on the opposite side KV clutch accordingly 14 Now lift the plate carrier with the KV ...

Page 363: ...rier see Figure 259 KV Dimension Y long plate carrier side resp great K1 Dimension X short plate carrier side resp small Item Denomination Quantity s mm Comment 1 Plate Carrier 1 2 Piston 1 3 Outer Plate 2 1 85 0 0728 in One side Coated 4 Outer Plate 11 2 5 0 0984 in Coated On Both Sides 5 Inner Plate 11 2 5 0 0984 in 6 Inner Plate 1 3 0 0 1181 in Optional 7 Snap Ring 1 2 5 4 0 0 0984 0 1575 in Op...

Page 364: ...on with about 100 N 10 kg and set the dial indicator to Zero D Now press the end shim against the snap ring upward and read the plate clearance on the dial indicator IMPORTANT In case of deviations from the required plate clearance 2 8 3 0 mm 0 1102 0 1181 in correct with corresponding inner plate Item 6 optional s 2 5 4 0 0 0984 0 1575 in or and snap ring optional After the performed adjustment o...

Page 365: ...ur gear KV B Check Axial play Spur gear bearing 0 0 0 05 mm 0 0 0 0020 in C Install both outer bearing races 2 and place spur gear over the inner bearing race D Introduce shim s 4 and ring 3 Reference Number Description 1 Inner Bearing Race 2 Outer Bearing Race 3 Ring 4 Shim s Optional Empirical Value s 1 70 mm 0 0669 in 5 Spur Gear Figure 263 Figure 264 Figure 265 ...

Page 366: ...d determine axial play using dial indicator NOTE In case of deviations from the required axial play correct with corresponding shim Item 4 Figure 263 F Heat inner bearing race and position it against shoulder G Line up shim see Figure 263 Figure 267 and ring CAUTION Use protective gloves Figure 266 Figure 267 Figure 268 Figure 269 ...

Page 367: ...inner plates are accommodated I Heat inner bearing race spur gear bearing and position it against shoulder J Heat inner bearing race clutch bearing and position it against shoulder K Tilt plate carrier 180 CAUTION Use protective gloves CAUTION Use protective gloves Figure 270 Figure 271 Figure 272 ...

Page 368: ...ee Figure 273 KV Dimension Y long plate carrier side resp great K1 Dimension X short plate carrier side resp small Item Denomination Quantity s mm Comment 1 Plate Carrier 1 2 Piston 1 3 Outer Plate 2 1 85 0 0728 in One side Coated 4 Outer Plate 8 2 5 0 0984 in Coated On Both Sides 5 Inner Plate 8 3 5 0 1378 in 6 Inner Plate 1 2 5 3 5 0 0984 0 1378 in Optional 7 Snap Ring 1 2 1 2 5 0 0827 0 0984 in...

Page 369: ... about 100 N 10 kg and set the dial indicator to Zero D Now press the end shim against the snap ring upward and read the plate clearance on the dial indicator E After the performed adjustment of the plate clearance disassemble the plate pack oil plates according to ZF List of lubricants TE ML 03 and install them again IMPORTANT In case of deviations from the required plate clearance 2 6 2 8 mm 0 1...

Page 370: ...components of spur gear K1 NOTE Prior to assemble the components align plate pack using the spur gear radially and center it see Figure 278 B Install snap ring C Introduce bush with the end face side collar Arrow facing the snap ring Reference Number Description 1 Ball Bearing Compl 2 Snap Ring 3 Spur Gear Figure 277 Figure 278 Figure 279 Figure 280 ...

Page 371: ...nward Apply the pressing in tool only on the outer bearing race E Heat ball bearing and line it up until contact is obtained NOTE Lubricating groove Arrow must face upward F Line up the bush G Heat spur gear about 120 C 248 F and introduce it until all inner plates are accommodated CAUTION Use protective gloves CAUTION Use protective gloves Figure 281 Figure 282 Figure 283 Figure 284 ...

Page 372: ... 100 000 N 10 ton Figure 287 5 Lift plate carrier into the clamping ring S secure and tilt it 90 Wet thread of slotted nut with Loctite 262 and install slotted nut NOTE Install slotted nut with the collar facing the inner bearing race NOTE Torque limit 550 Nm 405 ft lb 6 Install opposite slotted nut KV side accordingly CAUTION Use protective gloves CAUTION Support on the lower and on the upper inn...

Page 373: ...r ZF 4WG 310 7 Check function of the clutches KV and K1 using compressed air NOTE At correctly installed components the closing resp opening of the clutches is clearly audible 8 Squeeze in and engage rectangular rings 3x see Arrows Figure 289 Figure 290 ...

Page 374: ...imension NOTE Dimension I e g 61 57 mm 2 4240 in 3 Measure Dimension II housing dimension from the locating face of the inner bearing race to the locating face of the axle NOTE Dimension II e g 0 52 mm 0 0205 in EXAMPLE D1 Dimension I e g 61 57 mm 2 4240 in Dimension II e g 0 52 mm 0 0205 in Gives Dimension X 61 05 mm 2 4035 in Required Axial Play e g 0 03 mm 0 0012 in Gives Installation Dimension...

Page 375: ...bly of the shim and of the countershaft axle can be performed only after the installation of the clutches page 139 5 Position countershaft gear along with inner bearing races see Figure 294 6 Insert outer bearing races KV K1 KR K2 and K3 K4 into the housing bores until contact is obtained see Arrows Dimension Y installation dimension 61 02 mm 2 4024 in Dimension III bearing dimension 59 52 mm 2 34...

Page 376: ... 9 Check installation position of the countershaft gear Arrow once more and correct if necessary 10 Locate the spur gear K3 using Special device and eye bolt Arrow axially NOTE The securing of spur gear prevents the slipping out of the plates during the lifting into position of the clutch Figure 296 Figure 297 Figure 298 Figure 299 ...

Page 377: ... direction of arrow and position clutch K3 K4 12 Now remove the Special device again 13 Cool down outer bearing race and insert in into housing bore until contact is obtained 14 Heat inner bearing race and assemble it until contact is obtained 15 Position oil baffle Figure 300 Figure 301 Figure 302 Figure 303 ...

Page 378: ... and fasten both plates using hex head screws mount plain washer NOTE Torque limit M8 8 8 2 35 kg m 16 96 ft lb NOTE Secure hex head screws with Loctite 262 18 Cool down output shaft and install it until contact is obtained NOTE Pay attention to installation position see Figure 306 Figure 304 Figure 305 Figure 306 ...

Page 379: ...In this connection see the respective Spare Parts List 2 Drive the roll pin 2x8 mm 0 0787 x 0 3150 in flush mounted in 1 Figure 308 3 Equip screw plug with new O ring and install it 2 Figure 308 4 Squeeze both snap rings Arrow into the recess Reference Number Description 1 Sealing Cover Use Loctite 262 2 Connecting Piece Install New Sealing Ring 3 Cover Plate Install New Gasket 4 Sealing Cover Use...

Page 380: ...er snap ring snaps into the groove of the ball bearing 6 Insert gear wheel until contact is obtained 7 Secure gear wheel using circlip 8 Cover mounting face with sealing compound Loctite 574 9 Install two adjusting screws and position the housing cover on the gearbox housing until contact is obtained using lifting de vice Figure 310 Figure 311 Figure 312 Figure 313 ...

Page 381: ... obtained 11 Fasten housing cover using screw connection 12 Drive roll pin 3 Figure 314 flush mounted in NOTE Torque limit M10 8 8 46 Nm 34 ft lb 13 Insert ball bearing until contact is obtained NOTE Introduce shim s 4 0 mm 0 1575 in 14 Secure ball bearing free play using shim and circlip Figure 314 Figure 315 Figure 316 Figure 317 ...

Page 382: ... Press screening plate against shoulder 17 Line up output flange 18 Wet contact face of the shim with sealing compound Loctite 574 and fasten output flange with hex head screws NOTE Torque limit M10 8 8 46 Nm 34 ft lb CAUTION According to the version different shaft seals can have been applied Outer diameter rubber coated wet with mineral spirits Outer diameter metallic wet with sealing compound L...

Page 383: ... the outer race Housing dimension Press the inner bearing race uniformly on and determine Dimension I from the mounting face to the inner bearing race NOTE Dimension I e g 43 85 mm 1 7264 in NOTE Apply several measuring points and determine the average value Cover dimension Determine Dimension II from the mounting face to the con tact inner bearing race NOTE Dimension II e g 42 15 mm 1 6594 in Fig...

Page 384: ...st shoulder 22 Install and grease O ring Figure 326 23 Heat inner diameter of the bearing cover bearing seat Dimension I e g 43 85 mm 1 7264 in Dimension II e g 42 15 mm 1 6594 in Difference 1 70 mm 0 0669 in Bearing Preload e g 0 10 mm 0 0039 in Gives Shim s s 1 80 mm 0 0709 in CAUTION Use protective gloves Figure 324 Figure 325 Figure 326 ...

Page 385: ... against shoulder NOTE Torque limit M10 8 8 46 Nm 34 ft lb NOTE Pay attention to the radial installation position see markings Arrows 26 Adjust bearing preload of Clutch KR K2 0 20 0 25 mm 0 0079 0 0098 in Figure 329 Figure 332 A Insert outer bearing race until contact is obtained Housing dimension Determine Dimension I from outer bearing race to mounting face NOTE Dimension I e g 15 68 mm 0 6173 ...

Page 386: ... II e g 17 46 mm 0 6874 in B Make shim adhere with assembly grease in the cover Install O ring Arrow EXAMPLE G 27 Grease and align rectangular rings Figure 333 centrically Dimension I e g 17 46 mm 0 6874 in Dimension II e g 15 68 mm 0 6173 in Difference 1 78 mm 0 0701 in Bearing Preload e g 0 22 mm 0 0079 in Gives Shim s s 2 00 mm 0 0787 in Figure 331 Figure 332 Figure 333 ...

Page 387: ...e Clutch KV K1 0 15 0 20 mm 0 0059 0 0079 in Figure 335 Figure 338 A Lay outer bearing race over the inner bearing race Housing dimension Press the outer bearing race uniformly on and determine Dimension I from the mounting face to the outer bearing race NOTE Dimension I e g 52 67 mm 2 0736 in NOTE Apply several measuring points and determine the average value B Insert ring with the chamfer facing...

Page 388: ...TE Dimension II e g 50 75 mm 1 9980 in C Insert shim EXAMPLE H 30 Insert outer bearing race until contact is obtained 31 Line up O ring Figure 339 Dimension I 52 67 mm 2 0736 in Dimension II 50 75 mm 1 9980 in Difference 1 92 mm 0 0076 in Bearing Preload e g 0 18 mm 0 0071 in Gives Shim s s 2 10 mm 0 0827 in Figure 337 Figure 338 Figure 339 ...

Page 389: ...d align the rectangular rings Figure 340 centrically 33 Insert the bearing cover until contact is obtained and fasten using hex head screws NOTE Torque limit M10 8 8 46 Nm 34 ft lb NOTE Pay attention to the radial installation position see markings Arrows Figure 340 Figure 341 ...

Page 390: ...djusting screw Figure 342 4 Supercool pin 5 Make determined shim see also page 123 adhere with grease 6 Insert pin until contact is obtained 7 Remove adjusting screw and secure bolt using hex head screw NOTE Torque limit M10 8 8 46 Nm 34 ft lb NOTE Wet thread of hex head screw with Loctite 243 CAUTION Use protective gloves Figure 342 Figure 343 Figure 344 Figure 345 ...

Page 391: ... mounted to the housing face NOTE Wet contact face with Loctite 262 HYDRAULIC PUMP 1 Press needle sleeve Figure 347 against shoulder with the reinforced shell facing the pressing in tool 2 Insert disk s 1 3 mm 0 0512 in and position outer bearing race against shoulder 3 Install and grease O ring Figure 349 Figure 346 Figure 347 Figure 348 Figure 349 ...

Page 392: ...ure 351 and mount pump flange 7 Fasten pump flange resp the pump using hex head screws NOTE Torque limit M12 8 8 79 Nm 58 ft lb NOTE Wet thread of the two hex head screws Position see Arrows with Loctite 243 through holes 8 Insert O ring Figure 353 into the annular groove and grease it Fasten pump flange power take off with hex head screws NOTE Torque limit M14 8 8 125 Nm 92 ft lb CAUTION Use prot...

Page 393: ...aling lip 2 Press screening plate Figure 355 against shoulder 3 Line up output flange 4 Wet contact face of the disk with sealing compound Loctite 574 and fasten output flange with hex head screws NOTE Torque limit M10 8 8 46 Nm 34 ft lb CAUTION According to the version different shaft seals may be applied Outer diameter rubber coated wet with mineral spirits Outer diameter metallic wet with seali...

Page 394: ...sten cover using hex head screws mount flat washers 3 Install new O ring Arrow NOTE Torque limit M8 8 8 23 Nm 17 ft lb 4 Equip screw plugs 1 and 2 Figure 360 with new O ring and install them 5 Mount gasket and fasten cover plate 3 Figure 360 using hex head screws NOTE Torque limit screw plugs 140 Nm 103 ft lb NOTE Torque limit M8 8 8 23 Nm 17 ft lb Figure 357 Figure 358 Figure 359 Figure 360 ...

Page 395: ...itting key Figure 361 3 Adjust Gap Dimension 0 50 mm 0 0197 in Driver Input shaft Figure 362 Figure 366 A Line up the disk s 1 90 mm 0 0748 in and position inner bearing race against shoulder B Determine Dimension I from the inner bearing race to the end face driver NOTE Dimension I e g 9 64 mm 0 3795 in Reference Number Description 1 Driver 2 Input Shaft Figure 361 Figure 362 Figure 363 Figure 36...

Page 396: ...ne up shim s 4 Position driver against shoulder and secure it using clamping disk and socket head screw NOTE Torque limit M10 8 8 DIN 6912 32 Nm 24 ft lb Dimension II 10 64 mm 0 4189 in Dimension I 9 64 mm 0 3795 in Difference 1 00 mm 0 0394 in Required Gap Dimension 0 50 mm 0 0197 in Gives Shim s 1 50 mm 0 0591 in Figure 365 Figure 366 Figure 367 ...

Page 397: ...ulder 6 Squeeze circlip in Figure 369 and line up the drive gear 7 Squeeze circlip in Figure 370 and engage it 8 Introduce pre assembled input shaft until contact is obtained NOTE Pay attention to the overlapping of the fitting key with the fitting key groove Figure 368 Figure 369 Figure 370 Figure 371 ...

Page 398: ...imension I e g 128 50 mm 5 0591 in NOTE Apply several measuring points and determine the average value B Measure Dimension II from the mounting face converter bell to the locating face outer bearing race NOTE Dimension II e g 127 46 mm 5 0181 in C Insert shim and position outer bearing race until contact is obtained EXAMPLE K Dimension I 128 50 mm 5 0591 in Dimension II 127 46 mm 5 0181 in Differe...

Page 399: ...ee Figure 375 2 Introduce spur gear Figure 376 starting from the side with the long collar facing upward and bring it in position 3 Insert both roll pins ø 2 5 mm 10 0984 in and ø 1 5 mm 0 0591 in flush mounted into the bore Arrow of the input shaft 4 Supercool the input shaft and introduce it until contact is obtained CAUTION Use protective gloves Figure 375 Figure 376 Figure 377 Figure 378 ...

Page 400: ...ion I from the mounting face to the outer bearing race NOTE Dimension I e g 59 60 mm 2 3465 in B Mount gasket Arrow and determine Dimension II from the mounting face to the locating face of the outer bearing race NOTE Dimension II e g 58 50 mm 2 3031 in EXAMPLE L CAUTION Use protective gloves Dimension I 59 60 mm 2 3465 in Dimension II 58 50 mm 2 3031 in Difference 1 10 mm 0 0433 in Axial Play 0 0...

Page 401: ... 10 Install converter safety valve disk compression spring and ball see 2 Figure 384 Squeeze both rectangular rings into the annular grooves of the input shaft and engage them 3 Figure 384 11 Now grease rectangular rings and align them centrically 12 Supercool oil feed flange about 80 C 112 F and make shim s 1 05 mm 0 0413 in see Example page 149 adhere with assembly grease in the bearing bore Fig...

Page 402: ...it M10 8 8 46 Nm 34 ft lb 15 Wet thread of the screw in sleeves 1 and 2 Figure 388 with Loctite 262 and install the two screw in sleeves 16 Equip screw plugs 3 and 4 Figure 388 with new O rings and install them NOTE Torque limit 10x1 25 Nm 18 ft lb NOTE Torque limit M14x1 5 35 Nm 26 ft lb 17 Converter Pressure Backup Valve Figure 389 and Figure 390 A Drive roll pin 6 x 50 mm 0 2362 x 1 9685 in int...

Page 403: ...48 F NOTE Carry out the following steps Figure 392 Figure 394 in immediate chronological order 19 Grease rectangular ring Arrow and align it centrically Introduce input shaft until contact is obtained NOTE Pay attention to the overlapping of the fitting key with the fitting key groove 20 Install two adjusting screws and mount flat gasket 1 Figure 393 21 Lay O ring 2 Figure 393 into the annular gro...

Page 404: ...mage Pay attention to the radial installation position CONVERTER 1 Fasten diaphragms 3x on converter using hex head screws mount plain washer NOTE Insert hex head screws with Loctite 243 NOTE Torque limit M10 8 8 4 69 kg m 33 93 ft lb 2 Squeeze in and engage rectangular ring Figure 396 Now grease rectangular and align it centrically 3 Install converter using lifting drive until contact is obtained...

Page 405: ...gure 399 7 Equip screw plug 1 Figure 400 with new O ring and install it Install the two retaining plates 2 Figure 400 8 Mount hydraulic control unit HSG 94 see page 56 page 58 9 Install all oil lines CAUTION The line routing is different according to the design In this connection pay attention to the Perspective Illustrations of the corresponding Spare Parts List Figure 398 Figure 399 Figure 400 ...

Page 406: ...he installation position of the single inductive transmitters and the speed sensor Reference Number Description 6 Inductive Transmitter N Turbine 14 Inductive Transmitter N Engine 39 Inductive Transmitter N Central Gear Train 6 31 Speed Sensor N Output And Speedometer 39 6 39 14 AHS3460S Figure 401 AHS3470S B C 31 Figure 402 ...

Page 407: ... face on the inductive transmitter NOTE Dimension I e g 30 00 mm 1 1811 in B Rotate counting disk radially until one tooth tip is central to the inductive transmitter bore C Screw the plug gauge in until contact is obtained Position anvil on the tooth tip until contact is obtained and lock it using set screw Figure 405and Figure 406 IMPORTANT Pay attention to the different Setting dimensions X Ind...

Page 408: ...2 E Line up the corresponding adjusting disk s and wet thread Arrow with Loctite 574 Dimension II e g 30 10 mm 1 1850 in Dimension X 0 5 0 3 mm 0 0197 0 0118 in e g 0 60 mm 0 0236 in Gives Installation Dimension A 29 50 mm 1 1614 in Dimension I e g 30 10 mm 1 1850 in Installation Dimension A e g 29 50 mm 1 1614 in Gives Adjusting Disk s 0 50 mm 0 0197 in AHS3510S II Figure 406 Figure 407 Figure 40...

Page 409: ... dimensions Installation position of the single inductive transmitters see also page 160 4 Install Speed sensor N Output Speedometer 31 Figure 410 Figure 415 NOTE Setting dimension X 1 0 0 5 mm 0 0394 0 0197 in A Figure 411 shows the speed sensor Hall sensor B Determine Dimension I from the housing face to the spur gear K3 NOTE Dimension I e g 39 20 mm 1 5433 in Reference Number Description 1 Spee...

Page 410: ... D Line up setting plates 2x s 0 5 mm 0 0197 in and grease O ring EXAMPLE N1 EXAMPLE N2 Dimension I e g 39 20 mm 1 5433 in Dimension X 1 0 0 3 mm 0 0394 0 0118 in e g 1 20 mm 0 0472 in Gives Adjusting Disk s 38 00 mm 1 4961 in Dimension I e g 39 00 mm 1 5354 in Installation Dimension A e g 38 00 mm 1 4961 in Gives Setting Plate s 1 00 mm 0 0394 in Figure 413 Figure 414 ...

Page 411: ... speed sensor using socket head screw NOTE Torque limit M8 8 8 23 Nm 17 ft lb NOTE Installation position of the speed sensor see also page 155 CAUTION Prior to the commissioning of the Transmission carry out the oil filling according to the Operating Instructions Figure 415 ...

Page 412: ...his section Always use tools and equipment that is in good working order Use lifting and hoisting equipment capable of safely handling load Remember that ultimately safety is your own personal responsibility MODEL SERIAL NUMBER RANGE Mega 130 1003 and Up Mega 160 1021 and Up Mega 200 V 1001 and Up Mega 250 V 1001 and Up Mega 300 V 1001 and Up Mega 400 III PLUS 1001 and Up Mega 400 V 1001 and Up Me...

Page 413: ...ay During Operation 6 Definition of Operating Modes 8 Normal 8 Substitute Clutch Control 8 Limp home 8 Transmission shut Down 8 TCU Shut Down 8 Clutch Pack and Solenoid Valve Cross reference Table 9 Table of Fault Codes 10 Table of Fault Codes ERGO Control 32 Measurement of Resistance at Actuator sensors and Cable 35 Actuator 35 Cable 35 ...

Page 414: ...rating condition of the system It displays normal operational codes and fault codes ABBREVIATIONS Throughout this section the following abbreviations are used to indicate various conditions Abbreviations ABS Anti Blocking System ADM 1 8 AEB ASR Anti Slipping Regulation CAN Controller Area Network CCO Clutch Cut Off DCO DCT1 DNS1 EAM1 EAMODUL1 EEC 1 3 Electronic Engine Controller FMR 1 and 2 LIS 1 ...

Page 415: ...y shows a spanner symbol g for a fault The display shows the fault code if the gear selector is in neutral position If more than one fault is detected each fault code is shown for about 1 second S T O P h f e d a b c g special symbols a h left character right character HBOE630L Figure 1 ...

Page 416: ...eaning of Number 1 Hex Digital Input Signal 2 Hex Analog Input Signal 3 Hex Speed Signal 4 Hex CAN Signal Error 5 Hex CAN Signal Error 6 Hex CAN Signal Error 7 Hex Analog Current Output Signal 8 Hex Analog Current Output Signal 9 Hex Digital Output Signal A Hex Digital Output Signal B Hex Transmission Fault Clutch Error C Hex Logical Fault D Hex Power Supply E Hex High Speed Signal F Hex General F...

Page 417: ...bars Manual mode 3 gear 4 bars Manual mode 4 gear 4 bars and 2 arrows Automatic mode Bars flashing 6 WG converter lockup clutch open 4 WG Downshift mode active Difference of engine and turbine speed above a certain limit and lockup clutch not activated Spanner At least one fault active Select neutral to get fault code displayed Fault code See fault code list See page 10 WS Warning sump temperature...

Page 418: ...ror Codes ZF F or R flashing Direction F or R selected while turbine speed is to high CAUTION Gear will engage if turbine speed drops EE flashing No communication with display Checked wiring from TCU to display Symbol Meaning Remarks ...

Page 419: ...r reverse the TCU will select the limp home gear If output speed is less than a threshold for reversal speed and TCU has changed into the limp home gear and the operator selects a shuttle shift TCU will shift immediately into the limp home gear of the selected direction If output speed is greater than the threshold TCU will shift the transmission into neutral The operator has to slow down the vehi...

Page 420: ...controlled by proportional valves that contain a solenoid valve The following chart identifies which solenoid valve corresponds to each clutch pack Clutch Pack Solenoid Valve Proportioning Valve Number Mega 130 4WG 100 Mega 160 4WG 130 Mega 250 V 4WG 190 Mega 300 V 4WG 210 Mega 400 III PLUS 4WG 260 Mega 400 V 4WG 260 Mega 500 V 4WG 310 K1 Y3 Y3 Y3 Y3 Y3 Y3 Y3 K2 Y6 Y6 Y6 Y6 Y6 Y6 Y6 K3 Y4 Y4 Y4 Y4...

Page 421: ... position 12 Logical error at direction select signal TCU detected a wrong signal combination for direction Cable from shift lever to TCU is broken Cable is defective and is contacted to battery voltage or vehicle ground Shift lever is defective TCU shifts transmission to neutral OP Mode transmission shut down Check cables from TCU to shift lever Check signal combinations of shift lever positions ...

Page 422: ...ific Check cable from TCU to Solenoid LIS1 Function No 1 device Check connectors from Solenoid LIS1 Function No 1 device to TCU Check resistance of Solenoid LIS1 Function No 1 device 1 See Measurement of Resistance at Actuator sensors and Cable on page 35 1A S C to ground at Solenoid LIS2 Function No 2 TCU detected a wrong voltage at output pin that looks like a S C to vehicle ground Cable is defe...

Page 423: ... an internal defect Connector has no connection to TCU Customer specific Check cable from TCU to Solenoid LIS2 Function No 2 device Check connectors from Solenoid LIS2 Function No 2 device to TCU Check resistance of Solenoid LIS2 Function No 2 device 1 See Measurement of Resistance at Actuator sensors and Cable on page 35 25 S C to battery voltage or O C at transmission sump temperature sensor inp...

Page 424: ...no connection to TCU Speed sensor has an internal defect Connector pin is contacted to battery voltage or has no contact OP Mode substitute clutch control Check cable from TCU to sensor Check connectors Check speed sensor 32 S C to ground at engine speed input TCU measures a voltage less than 0 45V at speed input pin Cable connector is defective and is contacted to vehicle ground Speed sensor has ...

Page 425: ...or pin is contacted to battery voltage or has no contact OP Mode substitute clutch control If a failure is existing at output speed TCU shifts to neutral OP Mode limp home Check cable from TCU to sensor Check connectors Check speed sensor 35 S C to ground at turbine speed input TCU measures a voltage less than 0 45V at speed input pin Cable connector is defective and is contacted to vehicle ground...

Page 426: ... is defective and is contacted to battery voltage Cable has no connection to TCU Speed sensor has an internal defect Connector pin is contacted to battery voltage or has no contact OP Mode substitute clutch control Check cable from TCU to sensor Check connectors Check speed sensor 38 S C to ground at internal speed input TCU measures a voltage less than 0 45V at speed input pin Cable connector is ...

Page 427: ...y voltage or has no contact Special mode for gear selection OP Mode substitute clutch control If a failure is existing at turbine speed TCU shifts to neutral OP Mode limp home Check cable from TCU to sensor Check connectors Check speed sensor 3B S C to ground at output speed input TCU measures a voltage less than 1 00V at speed input pin Cable connector is defective and is contacted to vehicle gro...

Page 428: ...turbine speed TCU shifts to neutral OP Mode limp home Check sensor signal of output speed sensor Check sensor gap of output speed sensor Check cable from TCU to sensor This fault is reset after power up of TCU 71 S C to battery voltage at clutch K1 The measured resistance value of valve is out of limit voltage at K1 valve is too high Cable connector is defective and has contact to battery voltage ...

Page 429: ...t of limit voltage at K2 valve is too high Cable connector is defective and has contact to battery voltage Cable connector is defective and has contact to another regulator output of TCU Regulator has an internal defect TCU shifts to neutral OP Mode limp home If failure at another clutch is pending TCU shifts to neutral OP Mode TCU shut down Check cable from TCU to gearbox Check connectors from ge...

Page 430: ...or sensors and Cable on page 35 78 S C to ground at clutch K3 The measured resistance value of valve is out of limit voltage at K3 valve is too low Cable connector is defective and has contact to vehicle ground Regulator has an internal defect TCU shifts to neutral OP Mode limp home If failure at another clutch is pending TCU shifts to neutral OP Mode TCU shut down Check cable from TCU to gearbox ...

Page 431: ...nection to TCU Engine derating device has an internal defect Connector has no connection to TCU No reaction OP Mode normal Check cable from TCU to engine derating device Check connectors from engine derating device to TCU Check resistance 1 of engine derating device 1 See Measurement of Resistance at Actuator sensors and Cable on page 35 Only Mega 500 V 81 S C to battery voltage at clutch K4 The m...

Page 432: ...t of limit voltage at KV valve is too high Cable connector is defective and has contact to battery voltage Cable connector is defective and has contact to another regulator output of TCU Regulator has an internal defect TCU shifts to neutral OP Mode limp home If failure at another clutch is pending TCU shifts to neutral OP Mode TCU shut down Check cable from TCU to gearbox Check connectors from ge...

Page 433: ...or sensors and Cable on page 35 88 S C to ground at clutch KR The measured resistance value of valve is out of limit voltage at KR valve is too low Cable connector is defective and has contact to vehicle ground Regulator has an internal defect TCU shifts to neutral OP Mode limp home If failure at another clutch is pending TCU shifts to neutral OP Mode TCU shut down Check cable from TCU to gearbox ...

Page 434: ...ternal defect Connector pin is contacted to battery voltage No reaction OP Mode normal Check cable from TCU to backup alarm device Check connectors from backup alarm device to TCU Check resistance 1 of backup alarm device 1 See Measurement of Resistance at Actuator sensors and Cable on page 35 93 O C at relay reverse warning alarm TCU detected a wrong voltage at output pin that looks like a O C fo...

Page 435: ...ock TCU detected a wrong voltage at output pin that looks like a S C to battery voltage Cable is defective and is contacted to battery voltage Starter interlock relay has an internal defect Connector pin is contacted to battery voltage No reaction OP Mode normal Check cable from TCU to starter interlock relay Check connectors from starter interlock relay to TCU Check resistance 1 of starter interl...

Page 436: ... fault code 95 and 98 are both being displayed for about one second each see combined fault code B1 Slippage at clutch K1 TCU calculates a differential speed at closed clutch K1 If this calculated value is out of range TCU interprets this as slipping clutch Low pressure at clutch K1 Low main pressure Wrong signal at internal speed sensor Wrong signal at output speed sensor Sensor gap is incorrect ...

Page 437: ...t clutch K3 TCU calculates a differential speed at closed clutch K3 If this calculated value is out of range TCU interprets this as slipping clutch Low pressure at clutch K3 Low main pressure Wrong signal at internal speed sensor Wrong signal at output speed sensor Sensor gap is incorrect Clutch is defective TCU shifts to neutral OP Mode limp home If failure at another clutch is pending TCU shifts...

Page 438: ...t clutch KV TCU calculates a differential speed at closed clutch KV If this calculated value is out of range TCU interprets this as slipping clutch Low pressure at clutch KV Low main pressure Wrong signal at internal speed sensor Wrong signal at turbine speed sensor Sensor gap is incorrect Clutch is defective TCU shifts to neutral OP Mode limp home If failure at another clutch is pending TCU shift...

Page 439: ...oltage at power supply for sensors TCU measures more than 6V at the pin AU1 5V sensor supply See fault codes No 21 2C Check cables and connectors to sensors which are supplied from AU1 Check the power supply at the pin AU1 should be approximately 5V Fault codes No 21 to No 2C may be a reaction of this fault D2 S C to ground at power supply for sensors TCU measures less than 4V at the pin AU1 5V se...

Page 440: ...wn Check fuse Check cables from gearbox to TCU Check connectors from gearbox to TCU Replace TCU D6 Error at switch 2 for valve power supply VPS2 TCU switched on VPS2 and measured VPS2 is off or TCU switched off VPS2 and measured VPS2 is still on Cable or connectors are defect and are contacted to battery voltage Cable or connectors are defect and are contacted to vehicle ground Permanent power sup...

Page 441: ...TCU Often shown together with fault code F2 F2 Configuration lost TCU has lost the correct configuration and can t control the transmission Interference during saving data on non volatile memory TCU is brand new or from another vehicle Transmission stay neutral OP Mode TCU shut down Reprogram the correct configuration for the vehicle e g with cluster controller F3 Application error Something of th...

Page 442: ...latile memory TCU is brand new No reaction Default values 0 for AEB offsets used OP Mode normal Execute AEB Fault Code hex Meaning of the Fault Code Possible reason for fault detection Reaction of the TCU Possible Steps to Repair Remarks Only Mega 400 III PLUS Only Series V Gray shaded boxes are error codes for other applications They are only given for general reference purposes ...

Page 443: ...nput Not used 25 Short circuit to battery voltage or open circuit at temperature sensor input 26 Short circuit to ground at temperature sensor input 31 Short circuit to battery voltage at engine speed input 32 Short circuit to ground or open circuit at engine speed input 33 Logical error at engine speed input 34 Short circuit to battery voltage at turbine speed input 35 Short circuit to ground or ...

Page 444: ... to battery voltage at converter clutch Not used 7B Short circuit to ground at converter clutch Not used 7C Open circuit at converter clutch Not used 81 Short circuit battery voltage at clutch K4 82 Short circuit to ground at clutch K4 83 Open circuit at clutch K4 84 Short circuit to battery voltage at clutch KV 85 Short circuit to ground at clutch KV 86 Open circuit at clutch KV 87 Short circuit ...

Page 445: ...t to battery voltage at power supply for sensors D2 Short circuit to ground at power supply for sensors D3 Low power at battery D4 High power at battery D5 Error at switch 1 for valve power supply D6 Error at switch 2 for valve power supply E1 Short circuit to battery at speedometer output Not used E2 Short circuit to ground or open circuit at speedometer output Not used E3 Short circuit to batter...

Page 446: ... for S C to ground G is connected to vehicle ground Short cut to battery R12 R R1G 0 R2G R or R1G R R2G 0 for S C to battery G is connected to battery voltage CABLE open circuit R12 R1P R1C R2P R2C short cut to ground R12 0 R1C R2C 0 R1P R2P short cut to battery R12 0 R1C R2C R1P R2P 0 R 2 1 G HBOE640I Figure 3 P power supply 1 2 TCU Actuator Sensor U Bat Gnd C chassis HBOE650I Figure 4 ...

Page 447: ...S0607900C Page 36 Transmission Error Codes ZF ...

Page 448: ...1HYDRAULICS ...

Page 449: ... safety is your own personal responsibility MODEL SERIAL NUMBER RANGE Mega 130 0001 and Up Mega 160 0001 and Up Mega 200 III 1001 and Up Mega 200 V 1001 and Up Mega 250 III 1001 and Up Mega 250 V 1001 and Up Mega 300 V 1001 and Up Mega 400 III PLUS 1001 and Up Mega 400 V 1001 and Up Mega 500 V 1001 and Up Solar 130LC V 0001 and Up Solar 130W V 0001 and Up Solar 170LC V 1001 and Up Solar 170W V 100...

Page 450: ... OF CONTENTS General Description 3 Specifications 4 Accumulator Charging 7 Charging the Accumulator with Nitrogen 7 Solar 290LC V 0001 and Up Solar 290LL 1001 and Up Solar 330LC V 1001 and Up Solar 400LC V 1001 and Up Solar 450LC V 1001 and Up MODEL SERIAL NUMBER RANGE ...

Page 451: ... accumulator for passing hydraulic fluid in and out and an elastic diaphragm to separate the two chambers The flexible diaphragm changes shape to conform to the changing pressures and volumes of the two fluids in the upper and lower chambers There are six possible positions the diaphragm can be in and they are as follows 1 With no gas charge in the upper chamber 0 bar 0 psi empty and no oil in the...

Page 452: ...flexible diaphragm begins to retract upward 4 When system oil is at highest working pressure and the accumulator fills to maximum reserve capacity the flexible diaphragm is pushed up into the top of the upper chamber The highest working pressure is sometimes referred to as the P3 pressure and can also be referenced on the manufacturer s data label on the exterior of the accumulator 5 If system oil...

Page 453: ... cc 45 77 in3 Mega 400 V S N 1001 and Up Brake System 30 kg cm2 430 psi 750 cc 45 77 in3 Mega 400 V S N 1001 and Up Pilot 15 kg cm2 210 psi 320 cc 19 53 in3 Mega 500 V S N 1001 and Up Brake System 30 kg cm2 430 psi 750 cc 45 77 in3 Mega 500 V S N 1001 and Up Pilot 15 kg cm2 210 psi 320 cc 19 53 in3 Solar 130LC V S N 0001 and Up Pilot Travel 10 kg cm2 140 psi 320 cc 19 53 in3 Solar 130W V S N 0001 ...

Page 454: ...220LL S N 1001 and Up Pilot Travel 10 kg cm2 140 psi 320 cc 19 53 in3 Solar 220N V S N 1001 and Up 10 kg cm2 140 psi 320 cc 19 53 in3 Solar 250LC V S N 1001 and Up Pilot Travel 10 kg cm2 140 psi 320 cc 19 53 in3 Solar 290LC V S N 0001 and Up Pilot Travel 10 kg cm2 140 psi 320 cc 19 53 in3 Solar 290LL S N 1001 and Up Pilot Travel 10 kg cm2 140 psi 320 cc 19 53 in3 Solar 330LC V S N 1001 and Up Pilo...

Page 455: ...m or upper valve failure or any type of accident or handling fault the upper chamber of the accumulator could at some point require re pressurization Depending upon the specific procedures and safety precautions recommended for the type and model accumulator that has been installed on your machine a specialized adapter and or filling tool may be required to perform the procedure Consult your deale...

Page 456: ... Coat area around protective plug 11 with soapy water If soap bubbles form retighten protective plug 11 10 Install protective cap 10 Figure 3 on accumulator NOTE After an accumulator has been installed or after an accumulator has been recharged with P1 after the first week of operation Check for a pressure drop due to leaks If no pressure drop is found after the first week check again after 3 more...

Page 457: ...pment that is in good working order Use lifting and hoisting equipment capable of safely handling load Remember that ultimately safety is your own personal responsibility MODEL SERIAL NUMBER RANGE Mega 130 0001 and Up Mega 160 0001 and Up Mega 200 III 1001 and Up Mega 200 V 1001 and Up Mega 250 III 1001 and Up Mega 250 V 1001 and Up Mega 300 V 1001 and Up Mega 400 III PLUS 1001 and Up Mega 400 V 1...

Page 458: ...urn to Master Table of Contents TABLE OF CONTENTS General Description 3 Theory of Operation 4 Parts List 5 Troubleshooting Testing and Adjustment 7 Disassembly 11 Cleaning and Inspection Wear Limits and Tolerances 13 Reassembly 14 ...

Page 459: ... piston is held to piston rod by a nut A dust seal protects the U ring and oil seal from dirt and also prevents oil from leaking out of the cylinder Figure 1 Reference Number Description 1 Retaining Ring 2 Dust Seal 3 U Ring 4 Seat O ring 5 Port A 6 Cushion Plate 7 Wear Ring 8 Piston Nut 9 Port B 10 Seal O ring 11 Piston 12 Spring 13 Cylinder Tube 14 O ring Backup Ring 15 Bushing 16 Cylinder Head ...

Page 460: ... rod is retracted oil flow through the circuit from the pump to the front side of the cylinder generates a force F2 that can be expressed by the formula in which the diameter of the piston rod is expressed by R and the other two terms are the same as in the preceding expression Because the volume of oil needed to lengthen the cylinder rod Q1 is greater than the volume of oil required to retract th...

Page 461: ...e Number Description 1 Cylinder Tube 2 Cylinder Rod 3 Cylinder Head 4 Bushing 5 Snap Ring 6 Packing Header 7 U Ring 8 Wiper Ring 9 Snap Ring 10 Piston 11 Piston Ring 12 U Ring 13 U Ring Holder 14 Stopper 15 U nut 16 Lock Washer 17 Pin Bushing 18 Pin Bushing 19 Grease Flitting 20 O ring Reference Number Description ...

Page 462: ...ription 1 Cylinder Tube 2 Cylinder Rod 3 Cylinder Head 4 Bushing 5 Snap Ring 6 Packing Header 7 U ring 8 Wiper Ring 9 Piston 10 Piston Ring 11 U ring 12 U ring Holder 13 U ring Holder 14 Stopper 15 Castle Nut 16 Shim 17 Dividing Pin 18 Lock Washer 19 Pin Bushing 20 O ring 21 O ring 22 Plug Reference Number Description ...

Page 463: ...seal 2 Replace dust seal Damage to dust seal 2 Replace dust seal Foreign material in seal O ring 4 Remove foreign material Scratches in seal O ring 4 Replace O ring 4 Damage to seal O ring 4 Replace O ring 4 Scratches on sealing surface of piston rod 18 If scratches are not deep hone with an oil stone and lubricate If scratches are deep replace piston rod 18 Deep scratches on inner surface of bush...

Page 464: ...If scratches are deep replace piston rod 18 Deep scratches on inner surface of bushing 15 Figure 1 Replace bushing Oil leaking between cylinder head 16 and cylinder tube 13 Damage to O rings 14 Figure 1 Replace O rings 14 Oil leaking from welded area of cylinder tube 13 Damage to welded area Replace cylinder tube 13 Cylinder drops from pull of gravity Light scratches on sealing surface of cylinder...

Page 465: ...ow due to dirty filter or dirty intake line Disassemble and clean parts Reservoir oil level too low Fill reservoir to correct level Relief valve pressure setting incorrect Adjust relief valve pressure Pump worn or damaged internally Replace worn or damaged parts Relief valve sticking Disassemble and inspect cartridge Clean or replace cartridge Worn cylinder seals Replace worn parts Low pump output...

Page 466: ...th proper type of oil Oil level too low Raise to proper level Air trapped in system Perform cylinder bleeding procedure to remove air Frequent rubber hose damage System pressure too high Adjust relief valve pressure Hoses breaking due to contact with another machine parts Restrain hoses to prevent contact Problem Cause Remedy ...

Page 467: ...emove bolts that hold cylinder head to cylinder tube See Figure 7 2 Support cylinder rod with a lifting sling See Figure 8 Slide cylinder rod out of cylinder tube Rotate cylinder rod slightly as it is being pulled from cylinder tube This will make it easier to pull rod out of tube 3 Set cylinder rod assembly in a repair fixture and secure rod in place See Figure 9 Use a power wrench and socket to ...

Page 468: ...se caution when removing slipper seal to prevent damage to piston O ring groove Remove wear rings from piston 6 When disassembling cylinder head do not remove slipper seal backup ring back ring or dust seal unless items are scratched or damaged If seals are removed from head they must be replaced They cannot be reused Remove snap ring 1 Figure 12 Use a screwdriver to remove dust seal 2 from head R...

Page 469: ...to any parts of U packing 1 Figure 13 Remove U packing 1 Remove O ring 2 and ring 3 CLEANING AND INSPECTION WEAR LIMITS AND TOLERANCES For general cleaning and inspection procedures refer to General Maintenance Procedures section Reference Number Description 1 U Packing 2 O Ring 3 Ring Figure 13 ...

Page 470: ...se to inner part of cylinder head and to U packing groove See Figure 15 2 Install split backup ring into its groove by compressing ring See Figure 16 Make sure that ends of ring do not overlap NOTE The U packing can be installed by hand or by using a seal installing jig The jig should be made of copper aluminum or plastic If a jig is used be sure that jig does not have sharp edges that could damag...

Page 471: ...tly installed by pushing with your hand on inner diameter of U packing See Figure 19 NOTE There are 2 backup rings used on outside of cylinder head One backup ring is continuous The other backup ring is open split by an angled cut 6 Use grease or an adhesive to hold split backup ring 1 Figure 20 in place Install split backup ring 1 in groove closets to flange on cylinder head Reference Number Desc...

Page 472: ...ure should be 30 50 C 86 122 F Leave ring in water for 2 3 minutes Slide continuous backup ring 2 Figure 20 over cylinder head and into its groove 8 Install an O ring over each of backup rings See Figure 22 9 Use a seal installing jig to install dust seal into cylinder head See Figure 23 Install snap ring Figure 21 Figure 22 Figure 23 ...

Page 473: ... areas and dull sharp edges 11 Apply grease or hydraulic oil to corner of piston at position A See Figure 25 12 Insert one end of backup ring into its groove See Figure 26 Use your hand to slide other end of ring into groove 13 Use warm water to expand slipper seal See Figure 27 This will make seal easier to install Set slipper seal in 60 100 degree C 140 212 degree F water for 5 minutes or longer...

Page 474: ...tall two backup rings 1 Figure 29 One ring fits on either side of slipper seal 2 WARNING Before piston is inserted into cylinder tube make sure that slipper seal is no longer expanded If seal is still expanded it could catch on threaded portion of cylinder tube An expanded seal could also jam inside cylinder tube Reference Number Description 1 Backup Ring 2 Slipper Seal Figure 28 Figure 29 ...

Page 475: ...ion to prevent nicks or scratches to chrome plated areas of rod chrome plated area is oil sealing surface of rod 18 Slide cylinder head assembly 1 Figure 32 onto cylinder rod 2 Use caution to prevent threads on rod from damaging seal inside cylinder head Reference Number Description 1 Cylinder Rod 2 Repair Fixture Reference Number Description 1 Cylinder Head 2 Cylinder Rod Figure 30 Figure 31 Figu...

Page 476: ...use a torque wrench to tighten nut 1 to specified torque After nut has been tightened check to see that cushion flange moves 21 Slide rod assembly into cylinder tube Align punch mark 1 Figure 35 with port 2 in cylinder tube This will align hole 3 in cylinder head with port 2 Reference Number Description 1 Cushion Flange 2 Cylinder Rod 3 Piston Assembly Reference Number Description 1 Punch Mark 2 P...

Page 477: ...align with port in cylinder tube NOTE After rebuilding a cylinder or after loosening a cylinder hydraulic line air must be bled from hydraulic system To bleed air from system first extend and retract a cylinder or pair of cylinders about 5 times at low engine rpm Stop cylinder about 100 mm 4 in short of full extension and full retraction Then fully extend and retract cylinder about 5 times also at...

Page 478: ...S0705010 Page 22 Cylinders Return to Master Table of Contents ...

Page 479: ...practices outlined in the front of this manual or those contained within this section Always use tools and equipment that is in good working order Use lifting and hoisting equipment capable of safely handling load Remember that ultimately safety is your own personal responsibility MODEL SERIAL NUMBER RANGE Mega 400 V 1001 and Up Mega 500 V 1001 and Up Copyright 2000 Daewoo December 2000 ...

Page 480: ...cription 3 Construction 3 Principles of Operation 5 Parts List 12 Specifications 13 Special Tools and Materials 14 Special Tools 14 Troubleshooting Testing and Adjustment 15 Disassembly 17 Cleaning and Inspection Wear Limits and Tolerances 21 Reassembly 22 Start up Procedures 25 ...

Page 481: ...k or shading when appropriate CONSTRUCTION General Pumps in this series are used to develop hydraulic fluid flow for operation of industrial and mobile equipment The positive displacement pumping cartridges are of the rotary vane type with shaft side loads hydraulically balanced Flow rate depends on pump size and speed at which it is driven All units are designed so that direction of rotation pump...

Page 482: ...let support plate fitted with four special seal packs two flex side plates and ten vanes and inserts fitted to the rotor slots Fluid enters the cartridge through the inlet port in the cover and is discharged through the outlet flex side plate and support plate to the outlet port in the body Figure 2 Reference Number Description 1 Flex Side Plates 2 Seal Packs 3 Rotor 4 Insert 5 Vane 6 Inlet Suppor...

Page 483: ...r volume between the vanes to increase as the vanes pass the inlet sections of the ring This results in a low pressure condition which allows atmospheric pressure to force fluid into the chambers An additional inlet fluid path exists through a drilled hole in the cam ring This hole connects the inlet port directly to the inlet areas of the cam ring and provides an additional flow path for fluid to...

Page 484: ...med 180 apart Figure 3 Thus opposing hydraulic forces which develop side loads on the shaft cancel out Figure 3 OPERATION OF BALANCED VANE TYPE CARTRIDGE Reference Number Description 1 Rotation 2 Inlet 3 Ring 4 Rotor 5 Outlet 6 Vane 7 Inlet 8 Shaft 9 Outlet 10 Insert 11 Rotation 12 Outlet 13 Inlet Reference Number Description ...

Page 485: ...area of the outer vane The valving of pressure to and from the bottom area of the vane is through holes drilled in the rotor as shown in Figure 4 This selective application of pressure maintains the vane in substantially constant radial hydraulic balance in all positions Vane tip wear is compensated for automatically As the vane wears pressure moves the vane further out in the rotor slot holding t...

Page 486: ...provide optimum running clearances for minimum internal leakage and minimum friction See Figure 5 The flex side plates also provide passages for feeding under vane pressure to the space between the vane and insert The bronze faces of the flex side plates ride next to the rotor and provide excellent wear and cold start characteristics The inlet and outlet support plates hold the flex side plates in...

Page 487: ...m entering the area between the seals Refer to Figure 7 The outer shaft seal is rated 0 48 bar 7 0 psi from an internal source and 0 14 bar 2 0 psi from an external source Double shaft seal models require a different shaft that may or may not be interchangeable with previous designs This is due to an increase in shaft shoulder length to accommodate the second shaft seal The overall shaft length of...

Page 488: ...Main Pump Denison T6DMY Series Reference Number Description 1 Primary Seal 2 Secondary Seal 3 Special Shaft Longer Seal Area 4 Plastic Plug A 16 002 mm 0 630 in B 58 420 mm 2 30 in Figure 7 DOUBLE SHAFT SEAL ARRANGEMENT ...

Page 489: ...S0708460K Page 11 Main Pump Denison T6DMY Series ...

Page 490: ...S0708460K Page 12 Main Pump Denison T6DMY Series PARTS LIST Figure 8 ...

Page 491: ...ning 8 Ring Spirolox 9 Ring Backup 10 O ring 11 O ring 12 Ring Seal 13 Plate Outlet Support 14 Pack Seal 15 Plate Kit Flex Side 16 Rotor 17 Vane Insert 18 Plate Inlet Support 19 Pin 20 Screw Hex Head 21 Cover 22 Bolt 23 Ring Reference Number Description Main Pump Specification Type Fixed vane Displacement 121 5 cc rev 7 41 in3 rev Maximum flow rate 240 liters min 63 4 gpm ...

Page 492: ...OTE If a shaft seal bullet is unavailable wrap splines on shaft with masking tape to prevent damage to seal Coat tape with oil while installing shaft Be sure to remove all tape after installation The driver can be made from tubular stock as shown in Figure 9 The tool applies a uniform pressure to the recessed area of the seal rather than to the lip of the seal The inside diameter of the tool will ...

Page 493: ...e pipe in reservoir restricted Check all strainers and filters for dirt and sludge Clean if necessary Fluid viscosity too heavy to pick up prime Completely drain system Add new filtered fluid of proper viscosity Air leaks at intake Pump not priming Check inlet connections to determine where air is being drawn in Tighten any loose connections See that fluid in reservoir is above intake pipe opening...

Page 494: ...rvoir would probably be foamy Check inlet connections and seal to determine where air is being drawn in Tighten any loose connections and replace seal if necessary See that fluid in reservoir is above intake pipe opening Pump drive speed too slow or too fast Operate pump at recommended speed Coupling misalignment Check if shaft seal bearing or other parts have been damaged Replace any damaged part...

Page 495: ...dy 2 and cover 3 for correct reassembly Remove four cover screws 4 and lift cover off pump B Remove cover O ring Pull and or pry out cartridge as shown in Figure 11 C Pry under coil and remove large spirolox ring and pull shaft and bearing from body Drive shaft seals out of body If it is necessary to remove shaft bearing first remove small snap ring and then press shaft out of bearing while suppor...

Page 496: ...lace cartridge on a flat surface outlet support plate down and remove two socket head screws D Slide inlet support plate and seal packs off cartridge DO NOT allow flex side plate to slide with support plate See Figure 14 E Move flex side plate off center just enough to grab edge and lift up and away without sliding See Figure 15 WARNING Do not slide flex side plates across ring and rotor Burrs on ...

Page 497: ...verse cartridge to have outlet support plate pointing up See Figure 16 G Slide outlet support plate and seal packs off cartridge do not allow flex side plate to slide with support plate Refer to Figure 17 H Move flex side plate off center just enough to lift up and away without sliding See Figure 18 Figure 16 Figure 17 Figure 18 ...

Page 498: ...arrow stamped into rotor periphery Remove vanes and inserts in order starting at arrow Keep them in order for inspection See Figure 19 NOTE Do not remove cartridge locating pins from inlet support plate unless they are damaged Pins are of a drive loc type and can be difficult to remove Figure 19 ...

Page 499: ...spect both sides of each vane and insert in order If pickup heavy wear or scoring is found inspect the appropriate rotor slot Replace scored parts 4 Inspect the cam ring for vane chatter marks wear and or scratches Replace if scoring is evident NOTE All cartridge kit parts must be free of burrs Stone the mating surfaces of each part with an oiled Arkansas stone before assembly NOTE Pre assembled r...

Page 500: ...th seal retainer surface up O rings facing downward into cavities B Place a flex side plate over each of support plates with bronze wear surface facing up Align scribe marks to make sure correct flex side plate is used with correct support plate NOTE Flex side plates develop a wear pattern with rotor and vanes and should not be interchanged C For right hand rotation units set rotor on flat wooden ...

Page 501: ...emove flat wooden board G Lubricate exposed surface of rotor and vanes with system fluid Locate scribe mark on inlet support plate and flex side plate Hold inlet support plate and flex side plate together and assemble over cam ring and rotor with scribe marks in line See Figure 23 NOTE The cast in arrows next to socket head screws indicate cartridge direction of rotation H Thread two socket head s...

Page 502: ... arrangements are available in VQ pump series See Figure 6 and Figure 7 C Lubricate secondary seal with petroleum jelly and place seal in position against shaft end of body See Figure 7 Use a small hardwood block to drive seal evenly into body Installation is complete when seal face is flush with front of body DO NOT drive seal past flush as it can block body drain opening NOTE If shaft bearing wa...

Page 503: ...aulic fluid This will make it easier for pump to prime when it is first started Self Priming With a minimum drive speed of 600 rpm a pump should prime almost immediately Failure to prime within a reasonable length of time may result in damage due to lack of lubrication Inlet lines must be tight and free from air leaks However it may be necessary to crack a fitting on outlet side of pump to purge e...

Page 504: ...S0708460K Page 26 Main Pump Denison T6DMY Series ...

Page 505: ...ations and safe shop practices outlined in the front of this manual or those contained within this section Always use tools and equipment that is in good working order Use lifting and hoisting equipment capable of safely handling load Remember that ultimately safety is your own personal responsibility MODEL SERIAL NUMBER RANGE Mega 400 V 1001 and Up Mega 500 V 1001 and Up Copyright 2000 Daewoo Dec...

Page 506: ...Maintenance 8 Circuit Inspection 8 Adding Hydraulic Oil to System 8 Adjustments 8 Lubrication 8 Replacement Parts 9 Disassembly 10 Basic Pump Disassembly 12 Cartridge Disassembly 13 Cleaning and Inspection Wear Limits and Tolerances 16 Cleaning 16 Inspection Repair and Replacement 16 Reassembly 18 Cartridge Assembly 19 Basic Pump Assembly 22 Start up Procedures 23 Start up 23 Test 23 ...

Page 507: ...mbers are formed between the vanes and cam ring and are enclosed by two end plates The pump is a balanced intra vane design See Figure 1 Outlet pressure is constantly applied to small intra vane area of the vane As the pump vane rotates through high and low quadrants outlet pressure is alternately applied to the rest of under vane area This varying pressure under the vane reduces wear and increase...

Page 508: ...S0708470K Page 4 Steering and Brake Pump Denison T67DB Series PARTS LIST Figure 2 ...

Page 509: ...rt 14 Pack Seal 15 Plate Kit Flex Side 16 Ring 17 Rotor 18 Vane Insert 19 Plate Inlet Support 20 Pin 21 Screw 22 Body Inlet 23 Bolt 24 Screw 25 Pin 26 Pack Seal 27 Plate Kit Flex Side 28 Ring 29 Plate Inlet Support 30 Rotor 31 Kit Vane 32 Plate Outlet Support 33 O ring 34 Ring Seal 35 O ring 36 U ring 37 Cover Rear Flange 38 Bolt 39 Cartridge Kit Center Consists of 24 thru 36 40 Cartridge Kit Shaf...

Page 510: ...for overhaul NOTE In addition to the above tool an arbor press may be required to service the shaft bearing Model Dimension A B C D E T67DB 031 B08 71 933 0 025 mm 2 832 0 001 in 50 216 0 025 mm 1 977 0 001 in 44 653 0 025 mm 1 758 0 001 in 42 850 0 025 mm 1 687 0 001 in 6 350 mm 0 250 in Figure 3 SHAFT SEAL DRIVER DIMENSIONS ARE IN INCHES ...

Page 511: ...ise disappears Damaged or missing pump seals at mating surfaces Locate and replace damaged or missing seals Cartridge kit not assembled properly Reassemble cartridge kit Pump inlet outlet lines reversed Reconnect lines to proper port connections Pump overheating Internal leakage If excessive internal leakage exists return to shop for complete overhaul Heat exchanger not functioning Locate trouble ...

Page 512: ...pressure drop This can force particles through the filter which would ordinarily be trapped or can cause the by pass to open resulting in a partial or complete loss of filtration 4 Air bubbles in the reservoir can cause damage to pump and other components If bubbles are seen locate source of air and seal the leak 5 A pump which is running excessively hot or noisy is a potential failure Should a pu...

Page 513: ...ur Daewoo distributor Sophisticated design process and material are used in the manufacture of these parts NOTE Substitute replacement parts may result in early failure of pump assembly 2 Commonly replaced parts are usually provided in the form of repair kits available through your Daewoo distributor It is strongly recommended to use repair kits when a pump is overhauled Figure 4 PREASSEMBLED CART...

Page 514: ...S0708470K Page 10 Steering and Brake Pump Denison T67DB Series DISASSEMBLY Figure 5 ...

Page 515: ...et Support 14 Pack Seal 15 Plate Kit Flex Side 16 Ring 17 Rotor 18 Vane Insert 19 Plate Inlet Support 20 Pin 21 Screw 22 Body Inlet 23 Bolt 24 Screw 25 Pin 26 Pack Seal 27 Plate Kit Flex Side 28 Ring 29 Plate Inlet Support 30 Rotor 31 Kit Vane 32 Plate Outlet Support 33 O ring 34 Ring Seal 35 O ring 36 U ring 37 Cover Rear Flange 38 Bolt 39 Cartridge Kit Center Consists of 24 thru 36 40 Cartridge ...

Page 516: ...ge to body and its machine surfaces 4 Remove U ring 36 O ring 35 seal ring 34 and O ring 33 from cartridge kit 39 and discard 5 Pull and or pry out center cartridge kit 39 from inlet housing 22 6 Remove four screws 23 from inlet housing 22 then left off housing 7 Pull shaft end cartridge kit 40 from body 1 8 Pry under coil and remove spirolox ring 8 from body 1 See Figure 6 9 Pull the shaft group ...

Page 517: ... outlet support plate down and remove two socket head screws NOTE Do not slide flex side plates across ring and rotor Burrs on ring and rotor can cause deep scratches in soft brass surface 3 Slide inlet support plate and seal packs off cartridge Do not allow flex side plate to slide with support plate 4 Move flex side plate off center just enough to grab edge and lift up and away without sliding F...

Page 518: ...rotor and reverse cartridge to have outlet support plate pointing up Use wood to hold ring rotor and vanes 6 Slide outlet support plate and seal packs off cartridge do not allow flex side plate to slide with support plate 7 Move flex side plate off center just enough to lift up and away without sliding Figure 10 Figure 11 Figure 12 ...

Page 519: ... vanes Locate the arrow stamped into rotor periphery Remove vanes and inserts in order starting at arrow Keep them in order for inspection 9 Do not remove cartridge locating pins from inlet support plate unless they are damaged Pins are of a drive loc type and can be difficult to remove Figure 13 ...

Page 520: ... which shows wear or damage The following parts are subject to special attention 1 Cartridge kits 39 and 40 to obtain maximum overhaul life of the pump a complete cartridge kit should be installed if wear or scoring is noticed during the following inspection steps A Inspect the mating surfaces of the rotors 15 and 28 outlet support plates 17 and 30 and inlet support plates 12 and 25 for wear and o...

Page 521: ...S0708470K Page 17 Steering and Brake Pump Denison T67DB Series ...

Page 522: ...S0708470K Page 18 Steering and Brake Pump Denison T67DB Series REASSEMBLY Figure 15 ...

Page 523: ...E If locating pins were removed from the inlet support plate install new pins with locking flutes within inlet support plate Drive new pins into support plate with a soft tip hammer Reference Number Description 1 Body 2 Seal Secondary 3 Seal Primary 4 Washer 5 Shaft 6 Bearing 7 Ring Retaining 8 Ring Lock 9 Ring Backup 10 O ring 11 Ring Seal 12 O ring 13 Plate Outlet Support 14 Pack Seal 15 Plate K...

Page 524: ...t wooden board with arrow pointing left Assemble the vanes and insert into rotor in reverse order of removal Make sure that sharp chamfer edge of each vane leads in direction of rotation All vanes must move freely in rotor slots with no evidence of bind 5 Assemble cam ring over rotor and vanes with arrow pointing in the same direction direction as rotor arrow Lubricate top surface of rotor and van...

Page 525: ...ll cover over the cartridge Tap lightly on cover with your hand until each part centers Remove the cover gently so as not to disturb alignment Torque socket head screws to the torque noted below and recheck kit alignment with cover Repeat until cartridge is aligned NOTE Center End Cartridge Kit Torque 2 3 Nm 25 35 in lb NOTE Shaft End Cartridge Kit Torque 11 Nm 100 in lb 12 Check rotor for bind by...

Page 526: ...l during installation Coat splined portion of shaft with hydraulic oil Carefully install the shaft group items 5 6 and 7 through seals 2 and 3 and into body 1 Spread Spirolox ring 8 and feed it into groove behind bearing This will secure the shaft group within body 1 6 Install sealing ring 11 into body 1 7 If center cartridge kit 40 is replaced with a new kit install kit into inlet body 1 If cartr...

Page 527: ...rotation D Apply a small amount of hydraulic oil to screws 24 and thread screws into cartridge kit 11 Install sealing ring 34 into cover 37 12 Install O ring 33 over cartridge kit 39 against housing face 13 Position cover 37 over cartridge kit 39 according to prick marks made during step 2 of disassembly procedures Install cover 37 and secure with screws 38 NOTE Torque screws 23 to 54 68 Nm 40 50 ...

Page 528: ...S0708470K Page 24 Steering and Brake Pump Denison T67DB Series ...

Page 529: ...ces outlined in the front of this manual or those contained within this section Always use tools and equipment that is in good working order Use lifting and hoisting equipment capable of safely handling load Remember that ultimately safety is your own personal responsibility MODEL SERIAL NUMBER RANGE Mega 500 V 1001 and Up Copyright 2001 Daewoo May 2001 ...

Page 530: ...S0709240K Page 2 Brake Pedal Valve TABLE OF CONTENTS General Description 3 Theory of Operation 3 Specification 5 Brake System 6 Brake Pilot and Parking Brake Supply Valve 7 Specifications 8 ...

Page 531: ...al Figure 1 The valve contains two spools Figure 2 One spool ports fluid to the brake pistons in the front axle and the other spool ports fluid to the brake pistons in the rear axle Maximum system operating pressure is 60 bars 870 psi If something in one of the circuits should fail the other circuit will continue to operate AHS3750L Figure 1 ...

Page 532: ...in control spring 5 This allows brake pressure in both circuits to rise proportionally to the force applied to the brake pedal As the force applied to the brake pedal becomes constant the control spools 1 and 2 move into a balanced position and hold the braking pressure constant When force is removed from the brake pedal this removes force from the control spring The return springs 3 and 4 now mov...

Page 533: ...S0709240K Page 5 Brake Pedal Valve SPECIFICATION Item Specification Braking Pressure 60 0 bar 870 psi Pedal Force 24 2 0 kg 53 4 4 lb Operating Angle 18 2 ...

Page 534: ...d large enough to allow the brakes to be applied nine times with full pressure after the engine has been turned off The brake hydraulic system includes a pressure operated transmission cutoff switch 2 Figure 3 Pressing the brake pedal 5 will open cutoff switch 2 When the transmission cutoff switch in the operator s cab is selected this will cut off current to a solenoid operated hydraulic valve in...

Page 535: ...e for braking to the pilot controller for operation of bucket and boom and to the parking brake MOUNT HOLES 2 φ11DR THRO AHS3780L Figure 4 VALVE CARTRIDGE IDENTIFICATION AND PILOT LOCATION Reference Number Description 1 Body 200 x 120 x 79 2 Relief C1 3 Check C2 C3 4 Solenoid C4 C5 5 Coil C4 C5 6 Plug Reference Number Description ...

Page 536: ...ICATIONS Item Specifications System Flow 41 l min 37 bar 10 8 gpm 535 psi Setting Pressure C1 37 2 kg cm2 20 l min 526 28 psi 5 3 gpm Port Size T1 PF 1 2 O ring TP PF 1 4 O ring All other ports PF 3 8 O ring AHS3790L Figure 5 HYDRAULIC CIRCUIT ...

Page 537: ... safe shop practices outlined in the front of this manual or those contained within this section Always use tools and equipment that is in good working order Use lifting and hoisting equipment capable of safely handling load Remember that ultimately safety is your own personal responsibility MODEL SERIAL NUMBER RANGE Mega 400 V 1001 and Up Mega 500 V 1001 and Up Copyright 2000 Daewoo December 2000...

Page 538: ... 6 Neutral 6 Bucket option Spool Operation 6 Boom Spool Operation 7 Boom Float 7 Relief Valve 7 Main Relief Valve 7 Port Relief Valve 7 Operation Main Relief Valve 8 Operation in Inoperative State 8 Operation A 8 Operation B 8 Operation Port Relief Valve 9 In the Inoperative State 9 Operation A 9 Operation B 9 Operation C 10 Sucking Operation 10 ...

Page 539: ...e installed in the bucket circuit to protect circuit components in the event of abnormally high pressure One valve works as a relief valve while the other valve works as an anticavitation valve to provide additional oil flow to the opposite side of the bucket cylinders Boom spool has two important roles in loader work at the floating position One is that it is possible to lower the boom by its wei...

Page 540: ...b1 Bucket Dump Valve Port a2 Boom Up Valve Port f Float Valve Port A1 Bucket Crowd Port to Bucket Cylinder Tube 1 Main Relief Valve B2 Boom Lower Port to Boom Cylinder Rod B3 Option Cylinder Port to Option Cylinder Tube B1 Bucket Dump Port to Bucket Cylinder Rod A2 Boom Up Port to Boom Cylinder Tube P Pump Port R Tank Port A3 Option Cylinder Port to Option Cylinder Rod 2 Overload Relief Valve 3 An...

Page 541: ...pool STD 3 Spool OPT Name MRT40D1F1 56 MRT40D1F1D1 52 Type Pilot Control with Float spool Spool Diameter ø 40 0 mm 1 5748 in Spool Arrangement Bucket Boom Bucket Boom Auxilary Main relief pressure 200 kg cm2 210 l min 2 840 psi 55 4 gpm Overload relief pressure 240 kg cm2 20 l min 3 400 psi 5 3 gpm ...

Page 542: ...sure oil passage and leaves the control valve through the exhaust port of the inlet section BUCKET OPTION SPOOL OPERATION When the bucket spool moves in the direction indicated by the arrow The neutral oil passage is closed by the spool and the pressure oil pushes open the load check valve to flow to the cylinder port A1 from which it is directed into the bucket cylinder rod side The oil discharge...

Page 543: ...ide is sent to the tail side and the oil forced out from its tail side is sent to the rod side respectively through the low pressure oil passage in the control valve RELIEF VALVE Main Relief Valve The main relief valve is between the neutral oil passage and the low pressure oil passage return oil passage in the inlet section Port Relief Valve The port relief valve is between the rod side cylinder ...

Page 544: ...ats to the sleeve 4 Operation A When the pressure in the neutral oil passage HP rises and exceeds the relief pressure setting the pilot poppet 5 opens The pressure oil flows from the pilot poppet into the low pressure oil passage LP passing between the sleeve 4 and the housing 6 Operation B As the pilot poppet 5 opens the pressure in the internal cavity 3 lowers to move the main poppet 1 so that t...

Page 545: ...e same time Operation A When the pressure at the cylinder port HP rises and exceeds the relief pressure setting the pilot poppet 4 opens The pressure oil flows from the pilot poppet into the low pressure oil passage LP passing between the check valve poppet 2 and the housing 5 Operation B As the pilot poppet 4 opens the pressure at the back of the piston poppet 1 lowers to move the piston poppet 1...

Page 546: ...low pressure oil passage LP Sucking Operation If the pressure at the cylinder port HP becomes lower than that at the low pressure oil passage LP due to the development of cavitation the check valve poppet 2 moves depending upon the difference in area on which negative pressure acts across the check valve poppet Consequently oil is supplied from the low pressure oil passage LP to the cylinder port ...

Page 547: ...and safe shop practices outlined in the front of this manual or those contained within this section Always use tools and equipment that is in good working order Use lifting and hoisting equipment capable of safely handling load Remember that ultimately safety is your own personal responsibility MODEL SERIAL NUMBER RANGE Mega 500 V 1001 and Up Copyright 2001 Daewoo May 2001 ...

Page 548: ...S0709476K Page 2 Pilot Control Valve Return to Master Table of Contents ...

Page 549: ...S0709476K Page 3 Pilot Control Valve Return to Master Table of Contents TABLE OF CONTENTS General Description 4 Pilot Valve Operation 4 Pilot System 6 ...

Page 550: ...s This allows pilot pressure to flow to the boom or bucket control valve where pilot pressure operates the control valve When the lever is completely moved in one direction solenoid 7 energizes electromagnet 8 and holds the lever in the fully moved position PILOT VALVE OPERATION The lever handle is positioned on the right side of the operator s seat This single lever controls the following machine...

Page 551: ...Control Valve Return to Master Table of Contents Figure 1 Reference Number Description 1 Lever 2 Valve Spool 3 Regulating Spring 4 Return Spring 5 Plunger 6 Spool Groove 7 Solenoid 8 Electromagnet Reference Number Description ...

Page 552: ...of main control valve 8 This causes the main control valve spool to move Movement of the spool opens passages for attachment pressure oil to flow to the rod end of the bucket cylinder 9 Spool movement also opens a passage for return oil from the head end of the bucket cylinder to flow back to hydraulic tank Attachment pressure oil acts on the rod end of the bucket cylinder and because the head end...

Page 553: ...S3800L Figure 2 Reference Number Description 1 Pilot Pump 2 Brake and Pilot Filter 3 Pressure Relief Valve 4 Accumulator Pilot 5 Pilot Cutoff Valve 6 Pilot Valve Mono STD 7 Solenoid Valve OPT 8 Main Control Valve 9 Bucket Cylinder 10 Boom Cylinder Reference Number Description ...

Page 554: ...S0709476K Page 8 Pilot Control Valve Return to Master Table of Contents ...

Page 555: ...tlined in the front of this manual or those contained within this section Always use tools and equipment that is in good working order Use lifting and hoisting equipment capable of safely handling load Remember that ultimately safety is your own personal responsibility MODEL SERIAL NUMBER RANGE Mega 400 V 1001 and Up Mega 500 V 1001 and Up Copyright 2000 Daewoo December 2000 ...

Page 556: ...st 4 Specifications 5 Special Tools and Materials 6 Special tools 6 Troubleshooting Testing and Adjustment 7 Steering System with OSQA B and OSPBX LS 8 Disassembly 9 Cleaning and Inspection Wear Limits and Tolerances 29 Cleaning 29 Inspection and replacement 29 Lubrication 29 Reassembly 29 ...

Page 557: ...S0709665K Page 3 Flow Amplifier Danfoss GENERAL DESCRIPTION Figure 1 ...

Page 558: ...S0709665K Page 4 Flow Amplifier Danfoss PARTS LIST Figure 2 ...

Page 559: ...Guide Spring 25 Screw Drive 26 Plate Name 27 Orifice 28 Spring 29 Spring 30 Spring 31 Plug 32 Washer 34 Orifice 35 Orifice 36 Orifice 37 Throttle Check Valve 38 Plug 40 Spring 41 Spring Reference Number Description Flow Amplifier Specification Type Contains a directional valve an amplification stage a priority valve a pilot pressure relief valve and suction valve Amplification Factor 8 Control Pre...

Page 560: ...S0709665K Page 6 Flow Amplifier Danfoss SPECIAL TOOLS AND MATERIALS SPECIAL TOOLS Guide screws Material M8 x 1 Hook Material Wire Figure 3 ...

Page 561: ...S0709665K Page 7 Flow Amplifier Danfoss TROUBLESHOOTING TESTING AND ADJUSTMENT Figure 4 Flow Amplifier Circuit ...

Page 562: ... check valve No end stop in one or both directions One or both shock valves 8 set too low Setting takes a long time without special equipment Contact the nearest service shop One or both anti cavitation valves 9 leaky or sticks Clean or replace completely shock anti cavitation valve s Missing end stop plate s pos 10 for directional valve Fit end stop plates Hard point when starting to turn the ste...

Page 563: ...low Amplifier Danfoss DISASSEMBLY 1 Dismantling counter pressure valve A Unscrew plug with O ring Hexagon socket for 8 mm internal hexagon B Remove small spring hook C Remove ball magnetic rod Figure 5 Figure 6 Figure 7 ...

Page 564: ...S0709665K Page 10 Flow Amplifier Danfoss D Remove piston E Remove spring F Counter pressure valve shown dismantled Figure 8 Figure 9 Figure 10 ...

Page 565: ...e valve with orifice shown dismantled 2 Removing pressure relief valve A Unscrew plug with washer hexagon socket for 8 mm internal hexagon B Screw pressure relief valve out 10 mm hexagon key C Remove washer magnetic rod Figure 11 Figure 12 Figure 13 Figure 14 ...

Page 566: ...A Hold cartridge and screw adjustment screw out 5 mm hexagon key B Pressure relief valve shown dismantled 4 Removing end cover at PP connection A Unscrew screws with spring washer hexagon socket for 13 mm external hexagon and 10 mm internal hexagon Figure 15 Figure 16 Figure 17 ...

Page 567: ...S0709665K Page 13 Flow Amplifier Danfoss B Remove end cover C Remove stop and 2 springs D Remove spring Figure 18 Figure 19 Figure 20 ...

Page 568: ...nfoss E Remove plate and six O rings F Remove spring guide 5 Removing end cover at LS connection A Unscrew screws with spring washer using hexagon socket for 13 mm external hexagon and 10 mm internal hexagon Figure 21 Figure 22 Figure 23 ...

Page 569: ...S0709665K Page 15 Flow Amplifier Danfoss B Remove end cover C Remove stop and two springs D Remove stop and spring Figure 24 Figure 25 Figure 26 ...

Page 570: ...S0709665K Page 16 Flow Amplifier Danfoss E Remove plate and four O ring F Remove spring guide 6 Removing spools A Remove directional spool Figure 27 Figure 28 Figure 29 ...

Page 571: ...ge 17 Flow Amplifier Danfoss B Remove amplifier spool C Remove priority valve spool 7 Removing orifice and throttle check valve A Unscrew orifice in LS connection with 6 mm hexagon key Figure 30 Figure 31 Figure 32 ...

Page 572: ...anfoss B Unscrew throttle check valve in PP connection with 6 mm hexagon key C Unscrew orifice in housing with 4 mm hexagon key 8 Removing shock valves A Remove shock valve with screwdriver and hexagon key Figure 33 Figure 34 Figure 35 ...

Page 573: ...fier Danfoss 9 Overview of dismantled parts A Housing and end cover with accessories B Spool with accessories 10 Dismantling of directional spool A Unscrew orifice with 4 mm hexagon key Use a mandrel Figure 36 Figure 37 Figure 38 ...

Page 574: ...foss B Directional spool shown dismantled 11 Dismantling of priority valve spool A Unscrew plug or throttle check valve with 8 mm hexagon key B Priority valve spool with plug for external PP shown dismantled Figure 39 Figure 40 Figure 41 ...

Page 575: ...e spool with throttle check valve for internal PP shown dismantled 12 Dismantling of amplifier spool A Carefully remove spring from recess with 3 mm screwdriver NOTE Avoid damage to spring ring B Carefully guide spring ring back Figure 42 Figure 43 Figure 44 ...

Page 576: ...2 Flow Amplifier Danfoss C Carefully take spring ring from recess and guide it back with 3 mm screwdriver NOTE Avoid damage to spring ring D Press pin out gently with finger E Remove plug Figure 45 Figure 46 Figure 47 ...

Page 577: ...S0709665K Page 23 Flow Amplifier Danfoss F Remove spring G Remove pin with 3 mm screwdriver H Remove inner spool Figure 48 Figure 49 Figure 50 ...

Page 578: ...r Danfoss I Unscrew check valve with hexagon socket for 17 mm external hexagon and mandrel in pin hole J Unscrew orifice out of plug with 4 mm hexagon key Use a mandrel K Amplifier spool shown dismantled Figure 51 Figure 52 Figure 53 ...

Page 579: ...key and hexagon socket for 17 mm external hexagon B Check valve shown dismantled 14 Dismantling of shock valve suction valve A Unscrew lock nut with hexagon socket for 13 mm external hexagon Use a mandrel NOTE When readjusting shock valve hold lock nut with 13 mm ring spanner Figure 54 Figure 55 Figure 56 ...

Page 580: ...S0709665K Page 26 Flow Amplifier Danfoss B Remove disc and spring C Remove housing D Unscrew pilot valve with hexagon socket for 19 mm external hexagon Use a mandrel Figure 57 Figure 58 Figure 59 ...

Page 581: ...S0709665K Page 27 Flow Amplifier Danfoss E Remove pilot valve and spring F Remove spool G Unscrew adjustment screw and remove spring and ball Figure 60 Figure 61 Figure 62 ...

Page 582: ...S0709665K Page 28 Flow Amplifier Danfoss H Shock valve suction valve shown dismantled Figure 63 ...

Page 583: ...e Procedures section CLEANING Clean all parts carefully with low aromatic kerosine INSPECTION AND REPLACEMENT Replace all gaskets and sealing washers Check al other parts carefully and replace if necessary LUBRICATION Before assembly lubricate all parts with hydraulic oil REASSEMBLY 1 Assemble shock valve suction valve A Guide spring with cone into housing Figure 64 ...

Page 584: ...S0709665K Page 30 Flow Amplifier Danfoss B Install adjustment screw C Install spool D Install spring Figure 65 Figure 66 Figure 67 ...

Page 585: ...Flow Amplifier Danfoss E Install pilot valve Remember O ring F Tighten with torque wrench for 19 mm external hexagon Use a mandrel Tightening torque 2 0 5 daNm 175 45 in lb G Install housing Figure 68 Figure 69 Figure 70 ...

Page 586: ...S0709665K Page 32 Flow Amplifier Danfoss H Install spring I Fir disc J Install lock nut Tighten torque 1 5 0 2 daNm 135 20 in lb Figure 71 Figure 72 Figure 73 ...

Page 587: ...d plug B Tightening torque 0 5 1 daNm 45 90 in lb 3 Assembly of amplifier spool A Install orifice in plug Tightening torque 0 5 1 daNm 45 90 in lb B Install check valve Tightening torque 2 0 3 daNm 175 25 in lb NOTE Avoid damaging spool surface Remember O ring Figure 74 Figure 75 Figure 76 ...

Page 588: ...OTE When assembling OSQA 5 and OSQB 5 there are two ways of installing inner spool Only one is correct The pilot channel which is faced upwards must be lined up with one of five amplification holes in the outer spool D Guide inner spool in E Install pin Figure 77 Figure 78 Figure 79 ...

Page 589: ...S0709665K Page 35 Flow Amplifier Danfoss F Push spring ring into position Place spring ring into recess with ends facing away from pin plate G Install spring H Install plug Figure 80 Figure 81 Figure 82 ...

Page 590: ...o position pLace spring ring into recess with ends facing away from pin holes 4 Assembly of priority valve spool A Install plug or throttle check valve B External pp plug C External pp throttle check valve D Tightening torque 1 0 03 daNm 90 25 in lb Figure 83 Figure 84 Figure 85 ...

Page 591: ...n orifice B Tightening torque 0 5 0 1 daNm 45 10 in lb 6 Installation of orifice and throttle check valve A Install orifice in housing B Tightening torque 0 5 0 1 daNm 45 10 in lb C Install orifice in LS connection D Tighten torque 1 0 3 daNm 90 25 in lb Figure 86 Figure 87 Figure 88 ...

Page 592: ... connection Install washer and plug Tightening torque 4 0 3 daNm 355 25 in lb B 7 116 20 UNF in PP connection Install O ring and plug Tightening torque 1 5 0 5 daNm 135 45 in lb 8 Installation of shock valves A Guide shock valve in and secure it by hand Remember O ring 9 Assembly of pressure relief valve A Guide adjustment screw spring and cone up into cartridge Figure 89 Figure 90 Figure 91 ...

Page 593: ... B Screw adjustment screw so far in that 10 mm hexagon key fully engages 10 Installation of pressure relief valve A Let washer drop into hole B Install pressure relief valve Tighten torque 3 0 3 daNm 265 25 in lb Figure 92 Figure 93 Figure 94 ...

Page 594: ...s C Install plug with washer Tighten torque 6 0 5 daNm 530 45 in lb 11 Installation of back pressure valve A First Install spring in piston with Vaseline Install assembled piston and spring B Let ball drop down Figure 95 Figure 96 Figure 97 ...

Page 595: ...ring Remember O ring Tightening torque 2 5 0 03 daNm 220 25 in lb 12 Installation of spools A Install directional spool Install priority valve spool NOTE Spring control must be placed in correct position against LS connection B Install spring NOTE Spring must be by LS connection Figure 98 Figure 99 Figure 100 ...

Page 596: ...ifice must be placed in correct position against LS connection 13 Installation of end cover at PP connection A Install spring with Vaseline on amplifier spool NOTE The spring must be installed at PP connection B Install spring guide with Vaseline Figure 101 Figure 102 Figure 103 ...

Page 597: ...S0709665K Page 43 Flow Amplifier Danfoss C Install large and small springs with Vaseline D Install guide screws E Install four large and two small O rings Figure 104 Figure 105 Figure 106 ...

Page 598: ...S0709665K Page 44 Flow Amplifier Danfoss F Guide plate in G Install stop thickness 5 mm in end cover with Vaseline H Guide end cover in Figure 107 Figure 108 Figure 109 ...

Page 599: ... screw with spring washer J Install screw with spring washer Tightening torque 2 5 0 5 daNm 220 45 in lb 14 Installation of end cover at LS connection A Install guide screws B Install remote control valve with Vaseline Figure 110 Figure 111 Figure 112 ...

Page 600: ...age 46 Flow Amplifier Danfoss C Install large and small springs with Vaseline D Guide in plate with four O rings E Install stop priority valve spool F thickness 8 mm with Vaseline Figure 113 Figure 114 Figure 115 ...

Page 601: ...S0709665K Page 47 Flow Amplifier Danfoss G Install stop for directional spool thickness 5 mm with Vaseline H Guide in end cover I Install large screw with spring washer Figure 116 Figure 117 Figure 118 ...

Page 602: ...age 48 Flow Amplifier Danfoss J Install screws with spring washers Tightening torque 2 5 0 5 daNm 220 45 in lb Tightening torque for large screw 8 1 daNm 710 90 in lb K Install plastic plugs Figure 119 Figure 120 ...

Page 603: ...es outlined in the front of this manual or those contained within this section Always use tools and equipment that is in good working order Use lifting and hoisting equipment capable of safely handling load Remember that ultimately safety is your own personal responsibility MODEL SERIAL NUMBER RANGE Mega 300 V 1001 and Up Mega 400 V 1001 and Up Mega 500 V 1001 and Up Copyright 2001 Daewoo May 2001...

Page 604: ...s TABLE OF CONTENTS General Description 3 Power Steering System 3 Gerotor Operation 5 Cushion Valve Operation 6 Parts List 8 Specifications 9 Special Tools 10 Troubleshooting Testing and Adjustment 12 Disassembly 13 Cleaning and Inspection 17 Reassembly 18 Installation 29 ...

Page 605: ... hydraulic pump that is powered by the rotation of the steering wheel Rotating the steering wheel will cause the gerotor to draw oil from the hydraulic tank and send this oil to the steering cylinders The shaft that is rotated by the steering wheel is attached to the spool 8 Figure 1 by the engagement of a spline The spool is surrounded by a sleeve 3 The spool and sleeve are connected by the cente...

Page 606: ...Master Table of Contents AJS0700L Figure 2 Steering Circuit Reference Number Description 1 Steering Unit 2 Priority Valve 3 Steering Cylinder 4 Cushion Valve 5 Valve block 6 Steer Pump 7 Supply Line to Main Control Valve Reference Number Description ...

Page 607: ...and into the tank Left Turn The spool 2 Figure 3 is engaged with the spline of the steering shaft When the steering wheel is connected to the spool 2 by centering springs 3 When the spool turns the sleeve turns The sleeve turning angle is about 10 less than the spool turning angle This allows the longitudinal slots in the spool to align with the ports in the sleeve When the steering wheel is turne...

Page 608: ...t R it pushes the spring 3 and opens the poppet 2 And this operation directs the high pressure oil to the port L through the center hole in the spool 12 and the check valve poppet in the port L part At the same time oil reaches the pressure room of the plug through the orifice 8 This operation closes the passage from the port R to the port L This releases the pressure and prevents machine shock by...

Page 609: ...S0709730K Page 7 Power Steering Unit Return to Master Table of Contents ...

Page 610: ...S0709730K Page 8 Power Steering Unit Return to Master Table of Contents PARTS LIST An exploded view of the steering unit is shown in Figure 5 Figure 5 ...

Page 611: ...ngs 14 Shaft 15 Spacer 13 8 mm If equipped 16 Spacer 25 mm If equipped 17 Spacer Bushing If equipped 18 O ring 80 5 x 1 5 mm 19 Middle Plate 20 Distributor Plate 21 Rotor 22 O ring 79 92 x 1 78 mm 23 Cylinder Gear 24 End Cover 25 Washer 26 Roll Pin 2 5 x 32 mm 27 Bolt Reference Number Description Steering Unit Specification M300 V M400 V M500 V Type Load Sensing Dynamic Signal Non reaction Gerotor...

Page 612: ... Return to Master Table of Contents SPECIAL TOOLS The tools necessary for steering unit repair are illustrated below 1 Stabilizing base See Figure 6 2 O ring assembly tool See Figure 7 3 Seal driver See Figure 8 Figure 6 Figure 7 Figure 8 ...

Page 613: ...ge 11 Power Steering Unit Return to Master Table of Contents 4 Torque wrench 0 5 kg m 0 35 ft lb See Figure 9 13 mm socket Ratchet handle 12 mm screwdriver 6 mm screwdriver 2 mm screwdriver Plastic hammer Figure 9 ...

Page 614: ...el low in reservoir Add oil Low oil pressure due to broken or damaged oil pump Replace pump Steering valve stuck Clean repair or replace Low oil level in steering gearbox Inspect oil level fill to proper level Damaged bolt and nut in steering gearbox Replace damaged parts Difficult to drive in a straight line Defective spool in steering valve Tighten lock nut Stuck or damaged steering valve or dam...

Page 615: ...g unit is clean before opening the unit Use a wire brush and solvent to clean the entire unit 1 Remove steering column from steering unit Bolt steering unit to stabilizing base Bolt base to work bench 2 Remove bolts from steering unit end cover See Figure 10 3 Remove end cover from unit See Figure 11 4 Lift cylinder gear off unit See Figure 12 Remove two O rings Figure 10 Figure 11 Figure 12 ...

Page 616: ... cylinder gear If equipped See Figure 13 NOTE Refer to parts manual for our unit to determine if these parts are installed 6 Remove shaft from housing See Figure 14 7 Remove distributor plate from housing See Figure 15 8 Remove O ring from top of middle plate See Figure 16 Figure 13 Figure 14 Figure 15 Figure 16 ...

Page 617: ...to Master Table of Contents 9 Lift middle plate off housing See Figure 17 10 Remove O ring from housing See Figure 18 11 Unscrew threaded bushing and remove it See Figure 19 12 Remove cross pin See Figure 20 Figure 17 Figure 18 Figure 19 Figure 20 ...

Page 618: ... Figure 21 14 Pull sleeve and spool out of housing See Figure 22 15 Remove thrust bearing and thrust washers from sleeve See Figure 23 Remove spacer ring Be sure to remove spacer ring It can stick in sleeve 16 Carefully slide control spool out of sleeve See Figure 24 Figure 21 Figure 22 Figure 23 Figure 24 ...

Page 619: ...dust seal from housing See Figure 26 Remove O ring and backup ring from inside housing 19 Figure 27 shows all parts removed from steering unit Clean all parts before assembly Use only new O rings and seals CLEANING AND INSPECTION For general cleaning and inspection procedures refer to General Maintenance Procedures section Figure 25 Figure 26 Figure 27 ...

Page 620: ...teering unit is assembled 1 Install springs in spool slot See Figure 28 Springs must be positioned as shown in Figure 29 2 Position springs so that amount of spring protruding out of spool is equal on both sides See Figure 30 Bolt Torque Chart Bolt Size Torque Value M10 4 8 kg m 35 ft lb 3 8 16 NC 4 8 kg m 35 ft lb Figure 28 Figure 29 Figure 30 ...

Page 621: ...ure 31 Use care so that sleeve and spool are correctly assembled The spring slot in sleeve must align with spring slot in spool Also one of the T shaped slots A in the spool must align with one of the small holes B in sleeve See Figure 32 4 Center springs in sleeve See Figure 33 Figure 31 Figure 32 Figure 33 ...

Page 622: ...g on sleeve See Figure 34 Burnish seal ring with a smooth object until seal does not protrude past diameter of sleeve 6 Rotate seal ring See Figure 35 It must rotate freely without resistance 7 Turn sleeve 180 Install cross pin into sleeve and spool See Figure 36 Figure 34 Figure 35 Figure 36 ...

Page 623: ...earing over end of spool See Figure 37 The sequence of the parts installation is shown in Figure 38 9 Oil O ring and backup ring and then install them on an O ring assembly tool See Figure 39 Reference Number Description 1 Thrust Washer 2 Thrust Bearing 3 Thrust Washer 4 Spool 5 Sleeve Figure 37 Figure 38 Figure 39 ...

Page 624: ...bly tool down into bore of steering unit See Figure 40 11 Use assembly tool to install O ring and backup ring into bore See Figure 41 12 Unbolt housing from stabilizing base Hold housing in a horizontal position See Figure 42 Insert sleeve and spool into bore Figure 40 Figure 41 Figure 42 ...

Page 625: ...rn to Master Table of Contents 13 The sleeve will push the O ring and backup ring into correct position See Figure 43 14 Bolt housing back into stabilizing base See Figure 44 15 Insert ball into hole See Figure 45 Figure 43 Figure 44 Figure 45 ...

Page 626: ...op of the bushing must be lower than the surface of housing 17 Lubricate O ring with 20 weight mineral oil and install it in groove See Figure 47 18 Install middle plate onto housing See Figure 48 Be sure to properly align plate holes with holes in housing 19 Lubricate O ring with 20 weight mineral oil and install it in groove See Figure 49 Figure 46 Figure 47 Figure 48 Figure 49 ...

Page 627: ... Figure 50 Be sure to properly align plate holes with holes in middle plate 21 Install shaft into bore of housing See Figure 51 Position slot in shaft to engage cross pin 22 Position rotor so that cross pin is between two teeth as shown by position of screwdriver See Figure 52 Figure 50 Figure 51 Figure 52 ...

Page 628: ...n housing See Figure 53 24 Use a bolt to align holes in cylinder gear with bolt holes in housing See Figure 54 25 Install spacer bushing See Figure 55 Remove bolt that was installed in previous step If equipped OSPL 630 1 3 80 mm 0 1496 in 15 Figure 5 OSPL 800 16 Figure 5 OSPL 1000 16 Figure 5 NOTE Refer to parts manual for our unit to determine if these parts are installed Figure 53 Figure 54 Fig...

Page 629: ...ee Figure 56 NOTE Refer to parts manual for our unit to determine if these parts are installed 27 Install end cover See Figure 57 28 Install a washer and roll pin into hole shown in Figure 58 29 Install six remaining bolts and tighten them See Figure 59 Cross tighten bolts and roll pin to 48 1 Nm 35 ft lb Figure 56 Figure 57 Figure 58 Figure 59 ...

Page 630: ...eering unit over and work from opposite side Set dust seal in position on housing See Figure 60 31 Use a seal driver and a plastic hammer to install dust seal See Figure 61 32 Install plastic plugs to prevent dirt from entering steering unit See Figure 62 Figure 60 Figure 61 Figure 62 ...

Page 631: ... port T Tank port P Pressure from pump INSTALLATION The following table shows torque specifications for hydraulic fittings used to install steering unit Type of Screw Fitting Tightening Torque kg m ft lb 1 4 RG 1 4 BSP F R 1 4 G l 4 1 2 RG 1 2 BSP F R 1 2 G 1 2 7 16 20UNF Cutting Edge 4 29 10 72 Copper Washer 2 15 3 22 Aluminum Washer 3 22 8 58 O ring 2 15 Figure 63 ...

Page 632: ...S0709730K Page 30 Power Steering Unit Return to Master Table of Contents ...

Page 633: ... safe shop practices outlined in the front of this manual or those contained within this section Always use tools and equipment that is in good working order Use lifting and hoisting equipment capable of safely handling load Remember that ultimately safety is your own personal responsibility MODEL SERIAL NUMBER RANGE Mega 500 V 1001 and Up Copyright 2001 Daewoo May 2001 ...

Page 634: ...S0709750K Page 2 Restriction Valve Return to Master Table of Contents TABLE OF CONTENTS General Description 3 Theory of Operation 3 Unloader Cartridge Identification 4 Specifications 5 ...

Page 635: ...4 and C5 Output from the steering pump passes through the priority valve that is part of the flow amplifier See the hydraulic schematic Figure 1 This flow then passes out of the flow amplifier and enters the restriction valve at port EF This allows output from the steering pump to join flow from the main pump to supply the boom bucket and option control valves AHS3820L Figure 1 RESTRICTION CIRCUIT...

Page 636: ...urn to Master Table of Contents UNLOADER CARTRIDGE IDENTIFICATION Reference Number Description Remark 1 Body 125 99 184 2 Sub Block 125 99 79 3 Check Valve C3 4 Check Valve C4 5 6 7 5 O ring AHS3830L Figure 2 VALVE CARTRIDGE IDENTIFICATION ...

Page 637: ...r 3 045 84 psi Rated Flow Ports to R1 R3 C 200 l min 52 8 gpm Rated Flow Ports to R2 700 l min 184 8 gpm Setting Pressure C4 5 6 7 0 7 0 1 Bar 10 1 5 psi Cracking Pressure Port Size R1 R2 2 SAE Flange Port M12 1 75 P1 EF P3 1 1 4 SAE Flange Port M12 1 75 HT 1 PF O ring TPM 1 4 PF O ring R3 1 4 PF O ring Supplied Plugged C 3 4 PF O ring ...

Page 638: ...S0709750K Page 6 Restriction Valve Return to Master Table of Contents ...

Page 639: ... recommendations and safe shop practices outlined in the front of this manual or those contained within this section Always use tools and equipment that is in good working order Use lifting and hoisting equipment capable of safely handling load Remember that ultimately safety is your own personal responsibility MODEL SERIAL NUMBER RANGE Mega 500 V 1001 and Up Copyright 2001 Daewoo May 2001 ...

Page 640: ...S0793060K Page 2 Hydraulic Schematic Mega 500 V Return to Master Table of Contents TABLE OF CONTENTS General Description 3 Mega 500 V 4 ...

Page 641: ...o Master Table of Contents GENERAL DESCRIPTION Schematic s presented in this section are laid out on facing pages An overlapping edge has been taken into consideration so that a photocopy can be made and pasted together to make a complete schematic Figure 1 ...

Page 642: ...S0793060K Page 4 Hydraulic Schematic Mega 500 V Return to Master Table of Contents MEGA 500 V Figure 2 ...

Page 643: ...S0793060K Page 5 Hydraulic Schematic Mega 500 V Return to Master Table of Contents AHS3670L MEGA 500 V OPTIONAL EQUIPMENT ...

Page 644: ...S0793060K Page 6 Hydraulic Schematic Mega 500 V Return to Master Table of Contents ...

Page 645: ...1ELECTRICAL SYSTEM ...

Page 646: ... safe shop practices outlined in the front of this manual or those contained within this section Always use tools and equipment that is in good working order Use lifting and hoisting equipment capable of safely handling load Remember that ultimately safety is your own personal responsibility MODEL SERIAL NUMBER RANGE Mega 500 V 1001 and Up Copyright 2001 Daewoo May 2001 ...

Page 647: ...of Operation 11 Engine Stop and Derating System 12 Operation In Engine Stop Mode 12 Operation in Engine Derating 14 Charging System 16 Monitoring System 17 Instrument Panel 18 Function Check 19 Monitoring System Schematic 20 Operation 22 Instruments 22 Indicator Lights 23 Initial Operation 25 Control Unit Operation 26 Characteristic of Operation 27 Windshield Wiper 28 Front Windshield Wiper 28 Fro...

Page 648: ...ected in series and a three phase AC generator with a rectifier The electric wiring used in the system is easily identifiable by the insulator color The color symbols used in the electric system is listed in the following chart Electric Wire Color NOTE RW Red wire with White stripe R Base Color W Stripe Color NOTE 0 85G Nominal sectional area of wire core less insulator 0 85 mm2 0 03 in2 Symbol Co...

Page 649: ...rminal of DC DC converter back up for car stereo memory 2 B terminal of starter switch and No 22 terminal of air conditioner control panel 3 Power terminal B of engine stop motor When the starter switch is in the preheat on and start positions the current flows from the battery fusible link fuse starter switch B terminal starter switch BR terminal diode battery relay BR terminal which activates th...

Page 650: ...to Master Table of Contents AHS0030L Figure 1 ELECTRICAL POWER CIRCUIT DIAGRAM Reference Number Description 1 Battery 2 Battery Relay 3 Fusible Link 4 Circuit Breaker 5 Starter Switch 6 Fuse Box 7 Alternator 8 Diode Reference Number Description ...

Page 651: ...er controller 7 to the E terminal of the starter controller and then to the ground When the contact point B and PP of starter relay 8 are connected the pinion gear of the starter 9 is pushed forward and makes contact with the ring gear of the flywheel and the internal contacts of the starter are connected The current flows from the battery 1 to the A terminal of the battery relay 2 to the B termin...

Page 652: ...HILE STARTING Reference Number Description 1 Battery 2 Battery Relay 3 Fusible Link 4 Circuit Breaker 5 Starter Switch 6 Fuse Box 7 Starter Controller 8 Starter Relay 9 Starter 10 Alternator 11 Transmission Selector Switch 12 Diode 13 Transmission Controller 14 Safety Start Relay Reference Number Description ...

Page 653: ...ed the connection between S and E terminals and the connection between B and PP terminals are opened As a result the rotation of the starter 9 is stopped Once the engine is running the starter 9 will not operate even if the starter switch 5 is moved to the start position preventing possible damage to the starter 9 AHS0050L Figure 3 OPERATION OF START CIRCUIT 2 IMMEDIATELY AFTER START Reference Num...

Page 654: ...S0802190K Page 9 Electrical System Return to Master Table of Contents ...

Page 655: ... valve fitting ether switch 1219 mm 48 in length of nylon tubing fuel cylinder single hole straight atomizer nozzle and bracket AHS6620L Figure 4 Reference Number Description 1 Ether Switch 2 Nylon Tube 3 Valve Fitting 4 Valve Assembly 5 Bracket 6 Fuel Cylinder Clamp 7 Dash Label 8 Fuel Cylinder 9 Atomizer Reference Number Description ...

Page 656: ...the starter switch is turned to the start position the engine can be cranked more easy NOTE Never hold the ether switch 7 in for more than 5 seconds as this can damage the electric solenoid valve I HA3O2019 O Figure 5 AHS6630L Figure 6 COLD WEATER STARTING AID CIRCUIT Reference Number Description 1 Battery 2 Battery Relay 3 Fusible Link 4 Circuit Breaker 5 Starter Switch 6 Fuse Box 7 Ether Switch ...

Page 657: ...ing from the BR terminal of the starter switch 5 the fuel shutoff valve 7 and fuel is supplied to the cylinder As a result the engine is being started When the starter switch 5 is in the OFF position during the engine running because the current is not applied to the fuel shutoff valve 7 it is closed and fuel is not supplied to the cylinder As a result the engine is stopped AHS0060L Figure 7 ENGIN...

Page 658: ...S0802190K Page 13 Electrical System Return to Master Table of Contents ...

Page 659: ...tacts points 30 and 87 of the engine derating relay 7 are closed due to the signal of the transmission controller 10 Then the engine derating relay 7 supply current to the engine derating solenoid which actuates a throttle lever linked limited speed governer in fuel injection pump In accordance with this the engine rpm will be dropped down for maximum 0 7 seconds The operating time is set automati...

Page 660: ... Contents Reference Number Description 1 Battery 2 Battery Relay 3 Fusible Link 4 Circuit Breaker 5 Starter Switch 6 Fuse Box 7 Engine Derating Relay 8 Engine Derating Solenoid 9 Diode 10 Transmission Controller 11 Shift Lever Switch Reference Number Description ...

Page 661: ...o the battery relay 2 and to the battery 1 The alternator also supplies electric current to other electrical components When the alternator 7 starts to operate a current flows from the R terminal of alternator to the diode 8 and then to the battery relay 2 coil securing a path for the charging current to the battery 1 Thus preventing the possibility of a high voltage build up and possible damage t...

Page 662: ...90L Figure 10 Reference Number Description 1 Instrument Panel 2 Battery 3 Alternator 4 Speed Sensor 5 Coolant Temperature Sensor 6 Fuel Sensor 7 Transmission Oil Temperature Sensor 9 Air Cleaner Indicator 10 Engine Coolant Temperature Switch 11 Engine Oil Pressure Switch 12 Hazard Warning Light Switch 13 Turn Signal Light Switch 14 High Beam Switch 15 Work Light Switch 16 Brake Oil Pressure Switch...

Page 663: ...lant Temperature Gauge 6 Transmission Oil Temperature Gauge 8 Air Cleaner Clogging Warning Light 9 Engine Coolant Temperature Warning Light 10 Engine Oil Pressure Warning Light 11 Charging Warning Light 12 Turn and Hazard Warning Light 13 High Beam Indicator 14 Turn and Hazard Warning Light 15 Work Light Indicator 16 Brake Oil Pressure Warning Light 17 Parking Brake Indicator Reference Number Desc...

Page 664: ...switch is turned to the ON position all displays switch lights and warning lights except turn and hazard warning light high beam indicator and working light indicator will be lit for two seconds and the warning buzzer will sound Any lights which do not turn ON during the function check should be replaced ...

Page 665: ...15 CN2 7 CN2 17 CN2 9 CN2 8 CN2 6 CN2 10 CN2 1 CN2 16 CN2 13 CN2 11 CN2 12 CN2 2 CN2 5 CN2 3 CN2 4 CN1 9 CN1 1 8 17 19 18 16 5 6 7 AMP MIC 13P CN1 TIME DELAY BUZZER CIRCUIT 21 3 4 10 1 AMP MIC 13P 1 CN1 CN1 2 CN1 7 CN1 8 2 3 S S CN1 5 CN1 6 CN1 13 CN1 3 CN1 4 S S SIG 2 1 11 13 12 2 28 27 24 22 25 20 HAAG2020 Figure 12 ...

Page 666: ...eering Switch 10 Speedometer 11 Coolant Temperature Sensor 12 Fuel Sensor 13 Transmission Oil Temperature Sensor 14 Brake Oil Filter Switch 15 Air Cleaner Clogging Warning Indicator 16 Engine Oil Pressure Switch 17 Coolant Temperature Switch 18 Brake Oil Pressure Switch 19 Parking Brake Pressure Switch 20 Alternator 21 Control Unit 22 Alarm Buzzer 23 Alarm Relay 24 Battery 25 Battery Relay 26 Circ...

Page 667: ...h 1 811 Hz 30 km h 2 716 Hz 40 km h 3 622 Hz F 90 55 V Hz F Frequency of transmission controller V Speed km h Tachometer CN1 3 500 rpm 143 Hz 1000 rpm 287 Hz 1500 rpm 430 Hz 2000 rpm 573 Hz 2500 rpm 717 Hz 3000 rpm 860 Hz F 0 2867 N Hz F Frequency of alternator P terminal N Engine rpm Hour Meter CN1 2 ALTERNATOR I Terminal voltage 24V Fuel Level Gauge CN1 7 EMPTY Above 90 Ohm 1 2 38 Ohm FULL Below...

Page 668: ...d Coolant Temperature CN2 3 Light turns ON when coolant temperature increases over 103 C When terminal input is connected Engine Oil Pressure CN2 4 Light turns ON when engine oil pressure drops below 1 6 kg cm2 After starting engine if engine oil pressure is insufficient after 8 seconds a warning buzzer will sound Charging CN2 5 Light turns ON when not charging and R terminal output drops below 24...

Page 669: ... turns ON when work light is operated Terminal input is to 24 V Brake Oil Pressure CN2 10 Light turns OFF when brake oil pressure increases over 65 kg cm2 and light turns ON when brake oil pressure drops below 60 kg cm2 When terminal input is connected Under normal conditions will turn ON before engine start up and turn OFF once engine is running Parking Brake CN2 12 Light turns OFF when parking b...

Page 670: ...put Operation and initial setting mode Initial Operation CN 1 1 All indicator lights are turned on and turned off after 2 seconds Except for turn signal indicator high beam indicator and working light indicator Warning buzzer is activated and turned off after 2 seconds Monitoring system displays present condition ...

Page 671: ...e Number Description 1 Instrument Panel 2 Starter Switch 3 Forward Lever Switch 4 Reverse Lever Switch 5 Fuse Box 6 Control Unit 7 Warning Buzzer 8 Alternator 9 Engine Oil Pressure Switch 10 Coolant Temperature Switch 11 Brake Oil Pressure Switch 12 Parking Brake Pressure Switch 13 Alarm Relay Reference Number Description ...

Page 672: ... of alternator is below 12 1 V Charging light L5 will be ON is above 12 1 V Charging light L5 will be OFF 3 When I terminal voltage of alternator is above 12 1 V Engine oil pressure switch is ON Warning buzzer sounds after 8 1 seconds Coolant temperature switch is ON Warning buzzer sounds immediately Brake oil pressure switch is ON Warning buzzer sounds immediately Forward and reverse lever switch...

Page 673: ... electric currents flow through Fuse box 1 to the B S terminal of wiper motor 5 to the 87a 30 terminal of wiper relay 3 to the 31b 53 terminal of wiper switch 2 L E terminal of wiper motor 5 Wiper acts until wiper rotates to the stop position than the wiper stops 4 Intermittent wiper action Fuse box 1 to the 15 J terminal of wiper switch 2 to the 1 4 terminal of wiper timer 4 are connected intermi...

Page 674: ...on Only wiper action Fuse box 1 to the B L terminal of wiper motor 3 to the 4 2 terminal of switch 2 are connected then activates wiper 3 When you turn off windshield wiper switch in 1st or 2nd position electric current flows fuse box 1 to the B L terminal of wiper motor 3 to the 4 6 terminal of wiper switch 2 to the diode 6 to the S E terminal of wiper motor 3 Reference Number Description 1 Fuse ...

Page 675: ...Return to Master Table of Contents AJS0160L 1 2 3 5 4 6 5 Figure 16 REAR WINDSHIELD WIPER STOP CIRCUIT Reference Number Description 1 Fuse Box 2 Wiper washer Switch 3 Wiper Motor 4 Washer Tank 5 Diode 6 Diode Reference Number Description ...

Page 676: ...S0802190K Page 31 Electrical System Return to Master Table of Contents ...

Page 677: ...K Page 32 Electrical System Return to Master Table of Contents LIGHTING SYSTEM LIGHT CIRCUIT AJS0180L 19 22 21 18 17 7 2 24 12 10 11 13 6 8 3 23 5 9 14 16 15 1 26 27 20 18 4 18 28 29 25 Figure 17 LIGHT CIRCUIT ...

Page 678: ...ination switch 4 is in the 0 position the current flows to the 56b terminal and it allow the low light which is in the headlight L 10 and the headlight R 11 to be turned ON B Also if the combination switch 4 is in the t position the current flows to the 56a terminal and it allow the high light which is in the headlight L 10 and the headlight R 11 to be ON At the same time the current flows to the ...

Page 679: ...x 1 1 to the stop light switch 7 and to the F terminal of rear combination light L 14 and rear combination light R 15 And the stop light will be ON 7 When the front working light switch 19 is in the ON position the current flows from the fuse box 1 1 to the 5 1 terminal of front working light switch 19 and to the front working light 20 This current makes the front working lights turn ON At the sam...

Page 680: ...ty recommendations and safe shop practices outlined in the front of this manual or those contained within this section Always use tools and equipment that is in good working order Use lifting and hoisting equipment capable of safely handling load Remember that ultimately safety is your own personal responsibility MODEL SERIAL NUMBER RANGE Mega 500 V 1001 and Up Copyright 2001 Daewoo May 2001 ...

Page 681: ...S0893060K Page 2 Electrical Schematic Mega 500 V Return to Master Table of Contents TABLE OF CONTENTS General Description 3 Mega 500 V 4 ...

Page 682: ...to Master Table of Contents GENERAL DESCRIPTION Schematic s presented in this section are laid out on facing pages An overlapping edge has been taken into consideration so that a photocopy can be made and pasted together to make a complete schematic Figure 1 ...

Page 683: ...S0893060K Page 4 Electrical Schematic Mega 500 V Return to Master Table of Contents MEGA 500 V Figure 2 ...

Page 684: ...S0893060K Page 5 Electrical Schematic Mega 500 V Return to Master Table of Contents AHS3680L MEGA 500 V ...

Page 685: ...S0893060K Page 6 Electrical Schematic Mega 500 V Return to Master Table of Contents ...

Page 686: ...1ATTACHMENTS ...

Reviews: