1
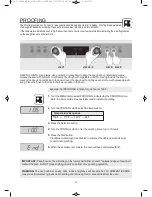
. Turn the MENU dial to select PROOFING, indicated by the PROOFING icon.
Note: the Voice Guide may use fermentation instead of proofing.
2
. Turn the CONTROL dial to select the temperature.
3
. Press the Selection button.
4
. Turn the CONTROL dial to enter the proofing time of up to 10 hours.
5
. Press the Start button.
Proof bread until dough has doubled in volume. Check bread products early
to avoid over-proofing.
6
. When the operation is complete, the oven will beep and display “End”.
27
PROOFING
The Proofing function can be used to raise yeast-based bread products prior to baking. Proofing bread prepares
the dough for baking by activating the yeast, a process also referred to as fermentation.
If the temperature inside the oven is high, allow the oven to cool to room temperature before starting the proofing function
so the dough rises at a constant rate.
Example: Set PROOFING function for one hour at 105˚F .
WARNING:
The oven cabinet, cavity, door, racks and dishes will become hot. To PREVENT BURNS,
always use thermal oven gloves while handling and removing food or accessories from the oven.
HELPFUL HINTS: Use a large, deep ceramic or glass bowl to keep the dough at a constant temperature.
Grease the bowl with butter or oil and spray the dough with vegetable oil before placing it inside the bowl to
prevent the dough from sticking to the bowl. Cover the dough with a tightly woven cloth or with greased plastic
wrap. Place the bowl on the tray in the lower position in the oven.
IMPORTANT:
Place bowl on the metal tray on the lower shelf. Allow at least 1” between edges of bowl and
walls of the oven. Do NOT place anything directly on bottom of oven during operation.
105˚F
↔
115˚F
↔
120˚F
↔
95˚F
Temperature Sequence
STEP
1
STEPS
2,4
STEP
3
STEP
5
KOC-1C4K5AV0_REV_110214:KOC-1C4K5AV0_(㦖_㦖㦖㦖) 2011-02-14 오 7:15 페이지 27


