background image

ISM

• Image Sticking

Minimisation

• Displaying a still image

for a long time causes
part image sticking on
the screen. 

• The ISM function

minimises this effect.

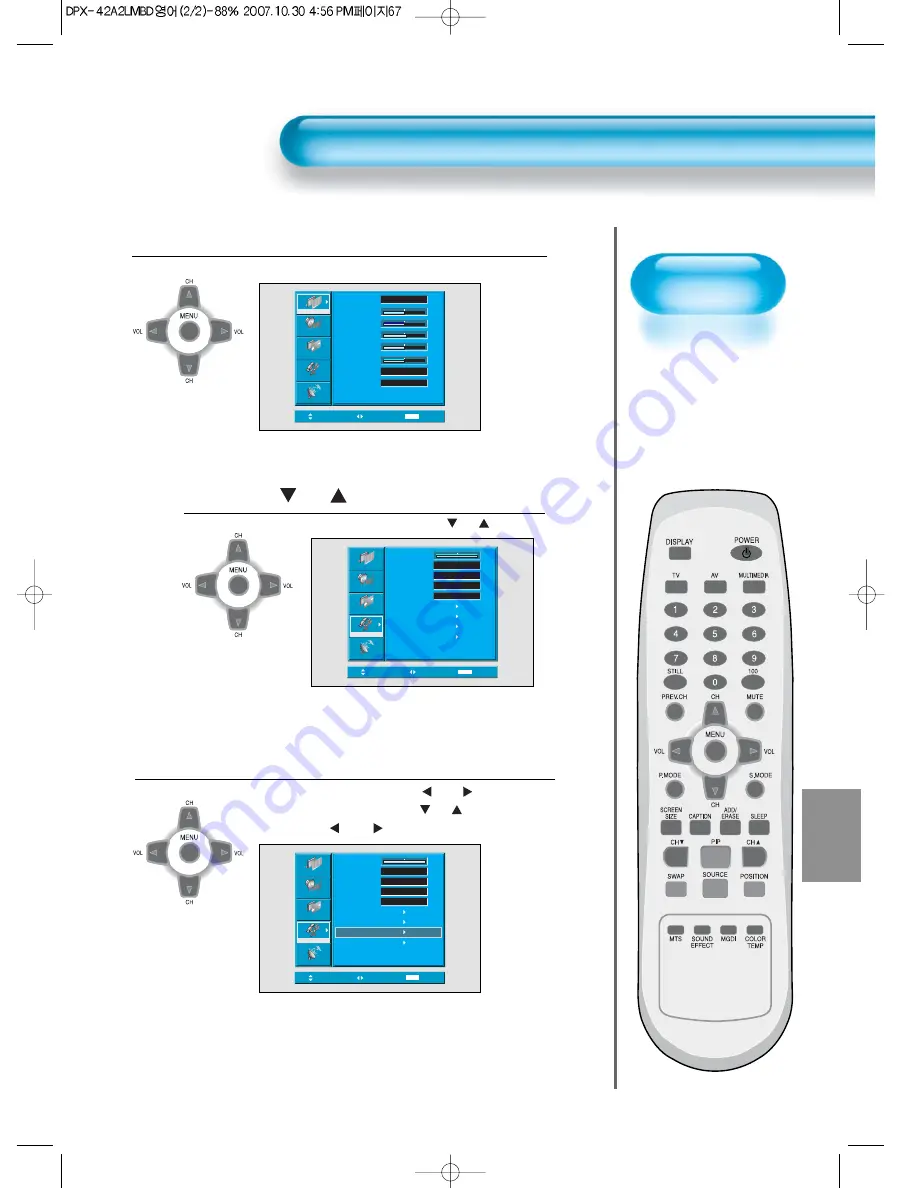
Image Sticking Minimisation(ISM)

67

Press the MENU Button.

• The MENU screen will be displayed as below.

Press the 

CH

Button. 

• Select [Feature] by the 

CH

button. 

Select ISM.

• Enter the sub menu by using the “

VOL  ” button.

• Select the [ISM] by pressing the “

CH

” button.

• Press of the “

VOL  ” button while you are in the ISM.

1

2

Move

Select

MENU

Exit

Mode

Brightness

Contrast

Sharpness

Color

Tint

Color Temp.

N.R.

Normal

Normal

On

50

50

50

50

8

Picture

Screen

Sound

Feature

Install

Move

Select

MENU

Exit

Background

Language

Child Lock

MGDI plus

Auto Power

Closed Caption

Time Setting

ISM

Initialize

English

Off

On

Off

Picture

Screen

Sound

Feature

Install

10

Move

Select

MENU

Exit

Picture

Screen

Sound

Feature

Install

Background

Language

Child Lock

MGDI plus

Auto Power

Closed Caption

Time Setting

ISM

Initialize

English

Off

On

Off

10

Summary of Contents for DPX-32X1BMB

Page 1: ...customise settings as desired Menu on the Screen will disappear After selecting a desired picture mode the menu on the screen will be disappeared If you want to customise the picture mode refer to the...

Page 2: ...hown below will display on the screen 1 2 Customising Picture Move Select MENU Exit Mode Brightness Contrast Sharpness Color Tint Color Temp N R Normal Normal On 50 50 50 50 8 Picture Screen Sound Fea...

Page 3: ...ontrol is used when the input signal is NTSC or Component If input signal is NTSC Tint control is displayed in picture menu 4 Selecting the color temperature makes the mood normal warm or cool Move Ad...

Page 4: ...to be burned So avoid displaying a picture in 4 3 screen size for a long time 2 Under Component PC and HDMI inputs only 16 9 and 4 3 are available 3 16 9 16 9 picture formats 14 9 14 9 picture formats...

Page 5: ...Press the CH buttons to select Screen In case of PC input 1 2 Adjusting Screen in the MENU Move Select MENU Exit Mode Brightness Contrast Sharpness Color Tint Color Temp N R Normal Normal On 50 50 50...

Page 6: ...S 14 9 Component 16 9 4 3 PC HDMI 2 Other Screen adjustments Under PC mode H Position As the value increases the screen moves to the right V Position As the value increases the screen moves up Auto Ad...

Page 7: ...ng a STILL Image NOTES 1 Displaying the same images such as still images for a long time may cause image burn after image lagging 2 In this case such image burn may become less noticeable if moving im...

Page 8: ...H button the sub picture can be moved to any position you want Swap the pictures In order to swap between the main picture and sub picture press the SWAP button 3 1 2 Screen Adjustment of the Sub pict...

Page 9: ...put Source Various signal sources can be displayed within the sub picture under PIP mode Once the PIP mode is on you may change the input source of the sub picture by pressing the SOURCE button Pressi...

Page 10: ...nt sound mode appears The sequence used is as follows Normal Suitable for watching any motion picture Movie Select this mode to simulate being at a movie theater Music Ideal for listening to music New...

Page 11: ...uttons then adjust it 3 Press the MENU Button The MENU screen as below will be displayed 1 2 Move Select MENU Exit Mode Brightness Contrast Sharpness Color Tint Color Temp N R Normal Normal On 50 50 5...

Page 12: ...MTS menu or pressing the MTS button of the remote control repeatedly MONO MONO sends the mono sound to the loudspeakers STEREO STEREO sends the stereo sound to the loudspeakers SAP SAP sends the seco...

Page 13: ...ncy as desired 2 If you modify the sound frequency in auto Sound Mode News Movie Music etc it is automatically switched to the User Mode 3 For a realistic sound effect lower than 120Hz frequency sound...

Page 14: ...n select input using INPUT button in the keypad of the PDP unit The sequence of selection is as follows TV AV1 AV2 Component1 Component2 PC HDMI TV Component 1 Selecting INPUT SIGNAL Press the Input S...

Page 15: ...CR image Displays the program number and input terminal which is used Indicates the mode and current time AV1 PM 12 00 NOTES 1 1920 x 1080 displayed in the INPUT signal is not the resolution of the se...

Page 16: ...1 2 MENUBackground LanguageandChildLockSetting 59 59 Move Select MENU Exit Mode Brightness Contrast Sharpness Color Tint Color Temp N R Normal Normal On 50 50 50 50 8 Picture Screen Sound Feature Ins...

Page 17: ...ll not be turned on with the keypad on the PDP Only by the remote controller the PDP is turned on 4 5 60 NOTES When power is turned on the first time SELECT LANGUAGE mode will be displayed then select...

Page 18: ...elect MENU Exit Mode Brightness Contrast Sharpness Color Tint Color Temp N R Normal Normal On 50 50 50 50 8 Picture Screen Sound Feature Install Move Select MENU Exit Background Language Child Lock MG...

Page 19: ...ssing the power button on the remote control or the keypad of the front panel 2 OFF When the AC power is ON the TV will be turned on by pressing the power button on the remote control or the keypad of...

Page 20: ...tion mode is changed as follow Closed Caption Setting in the Menu Press the Menu Button The MENU screen will be displayed as below 1 2 Closed Caption Setting Off Move Select MENU Exit Mode Brightness...

Page 21: ...ext2 Text3 Text4 Off caption box black and trasparent and CC on Mute can be set CC on Mute function Display CC1 automatically when sound is MUTE Move Select MENU Exit Background Language Child Lock MG...

Page 22: ...MENU Exit Mode Brightness Contrast Sharpness Color Tint Color Temp N R Normal Normal On 50 50 50 50 8 Picture Screen Sound Feature Install Move Select MENU Exit Background Language Child Lock MGDI plu...

Page 23: ...Setting channel and volume when TV is turned on by Wake Timer 4 Time Setting Functions 1 This time memory function automatically turns the TV set On or Off at a desired time Once set up this function...

Page 24: ...ing the CH button Press of the VOL button while you are in the ISM 3 1 2 Move Select MENU Exit Mode Brightness Contrast Sharpness Color Tint Color Temp N R Normal Normal On 50 50 50 50 8 Picture Scree...

Page 25: ...down left right at 15 sec interval to minimize image sticking Low Bright When displaying a still picture or a fixed pattern for a long time 5Min the brightness level decreases to minimize image sticki...

Page 26: ...edasbelow Select Feature Select Feature by the CH button 1 2 Move Select MENU Exit Mode Brightness Contrast Sharpness Color Tint Color Temp N R Normal Normal On 50 50 50 50 8 Picture Screen Sound Feat...

Page 27: ...IALISATION Enter the sub Menu by using the VOL button Select the Initialize by pressing the CH button then press the VOL button A confirmation message will be displayed To perform initialization press...

Page 28: ...ngforSleepTimer To cancel the Sleep Timer press the SLEEP button to select Off 1 Setting Sleep Timer NOTES 1 On screen information disappears if you do not take any action for about two seconds after...

Page 29: ...ontrol does not function properly Check for any obstacle between the Remote Control and the Display Check for dead batteries and incorrect battery orientation Check if the Remote Control is the right...

Page 30: ...Jack S VHS LEFT RIGHT INPUT Standard NTSC M PAL M N Receiving Channel TV VHF CH02 13 55 25MHz 211 25MHz UHF CH14 69 471 25MHz 801 25MHz CATV CH1 73 25MHz 14 25 121 25MHz 799 25MHz EXTERNAL VIDEO OUTPU...

Reviews: