background image

KOC-8HAFR_

12

KOC-8HAFR_

13

»C

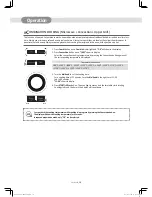
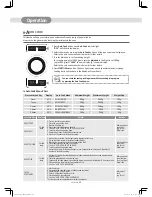
ONVECTION COOKING(with pre-heat)

For convection cooking, it is recommended that you preheat the oven to the appropriate temperature before placing the food in 

the oven. (except for 40°C convection mode)

The maximum preheating time is 30 minutes. If the cooking is not started immediately after preheating, the convection indicator 

will continue to flash and the preheated oven temperature will be displayed.

It is maintained for 15 minutes; it is then switched off automatically.

1.  Press 

Convection

 button once. 

Convection

 indicator lights.  


"180C"

 shows in display.

2.  Select the convection cooking temperature by pressing the Convection button again until 

the corresponding temperature is displayed.

Temperature sequence

180°C →190°C →200°C →210°C →220°C →230°C → 240°C→ 250°C → (40°C ) → 110°C 
→120°C →130°C →140°C → 150°C →160°C →170°C

3.  Press 

START/+30sec

 button. 

Convection

 indicator blinks. 


Temperature of preheating and 

"PrE-"

 blink altematively in the display.    


The oven will now preheat. When oven is preheated the oven will beep and the preheated 

oven temperature will appear in the display.  Then open the door and place your food in the 

oven. Oven temperature and shows in display.

4.  Turn the 

dial knob 

to set the cooking time.    


For a cooking time of 11 minutes, turn the

 dial knob

 to the right to set 11:00.(up to 60 

minutes) 

"11:00"

 shows in display.

5.  Press 

START/+30sec

 button. The oven light comes on and the turntable starts rotating. 

Cooking starts and the time in the display will count down.

You can check the setting temperature while cooking is in progress by pressing the Convection button.

NOTE

DESUK_KOC-8HAF7R.indd   15

2014-01-02   오전 10:28:43

Summary of Contents for KOC-8HAFR

Page 1: ...COMBI MICROWAVE OVEN WITH AIR FRYER FUNCTION USER MANUAL HOW TO TURN ON THE OVEN AT FIRST MODEL NO KOC 8HAFR money money money money money DESUK_KOC 8HAF7R indd 3 2014 01 02 10 28 39...

Page 2: ...Customer Helpline Number 01189 252577 Spare Parts 0844 557 0290 or www 4daewoo co uk DAEWOO ELECTRONICS Web Site www daewooelectronics co uk DESUK_KOC 8HAF7R indd 2 2014 01 02 10 28 39...

Page 3: ...ceorrepairoperationthatinvolvestheremovalof acoverwhichgivesprotectionagainstexposuretomicrowaveenergy e WARNING Liquids and other foods must not be heated in sealed containerssincetheyareliabletoexpl...

Page 4: ...onal Cooking 14 Combination Cooking Microwave Convection Upper Grill 16 Deodorization 17 Steam Cleaning With Microwave Feature 17 Weight Defrost 18 Time Defrost 18 Home Fryer 19 Auto Cook 22 30sec 23...

Page 5: ...place the microwave in the vicinity of heat sources Broadcasting and transmitting equipment such as radios and TVs can affect the working of the microwave Remove the accessories from the microwave and...

Page 6: ...ds you can use the oven If you insert plug into a socket the oven is STANDBY POWER 0 mode So the display shows nothing To cancel STANDBY POWER 0 mode press and hold ECO ZERO ON button until display is...

Page 7: ...table only remove for cleaning Shaft Metal rack low use this rack together with a turntable Home Fryer Bowl Center the kit on the metal tray when using the Home fryer cooking Glass turntable Metal tur...

Page 8: ...talrack HomeFryerbowl Microwavecooking Convectioncooking Combinationcooking Autocookingmenu5 Grillcooking Autocookingmenu1 2 3 4 Convectioncooking cake pizza pie Homefryercooking NOTE Metal Tray must...

Page 9: ...Fryer bowl because it is very hot Please be careful when you taking out the Home Fryer bowl after cooking is done CAUTION Please be clean the Home Fryer bowl Spark can occur if there is foreign substa...

Page 10: ...ANING When blinking the oven is operating in weight input mode BUTTONS Home fryer Used to select Home fryer Auto cook Used to select Auto cook Dial knob Used to set time weight and quantity M W Used t...

Page 11: ...nning programme stops This also happens if you press the stop button The fan will continue to run You can start the programme again by pressing the start button Do not use the microwave if it is empty...

Page 12: ...ails 3 Turn the dial knob to set the cooking time For a cooking time of 5 minutes 30 seconds turn the dial knob to the right to set 5 30 up to 60 minutes 5 30 shows in display 4 Press START 30sec butt...

Page 13: ...will be given off To avoid this happening when food is being cooked heat the upper and lower grills without food for approximately 10 minutes Place food directly on the rack in a flan dish or on a he...

Page 14: ...re sequence 180 C 190 C 200 C 210 C 220 C 230 C 240 C 250 C 40 C 110 C 120 C 130 C 140 C 150 C 160 C 170 C 3 Press START 30sec button Convection indicator blinks Temperature of preheating and PrE blin...

Page 15: ...to the metal rack with no danger of arcing Convection Cooking Recipe Manual Cook Menu Ingredients Method MINI SAUSAGE ROLL store bought puff pastry 50g 3 Allpurpose flour for dusting sausages 50g 3 1e...

Page 16: ...GHERITA PIZZA FOR THE dough 300g strong bread flour 1 tsp instant yeast from a sachet or a tub 1 tsp salt 1 tbsp olive oil plus extra for drizzling FOR THE TOMATO SAUCE100ml passata handful fresh basi...

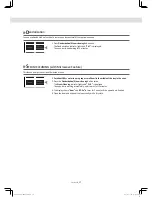
Page 17: ...temperature by pressing the Convection button again until the corresponding temperature is displayed Temperature sequence 180 C 190 C 200 C 210 C 220 C 230 C 240 C 250 C 110 C 120 C 130 C 140 C 150 C...

Page 18: ...bowl in the middle of the tray in the oven 2 Press the Deodorization Steam cleaning button twice The Steam Cleaning indicator lights and CL 2 is displayed The oven starts working immediately and it w...

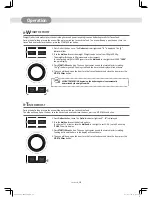
Page 19: ...nd the time in the display will count down 4 The oven will beep open the door turn the frozen food over and close the door press the START 30sec button WEIGHT DEFROSTING beginning the defrosting time...

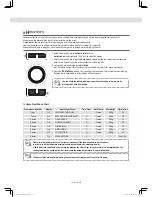
Page 20: ...ome Fryer button Auto Cook indicator light and Fr 1 will show in the display 2 Select the menu by pressing the Home Fryer button until the required menu is displayed Refer to the Home Fryer menu chart...

Page 21: ...the sides of the chicken breasts make a pocket like shape 3 Fill the chicken breasts with cream cheese and coat with flour beaten egg and bread crumbs respectively Place it in the fryer bowl 4 Cook wi...

Page 22: ...rops hot sauce salt pepper 1 Remove squid s organs and slice into 1cm thick rings 2 Marinate the squid in a bowl with white wine and garlic powder 3 Mix the bread crumbs with chopped parsley Mix milk...

Page 23: ...a little oil 4 Place roasts fat side down on the dish 5 Cook on AUTO COOK ROAST PORK or ROAST BEEF 6 Turn over when hearing the beep 7 Remove from oven Drain off any excess juices 8 Stand for 10 minut...

Page 24: ...d touching START 30sec button 2 Press the STOP Clear button Oven stops operating If you wish to cancel the cooking settings press the STOP Clear button again Stop You can stop or cancel a running prog...

Page 25: ...oven If you don t then steam and pressure might build up inside and cause an explosion even after the microwave cooking has stopped Oven Utensils And Accessories Guide A variety of utensils and mater...

Page 26: ...whichcouldcausesparksand orfires whenusedduringcooking 8 Donotpoppopcornunlesspoppedina microwaveapprovedpopcornpopperor unlessit scommerciallypackagedand recommendedespeciallyformicrowave ovens Micr...

Page 27: ...g thereforecaremustbetakenwhen handlingthecontainer Toreducetheriskofinjurytopersons a Donotoverheattheliquid b Stirtheliquidbothbeforeandhalfway throughheatingit c Donotusestraight sidedcontainerswit...

Page 28: ...ich is marked with the letter E or the earth symbol or coloured GREEN AND YELLOW or GREEN The wire which is coloured BLUE must be connected to the terminal which is marked with the letter N or coloure...

Page 29: ...y also be washed in the dishwasher Smells will disappear if you place a glass of vinegar or water with lemon in the microwave area Switch the microwave on at full power for two minutes Then rub down w...

Page 30: ...entilation openings blocked Has the food been defrosted sufficiently Did you turn over or stir the food during preparation SPARKS IN THE MICROWAVE If you see sparks in the microwave turn the microwave...

Page 31: ...me mean A Standing time means that food should be removed from the oven and covered for additional time to allow it to finish cooking This frees the oven for other cooking Q Why does my oven not alway...

Page 32: ...m 19 7X19 3X12 6 inch Cavity Dimensions W x D x H 310 X 328 X 232 mm 12 2X12 9X9 1 inch Net Weight Approx 18Kg 39 6 lbs Timer 60 minutes Select function Microwave Grill Convection Combination Home fry...

Page 33: ...product must be correctly installed and operated in accordance with the instructions contained in the manual lt must be used solely for domestic purposes The guarantee will be rendered invalid if the...

Reviews: