background image

NL

Montage-instructie Combi installatieset


Montage

Bevestiging 

1.  

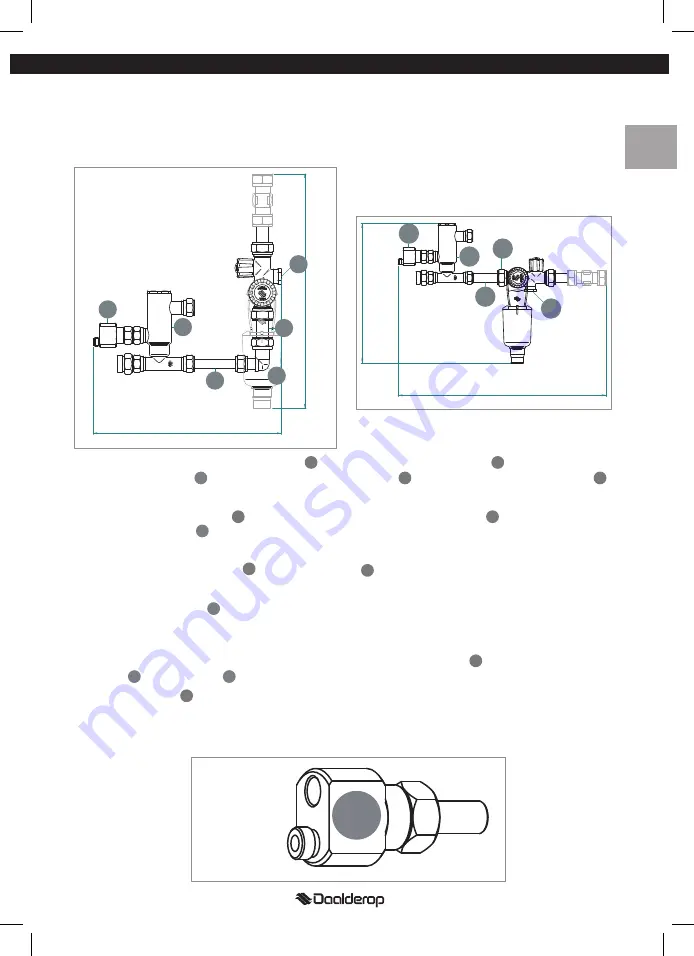
Bepaal of u de 90-graden (figuur 2a, volg stap 2a) of de in-lijn (figuur 2b, volg stap 2b) 
opstelling wilt gebruiken in uw keukenkast (afhankelijk van de beschikbare ruimte). Beide 
opstellingen kunnen ook verticaal gespiegeld worden toegepast.

2a. 

Monteer de kniekoppeling 15x12mm      met behulp van de buis 15mm      op de 
inlaatcombinatie     . Monteer vervolg de buis 12 mm       op de kniekoppeling 15x12 mm      .

2b. 

Monteer de buis 12 mm      met behulp van het knelverloop 15x12mm      op de 
inlaatcombinatie 

3. 

Monteer het mengventiel       op de buis 12mm      .

4. 

Installeer uw kraan      indien deze niet reeds geïnstalleerd is. Volg hiervoor de handleiding 
van uw kraan.

5. 

Verbind de ‘binnendraad’ aansluiting van het kokend water t-stuk      met de kokendwater-
slang     van uw kraan      . Gebruik hiervoor één van de twee meegeleverde 


pakkingringen     .


B

E

D

F

A

H

1

2

C

1

3

E

D

D

2

250 mm

30

0 mm

1

E

D

C

A

B

          min. 400 mm

23

0 mm

1

A

B

D

H

Buitendraad

Binnendraad

B

figuur 2a

figuur 3

figuur 2b

07.98.92.033 Handleiding Combi Installatieset_NMRS.indd   3

5-7-10   16:29

Summary of Contents for Combi

Page 1: ...embly instructions Instructions de montage montageanleitung combi installatieset COMBI INSTALLATION KIT SET D INSTALLATION COMBI KOMBIVENTIL EINBAUSET 07 98 92 033 Handleiding Combi Installatieset_NMR...

Page 2: ...ing 1x Mengventiel 1x Kokend water t stuk 1x Buis 15mm 1x Buis 12mm 1x Kniekoppeling 15x12mm 2x Pakkingring 2x Verlengslang 1x Knelverloop 15 12mm 1x Knelverloop 15 10mm Montage Combi installatieset V...

Page 3: ...iekoppeling 15x12 mm 2b Monteer de buis 12 mm met behulp van het knelverloop 15x12mm op de inlaatcombinatie 3 Monteer het mengventiel op de buis 12mm 4 Installeer uw kraan indien deze niet reeds ge ns...

Page 4: ...gen 8 Sluit de koudwaterslang van het kokend waterapparaat aan op de onderste aansluiting van het mengventiel 6 Bevestig het kokend water t stuk op het mengventiel zoals aangegeven in figuur 4 figuur...

Page 5: ...ekker in een geaarde wandcontactdoos Het kokend water apparaat zal nu het water verwarmen 13 Indien na 4 minuten tijdens het opwarmen geen expansiewater via de inlaatcombinatie wegloopt schakel dan on...

Page 6: ...aarden van kraan en spoelbak vallen niet onder de garantie 6 Garantie is enkel van toepassing als de kwaliteit van het leidingwater voldoet aan de volgende voorwaarden pH 7 pH 9 5 geleidbaarheid 125 m...

Page 7: ...er 2x Extension hose 1x Reducer 15x12mm 1x Reducer 15x10mm combi installation kit assembly Follow these five steps if your boiling water unit has already been installed 1 Unplug the boiling water unit...

Page 8: ...pe onto the safety valve assembly by means of the 12x15 mm reducer 3 Mount the mixing valve onto the 12 mm pipe 4 Install your tap if this has not already been installed Follow the instruction manual...

Page 9: ...o the bottommost coupling of the mixing valve 9 Connect the uppermost coupling of the mixing valve with the warm water supply of your tap 6 Fasten the boiling water T piece B onto the mixing valve as...

Page 10: ...ing water unit will now heat the water 13 If after 4 minutes during heating no expansion water leaks from through the safety valve assembly immediately switch the power off and open the boiling water...

Page 11: ...r manuals 5 The group installation set must not have undergone any modifications in its make up 6 Warranty will be honoured if and only if the quality of the cold mains water meets the following requi...

Page 12: ...n 15 12 mm 1x r duction compression 15 10 mm Montage du set d installation Combi Suivez les cinq tapes mentionn es ci dessous si votre appareil de production d eau chaude est d j install 1 Retirez la...

Page 13: ...sur le coude 15x12 mm 2b Montez le tube de 12 mm l aide de la r duction compression 15x12 mm sur le groupe de s curit 3 Montez la vanne m langeuse sur le tube de 12 mm 4 Installez votre robinet s il n...

Page 14: ...d eau chaude au raccord inf rieur de la vanne m langeuse 9 Raccordez le raccord sup rieur de la vanne m langeuse l alimentation d eau chaude de votre robinet 6 Fixez la pi ce en T eau chaude sur la va...

Page 15: ...la prise dans une prise murale avec prise de terre L appareil de production d eau chaude chauffera maintenant l eau 13 Si apr s 4 minutes de chauffe il n y a pas d eau d expansion qui goutte via le g...

Page 16: ...la terre insuffisante du robinet et de l vier ne sont pas couvertes par la garantie 6 La garantie n est d application que si la qualit des conduites est conforme aux conditions suivantes pH 7 pH 9 5 c...

Page 17: ...1 berpr fen Sie den Inhalt der Verpackung auf Vollst ndigkeit Montage des Kombiventil einbausets Gehen Sie bei einem schon fertig installierten Hei wasserboiler nach den folgenden 5 Schritten vor 1 Zi...

Page 18: ...g 15 x 12 mm an Sicherheitsventil montieren 3 Mischventil an Rohrst ck 12 mm montieren 4 Installieren Sie jetzt Ihren Wasserhahn falls nicht schon geschehen Befolgen Sie daf r die Montageanleitung f r...

Page 19: ...ringe 8 Nun den Kaltwasserschlauch des Hei wasserboilers an den untersten Anschluss vom Mischventil anschlie en 9 Schlie en Sie jetzt den obersten Anschluss vom Mischventil an den Hei wasseranschlusse...

Page 20: ...erboilers wieder in eine geerdete Steckdose ein Der Hei wasserboiler w rmt jetzt wieder das Wasser auf 13 Wenn innerhalb der Aufw rmphase nach 4 Minuten kein Expansionswasser ber das Sicherheitsventil...

Page 21: ...n werden Sch den durch Lochfra aufgrund einer nicht sachgem en Erdung des Hahns und des Sp lbeckens sind von der Garantie ausgenommen 6 Ein Garantierecht besteht ausschlie lich dann wenn die Qualit t...

Page 22: ...Notities Notes 07 98 92 033 Handleiding Combi Installatieset_NMRS indd 22 5 7 10 16 29...

Page 23: ...Notities Notes 07 98 92 033 Handleiding Combi Installatieset_NMRS indd 23 5 7 10 16 29...

Page 24: ...07 98 92 033 www daalderop nl 07 98 92 033 Handleiding Combi Installatieset_NMRS indd 24 5 7 10 16 29...

Reviews: