background image

17

Unlinking and midi link management 

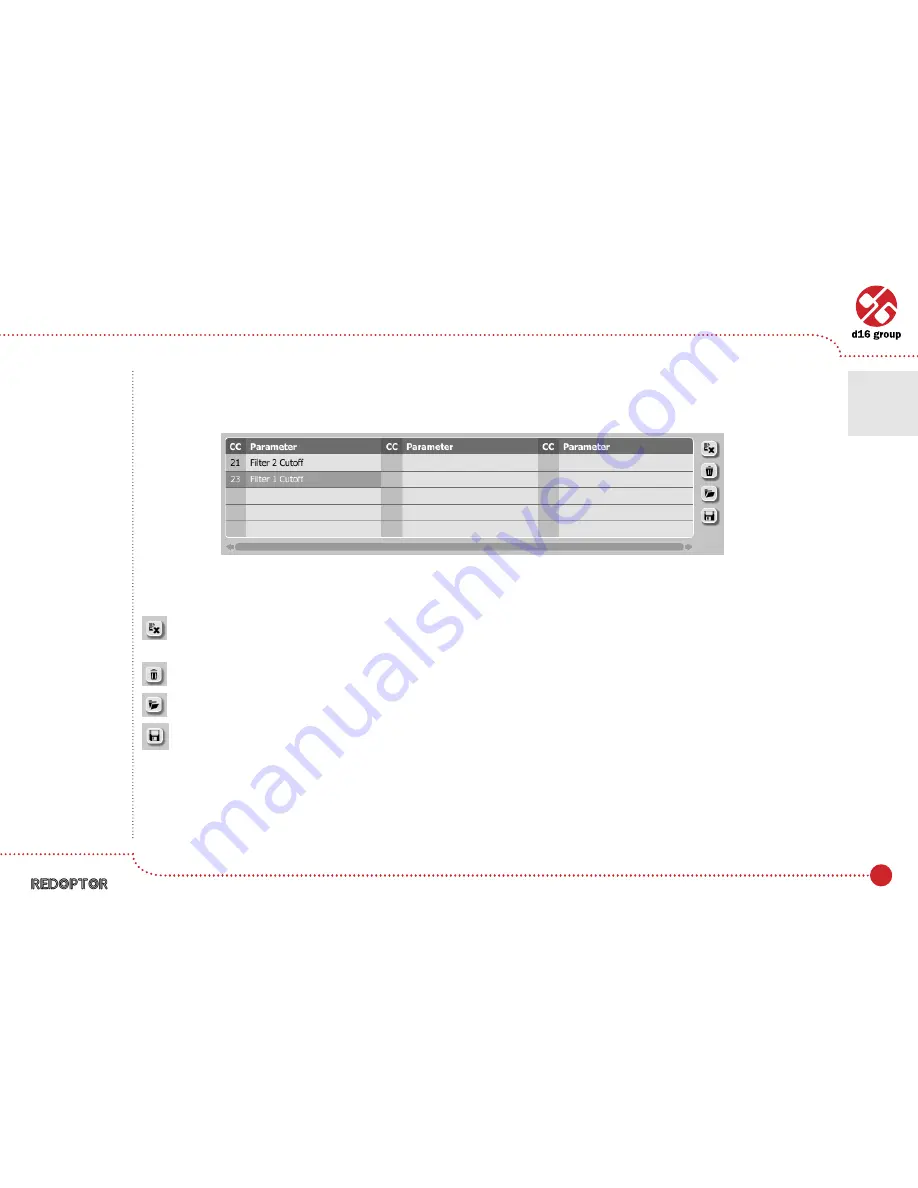
On the right side of the link list there are 4 function buttons located:

 –  Removes a selected link; choosing any link from the list and clicking on it highlights the selected link. Using this 

button removes the selected link. 

 – Removes all MIDI CC links. 

 – Loads link lists/MIDI maps from file (.rdccmap – Redoptor MIDI CC Map). 

 – Saves link lists/MIDI maps to file. 

MIDI CC link list and function buttons

Configuration 


Midi control tab

4

  Note: MIDI map 

files are saved 
in 

XML

 format, 

which enables 
their edition in 
any text editor.

Summary of Contents for Redoptor

Page 1: ...User Manual Vintage Tube Distortion ...

Page 2: ...effect with tube emulation We can distinguish two sections there Configuration and preset management Signal processing control section consists of the all remaining controls 1 Redoptor graphical interface Configuration and preset selection section ...

Page 3: ...ol parameters Basic modules Internally Redoptor consists of a few basic components These correspond to the sections on the graphical user interface Preamp This amplifies the incoming signal When it goes above the threshold value the tube clipping starts to work Shaping of the input signal can be performed using the Hi Cut and Lo Cut controls Preamp section ...

Page 4: ...hi pass filter s frequency in range 0 Hz 300 Hz Hi cut It s a low pass filter s frequency in range 1 5 kHz 8 kHz On Off Turning off a low pass filter completely Hi cut Lo cut and Hi cut control the bandwidth of the input signal which passes through the preamp Signal flow Basic modules 2 Low and Hi cut combination s frequency response ...

Page 5: ...he more harmonics in the signal Tone This is a cross fade between the output from the fixed Hi pass filter and the dry signal after the tube distortion Brightness Number of harmonics that emerge in the tube This could also be described as the control which gives a smooth transition between tube distortion and diode clipping distortion Tube distortion section Diagram representing Tone parameter Sig...

Page 6: ...or cutting range 300 Hz 2 kHz Treble For boosting or cutting range 2 kHz 5 kHz Presence For boosting or cutting range 5 kHz 12 kHz Each band is controlled by following parameters Frequency Centre frequency of a peak Gain Gain value for a band 24 dB 24 dB Band width Width of the band 4 octaves 0 5 octave Equalizer section Signal flow Basic modules 2 ...

Page 7: ...balance The Fx knob controls the wet dry signal mix and Output volume knob controls the final amplification Path of the signal s flow The picture below shows the signal flow through the plug in Signal flow Basic modules Path of the signal s flow 2 Master section Signal flow ...

Page 8: ...ter button Prev Next Buttons used to navigate through the preset bank Next button moves the browser to the next preset If the current preset is the last preset in a group pressing Next moves the browser to the first preset in the subsequent group Prev button moves the browser to the previous preset If the current preset is the first preset in a group pressing Prev moves the browser to the last pre...

Page 9: ...gs and in the preset bank will be restored Preset Browser As it was mentioned the preset bank in the plug in has a hierarchical structure i e presets are organized in groups Presets can be selected by Next Prev buttons which navigate through the structure in a linear way or by using the Preset Browser The Preset Browser is a tool which allows to easily manage the preset structure To open it click ...

Page 10: ...UI Preset Manager The left side shows the list of groups in the preset bank The right side shows the list of presets in the selected group List of groups in the preset bank List of presets in the selected group Preset Management Preset Browser 3 ...

Page 11: ...hange its position in the group by dropping it in a different slot in the list of presets in a selected group Move the preset to a different group by dragging and dropping it in the chosen slot in the group list Holding CTRL or SHIFT and using the mouse button allows to select more presets Holding CTRL and clicking on presets selects single items Using SHIFT allows to select a range of presets The...

Page 12: ...ack of a pointer on the right from its name Pastes the edited preset to the buffer works exactly like the combination of Prev and CTRL Overwrites the selected preset with the buffer content works exactly like the combination of Next and CTRL The postfix _copy is added to the name of the preset pasted from the buffer Works exactly like Prev on GUI allows to move backwards on the hierarchical struct...

Page 13: ... file Bank Load loads the entire bank of presets from a file file rdprb Redoptor bank Bank Save saves the entire bank of presets to a file Loading and Saving presets from the hard drive functions Preset Management Loading and Saving presets 3 Note Before saving the preset to a file save it in Redoptor using CTRL Browse when On demand function is selected in the plug in configuration Note Files sav...

Page 14: ...rol configures MIDI communications with the plug in Presets configures presets switching indicates personal resources loaded instead of default presets Quality conversion track quality settings Clicking on Options while holding CTRL opens a window with information about the version and the license owner Configuration 4 Configuration and preset selection section Configuration panel tabs ...

Page 15: ...ive MIDI CC links containing pairs comprising of a CC code and the name of the plug in parameter Default Map Checkbox which activates a default MIDI CC map When the map is activated it will be loaded with creating a new instance of the plug in Note This feature works only in the VST version of the plug in due to the fact that the AU specification does not include a MIDI input port necessary to rec...

Page 16: ...g in waits for any change in the parameter value movement of any control on GUI and for the movement of any MIDI CC control from the external MIDI controller which operates on an active MIDI input channel directed to Redoptor The order of these actions is irrelevant During the above mentioned actions the status bar informs about the currently changing values of controls and provides their names Co...

Page 17: ...and parameter pairs Subsequent links will be created and added to the list 3 When all the needed links are created uncheck the Midi Learn Mode checkbox In order to create new links it is possible to reactivate the Midi Learn Mode at any time The links are always sorted in an ascending manner in relation to the CC column according to the MIDI CC code MIDI CC link list Configuration Midi control tab...

Page 18: ...cking on it highlights the selected link Using this button removes the selected link Removes all MIDI CC links Loads link lists MIDI maps from file rdccmap Redoptor MIDI CC Map Saves link lists MIDI maps to file MIDI CC link list and function buttons Configuration Midi control tab 4 Note MIDI map files are saved in XML format which enables their edition in any text editor ...

Page 19: ...rowse button shows the path to the active map file A default MIDI map is loaded each time when the plug in is loaded Presets tab Preset Storing Using Prev Next buttons or the Preset Browser navigates through the preset bank Any change in the current preset can be stored automatically or on demand Depending on the selection one of the two options is active Default MIDI Map selection Configuration M...

Page 20: ...ing Type Changing between presets may cause undesirable sonic artifacts Switching the Changing Type flag may prevent this phenomenon Normal Changing presets takes place in a classical manner all parameter values are rapidly changed into new values Silent Before changing the preset the output signal is muted Next the parameters are set to new values and the signal level is restored to its previous ...

Page 21: ...n loads the factory presets with every new instance of the plug in Clear Preset Zeroed parameters with every new instance of the plug in User Defined Preset bank selected by the user When choosing User Defined option the Browse button on the right side is activated Using this button opens a dialog box in order to select a path to the user s preset bank Confirming the path saves it in the Redoptor ...

Page 22: ... the processor s capacity Four quality values are available Low Medium High Highest The higher the conversion quality is the more processor s capacity is required by the plug in Higher conversion quality leads to better sound quality Configuration Quality tab 4 Quality tab ...

Page 23: ...n project file The flag is not saved in the preset Default Quality Default value of the Current Quality flag for new instances of the plug in The flag is saved in the Redoptor configuration file When removing any instance of the plug in from the host application the configuration file is saved Configuration Quality tab 4 ...

Page 24: ...ignal s flow 6 3 Preset Management 7 Browsing presets 7 Preset Browser 8 Loading and Saving presets 12 4 Configuration 13 Midi control tab 14 Midi learn 15 Unlinking and midi link management 17 Default MIDI Map 18 Presets tab 18 Preset Storing 18 Changing Type 19 Default Presets 20 Quality tab 21 Current Quality 22 Default Quality 22 5 Contents 23 ...

Reviews: