background image

35

D-Link DIR-845L User Manual

Internet (Manual)

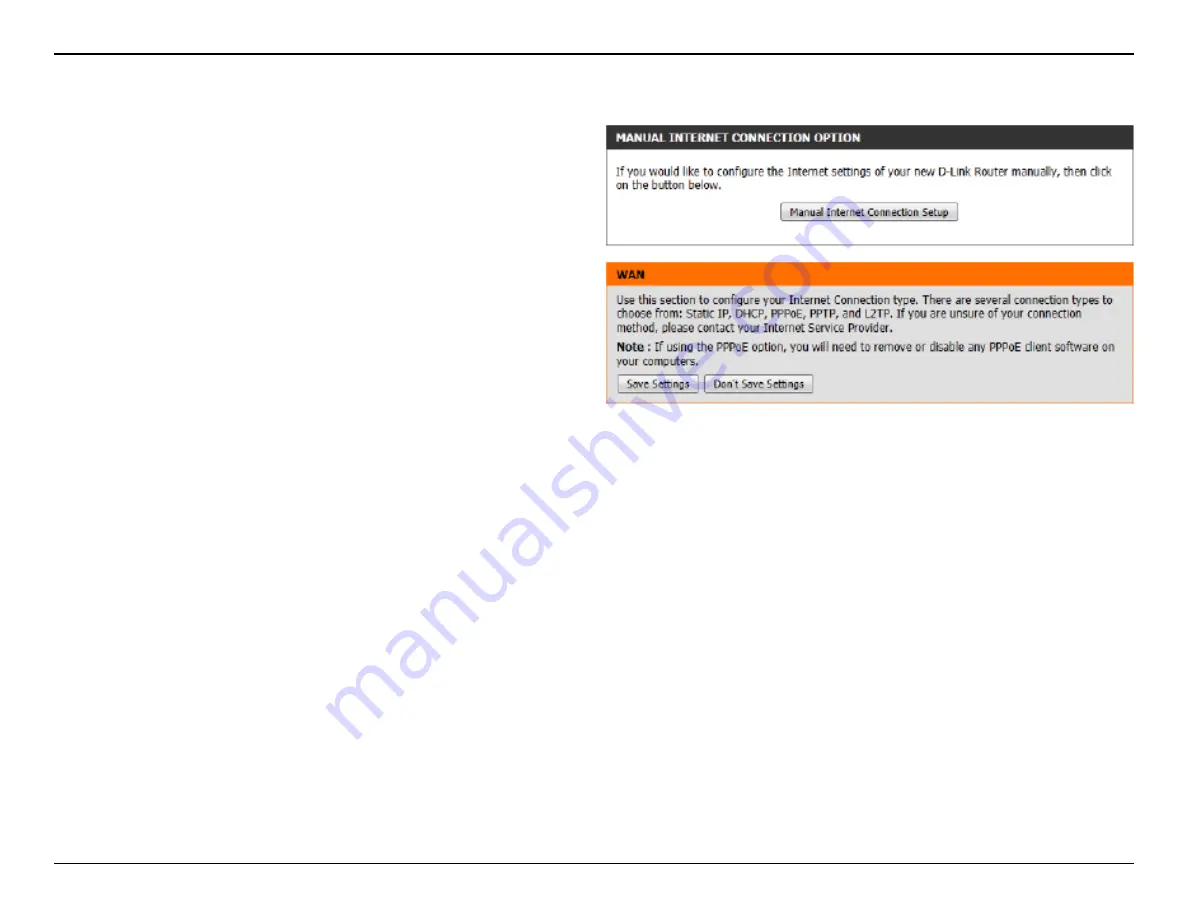
On this page the user can configure the Internet Connection settings 

manually. To access the Manual Internet Connection Setup page, click 

on the 

Manual Internet Connection Setup

 button. On this page there 

a multiple parameters that can be configured regarding the Internet 

Connection setup. We’ll discuss them from top to bottom.

At any given point the user can save the configuration done, on this 

page, by clicking on the 

Save Settings

 button. If you choose to discard 

the changes made, click on the 

Don’t Save Settings

 button.

Summary of Contents for Whole Home Cloud Router 2000

Page 1: ...Version 1 0 07 09 2012 Whole Home Cloud Router 2000 ...

Page 2: ...istered trademarks of D Link Corporation or its subsidiaries in the United States or other countries All other company or product names mentioned herein are trademarks or registered trademarks of their respective companies Copyright 2012 by D Link Systems Inc All rights reserved This publication may not be reproduced in whole or in part without prior expressed written permission from D Link System...

Page 3: ...3 Web based Configuration Utility 27 Internet Connection Setup 28 Internet Connection SetupWizard 29 Internet Manual 35 Static assigned by ISP 37 PPPoE DSL 38 PPTP 40 L2TP 42 DS Lite 44 Wireless connection setup wizard 45 Wi Fi Protected SetupWizard 48 Manual wireless network setup 49 Wireless Security 58 What isWPA 58 Network Settings 59 Router Settings 59 DHCP Server Settings 60 DHCP Reservation...

Page 4: ... Pack 112 Dynamic DNS 113 System Check 114 Schedules 115 Status 116 Device Info 116 Logs 117 Statistics 118 Internet Sessions 119 Routing 120 Wireless 121 IPv6 122 IPV6 Routing 123 Support 124 Connect aWireless Client to your Router 125 WPS Button 125 Windows 7 126 WPA WPA2 126 WPS 129 WindowsVista 133 WPA WPA2 134 WPS WCN 2 0 136 Windows XP 137 WPA WPA2 138 Troubleshooting 140 Wireless Basics 144...

Page 5: ...wersupplywithadifferentvoltageratingthantheoneincludedwiththeDIR 845Lwillcausedamageandvoidthewarranty for this product If any of the above items are missing please contact your reseller DIR 845L Whole Home Cloud Router 2000 Ethernet Cable Power Adapter CD WI FI Configuration Note Wi Fi Configuration Note ...

Page 6: ...ents Internet Explorer 7 or higher Firefox 3 5 or higher Safari 4 or higher Chrome 8 or higher Windows Users Make sure you have the latest version of Java installed Visit www java com to download the latest version mydlink Requirements iPhone iPad iPod Touch iOS 3 0 or higher Android device 1 6 or higher Computer with the following browser requirements Internet Explorer 7 or higher Firefox 3 or hi...

Page 7: ...less signal to significantly outperform 802 11g devices D Link has created SharePort technology to bring more flexibility to your network With SharePort technology you can connect a USB printer and share it throughout your network You can also share a USB storage device providing network storage for everyone to share With some routers all wired and wireless traffic includingVoIP Video Streaming On...

Page 8: ... on MAC Address URL and or Domain Name Filter Scheduling These filters can be scheduled to be active on certain days or for a duration of hours or minutes Secure Multiple Concurrent Sessions The DIR 845L can pass through VPN sessions It supports multiple and concurrent IPSec and PPTP sessions so users behind the DIR 845L can securely access corporate networks User friendly Setup Wizard Through its...

Page 9: ...tton to restore the device to its original factory default settings 3 LAN Ports 1 4 Connect 10 100 1000 Ethernet devices such as computers switches storage NAS devices and game consoles 4 Internet Port Using an Ethernet cable connect your broadband modem to this port 5 Power Button Press the power button to power on and off 6 Power Receptor Receptor for the supplied power adapter 1 3 4 5 6 2 ...

Page 10: ...tion on the Internet port and the router can connect to the Internet If the LED is orange the connection is good but the router cannot connect to the Internet 2 Internet LED A solid light indicates connection on the Internet port If the LED is orange the connection is good but the router cannot connect to the Internet 1 2 ...

Page 11: ...d directly to your modem You can only use the Ethernet port on your modem If you were using the USB connection before using the router then you must turn off your modem disconnect the USB cable and connect an Ethernet cable to the Internet port ontherouter andthenturnthemodembackon Insomecases youmayneedtocallyourISPtochangeconnection types USB to Ethernet IfyouhaveDSLandareconnectingviaPPPoE make...

Page 12: ...at is 1 5 feet thick 5 meters at a 45 degree angle appears to be almost 3 feet 1 meter thick At a 2 degree angle it looks over 42 feet 14 meters thick Position devices so that the signal will travel straight through a wall or ceiling instead of at an angle for better reception 3 Building Materials make a difference A solid metal door or aluminum studs may have a negative effect on range Try to pos...

Page 13: ...your modem and a computer Place the router in an open area of your intended work area for better wireless coverage 3 UnplugtheEthernetcablefromyourmodem orexistingrouterifupgrading thatisconnectedtoyourcomputer Plug it into the LAN port labeled 1 on the back of your router The router is now connected to your computer Modem USB WPS 1 2 3 4 INTERNET POWER DIR 845L Computer ...

Page 14: ...er and then plug it into a power outlet or surge protector Press the power button and verify that the power LED is lit Allow 1 minute for the router to boot up 7 If you are connecting to a Broadband service that uses a dynamic connection not PPPoE you may be online already Try opening a web browser and enter a web site If a solid light indicates connection on the Internet port and the router can c...

Page 15: ... the steps below 1 Plug the power into the router Connect one of your computers to the router LAN port using an Ethernet cable Make sure your IP address on the computer is 192 168 0 xxx where xxx is between 2 and 254 Please see the Networking Basics section for more information If you need to change the settings write down your existing settings before making any changes In most cases your compute...

Page 16: ... in Step 1 6 Disconnect the Ethernet cable from the router and reconnect your computer to your network 7 Connect an Ethernet cable in one of the LAN ports of the router and connect it to your other router Do not plug anything into the Internet WAN port of the D Link router 8 Youmaynowusetheother3LANportstoconnectotherEthernetdevicesandcomputers Toconfigureyourwirelessnetwork open a web browser and...

Page 17: ...nd connect to your clients D Link Setup Wizard This wizard will launch when you log into the router for the first time Refer to page 14 QRS Mobile App Use your iPhone iPad or iPod Touch to configure your router Refer to page 21 Manual Setup Log into the router and manually configure your router advanced users only Refer to page 27 Configuration ...

Page 18: ...tup Wizard If this is your first time installing the router open your web browser You will automatically be directed to the Wizard Setup Screen If not enter http dlinkrouter local Then press Enter If you have already configured your settings and you would like to access the configuration utility please refer to page 27 Please wait while your router detects your internet connection type If the rout...

Page 19: ...ar Connect your broadband modem to the Internet port and then click Try Again IftherouterdetectsanEthernetconnectionbutdoesnotdetectthetype of Internet connection you have this screen will appear Click Guide me throughtheInternetConnectionSettingstodisplayalistofconnection types to choose from Select your Internet connection type and click Next to continue ...

Page 20: ...our PPPoE software from your computer The software is no longer needed and will not work through a router If the router detected or you selected PPTP enter your PPTP username password and other information supplied by your ISP Click Next to continue If the router detected or you selected L2TP enter your L2TP username password and other information supplied by your ISP Click Next to continue ...

Page 21: ...eate a Wi Fi network name SSID using up to 32 characters Create aWi Fi password between 8 63 characters Your wireless clients will need to have this passphrase or key entered to be able to connect to your wireless network Click Next to continue In order to secure your router please enter a new password Check the EnableGraphicalAuthenticationboxtoenableCAPTCHAauthentication for added security Click...

Page 22: ...to continue The Setup Complete window will display yourWi Fi settings Click Save and Connect to continue If you want to create a bookmark to the router click OK Click Cancel if you do not want to create a bookmark If you clicked Yes a window may appear depending on what web browser you are using to create a bookmark ...

Page 23: ... you do have a mydlink account or if you need to create one Click Next to continue If you do not want to register at this time click Cancel If you clickedYes enter your mydlink account name email address and password Click Login to register your router If you clicked No fill out the requested information and click Sign Up to create your mydlink account ...

Page 24: ... receive notices browse network users and configure your router from an iPhone iPad iPod Touch iOS 3 0 or higher Android device 1 6 or higher To download the mydlink lite app visit the Apple Store Android Market or http mydlink com Lite PCandMacuserscanusethemydlinkportalathttp mydlink com ...

Page 25: ...k Select QRS Mobile and then download it You may also scan this code to download Step 2 Once your app is installed you may now configure your router Connect to the router wirelessly by going to your wireless utility on your device Scan for the Wi Fi name SSID as listed on the supplied info card Select and then enter your Wi Fi password Step 3 Once you connect to the router launch the QRS mobile ap...

Page 26: ... to and share a USB disk drive Install the SharePort Plus Utility on the computer or computers that you would like to use the USB device s with Remember that the computer s will also need the device drivers for the USB devices connected to the router For devices other than USB storage only one user can be connected to a USB device at a time SharePort Plus has a printer autoconnect function to make...

Page 27: ...t Mobile APP from the app store to your iPhone or iPad SharePort Mobile App 3 From your iOS mobile device click Settings The SharePort Mobile app will allow you to access files from a USB thumb drive that is plugged into your router You must enable file sharing from the Setup Storage page refer to page 68 for this app to work properly Settings ...

Page 28: ...ual Section 3 Configuration 4 Click Wi Fi select the Wi Fi Network Name SSID that you created in the setup and then enter your Wi Fi password 5 Once connected click on the SharePort Mobile icon 6 The following screen will appear ...

Page 29: ...right top corner of the screen Click Edit to enter your User Name and Password Once you finish click Done to continue 8 For the Movie section click the movie icon to play your movie from your USB flash drive 9 For the Music section click the music icon to play your music from your USB flash drive ...

Page 30: ...hoto section click the Photo icon to view your photos from your USB flash drive 11 For the Files section click on the Files icon to view your files from your USB flash drive 12 For the Folder section click the folder icon to view your folders from your USB flash drive ...

Page 31: ... 3 Configuration Web based Configuration Utility Leave the password blank by default To access the configuration utility open a web browser such as Internet Explorer and enter address of the router http dlinkrouter local or http 192 168 0 1 ...

Page 32: ...ion Setup Click Manual Internet Connection Setup to configure your connection manually and continue to the next page IfyouwanttoconfigureyourroutertoconnecttotheInternet using the wizard click Internet Connection Setup Wizard You will be directed to the Quick Setup Wizard ...

Page 33: ...button to discard any changes made and return to the main Internet page Also the user can click on the Prev button to return to the previous window for re configuration Welcome This wizard will guide you through a step by step process to configure your new D Link router and connect to the Internet Click Next to continue Step 1 Set Your Password By default the D Link Router does not have a password...

Page 34: ...listed below The following parameters will be available for configuration Dynamic IP Address Choose this if your Internet connection automatically provides you with an IP Address Most Cable Modems use this type of connection PPPoE Choose this option if your Internet connection requires a PPPoE username and password to get online Most DSL modems use this type of connection PPTP Choose this option i...

Page 35: ...ed here You may also need to provide a Host Name If you do not have or know this information please contact your ISP Primary DNS Address Enter the Primary DNS IP address used here Secondary DNS Address Enter the Secondary DNS IP address used here This field is normally optional Only one DNS address is required for a functional Internet connection but using a second DNS address provides more stabil...

Page 36: ... Subnet Mask Enter the PPTP Subnet Mask used here PPTP Gateway IP Address Enter the PPTP Gateway IP address used here PPTP Server IP Address Enter the PPTP Server IP address used here This is normally the same a the PPTP Gateway IP address User Name Enter the PPTP username used here Password Enter the PPTP password used here Verify Password Re enter the PPTP password used here Primary DNS Address ...

Page 37: ... Subnet Mask Enter the L2TP Subnet Mask used here L2TP Gateway IP Address Enter the L2TP Gateway IP address used here L2TP Server IP Address Enter the L2TP Server IP address used here This is normally the same a the L2TP Gateway IP address User Name Enter the L2TP username used here Password Enter the L2TP password used here Verify Password Re enter the L2TP password used here Primary DNS Address ...

Page 38: ...vailable for configuration IP Address Enter the Static IP address provided by the ISP here Subnet Mask Enter the Subnet Mask provided by the ISP here Gateway Address Enter the Gateway IP address provided by the ISP here Primary DNS Address Enter the Primary DNS IP address used here Secondary DNS Address Enter the Secondary DNS IP address used here This field is normally optional Only one DNS addre...

Page 39: ... on the Manual Internet Connection Setup button On this page there a multiple parameters that can be configured regarding the Internet Connection setup We ll discuss them from top to bottom At any given point the user can save the configuration done on this page by clicking on the Save Settings button If you choose to discard the changes made click on the Don t Save Settings button ...

Page 40: ...optional Only one DNS address is required for a functional Internet connection but using a second DNS address provides more stability MTU Maximum Transmission Unit you may need to change the MTU for optimal performance with your specific ISP 1500 is the default MTU MAC Address The default MAC Address is set to the Internet port s physical interface MAC address on the Broadband Router It is not rec...

Page 41: ...er It is not recommended that you change the default MAC address unless required by your ISP You can use the Copy Your PC s MAC Address button to replace the Internet port s MAC address with the MAC address of your Ethernet card My Internet Connection IP Address Subnet Mask Default Gateway DNS Servers MTU MAC Address Manual Internet Setup Static assigned by ISP Select Static IP Address if all the ...

Page 42: ...P Address Enter the PPPoE IP address used here This option is only available if Static IP is selected Username Enter the PPPoE account user name used here This information is given by the ISP Password Enter the PPPoE account password used here This information is given by the ISP Verify Password Re enter the PPPoE account password used here Service Name This optional field enables the user to ente...

Page 43: ...Secondary DNS IP address used here This field is normally optional Only one DNS address is required for a functional Internet connection but using a second DNS address provides more stability MTU Maximum Transmission Unit you may need to change the MTU for optimal performance with your specific ISP 1492 is the default MTU MAC Address The default MAC Address is set to the Internet port s physical i...

Page 44: ... Gateway IP Address Enter the PPTP Gateway IP address used here PPTP Server IP Address Enter the PPTP Server IP address used here This is normally the same a the PPTP Gateway IP address Username Enter the PPTP username used here Password Enter the PPTP password used here Verify Password Re enter the PPTP password used here Reconnect Mode Use the radio buttons to specify the reconnect mode The user...

Page 45: ...ddress provides more stability MTU Maximum Transmission Unit you may need to change the MTU for optimal performance with your specific ISP 1400 is the default MTU MAC Address The default MAC Address is set to the Internet port s physical interface MAC address on the Broadband Router It is not recommended that you change the default MAC address unless required by your ISP You can use the Clone Your...

Page 46: ...c IP is selected L2TP Subnet Mask Enter the L2TP Subnet Mask used here L2TP Gateway IP Address Enter the L2TP Gateway IP address used here L2TP Server IP Address Enter the L2TP Server IP address used here This is normally the same a the L2TP Gateway IP address Username Enter the L2TP username used here Password Enter the L2TP password used here Verify Password Re enter the L2TP password used here ...

Page 47: ...ddress is required for a functional Internet connection but using a second DNS address provides more stability MTU Maximum Transmission Unit you may need to change the MTU for optimal performance with your specific ISP 1400 is the default MTU MAC Address The default MAC Address is set to the Internet port s physical interface MAC address on the Broadband Router It is not recommended that you chang...

Page 48: ... Select the Manual Configuration to enter the AFTR IPv6 address in manually AFTR IPv6 Address After selecting the Manual Configuration option above the user can enter the AFTR IPv6 address used here B4 IPv4 Address Enter the B4 IPv4 address value used here WAN IPv6 Address Once connected the WAN IPv6 address will be displayed here IPv6 WAN Default Gateway Once connected the IPv6 WAN Default Gatewa...

Page 49: ...e user must enter a custom Wireless Network Name or SSID Enter the new Network Name SSID in the appropriate space provided There are seperate spaces provided for a 2 4GHz Network Name and a 5GHz Network Name Secondly the user can choose between two wireless security wizard configurations The user can select Automatically assign a network key by which the router will automatically generate a WPA WP...

Page 50: ...ss Security Password for both 2 4GHz and 5GHz bands tick the option provided If not selected you need to input two seperate Wireless Security Passwords for each individual Wireless band Click on the Prev button to return to the previous page Click on the Next button to continue to the next page Click on the Cancel button to discard the changes made and return to the main wireless page Setup Comple...

Page 51: ...47 D Link DIR 845L User Manual After click the Save button the device will save the settings made and return to the main wireless page End of Wizard ...

Page 52: ...ent does not support WPS Click on the Prev button to return to the previous page Click on the Next button to continue to the next page Click on the Cancel button to discard the changes made and return to the main wireless page Step 2 After selecting Auto the following page will appear There are two ways to add a wireless device that supports WPS Firstly there is the Personal Identification Number ...

Page 53: ...button to discard the changes made and return to the main wireless page Click on the Wireless Status button to navigate to the Status Wireless page to view what wireless client are connected to this device End of Wizard Wireless Settings Manual Wireless Network Setup The manual wireless network setup option allows users to configure the wireless settings of this device manually This option is for ...

Page 54: ... for this wireless network Enable Auto Channel Scan The auto channel selection setting can be selected to allow this device to choose the channel with the least amount of interference Wireless Channel By default the channel is set to 1 The Channel can be changed to fit the channel setting for an existing wireless network or to customize the wireless network If you enable Auto Channel Selection thi...

Page 55: ...er verifies the identity of a network device that is attempting to join the wireless network There are two types authentication for this device when using WEP Open System allows all wireless devices to communicate with the router before they are required to provide the encryption key needed to gain access to the network Shared Key requires any wireless device attempting to communicate with the rou...

Page 56: ...PA2 is the newer implementation of the stronger IEEE 802 11i security standard With the WPA2 option the router tries WPA2 first but falls back to WPA if the client only supports WPA With the WPA2 Only option the router associates only with clients that also support WPA2 security Cipher Type Select the appropriate cipher type to use here Options to choose from are Temporal Key Integrity Protocol TK...

Page 57: ... to WPA if the client only supports WPA With the WPA2 Only option the router associates only with clients that also support WPA2 security Cipher Type Select the appropriate cipher type to use here Options to choose from are Temporal Key Integrity Protocol TKIP Advanced Encryption Standard AES and Both TKIP and AES Group Key Update Interval Enter the amount of time before the group key used for bro...

Page 58: ... wireless network Enable Auto Channel Scan The auto channel selection setting can be selected to allow this device to choose the channel with the least amount of interference Wireless Channel By default the channel is set to 36 The Channel can be changed to fit the channel setting for an existing wireless network or to customize the wireless network If you enable Auto Channel Selection this option...

Page 59: ...er verifies the identity of a network device that is attempting to join the wireless network There are two types authentication for this device when using WEP Open System allows all wireless devices to communicate with the router before they are required to provide the encryption key needed to gain access to the network Shared Key requires any wireless device attempting to communicate with the rou...

Page 60: ... stronger IEEE 802 11i security standard With the WPA2 option the router tries WPA2 first but falls back to WPA if the client only supports WPA With the WPA2 Only option the router associates only with clients that also support WPA2 security Cipher Type Select the appropriate cipher type to use here Options to choose from are Temporal Key Integrity Protocol TKIP Advanced Encryption Standard AES an...

Page 61: ...PA With the WPA2 Only option the router associates only with clients that also support WPA2 security Cipher Type Select the appropriate cipher type to use here Options to choose from are Temporal Key Integrity Protocol TKIP Advanced Encryption Standard AES and Both TKIP and AES Group Key Update Interval Enter the amount of time before the group key used for broadcast and multicast data is changed ...

Page 62: ...11i and uses Advanced Encryption Standard AES instead of TKIP User authentication which is generally missing in WEP through the extensible authentication protocol EAP WEP regulates access to a wireless network based on a computer s hardware specific MAC address which is relatively simple to be sniffed out and stolen EAP is built on a more secure public key encryption system to ensure that only aut...

Page 63: ...onceyouclickSaveSettings you will need to enter the new IP address in your browser to get back into the configuration utility Enter the Subnet Mask The default subnet mask is 255 255 255 0 Enter a name for the router Enter the Domain name Optional Uncheck the box to transfer the DNS server information from your ISP to your computers If checked your computers will use the router for a DNS server Ro...

Page 64: ...IP addresses are outside of this range or you may have an IP conflict The length of time for the IP address lease Enter the Lease time in minutes If all the computers on the LAN successfully obtain their IP addresses from the router s DHCP server as expected this option can remain disabled However if one of the computers on the LAN fails to obtain an IP address from the router s DHCP server it may...

Page 65: ...tion First Broadcast operation is performed to register hosts and discover other hosts if broadcast operation fails WINS servers are tried if any This mode favours broadcast operation which may be preferred ifWINS servers are reachable by a slow network link and the majority of network services such as servers and printers are local to the LAN P Node this indicates to use WINS servers ONLY This se...

Page 66: ...his IP Address must be within the DHCP IP Address Range Enter the MAC address of the computer or device If you want to assign an IP address to the computer you are currently on click this button to populate the fields ClickSavetosaveyourentry YoumustclickSaveSettings at the top to activate your reservations Displays any reservation entries Displays the host name name of your computer or device MAC...

Page 67: ...ith non configurable blocking of sites that are inappropriate or risky for children No OpenDNS account required OpenDNS Parental Control Select this option to enable a fast and reliable DNS with configurable content filtering and phishing protection This option includes an OpenDNS account Click on the Manage your router link to navigate to the OpenDNS account website where you can either login if ...

Page 68: ...allow remote access to this router In the User Creation section the user can create and modify usernames and passwords The following parameters will be available for configuration User Name In the User Name field we can enter the new username that will be created Alternatively if we want to modify an existing user account select a username from the drop down menu It will automatically be added to ...

Page 69: ...nt user name that will be modified Folder This filed will display the access path that this user will have access to after logging in Click the Browse button to navigate to a folder located on the USB storage device Permission Here the user can select the appropriate permission setting for this user account Permissions available for selection from the drop down menu are Read Only and Read Write Re...

Page 70: ...ce that is available on the USB storage device attached Free Space This field will display the free space that is available on the USB storage device attached In the HTTP Storage Link section the user can use this link to connect to the drive remotely after logging in with a user account Notice the path of the link s provided will point the external interface of this router If no DDNS account is s...

Page 71: ...allow iTunes software to automatically detect and play music from the router The shared media may not be secure Allowing any devices to stream is recommended only on secure networks Select to enable or disable the DLNA server Enter the DLNA server s name Select to enable or disable the iTunes server Specifies the folder or directory that will be shared by theiTunes DLNAserver Selectroottoshareallf...

Page 72: ...lly configure the connection For the beginner user that has not configured a router before click on the IPv6 Internet Connection Setup Wizard button and the router will guideyouthroughafewsimplestepstogetyournetworkupandrunning For the advanced user that has configured a router before click on the ManualIPv6InternetConnectionSetup button to input all the settings manually To configure the IPv6 loc...

Page 73: ...zard button and the router will guide you through a few simple steps to get your network up and running Click Next to continue to the next page Click Cancel to discard the changes made and return to the main page The router will try to detect whether its possible to obtain the IPv6 Internet connection type automatically If this succeeds then the user will be guided through the input of the appropr...

Page 74: ...ou will need to ensure that any PPPoE client software on your computers has been removed or disabled The 3 options available on this page are IPv6 over PPPoE Static IPv6 address and Route and Tunneling Connection Choose the required IPv6 Internet Connection type and click on the Next button to continue Click on the Prev button to return to the previous page Click on the Cancel button to discard al...

Page 75: ...elect the PPPoE Session value used here This option will state that this connection shares it s information with the already configured IPv6 PPPoE connection or the user can create a new PPPoE connection here User Name Enter the PPPoE username used here If you do not know your user name please contact your ISP Password Enter the PPPoE password used here If you do not know your password please cont...

Page 76: ...ary IPv6 DNS Address LAN IPv6 Address The Link local address is used by nodes and routers when communicating with neighboring nodes on the same link This mode enables IPv6 capable devices to communicate with each other on the LAN side Enter the WAN IPv6 address for the router here Enter the WAN subnet prefix length value used here Enter the WAN default gateway IPv6 address used here Enter the WAN ...

Page 77: ...prefix value here 6rd Border Relay IPv4 Address Enter the 6rd border relay IPv4 address used here IPv6 DNS Server Enter the primary DNS Server address used here The IPv6 Internet Connection Setup Wizard is complete Click on the Connect button to continue Click on the Prev button to return to the previous page Click on the Cancel button to discard all the changes made and return to the main page Tu...

Page 78: ...6 in IPv4 Tunnel 6to4 6rd and Link local If you are unsure of your connection method please contact your IPv6 Internet Service Provider Note If using the PPPoE option you will need to ensure that any PPPoE client software on your computers has been removed or disabled Auto Detection Select Auto Detection to have the router detect and automatically configure your IPv6 setting from your ISP ...

Page 79: ... the Autoconfiguration feature Select Stateful DHCPv6 SLAAC RDNSS or SLAAC Stateless DHCPv6 Enter the start IPv6 Address for the DHCPv6 range for your local computers Enter the end IPv6 Address for the DHCPv6 range for your local computers Enter the IPv6 Address Lifetime in minutes My IPv6 Connection WAN IPv6 Address Settings LAN IPv6 Address LAN Link Local Address Enable Autoconfiguration Autocon...

Page 80: ... s LAN Link Local Address Check to enable the Autoconfiguration feature Select Stateful DHCPv6 SLAAC RDNSS or SLAAC Stateless DHCPv6 Enter the start IPv6 Address for the DHCPv6 range for your local computers Enter the end IPv6 Address for the DHCPv6 range for your local computers Enter the IPv6 Address Lifetime in minutes My IPv6 Connection IPv6 DNS Settings Primary Secondary DNS Address LAN IPv6 ...

Page 81: ...during which the Internet connection is maintained during inactivity To disable this feature enable Auto reconnect MaximumTransmissionUnit youmayneedtochangetheMTUfor optimalperformancewithyourspecificISP 1492isthedefaultMTU Select either Obtain DNS server address automatically or Use the following DNS Address Enter the primary and secondary DNS server addresses Enter the LAN local IPv6 address fo...

Page 82: ...art IPv6 Address Range End IPv6 Address Lifetime Select Stateful DHCPv6 SLAAC RDNSS or SLAAC Stateless DHCPv6 Enter the start IPv6 Address for the DHCPv6 range for your local computers Enter the end IPv6 Address for the DHCPv6 range for your local computers Enter the IPv6 Address Lifetime in minutes ...

Page 83: ...e the Autoconfiguration feature Select Stateful DHCPv6 SLAAC RDNSS or SLAAC Stateless DHCPv6 Enter the start IPv6 Address for the DHCPv6 range for your local computers Enter the end IPv6 Address for the DHCPv6 range for your local computers Enter the Router Advertisement Lifetime in minutes My IPv6 Connection IPv6 in IPv4 Tunnel Settings LAN IPv6 Address LAN Link Local Address Enable Autoconfigura...

Page 84: ...Check to enable the Autoconfiguration feature Select Stateful DHCPv6 SLAAC RDNSS or SLAAC Stateless DHCPv6 Enter the start IPv6 Address for the DHCPv6 range for your local computers Enter the end IPv6 Address for the DHCPv6 range for your local computers Enter the IPv6 Address Lifetime in minutes My IPv6 Connection 6 to 4 Settings Primary Secondary DNS Address LAN IPv6 Address LAN Link Local Addre...

Page 85: ... IPv6 address for the router Displays the Router s LAN Link Local Address Check to enable the Autoconfiguration feature Select Stateful DHCPv6 SLAAC RDNSS or SLAAC Stateless DHCPv6 Enter the Router Advertisement Lifetime in minutes My IPv6 Connection 6RD Settings LAN IPv6 Address LAN Link Local Address Enable Autoconfiguration Autoconfiguration Type Router Advertisement Lifetime ...

Page 86: ... Link DIR 845L User Manual Section 3 Configuration Select Link Local Only from the drop down menu Displays the IPv6 address of the router My IPv6 Connection LAN IPv6 Address Settings Link Local Connectivity ...

Page 87: ...er mydlink Service Wizard Step 1 In this section we can select one of two options Select the Yes I have a mydlink account option if you already have a mydlink account that you want to use on this router Select the No I want to register and login with a new mydlink account option to register a new account and use it on this router Click the Next button to proceed to the next step Click the Cancel b...

Page 88: ...k this option to accept the mydlink terms and conditions Click the Next button to proceed to the next step Click the Prev button to return to the previous step Click the Cancel button to discard the changes made and return to the main page When logging in with an existing account the following page appears The following parameters will be available for configuration E mail Address Account Name Ent...

Page 89: ...er Manual At any point during this wizard we can change the prefered language used To change the language select the desired language option from the Language drop down menu found on the top right of this page End of Wizard ...

Page 90: ...lick Enter the port that you want to open next to Private Port and Public Port The private and public ports are usuallythesame Thepublicportistheportseenfrom theInternetside andtheprivateportistheportbeing used by the application on the computer within your local network Select TCP UDP or Both from the drop down menu The schedule of time when the Virtual Server Rule will be enabled The schedule ma...

Page 91: ... will be listed in the Computer Name drop down menu Select your computer and click Enter the TCP and or UDP port or ports that you want to open You can enter a single port or a range of ports Separate ports with a common Example 24 1009 3000 4000 The schedule of time when the Virtual Server Rule will be enabled The schedule may be set to Always which will allow the particular service to always be ...

Page 92: ...ervice to always be enabled You can create your own times in the Tools Schedules section Name Trigger Traffic Type Firewall Traffic Type Schedule Application Rules Some applications require multiple connections such as Internet gaming video conferencing Internet telephony and others These applications have difficulties working through NAT Network Address Translation Special Applications makes some...

Page 93: ...ion Enable QoS This option is disabled by default Enable this option for better performance and experience with online games and other interactive applications such as VoIP Uplink Speed The speed at which data can be transferred from the router to your ISP This is determined by your ISP ISP s often define speed as a download upload pair For example 1 5Mbits 284Kbits Using this example you would en...

Page 94: ...er s IP cannot be included in this range Remote IP Range Enter the remote IP range used here This is the IP range of the public network from the Internet Port side To apply this rule to any IP addresses from the public side enter the range 0 0 0 1 to 255 255 255 254 Application Port Enter the application port number used here Click on the Save Settings button to accept the changes made Click on th...

Page 95: ...ease refer to the Networking Basics section in this manual Select a DHCP client from the drop down menu and click to copy that MAC Address Configure MAC Filtering MAC Address DHCP Client Use MAC Media Access Control Filters to allow or deny LAN Local Area Network computers by their MAC addresses from accessing the network You can either manually add a MAC address or select the MAC address from the...

Page 96: ...dd Policy The Access Control section allows you to control access in and out of your network Use this feature as Parental Controls to only grant access to approved sites limit web access based on time or dates and or block access from applications like P2P utilities or games Click Next to continue with the wizard Access Control Wizard ...

Page 97: ...drop down menu and then click Next to continue EnterthefollowinginformationandthenclickNexttocontinue Address Type Select IP address MAC address or Other Machines IP Address Enter the IP address of the computer you want to apply the rule to MachineAddress EnterthePCMACaddress i e 00 00 00 00 00 Select the filtering method and then click Next to continue ...

Page 98: ... Dest IP Start Enter the starting IP address Dest IP End Enter the ending IP address Protocol Select the protocol Dest Port Start Enter the starting port number Dest Port End Enter the ending port number To enable web logging click Enable Click Save to save the access control rule Yournewlycreatedpolicywillnowshowupunder PolicyTable ...

Reviews: