background image

62

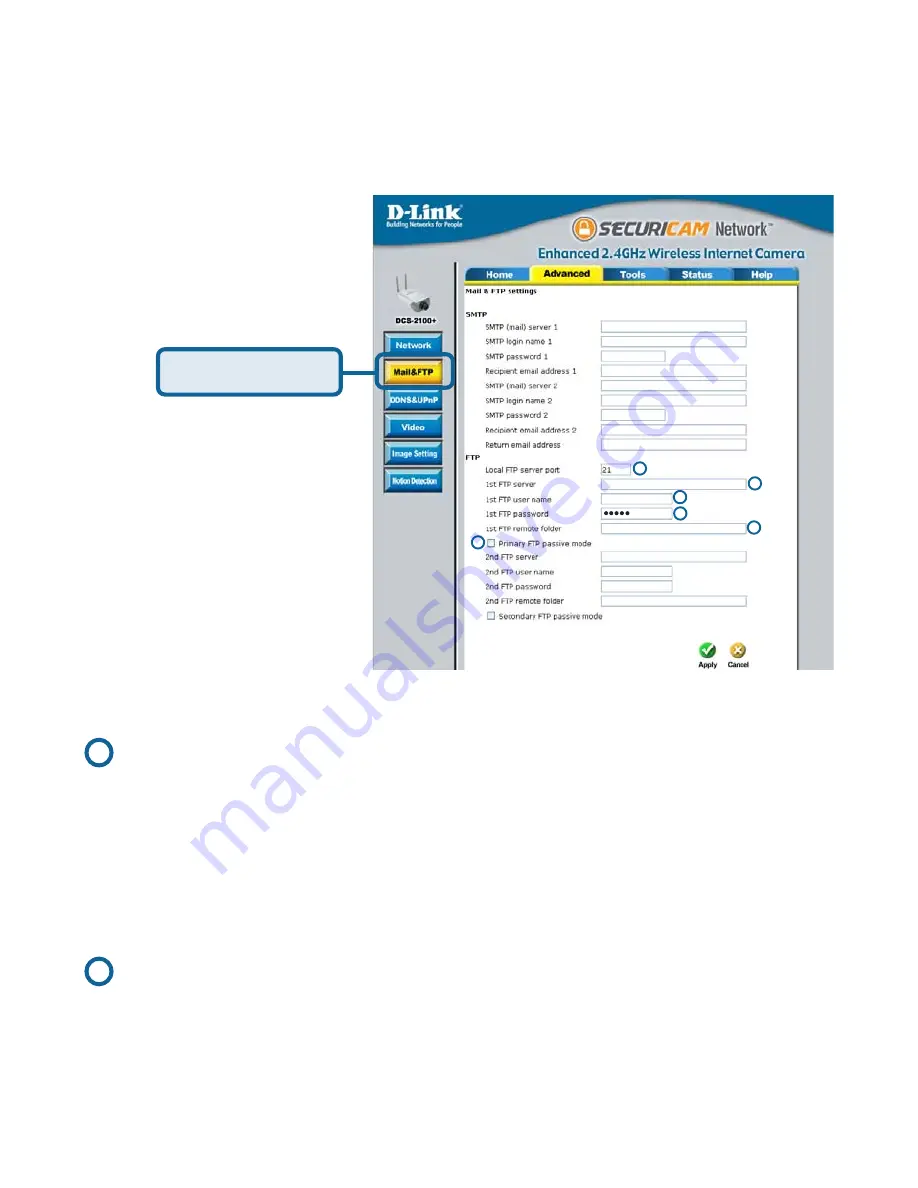
Next, click the 

Mail & FTP

 button under the 

Advanced

 tab to set the FTP

server settings for the 

DCS-2100+

.

In this window, enter the settings for the FTP server you wish to record to.
Optionally, you can enter settings for a secondary backup FTP server.

      Local FTP server port-

The Default port is 21. To connect to an FTP sever,
it is recommended that you do not change the
port number unless your camera is behind a
router. If your camera is behind a router, you can
assign any port number to this field, but you must
enable port forwarding on the router. Please refer
to your router manual for more information on port
forwarding.

      1st FTP server-

If you are going to upload snapshots to an FTP
server, you will need to fill in the Domain name or
IP address of your external FTP server such as
ftp://dlink.com or ftp://123.123.123.1. (The server
name and IP address will vary  depending on the
user.) The following user settings must be
correctly configured for remote access.

1

2

1

5

2

4

3

6

John Smith

123.123.123.1

Snapshot

Click 

Mail & FTP

Record Snapshots to your FTP server with
Motion Detection (continued)

Summary of Contents for SECURICAM Network DCS-2100+

Page 1: ...Enhanced 2 4 GHz Wireless Internet Camera Manual Building Networks for People Version 2 40 DCS 2100 10 04 04 ...

Page 2: ...n Internet Browser 34 Record Snapshots to your FTP server with Motion Detection 61 Using IP surveillance Software 65 Installing IP surveillance Software 65 Launcher 70 Monitor Program 73 Scheduling 98 Playback Program 106 Schedule Video Recording with Motion Detection 121 Appendix 124 Frequently Asked Questions 124 How to PING Your IP Address 127 Reset and Restore 128 I O Connector 129 Adjusting t...

Page 3: ...he DCS 2100 willcausedamageandvoidthewarrantyforthisproduct Minimum System Requirements Internet Explorer 6 x or higher Internet Web Browser CPU Pentium III 800MHz or above Pentium 4 2Ghz plus processor with 512Mb memory and a 32Mb video card is required for multiple camera viewing and recording in IP Surveillance Memory Size 128MB VGA card resolution 800 x 600 or above Package Contents If any of ...

Page 4: ...ersion 6 x or above Just plug in the camera and view the picture from your Internet Camera with a valid IP Address Broad Range of Applications With today s high speed Internet the Internet Camera provides the ideal solution for live video images over the Intranet and Internet for remote monitoring The DCS 2100 allows remote access from an Internet Explorer Web browser for live image viewing and al...

Page 5: ... Devices Supporting auxiliary Input Output connectors you can connect the Internet Camera to a variety of external devices such as IR sensors switches and alarm relays Combined with programmable alarming facilities you can develop a variety of security applications that are triggered on alarm based events The Internet Camera provides an industry standard in out external connector for connectivity ...

Page 6: ...twork Reset Button Reset will be initiated when the reset button is pressed once and held until the Power LED flashes through its cycle twice A Factory reset is initiated when the reset button is pressed continuously for 5 seconds or when the Power LED changes from green to red for 2 cycles For example you will see the LED turn to red twice release the reset button when the LED turns red the secon...

Page 7: ...or detailed information Connections continued Located on the bottom panel of the Internet Camera the socket is used to con nect the camera stand to the Internet Camera by attaching the screw head on the camera stand to the Internet Camera Bottom Panel Socket for stand Power LED LED stands for Light Emitting Diode The Power LED is positioned to the right of the Internet Camera lens As soon as the p...

Page 8: ...he Internet Camera s back panel labeled 12VDC and connect it to your wall outlet The Internet Camera comes with a camera stand with a swivel ball screw head that can be attached to the Internet Camera bottom socket cavity Attach the camera stand to the Internet Camera and station it for your application There are holes located in the base of the camera stand allowing the Internet Camera to be moun...

Page 9: ...rver will allow the camera to access the Internet without being attached to a computer and permits users to view the video and audio remotely However it is necessary to install the IP surveillance software from the enclosed CD to create a truly powerful monitoring and surveillance system The following section will detail the installation of the Installation Wizard and the IP surveillance software ...

Page 10: ...10 Installation Wizard continued Please wait while the InstallShield Wizard prepares to install Click Next Click Installation Wizard ...

Page 11: ...der name or select one from the existing folders list Click Next Please wait while the Installation Wizard is installed Installation Wizard continued The InstallShield will install in the following folder To install into a different folder click Browse and select another folder Click Next ...

Page 12: ...reen When it stops the blinking cycle continue to hold in the reset button until a second cycle of blinking red and green lights indicates a second reset cycle has completed This will take approximately 5 7 seconds The opening Installation Wizard screen will appear and show a MAC address of the DCS 2100 and an IP Address which may or may not be correct depending on what you have your DCS 2100 conn...

Page 13: ...IP address consistent to the device it is connected to After you click on the Link to Selected Devices button Installation Wizard will automatically open your Internet browser to the IP Ad dress of the DCS 2100 in this example it is http 192 168 0 146 Your DCS 2100 may have a different IP Address Click on the Link to Selected Devices button Select the MAC address For more information regarding the...

Page 14: ...ge 22 to install the IP surveillance software before you begin to use the DCS 2100 Enter the administrative password Click Save and then the X at the top right hand corner of your browser to close the page Installation Wizard continued At this point we highly recommend that you click on Configuration Tools Admin and enter in a password for security purposes ...

Page 15: ... number Remove Click to remove the selected camera s from the network Uncheck All Click to uncheck all selected cameras Links to Selected Devices Click to link all selected devices to the network Setup On the initial Setup Screen you can configure System and Date Time settings for each camera Click Next to configure Network settings for the camera System Settings Enter a Camera Name and create a R...

Page 16: ...x These settings can also be configured on the Advanced Network screen page 37 when configuring the camera via a Web Browser Click Next and then Apply to save the configured settings Users can click Previous to modify changes or mistakes The upgrade window allows users to upload a saved firmware file If the firmware is older than that currently on the camera a screen will appear indicating so and ...

Page 17: ... screen Click About to display the current version and date Click the Reset to Default tab to reset the camera s settings to factory defaults Locate the Firmware to Upgrade Indicate the location of the firmware to be uploaded to the camera Selected Package This displays the file name of the firmware selected for upload ...

Page 18: ...UPnP enabled the device will be easier to configure If you do not want to use the UPnP functionality it can be disabled by unchecking the Enabled DDNS checkbox in the DDNS UPnP settings page under Advanced in the configuration menu Use the following steps to enable UPnP Universal Plug and Play settings only if you are running Windows XP Me If you are running Windows 98 2000 UPnP is not available C...

Page 19: ...d Remove Windows Components The following screen will appear Select Networking Services Communications in Windows Me Click Details Select Universal Plug and Play Click Ok Enabling UPnP for Windows XP Me continued ...

Page 20: ...20 Please wait while Setup configures the components Click Next Click Finish Enabling UPnP for Windows XP Me continued ...

Page 21: ...t of your Internet Camera s IP address in this example 198 168 0 146 After you click on the DCS 2100 146 icon your Internet browser will automatically be opened to the IP Address of the DCS 2100 in this example it is http 192 168 0 146 Your DCS 2100 may have a different IP Address Note Screen shots are taken in Windows XP similar screens will appear in Windows Me Enabling UPnP for Windows XP Me co...

Page 22: ...n Scheduled recording for each camera Email FTP video snapshots AVI file export Motion detection for each camera The IP surveillance software on the CD included with the DCS 2100 Internet Camera converts the DCS 2100 into a powerful yet flexible surveillance system for home or business with these features Installing IP surveillance Software To install IP surveillance click on the Install IP survei...

Page 23: ...e Licensing Agreement and click Yes if you wish to accept the agreement Click No to exit the installation Enter your name and company information and click Next Click Next Installing IP surveillance Software continued Click Yes ...

Page 24: ...24 Installing IP surveillance Software continued Click Next Click Next Select the destination directory Select the program folder the software will be installed into ...

Page 25: ...25 The installation is complete Click Finish Installing IP surveillance Software continued Click Next ...

Page 26: ...udio over your computer speakers from the DCS 2100 If you are having problems please consult the FAQ sec tion of this manual page 124 Open your Internet browser and type in the IP address of the DCS 2100 In this example the address is http 192 168 0 146 your DCS 2100 may have a different IP address based on what you used in the Installation Wizard program ...

Page 27: ... Internet Camera the Administrator has the exclusive privilege to access the System Administration settings to allow users entry and authorize privileges for all users The Internet Camera supports multi level password protection access to the Internet Camera that can be restricted to defined users who have a User Name and User Password which is assigned by the Administrator The Administrator can r...

Page 28: ...pen Virtual Server Ports for Your Router Enable Remote Viewing This section is designed to walk you through the setup process for installing your camera behind a router and enable remote video viewing For the basic setup of the DCS 2100 follow the steps outlined in the Quick Installation Guide After you have completed the setup of the DCS 2100 outlined in the Quick Installation Guide you will have...

Page 29: ...your camera Write it down for later use 192 168 0 101 is only an example You will probably have a different IPAddress Run your Internet Explorer Web browser In the address bar type in the IP Address that was assigned to the Internet Camera by the Installation Wizard program The DCS 2100 Home Page appears with a window displaying live video from the camera You are able to view this screen from any ...

Page 30: ...d WAN IPAddress Dynamic means that your router s WAN IP address can change from time to time depending on your ISP Adynamic WAN IPAddress identifies your router on the public network and allows it to access the Internet http afreelist com bar pictures view 1469614 To find out what your router s WAN IP Address is go to the Status menu on your router and locate the WAN information for your router as...

Page 31: ...g Your WAN IP Address will be listed here Using Configuring the DCS 2100 with a NAT Router continued The firewall security features built into the DI 614 router prevent users from accessing the video from the DCS 2100 over the Internet The router connects to the Internet over a series of numbered ports The ports normally used by the DCS 2100 are blocked from access over the Internet Therefore thes...

Page 32: ...92 168 0 102 Follow these steps to configure your router s Virtual Server settings Repeat the above steps adding ports 5001 5002 and 5003 to both the Public and Private Port sections A check mark appearing before the entry name will indicate that the ports are enabled Click Enabled Enter a different name for each entry Enter your camera s local IP Address e g 192 168 0 102 in the example in step o...

Page 33: ...ddress of the router given to you by your ISP followed by a colon and the port number that you gave your camera e g http 205 163 122 96 83 It is not necessary to enter the colon and port number if you are using the default Web server port 80 To access from a computer on your local home network simply enter the local IP Address of the Camera followed by a colon and the port number e g 205 163 122 9...

Page 34: ...y Internet Explorer If you are following this manual in the order it is presented you should now have an operating DCS 2100 Internet Camera configured with the Installer program You also have installed the IP surveillance software from the CD This section of the manual will deal with using the Internet Camera in two parts Using the DCS 2100 with an Internet browser and accessing the screens to con...

Page 35: ...me page on your computer monitor Using the DCS 2100 with an Internet browser continued Click on the Connection Type button to change settings related to the connection There are two buttons on the left side of the Home page Connection Type and Configuration Click Connection Type ...

Page 36: ...connect with the new setting Options UDP Protocol Offers the highest image and video quality However packet losses will diminish image quality when bandwidth becomes restricted TCP Protocol Packet loss is less likely to occur compared to UDP when bandwidth is restricted HTTP Protocol If the network is protected by a firewall and it opens HTTP port 80 only HTTP protocol must be selected In this mod...

Page 37: ... configured The Advanced tab is the default screen in Configuration and Network is the default screen under Advanced Using the DCS 2100 with an Internet browser continued Click Configuration Any changes made to these settings will require the system to restart to validate Make sure every field is correctly typed before clicking on Apply ...

Page 38: ...The router used to forward frames to destinations in a different subnet Invalid router settings may cause the failure of transmissions to a different subnet Primary DNS Primary domain name server that translates names to IP addresses Secondary DNS Secondary domain name server to backup the primary one General Settings Using the DCS 2100 with an Internet browser continued Can be set to other than t...

Page 39: ...ng directly to a computer equipped with a wireless adapter in a peer to peer environment Using the DCS 2100 with an Internet browser continued Streaming Settings Control channel port Can be set to other than the default port 5001 to correspond with the port opened by the firewall Audio channel port Can be set to other than the default port 5002 to correspond with the port opened by the firewall Vi...

Page 40: ...roaming wireless Network adapters Long Preamble is the default setting Note High network traffic areas should use the shorter preamble type Data Encryption Enable Encryption by clicking on the box The DCS 2100 has Encryption disabled as the default setting Auth mode Choose one of the following authorization modes Open Authentication Communicates the key across the network Shared Authentication All...

Page 41: ...e user name used to log into your e mail account e g jdoe or jdoe yourisp com depending on your ISP SMTP password 1 The password used to log into your e mail account The password will appear as dots instead of entered characters Recipient email address 1 The e mail address of recipients for snapshots or a system log file Multiple recipients must be separated by a semicolon SMTP mail server 2 The d...

Page 42: ...owing user settings must be correctly configured for remote access It can be other than default port 21 If you find that you want to change the port to a port number other than 21 you will need to specify the port when connecting to the FTP server For example FTP 68 5 1 81 60 if you are to use port 60 for your FTP server port Local FTP server port 1st FTP password The e mail address of recipients ...

Page 43: ...r Mode Passive mode setting for the backup FTP server Secondary FTP passive Invalid settings may cause the DCS 2100 to not respond Change the configuration settings only if necessary Consult with your network administrator or your Internet Service Provider ISP if you do not have the necessary information If you cannot connect to the camera refer to page 128 for camera reset and restore factory set...

Page 44: ...address With most Cable and DSL connections you are assigned a dynamic IP address and that address is used only for the duration of that specific connection With the DCS 2100 you can set up your DDNS service and the DCS 2100 will automatically update your DDNS server every time it receives a different IP address Depending on the service this update may take a few hours Using the DCS 2100 with an I...

Page 45: ...il used to connect to the DDNS server UPnP UPnP is short for Universal Plug and Play which is a networking architecture that provides compatibility among networking equipment software and peripherals The DCS 2100 is a UPnP enabled internet camera If your operating system is UPnP enabled the device will be easier to configure If you do not want to use the UPnP functionality it can be disabled by un...

Page 46: ...ee options exist for the sizes of the video display You can select between 176x120 352x240 or 704x480 In 704x480 mode the frame rate will be reduced to 10fps and increased to 30fps automatically when it is switched back to a lower image size Power line frequency for fluorescent light Fluorescent lights may intermittently cause a flashing image depending on the AC power line frequency Change the fr...

Page 47: ...bit rate and select the desired bandwidth The video quality may be reduced in order to send maximum frames with limited bandwidth especially when images change drastically For higher video detail regardless of the bandwidth selection select Fix quality and select a video quality level This setting will utilize more bandwidth to send the maximum frames when images change drastically Mirror Horizont...

Page 48: ...nough to transmit 20 image frames per second fps or more If you are on a broadband network over 1 Mbps you can set Fix bit Rate to 1000Kbps or 1200Kbps or set Fix quality to achieve the maximum frames The maximum frame rate is 25 in 50Hz system and 30 in 60Hz system If your network bandwidth is more than 384Kbps you can adjust Fix bit rate according to your bandwidth and set the maximum frame rate...

Page 49: ...ise fix the bit rate according to your actual network speed and set the frame rate to 30 If the image quality is low select a lower frame rate above 15 If the image quality is still not improved select a lower bit rate Click the Image Setting button from the Configuration screen to access additional settings that affect how the video image appears Using the DCS 2100 with an Internet browser contin...

Page 50: ...ne the video image Image Brightness Contrast Saturation and Hue are all adjusted in the same manner For each video compensation you can set from among eleven levels ranged from 5 to 5 The default setting is zero for each adjustment You may press to fine tune the image and see what affect the setting will have on the image When the image is acceptable press to store the image settings or to recall ...

Page 51: ...lick to add a new window A maximum of three motion windows can be opened simultaneously Use your mouse to drag the window frame to resize or the title bar to move Clicking on the x at the upper right corner of the window will close the window Save Saves the related settings of that window Using the DCS 2100 with an Internet browser continued Enable motion detection Check this option to turn on the...

Page 52: ...word in the New Password field to enable protection and then confirm the password in Confirm Password field This password is used to identify the administrator You can add accounts with User name and User Password for other users in the Add user section Using the DCS 2100 with an Internet browser continued You can provide up to twenty accounts for other users visitors Each account identifies the a...

Page 53: ...e System settings from the Tools menu Camera name Using the DCS 2100 with an Internet browser continued Check this option to shut off the LED next to the lens This will prevent anyone from observing the operation of the Internet Camera The text will display as the title of the window within the Windows operating system This name will also display on the log in screen once a password has been set T...

Page 54: ...ime server Leaving the text box blank will let the DCS 2100 connect to default time servers Time zone Used to adjust the hour of time servers for local settings Keep current date and time Using the DCS 2100 with an Internet browser continued Click to save the current date and time of DCS 2100 An internal real time clock maintains the date and time even when the power is off Sync with computer time...

Page 55: ...55 Configuration Tools Applications Using the DCS 2100 with an Internet browser continued Click on the Applications button to access the Applications settings from the Tools menu ...

Page 56: ...ggered Take snapshots at second s after event After a snapshot is taken because of a trigger another snapshot will be taken after the configured time in seconds Trigger condition There are 4 conditions related to the digital input and three windows for motion detection There can be multiple selections Select the appropriate digital input condition according to the characteristics of the external d...

Page 57: ...r event The date and time suffix may be added according to the option Confirm the external mail or FTP server settings in network configuration Sequential operation Using the DCS 2100 with an Internet browser continued Snapshot every The camera will send snapshots at the specified interval to the external server according to the chosen method Remember this operation is dependent to the weekly sche...

Page 58: ...te the IP address of the DCS 2100 Using the DCS 2100 with an Internet browser continued Click Apply to make changes effective Configuration Tools Default FTP put snapshots with date and time suffix If the suffix is added the captured date and time can be easily differentiated from the snapshot file name in either sequential or event operation For instance video 20020102030405 jpg means the JPEG im...

Page 59: ... address Subnet Mask Default router address Primary DNS address Secondary DNS address Using the DCS 2100 with an Internet browser continued Configuration Status Device Info Click on the Status tab to access Device Info and a Log of DCS 2100 system activity The Device Info is the default screen when you click on the Status tab Click Device Info ...

Page 60: ...ach menu item under that tab Configuration Help Using the DCS 2100 with an Internet browser continued Configuration Status Log Click on the Log button to access a system log of system activity from the Status menu The content of the log file reveals useful information about the current configuration and connection logged after the DCS 2100 boots up Click Log ...

Page 61: ...tion detecting and record snapshots to an FTP server If no external sensor is available administrators can utilize the built in motion detection to monitor any abnormal movement and then record the snapshots to an FTP server In this window follow the steps below to ensure that motion detection is correctly enabled Click Motion Detection Check Enable motion detection Click on New to have a new wind...

Page 62: ... router you can assign any port number to this field but you must enable port forwarding on the router Please refer to your router manual for more information on port forwarding 1st FTP server If you are going to upload snapshots to an FTP server you will need to fill in the Domain name or IP address of your external FTP server such as ftp dlink com or ftp 123 123 123 1 The server name and IP addr...

Page 63: ...ify the user name to access your backup FTP server 2nd FTP password Specify the user password to your backup FTP server 2nd FTP remote folder Specify the destination folder on your external backup FTP server For detailed information about each setting please refer to Configuration Advanced Mail FTP in the section titled Using the DCS 2100 With an Internet Browser page 41 Click the apply button whe...

Page 64: ...ent operation Set the delay before detecting next event to avoid continuous false alarms following the original event Set the delay to take snapshots after event to capture the direction of the moving object 5 5 5 5 5 Check the window name in this case Back Door 6 6 6 6 6 Check Upload snapshots while motion detected 7 7 7 7 7 Click Send snapshots by FTP and check FTP put snapshots with date and ti...

Page 65: ...r Internet Explorer 6 x or above CPU Intel Pentium III 800GHz or above SDRAM 128 MB SDRAM Hard Disk 40GB Video Card nVidia TNT TNT2 GeForce series with 32 MB Display memory ATI Radeon series with 32 MB Display memory Software Installation Put the installation disk into your CD ROM and it will run automatically If it does not open My Computer and double click on the CD ROM icon Next the installatio...

Page 66: ...ed The License Agreement window below will appear Please read the following license agreement carefully Click Yes to accept this agreement and proceed with the installation Click Next Click Yes Installing the IP surveillance software continued ...

Page 67: ... enter the user name and company name Enter your user name and company name and then click Next to continue Click Next You must setup the administrator s password in order to proceed Input and confirm your password in the window shown in below Click Next to continue Click Next Installing the IP surveillance software continued ...

Page 68: ...tware and click Next which is shown in the figure below You can change the installation directory by clicking Browse Click Next Select a program folder to install the application software and then click Next which is shown in the figure below Click Next Installing the IP surveillance software continued ...

Page 69: ...information in the window shown below click Next to start the installation of the application Click Next Click Finish Click Finish in the window shown below to finish installation The program is now installed on your computer Installing the IP surveillance software continued ...

Page 70: ...check But when users want to click on the icon of Launcher on system tray Launcher will pop up a username password dialog the first time for menu popup or when Launcher is locked If a user fails to pass the authentication check no menu will show up If a user fails 3 consecutive tries he she will be locked out for a period of 60 seconds After passing authentication users will be able to use all fun...

Page 71: ...rface Below is the user interface for Launcher The main user interface for Launcher is an icon on system tray and the popup menu appears when the user clicks on the icon The menu items are listed below Lock Launcher When this item is selected Launcher will enter lock mode In lock mode whenever users want to invoke the menu a dialog asking for ID and password will appear The interface for this dial...

Page 72: ...at Startup Users can select whether or not to autorun Launcher when Window boots up Monitor Starts up the Monitor program If the Monitor program is already running clicking this button will re open the Monitor window Playback Starts up the Playback program If the Playback program is already running clicking this button will re open the Playback window Logout Logs out user from IP surveillance Afte...

Page 73: ...o the following features which make the system more powerful and convenient Simultaneous real time monitoring and recording audio and video High quality video up to full screen display High compression ratio Maximum of 16 cameras with different monitor layouts Auto alarm in multiple modes Account password protection Multiple recording modes Event driven Scheduled and manual recording for each came...

Page 74: ...monitoring lock stop alert and configuration menu for camera configurations global settings scheduler settings and the user information of this application software Tips for these operations are provided when you move the mouse cursor over each icon Channel area This area displays the status of each video channel The information indicates the status of connection recording selection and alert even...

Page 75: ... remove video from display windows DI DO control This tool receives the digital input signal and sends digital output signal to the remote Video Server Network Camera series product associated with the dedicated video channel Alert Message This tool will display the latest alert messages received by the remote Video Server Network Camera series product associated with the selected video channel Lo...

Page 76: ...ollowing tasks Run the configuration tool Change the recording schedule Change the local settings Again if you need to change the settings of the DCS 2100 you must have the administrator s password for the camera itself Camera Configurations When you log in for the first time you should configure this application software to connect the DCS 2100 in Configuration Menu Camera Configurations shown in...

Page 77: ...he remote settings for each camera you can refer to Using the DCS 2100 With an Internet Browser page 34 Local Settings Camera Selections Remote Camera Webpage Settings The Layout of the Configuration In the local settings shown below three main functionalities are provided Insert new camera to the list Delete camera from the list History of all cameras in the list Monitor Program continued Setup P...

Page 78: ...ck the Ok button to close the dialog Then the system will try to connect to the selected camera If the connection succeeds the camera will be inserted to the camera selection list Click Ok Specify the IP address port and admin pass word of the camera Once added you will see the IP address of the camera and also the port that is opened on the camera port 80 in this example The selected camera has b...

Page 79: ...eted History Clicking the History button will popup a historical camera list which lists the latest 16 cameras you inserted into the camera list 16 is the default number you can change the number of the latest installed cameras you want to keep in the registry Clicking on one camera in the history list will insert the camera into the camera list The historical camera list is shown below Historical...

Page 80: ...ital input alert This application software provides options for you to define the triggering criteria for the digital input of the DCS 2100 The alert of the digital input can be defined as high level triggered or low level triggered Recording Settings Record secs before event Once the automatic video recording has been activated you can change this setting to regulate the recording of triggered ev...

Page 81: ... the proceeding cameras will then move 1 position up or 1 position down depending on which direction the selected camera was moved Step 1 Step 2 Press the left mouse button at the gray index field Move the mouse to your new selected location and release the mouse button Then Video 1 will be moved to the 12th row in this example Once you click the Save button in the left bottom corner of this windo...

Page 82: ...eras These include the video database directory the usage of the Hard disk and options for video display You can activate the global settings window from Configuration Menu Global Settings shown above All recording processes will be stopped when activating the global settings window indicated by a warning window popped up in advance to keep you informed Monitor Program continued ...

Page 83: ...nchecked a warning message will pop up when it is approaching the storage space limit All recording will stop when the limit of the hard disk usage is reached Reserved space Indicate the size of the hard disk that will be reserved for other Windows applications at least 15 The remainder of the hard disk space will be available for recording The more space you have reserved the less there will be a...

Page 84: ... The upper bar contains Camera location and time of the remote site The lower bar contains Connection time and Recording time All of them shown in the figure below can be enabled or disabled here individually for the status indication Apply to full screen mode can also be turned on here Once it has been checked the status bar in each channel showing date location connection and recording time will...

Page 85: ...t size limit is 10MB The maximum value for this setting depends on the amount of Free Space available on your hard drive This value can be found under the Record Disk space Usage Settings section of the global settings window Backup Location Select Select the locations to backup by clicking the checkbox next to the location camera name To delete a location select the location and click the Delete ...

Page 86: ...gnal associated with each channel number It indicates the status of the dedicated video channel which is depicted as follows Off The video channel is not connected with any DCS 2100 yet Green The green light means the DCS 2100 associated with this channel number is connected and the video is monitored in the video area Red The red light indicates the video from this channel is recording into the v...

Page 87: ...rocedures for drag and drop step by step Show the video of a specified channel This section depicts the method of how to show the video of a specific channel in a display window Step 1 Move the mouse cursor to the display window shown below Video 1 5 9 13 Recording Selected Channel Connected and monitoring Not configured channel Configured but not connected no video Trashcan Mouse cursor Location ...

Page 88: ... left mouse button while on top of a display window In each display layout only one window can be assigned to a camera Also each camera must have its own separate window when displayed Once the video is in a display window it can be dragged and dropped to other windows If you drag one camera s video to a window that already has its own camera s video the two cameras will trade display windows Drag...

Page 89: ... it has been moved onto the displaying frame After that press the left mouse button and hold it Step 3 Move the cursor while still holding the left mouse button to the trashcan in the common area of the monitor program Step 4 When the cursor shape changes to an arrow shape over the trashcan release the left mouse button The video in the corresponding display window will disappear All operations ab...

Page 90: ...t icon In each layout you can drag and drop the channel number to any display window in the video area Following the procedures described in the section titled Show the video of a specified channel you can add the video channels to display windows within the selected layout in the video area one by one You can also exchange the video between different display windows by dragging and dropping 4 cam...

Page 91: ...hannel layout When you choose the one channel layout or four channel layout the Page up and Page down buttons will be shown in the left bottom corner of the video area You can use these two buttons to switch the pages as shown in the figure below Usetoswitchbetween cameras PT Monitor Program continued ...

Page 92: ...e same as the one channel layout Clicking the Back button in the upper left corner of the video area will switch to the previous selected multi camera layout The position that each video channel is in for every layout will be saved for the next time the layout is selected Back Back to previous layout Input OutputControlTools PT PT Digital Input Digital Output Alert Message Monitor Program continue...

Page 93: ...e color of the channel number indicates the status of the camera s DI Digital Input You can click the Switch button to change the HI LOW state of the DO Digital Output With these features you can monitor the remote sensor input from DI and also trigger the camera by DO switch When the color of a DI DO channel number is gray that means the video channel has not yet been connected to a camera Monito...

Page 94: ...e alert message will be shown in this window If there are more events than this window can display a scroll bar will appear The message format is described as follows time alert type channel number win1 win2 win3 For example the message PM 02 41 00 MO 1 0 1 1 means that this is a motion detection alert occurring at 02 41 00 PM in Motion Window 2 and Motion Window 3 for camera 1 If the message PM 0...

Page 95: ...e information includes the software name version user name and company Miscellaneous Functions Full Screen Quit Minimize StopAlert Sound Configuration Menu This section will describe some other miscellaneous functions of the icons shown above These functions are Quit By clicking this button IP surveillance will be closed with the latest settings saved Minimize Minimize the Monitor program Monitor ...

Page 96: ...o stop the alert sound It will also switch the I O Control to theAlert Message receiver so that the alert messages can be reviewed Configuration Menu The menu includes Camera Configuration Global Settings Scheduler and About options Common Control Functions This section will describe the common control functions shown above which are depicted by the small icons These functions only apply to the cu...

Page 97: ...hen save the picture as a bitmap file to the hard disk You can set the directory for storing these bitmap files at the Configuration menu Global Settings screen Please refer to the section titled Global Settings for more details Printer Click on the printer icon to print the current image to your default printer Trashcan You can drag and drop the video channel to the Trashcan to close the video co...

Page 98: ...easily regulate a schedule for each video channel The main features of the scheduling tool are Friendly graphic user interface for schedule editing Flexible schedule scheme suitable for all applications Individual schedule for each video channel Supports up to 9 preset schedule schemes for each video channel Automatic period recording Using the Scheduler This section discusses the method of how to...

Page 99: ...ast one camera has been added to the camera list Go to the configuration menu and click on Scheduler to launch the Scheduler The Layout and Functionalities Introduction The layout of the scheduler and its components shown below will be described Part 1 Part 2 Part 3 Part 4 Scheduling continued ...

Page 100: ...gs It consists of the day time line week time line begin time selector end time selector and event mode settings Part 3 The third part is the Secondary schedule which consists of event mode settings Part 4 The fourth part contains the operation buttons for the user to manipulate the edited schedule of the selected video channel The scheduler can be closed from here The Functionalities of Configura...

Page 101: ...nes are associated with each other That is if you make changes in one time line the corresponding changes will be applied with scale to the other three time lines in the same schedule Before you begin make sure that you select Once page 99 if you want to choose the days to record on Week Time Line In the figure below Week time line is displayed It includes the time line schedule information and th...

Page 102: ...g unmarking on the week time line for more details Schedule with Time Picker Begin and End Time Date picker Hour picker Minute picker There are three controlling units in both Begin Time and End Time selectors shown above The first unit of these two selectors is the date picker You can select day with it to set the beginning time and the ending time for the recording interval The second and third ...

Page 103: ...the editing schedule scheme Note that only after you click on the Apply button the scheduling information settings will be written back into the whole editing schedule scheme That means this edited scheduling time interval is valid only after you Apply the changes Period picker Apply Erase Schedule in event mode You can select to record in Event mode or Continuous mode by the Schedule mode selecto...

Page 104: ...hedule The secondary schedule provides options to record without a specified date or time Schedule in Continuous mode high Checking this will trigger recording while the digital input is high The technical name for this event is line trigger low Checking this will trigger recording while the digital input is low The technical name for this event is line trigger rising Checking this will trigger re...

Page 105: ...ly working on before loading a new one Otherwise the current changes will be lost Clear This button will clear all changes in the current schedule of the selected video channel Save This button is used for saving changes to the current schedule Save As This button is used to save the current schedule as another file name instead of the default name There are three modes in the secondary schedule D...

Page 106: ... features in the Playback program These functions are depicted as follows Powerful play control tool Play Stop Pause Step forward Fast play from x1 to x16 Slow play from 1 to 16 Convenient display adjustment tool Zoom in from 1 1 to 2 25 1 Zoom out from 1 1 to 1 2 Full screen Flexible searching range adjustment tool User input from full range to 1 second Zoom in from full range to 10 seconds Zoom ...

Page 107: ...cation software The figure below shows the login dialog For security concerns only the admin account can log in to this program To change the password of the admin account please refer to the section titled Logging In Layout DisplayArea Control Area Pull Bar Area Area Selection Indicator Status Area Histogram Area Playback Program continued ...

Page 108: ...ls i e area selection indicator frame selection indicator and pull bar These features provide much more convenience while searching recorded video in the IP surveillance database MainAreas DisplayArea The display area is able to show the surveillance database of each camera by time You can change the video size through the display adjustment tool and the playback method through the play control to...

Page 109: ...l exporting tool and system control tool StatusArea The status area is located at the bottom of the main window It tells you the program status information including display mode display size display speed exporting file format and exporting file name Indicators AreaSelectionIndicator In the main playback window the display area is surrounded by a blue rectangle This rectangle is the area selectio...

Page 110: ... video will halt and then restart playing the video sequence from the point you selected If the video sequence has been paused the display area will show the point you selected without playing Note that the pull bar will only function under the normal display mode Settings After the main window is shown on the screen you must modify the settings to make it to work properly Click on the Settings bu...

Page 111: ...mera name under the directory you set here Snapshot file location This sets the directory where bitmap files will be stored when you use the snapshot to export them Exporting bitmap files will be stored in the sub directory camera name under the directory you set here Modulation Mode The modulation mode cannot be changed This depends on how you recorded the video sequence in the monitor program If...

Page 112: ...2 Changing the location selector to another location in control area 3 Changing the playback method selector to Full Range 4 Changing the playback method selector to Time Period Period Start Time Label Period End Time Label HistogramArea Under the normal display single frame mode you can use all the tools provided with the playback program except the page control In this mode the two labels under ...

Page 113: ...see that period you can cancel it by just pressing the right button of your mouse with the left button still pressed If you click on the left button without dragging it the action will be the same as clicking on the pull bar in the same x axis position That means the playback system will shift to the pointed time and show video on the displaying frame Besides the dark regions in the histogram area...

Page 114: ...and the end time of a new period The end time must be later than the start time After you provide the correct start and end time clicking on the Play button in the jog dial will play the new period in the display area with changing the period start and end time label Besides the pull bar and histogram area will change too If the selected period is not present in the database the data in the period...

Page 115: ...e mode you want to use first Otherwise the period selector will revert back to the previous period set the last time you changed the playback method selector AlertAreaSelector In the preview mode the playback program can show the information of total events of only one alert window each time If you want to see the events of the other two alert area windows you must change the alert area selector t...

Page 116: ...e Stop button Note that once you press the Stop button the start point will be reset to the start of the present period Pause Resume The Pause button provides you a way to pause the video sequence display When the displaying video is paused click on the Pause button again to resume the video display Fast Play and Slow Play The camera supports a maximum of x16 fast forward play and minimum of 16 sl...

Page 117: ... Zoom Out and Full Screen ZoomIn When you click on the Zoom In button one time the image size in the display area will be magnified 12 5 percent to the original size Due to the limitation of the display area size the maximum zoom in ratio supported is only 2 25 1 for NTSC modulation mode and 1 875 1 for PAL modulation mode If you want to see the image in more detail you can use the full screen fun...

Page 118: ...ram area the display adjustment toolbox will change to a range adjustment toolbox The range adjustment toolbox provides a faster way to change the range of the displayed time period By using this toolbox you can browse the database of one location from any 10 second interval of the entire range The figure below shows the searching range adjustment toolbox composed of its own three elements i e Zoo...

Page 119: ...iod from the newly defined start time When you click on the Full Range button you will get the same functionality as when you change the playback method selector to Full Range System Control Toolbox The system control toolbox provides some basic operations for the playback program The figure below shows the three elements of the system control toolbox i e Lock Window Settings Minimize and Exit Ful...

Page 120: ... will pop up when you click the Settings button For more information about setting this program please refer to the section titled Settings Minimize Click this button in order to minimize the playback program window Exit The playback program will be closed immediately when you click on the Exit button ...

Page 121: ... recording To schedule video recording with motion detection you must first enable motion detection on the Internet Camera Click the Motion Detection button under the Advanced tab from the Configuration screen to access settings that affect how the DCS 2100 Internet Camera can serve as a security device by recording only when motion is detected Note These settings can be configured in your Web bro...

Page 122: ...nutes hours days weeks or months The Secondary Schedule allows you to set a schedule outside the Primary Schedule The Secondary Schedule provides two options to record without a specified date or time You can select Event Mode which will record whenever an event is triggered or Continuous Mode which will begin continuously after scheduling settings are saved You do not need to set the Secondary Sc...

Page 123: ...n when finished You have now set a schedule to record video when motion detection is triggered If you would like to save this configuration click Save As to save this configuration to a folder in your hard drive This configuration can be used on another system running IP surveillance or can be used as a backup if you need to re install the IP surveillance software program Schedule Video Recording ...

Page 124: ... Camera at the same time is 10 Please keep in mind the overall performance of the transmission speed will slow down when many users are logged on Q What algorithm is used to compress the digital image A The Internet Camera utilizes H 263 MPEG 4 Short Header Mode image compression technology to provide high quality images Q Can I capture still images from the Internet Camera A Yes you are able to c...

Page 125: ...n the router or firewall To correct the problem you need to determine if the DCS 2100 is behind a router or firewall and if the router or firewall is properly configured for the ports the DCS 2100 is using Refer to page 28 for help in opening the correct ports on a router or firewall for use with the DCS 2100 A2 Other possible problems might be due to the network cable Try replacing your network c...

Page 126: ...his issue you need more lighting Frequently Asked Questions continued Q I connected the Internet Camera directly to a computer with a cross over cable Ethernet cable and received the following Windows error upon running the Installation Wizard A1 This Windows error will occur if the Internet Camera is connected to a computer that is not properly configured with a valid IP address Turn off DHCP fro...

Page 127: ...nternet Groper command can determine whether a specific IP address is accessible by sending a packet to the specific address and waiting for a reply It can also provide a very useful tool to confirm if the IP address conflicts with Internet Camera over the network Follow the step by step procedure below to utilize the PING command but first you must disconnect Internet Camera from the network Star...

Page 128: ... begin blinking red and green fast 3 When the LED stops the blinking fast and starts blinking once every second the reset is completed RESTORE 1 Insert the paper clip or another similar tool and press and continuously hold down the button recessed inside the reset hole 2 Wait for the LED on the front of the camera to blink red and green and hold the button through two cycles of blinking about 5 7 ...

Page 129: ...ol Pin 1 and pin 2 can be connected to an external sensor and the state of voltage will be monitored from the initial state LOW The relay switch of pin 3 and pin 4 can be used to turn the external device on or off The I O connector provides the physical interface for digital output DO and digital input DI that is used for connecting a diversity of external alarm devices to the Internet Camera such...

Page 130: ... installation Note that the positive from the PIR is connected to the D of the I O port of the camera and the negative from the PIR is connected to the D of the camera I O port Configuring Your Camera for External Trigger Based Recording To configure your camera to record when triggered by an external device you must first set your SMTP or FTP settings in order to send snapshots to your email acco...

Page 131: ...P server to which recorded snapshots will be sent For detailed information about each setting please refer to Configuration Advanced Mail FTP in the section titled Using the DCS 2100 With an Internet Browser page 41 Click the apply button when finished Configuring Your Camera for External Trigger Based Recording continued I O Connector continued Click Mail FTP ...

Page 132: ... time except for the above schedule if you want to enable full time snapshot recording Check Event operation Set the delay before detecting next event to avoid continuous false alarms following the original event Set the delay to take snapshots after event to capture the direction of the moving object 5 5 5 5 5 Check the trigger condition for input and motion detection in this case Input is Low 6 ...

Page 133: ...ble conditions to maximize the image quality of the Internet Camera To adjust the focus of the lens you will need to turn the lens slowly either clockwise or counterclockwise until the desired image appears DO NOT overturn the lens in either direction as it will be out of focus or may damage the camera Unless you want to substitute the lens DO NOT unscrew more than 1 0mm apart from the Fixed Lens ...

Page 134: ... adapter 3 Screw the new lens onto the Internet Camera 4 Refer to Adjusting the Internet Camera Focus on the previous page 5 Refresh the Web browser and monitor the results from the Internet Camera Warning Direct exposure to sunlight may cause permanent damage to the CMOS sensor Therefore do not ex pose the Internet Camera s lens directly to sunlight When operation is required in glaring light env...

Page 135: ...egotiation WLAN 2 4Hhz 802 11b DSSS CSMA CA Protocol Bit rate 22 11 5 5 2 1 Mbps Security Up to 256 bit WEP Antenna 2 4Ghz swivel type monopole Frequency 2 4Ghz 2 5Ghz Impedance 50 Ohms nominal Gain 2dBi typical Video Algorithm supported H 263 MPEG 4 Short header mode Audio 24Kbps 8K sampling rate Video resolution Up to 30 fps at 160x120 Up to 30 fps at 320x240 General I O 1 opto isolated sensor i...

Page 136: ...s 11 6 oz Dimension 160mm L x 83 5mm W x 54mm H 6 3 in x 3 3 in x 2 1 in Viewing system requirement Protocol Standard TCP IP Internet Suite ActiveX Operating system Microsoft Windows XP 2000 ME or 98SE Browser Internet Explorer 5 x or above Environmental Operating 40 to 113 F Storage 4 to 158 F Humidity Max 95 RH Safety FCC class B CE Technical Specifications continued Security Administrator and u...

Page 137: ...U S and Canadian customers can contact D Link Technical Support through our website or by phone Tech Support for customers within the United States D Link Technical Support over the Telephone 877 453 5465 24 hours a day seven days a week D Link Technical Support over the Internet http support dlink com email support dlink com Tech Support for customers within Canada D Link Technical Support over t...

Page 138: ...138 Time Zone Table GMT stands for Greenwich Mean Time which is the global time that all time zones are measured from ...

Page 139: ...139 Time Zone Table continued ...

Page 140: ... period of ninety 90 days Warranty Period provided that the Software is properly installed on approved hardware and operated as contemplated in its documentation D Link further warrants that during the Warranty Period the magnetic media on which D Link delivers the Software will be free of physical defects D Link s sole obligation shall be to replace the non conforming Software or defective media ...

Page 141: ...ased from inventory clearance or liquidation sales or other sales in which D Link the sellers or the liquidators expressly disclaim their warranty obligation pertaining to the product Repair by anyone other than D Link or an Authorized D Link Service Office will void this Warranty Disclaimer of Other Warranties EXCEPT FOR THE LIMITED WARRANTY SPECIFIED HEREIN THE PRODUCT IS PROVIDED AS IS WITHOUTA...

Page 142: ... Class B digital device pursuant to part 15 of the FCC Rules These limits are designed to provide reasonable protection against harmful interference in a residential installation This equipment generates uses and can radiate radio frequency energy and if not installed and used in accordance with the instructions may cause harmful interference to radio communication However there is no guarantee th...

Page 143: ...143 Register online your D Link product at http support dlink com register 10 04 04 Registration ...

Reviews: