2
Quick Installation Guide
ENGLISH
Hardware Installation
Before You Begin
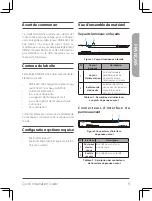
Observe the following precautions to help
prevent shutdowns, equipment failures, and
personal injury:
•
Install the DNR-4020-16P in a cool and
dry place.
•
Install the DNR-4020-16P in a site free
from strong electromagnetic sources,
vibration, dust, excessive moisture, and
direct sunlight.
•
Visually inspect the power connector and
make sure that it is fully secure.
•
Do not stack any devices on top of the
DNR-4020-16P.
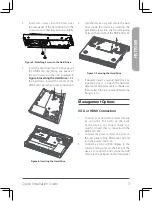
Hard Drive Installation
Note
: The hard drive of the device is not
included and must be provided by the user.
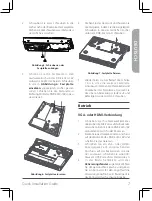
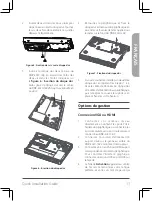
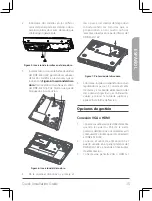
1.
Remove the fixing screws from the top
cover of the DNR-4020-16P, then remove
the top cover from the device.
Figure 4: Unscrewing the Cover
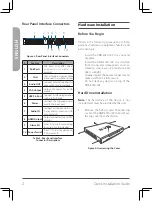
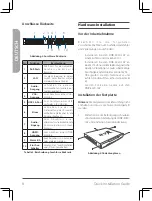
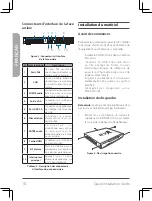
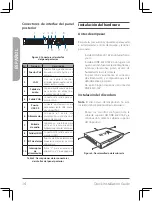
Rear Panel Interface Connectors
Figure 3: Rear Panel Interface Connectors
#
Feature
Description
1
PoE Ports
PoE ports that offer direct
connection to up to 16
cameras.
2
LAN
Uses a standard Ethernet cable
to connect to a switch or router.
3
Audio OUT
Connect external speakers for
live audio or audio playback.
4
VGA Output
Output connector for a VGA
monitor.
5
USB 2.0 Port
Connect a USB storage device
such as a flash drive.
6
Power
Connect the supplied power
cord to the input port.
7
Audio IN
Connect a microphone to use
2-way communication with
your camera(s).
8 HDMI Output
Output connector for an HDMI
monitor.
9
Alarm I/O
Alarm I/O ports for connecting
to sensors or other devices.
10 Power Switch
Press "1" to turn the device on,
"0"to turn it off.
Table 3: Rear Panel Interface
Connector Descriptions
1
3
2
7
4
8
5
9
6
10
Summary of Contents for JustConnect DNR-4020-16P
Page 75: ...Notes ...
Page 76: ...Notes 74 Quick Installation Guide ...
Page 77: ...Notes Quick Installation Guide 75 ...
Page 78: ...Notes ...
Page 79: ......
Page 80: ...Ver 1 00 WW _90x130 2020 09 28 101 010 0199 01 ...

