background image

3

D-Link DWP-902 Quick Install Guide

EN

G

LI

SH

Physical Installation

STEP 1: Verify SIM/UICC card.

Verify that your SIM/UICC card has been installed 

and activated by your carrier.

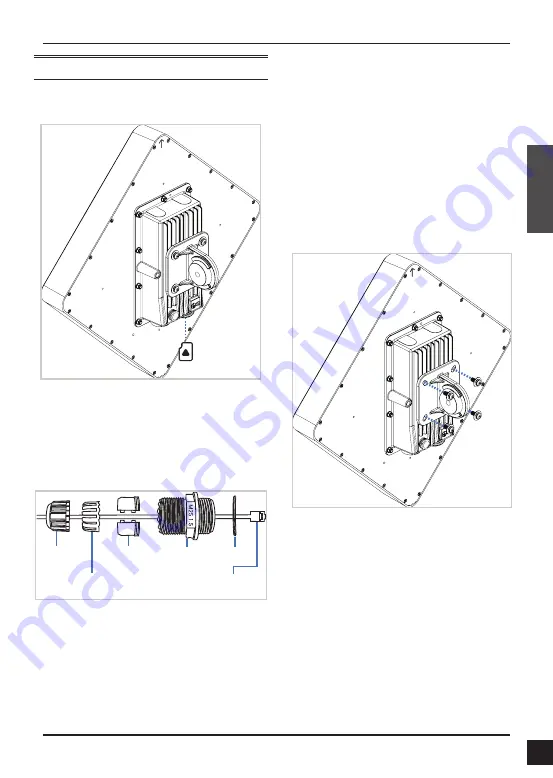
STEP 2: Connect an Ethernet Cable 

to the LAN1 (PoE) Port on the AP.

Sealing  

Insert

Gland

Sealing 

Nut

Washer

Clamping 

Screw

Ethernet 

Cable

A.  Separate the washer, gland, sealing insert, 

clamping claw, and sealing nut.

B.  Thread an Ethernet cable through each in 

order and then connect the cable to the port.

C.  Attach the washer and gland to the case 

DWP-902, then reassemble the sealing insert, 

clamping claw, and sealing nut. Tighten until 

snug.

STEP 3: Install Articulation Pole on 

Enclosure

Align the holes on the articulation pole to the 

back of the device and attach using the M5x16 

screws and M5 washers.

Summary of Contents for DWP-902

Page 1: ...the basic installation process for your new D Link Outdoor Internet Antenna Building Networks for People DWP 902 Documentation also available via the D Link Website Quick Installation Guide Outdoor Internet Antenna Quick Installation Guide ...

Page 2: ...ectrician if you are in doubt as to whether your outdoor installation is properly grounded Quick Install Guide This installation guide provides basic instructions for installing the DWP 902 Outdoor Internet Antenna on your network For additional information about how to use the Access Point please see the datasheet and user manual from the D Link support website Minimum System Requirements Compute...

Page 3: ...mping Screw Ethernet Cable A Separate the washer gland sealing insert clamping claw and sealing nut B Thread an Ethernet cable through each in order and then connect the cable to the port C Attach the washer and gland to the case DWP 902 then reassemble the sealing insert clamping claw and sealing nut Tighten until snug STEP 3 Install Articulation Pole on Enclosure Align the holes on the articulat...

Page 4: ...mps not included through the loops in the T form bracket position the bracket on the pole and then tighten firmly To adjust the bracket loosen slightly and slide STEP 5 Attach DWP 902 to the T form Bracket Use the included M8x40 Screw Bolt to attach the DWP 902 mounted articulation pole to the T form bracket The screw bolt should be aligned with the hexagonal hole Secure them with the included M8 ...

Page 5: ...d to an electrical ground STEP 7 Connect the DWP 902 to Your Network PoE Injector 30W PoE OUT 54V IN LAN IN PoE Out LAN IN 54V IN Router or Switch Computer DWP 902 DPE 301G1 LAN1 PoE A Connect the Ethernet cable connected to the DWP 902 in STEP 1 from the DWP 902 to the PoE OUT port on the PoE Injector B Connect an Ethernet cable from a router switch or PC to the DATA IN port on the PoE Injector C...

Page 6: ... configuring the AP locally connect a PC to the PoE Injector LAN IN port using an Ethernet cable B Open a web browser and go to http 192 168 17 1 Enter admin as the username and admin as the password to log into the web UI Once logged in you can configure the AP via web UI ...

Page 7: ...7 D Link DWP 902 Quick Install Guide ENGLISH TECHNICAL SUPPORT For Product Warranty or Technical Support Call U S Cellular Tech Support 1 888 944 9400 ...

Page 8: ...Ver 1 00 USCC _130x183 2018 05 07 ...

Reviews: