background image

17

D-Link DNR-2060-08P User Manual

Section 2: System Setup

Jog/Shuttle Control

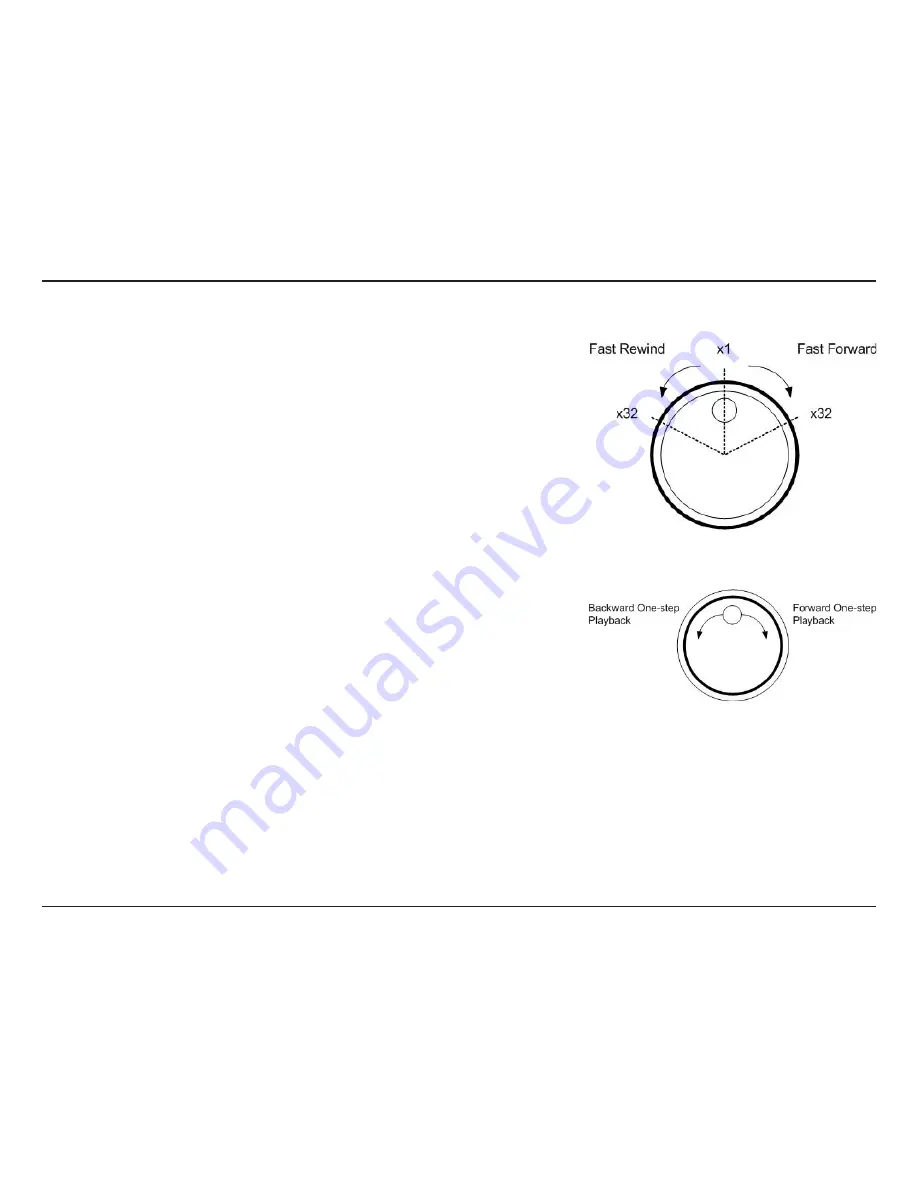
The jog/shuttle dial is used to provide a wide latitude in playback control. Note that the jog/

shuttle dial is active only when the NVR has been in Playback mode.

While playing back recorded video, users can rotate the shuttle ring to select different speed 

of forward and reverse playback. Rotating the shuttle ring clockwise/ counterclockwise causes 

the unit to playback faster forward/backward. According to the angle of rotation of the shuttle 

ring, users can choose a playback speed from 1×, 2×, 4×, 8×, 16×, and 32×, in both forward 

and reverse directions.

Inside the shuttle ring is the jog disk.

Once the video is paused, users can use the jog disk to playback video frame-by-frame. 

Clockwise rotation causes a one-step forward playback; and counterclockwise rotation causes a

one-step backward playback.

Summary of Contents for DNR-2060-08P

Page 1: ...User Manual DNR 2060 08P 6 Bay Network Video Recorder Version 1 0 04 25 2013 ...

Page 2: ...ription 1 0 April 25 2013 DNR 2060 08P Revision A1 with firmware version 1 00 Trademarks D Link and the D Link logo are trademarks or registered trademarks of D Link Corporation or its subsidiaries in the United States or other countries All other company or product names mentioned herein are trademarks or registered trademarks of their respective companies Copyright 2013 D Link Corporation All ri...

Page 3: ...3 Key Usage in Playback 23 Pause Playback and Single Step Forward 24 Search Recorded Video 24 Search by Time 25 Calendar Search 26 Search and Playback with the Event List 27 Panorama Search 28 Search by Text 29 Dome Control 30 Set Preset Points 32 Call Preset Points 32 Run Dome Camera Tour 33 Quick Video Export through Front Panel 34 Advanced Operation 35 System Menu 35 User Management 36 System D...

Page 4: ...lugins 82 Log in Log off 83 Firmware Upgrades 84 Web UI Basic Operation 84 Live Video 84 Select Display Mode 85 Operate Cameras with Dome Control 86 Digital Zoom of Camera Display 87 Manually Trigger Relay Output Devices 88 Instant Recording 88 Record Video Instantly 88 Playback Instant Recorded Video 88 Playback Video 89 Remote Playback 89 Playback Local drv Files 90 Playback Controls 90 Verify D...

Page 5: ...ing please contact your reseller Note Using a power supply with a different voltage than the one included with your product will cause damage and void the warranty for this product 3 Power Cord 4 Mounting Kit 2 Remote Control 1 Six SATA Cables 5 Software CD 6 Quick Installation Guide 7 Two Batteries for Remote Control 8 24 Screws ...

Page 6: ...torage and management solution providing reliable high quality remote monitoring for IP based security systems The DNR 2060 08P enables simultaneous recording and remote access to recorded video as well as live viewing Controlling the DNR 2060 08P is exceptionally easy using conventional front panel controls with an optional keypad and mouse or remote control handset High flexibility simple config...

Page 7: ...can keep a massive archive of High Definition recording while retaining your privacy instead of relying on the cloud Complete Connectivity DDNS Support Dynamic DNS is a solution for users without a fixed IP address With DDNS service users can connect to the NVR from the Internet using an easy to remember domain name NTP Support Maintaining an accurate record of time is essential if recorded data i...

Page 8: ... fullscreen 5 Arrow Keys In Zoom mode these buttons function as direction buttons In the OSD setup menu the direction buttons are used to move the cursor to previous or next fields To change the value in the selected field press UP DOWN buttons 6 Shuttle Jog This is used to control playback operations 7 Esc Button Press this button to cancel or exit from a control mode 8 Enter Button In the OSD me...

Page 9: ...e NVR is connected to a network and blinks when data is being transferred REC REC The Recording icon blinks while the NVR is recording Alarm The Alarm icon lights up when an alarm is triggered IR Receiver The infrared receiver receives signals from the remote control POWER 1 2 3 4 5 6 7 8 COPY DOME ESC ENTER SEQ REC FREEZE MODE SEARCH MENU PLAY STEP REW FF PLAY STOP Alarm Network REC Infrared Rece...

Page 10: ...cord shipped with the NVR 4 Main Audio Out A RCA connector is provided to output audio associated with the main monitor 5 Main Monitor VGA A VGA output connector is offered for connecting to a VGA monitor 6 Main Monitor Digital Output A digital output connector is provided for connection to a displaying device that transfers data digitally to show the best video quality 7 Alarm I O The NVR provide...

Page 11: ...crewdriver to remove the screws from the sides and top of the NVR then lift the cover Step 2 Locate the two 3 bay hard drive racks inside Select the rack you would like to install your hard drive into then slide the hard drive into the rack bay Hard Disk Drive Installation ...

Page 12: ...p Step 3 Attach one end of the SATA cable to the rear of the HDD Attach the other end of the SATA cable to a free SATA socket on the motherboard of the NVR Step 4 Secure the hard drive in place with screws using the guide holes along the center of the sides ...

Page 13: ...PoE IP cameras with a single cable Note The maximum power for all connected devices must not exceed 90 Watts Connecting a Power over Ethernet IP Camera Step 1 Make sure the NVR is connected to a network via a router or a switch or directly connected to a PC Plug in cameras using the PoE ports on the rear panel Step 2 The NVR will boot up and start to record automatically Suggested Setup ...

Page 14: ... Manual Section 2 System Setup Remote Control Operation A remote control is provided for the NVR The operational function keys on the left and dome camera control keys on the right on the remote control are listed as below figure ...

Page 15: ...llowing path Camera Connection Setup IP Dome ID Left click on IPDomeID and scroll the mouse wheel up or down the ID number will change as the scroll wheel moves Stop moving the scroll wheel when the preferred ID number appears then left click on the IP Dome ID to select the ID Number and the ID number will be changed Camera Title Alignment Users can change the display position of camera titles of ...

Page 16: ...16 D Link DNR 2060 08P User Manual Section 2 System Setup USB Keyboard Operation The following diagram shows the keys used to access and control the NVR from an attached USB keyboard ...

Page 17: ...speed of forward and reverse playback Rotating the shuttle ring clockwise counterclockwise causes the unit to playback faster forward backward According to the angle of rotation of the shuttle ring users can choose a playback speed from 1 2 4 8 16 and 32 in both forward and reverse directions Inside the shuttle ring is the jog disk Once the video is paused users can use the jog disk to playback vi...

Page 18: ...dly to select desired main monitor display format According to the monitor displaying type there are several available viewing modes full screen 2 windows and 8 windows Refer to section Viewing Modes for detailed information PLAY Press this key to switch between live image and playback video Note The video of latest 5 10 minutes cannot be played back because the video is still saved in the buffer ...

Page 19: ...the OSD menu and go to System User Management to enable or disable the password protection ENTER ZOOM In OSD setup menu or selection interface press this key to make the selection or save settings In live full screen viewing mode press this key to view a 2 zoom image press it again to return JOG SHUTTLE The jog shuttle knob is a combination of a shuttle ring with an embedded jog disk It provides w...

Page 20: ...odes The NVR has three different viewing modes Press a CHANNEL button to view the corresponding IP camera in full screen mode Press the MODE button to switch to the next available viewing modes 1 x 1 Single Channel Fullscreen View 2 x 2 Four Channel Grid View 3 x 3 9 1 Eight Channel Grid View ...

Page 21: ...ee Camera Title Alignment on page 15 The current operation status and date time information will be displayed in the status bar at the bottom of the screen Anicondisplayedonthestatusbarshowstheauthorityleveloftheaccountcurrentlylogged in If no user is logged in the icon displayed will be a guest icon When an account is logged in its authority level number 1 to 8 will be shown Move the cursor to an...

Page 22: ... will appear in the bottom right of the screen identifying the portion of the view available To pan to a specific area within the zoomed screen use the Direction keys to navigate within the frame Press ENTER again or press ESC to leave the Zoom mode Users can freeze the live video at any time Press the FREEZE button while viewing live video and the image will be frozen immediately and a pause icon...

Page 23: ...to pause the video playback When the recorded video is paused press LEFT RIGHT to single step reverse forward video playback respectively Press FREEZE again to resume video playback PLAY Press to start video playback or return to live mode View Recorded Video To view recorded video users can press the PLAY key directly After pressing the PLAY key the NVR will resume playback of the recorded video ...

Page 24: ...s and hold RIGHT LEFT keys to repeatedly reverse forward the video single step Press FREEZE again to resume the playback operation Search Recorded Video The NVR can search and play back recorded video by date time events or text To search by time select a specific date and time of the wanted video or enter Calendar Search To search by event select the channels to display in the event list In Live ...

Page 25: ...s to choose date time Press ENTER and adjust the values by using the UP DOWN keys Press ENTER to confirm the settings or ESC to abort Move the cursor to Begin Playback and press ENTER to start playing back the selected video Press PLAY again to return to live video Note If there is no available recorded video that matches the specified time and date the unit will playback the next available video ...

Page 26: ...NTER then press the UP DOWN keys to adjust the value and press ENTER again to confirm Move the cursor and press ENTER to select any date shown in bold and underlined font The bar below the calendar will change according to the recorded data of the selected date Select the preferred time from the time bar or alternatively move the cursor to the time shown at the bottom Press ENTER and adjust the va...

Page 27: ...To search for recorded events with the Event List Press SEARCH to enter the Search menu To search for recorded events from a specific camera use the LEFT RIGHT keys to move the cursor and press ENTER to select or de select a channel Move the cursor to the Event List and press ENTER to list the recorded events of the selected channels To exit the event list press ESC To playback video from the Even...

Page 28: ...nce Panorama search will start and the preview images will be in 1 second intervals with 20 preview images displayed Press the LEFT RIGHT keys and the previous next 20 preview images in 1 second intervals will be displayed Press the MODE key a second time and the panorama search preview will be refreshed in 1 minute intervals PressMODEathirdtimeandthepanoramasearchpreviewwillberefreshedin1hourinte...

Page 29: ...ets of word strings Search for videos with data containing both of the word strings Specific Specify one set of word string Search for videos with data containing the specific word string By Numerals Outside The Range Enter two numbers to specify a range Search for videos with data containing number s out of the range Inside The Range Enter two numbers to specify a range Search for videos with dat...

Page 30: ... Preset Live Pan Tilt Speed Adjust the camera s iris to a more closed position Adjust the camera s iris to a more open position Adjust the camera s focal point to a more distant point Adjust the camera s focal point to a nearer point Zoomoutthelensofselecteddomecamera Thisfunction enables users to shrink the current image and a larger viewing area can be displayed Zoom in the lens of selected dome...

Page 31: ... also perform the functions listed above Please refer to Front Panel Function Keys on page 8 for further details of function keys Direction Buttons Auto Focus Click on the buttons to pan and tilt the lens of selected dome camera Click on this button to automatically adjust focus of the dome camera ...

Page 32: ...the dome control panel or press CH1key to access the Set Go Preset function The numeric keyboard will be displayed as below Input a desired preset number Click on the Set Preset button to save the position Now the preset position is set and ready to be called To call preset points Press a Channel key to view the corresponding camera in full screen Then press DOME to enter Dome Control mode The dom...

Page 33: ...el key to view the corresponding camera in full screen Then press DOME to enter Dome Control mode The dome control panel will be displayed Click Preset on the dome control panel or pressCH1key to access the Set Go Preset function The numeric keyboard will be displayed Click on the Run Tour button to run the display of dome camera tour Press any of the Direction keys to end the display of dome came...

Page 34: ...device make sure the device is connected to the NVR Export Event Video To export event video footage follow these steps Press SEARCH and playback wanted event video To playback event video refer to Search Recorded Video on page 24 After entering Playback mode press COPY Press ENTER to start the export of the event video to the connected device or press ESC to abort If there is no exportable device...

Page 35: ...ntuitive Graphical User Interface GUI On Screen Display OSD setup menu To enter the OSD menu system press the MENU button and select an account to log in to and enter a corresponding password The preset password for the administrator account admin is 1234 Note It is strongly suggested to change the preset password to prevent unauthorized access to the unit ...

Page 36: ...singtheaccount Asecondpasswordcanalsobespecified if required Note The username and privilege level of the preset administrator account admin cannot be changed Permission Setup Use this option to setup the authority level for accessing the functions listed in this menu The functions include Playback Search Hidden Camera Dome Control Export Data Menu Access System Setup Monitor Setup Camera Setup Re...

Page 37: ...me Setting Users can set the current date time and other OSD parameters in Date Time menu under System setup menu The login account should have authority to access the System setup menu In OSD setup menu select System and press ENTER then select Date Time to access the Date Time menu ...

Page 38: ...Note If time settings have to be changed it is strongly recommended to format the HDDs to avoid database corruption Date Time Display You can set the time to be displayed in 1 row or 2 rows Use the UP DOWN keys to change the setting Date Display Mode This function allows you to set the display type of the date There are three options to select from Y M D M D Y or D M Y Y represents Year M represen...

Page 39: ...e If this function is enabled the date time information will be shown on the screen with a DST icon when playing back recorded video or searching video in the event list S indicates summer time and W indicates wintertime DST Start End Use this option to set the daylight saving duration Use LEFT RIGHT keys to move the cursor to the next or previous field use UP DOWN to change the settings in the se...

Page 40: ...Time Protocol Setup option will appear Select the Network Time Protocol Setup to set the NTP server The default NTP server is time nist gov A list of alternative IP addresses for NTP servers is listed below 129 6 15 28 129 6 15 29 132 163 4 101 132 163 4 102 132 163 4 103 128 138 140 44 192 43 244 18 131 107 1 10 69 25 96 13 206 246 118 250 208 184 49 9 64 125 78 85 207 200 81 113 64 236 96 53 68 ...

Page 41: ... and registered with a dynamic DNS service provider The following parameters are available for configuration Network Setup Server Address Host Name DDNS Port DDNS Username DDNS Password Submit Update EZDDNS Select a dynamic DNS service provider from the pull down list Enter your host name For example myhost mydomain net Enter the port for DDNS traffic Enter the username provided by your service pr...

Page 42: ... protocol for widespread plug and play devices to ease the network implementation When a PC and the NVR have both installed the UPnP function the PC can automatically recognize the NVR in the same local area network The advantage of this is that PCs can connect to the NVR via the remote control software by directly clicking on the icon representing the NVR in My Network Places folder ...

Page 43: ...ding port number are required Where the NVR is behind a router communications between the PC and the NVR will need to be transmitted via the router The router will need to have port mapping forwarding setup before images from the NVR can be remotely viewed on the PC For each individual NVR this setting would need to be done on an individual basis Fortunately if the NVR has UPnP NAT traversal funct...

Page 44: ...44 D Link DNR 2060 08P User Manual Section 4 Advanced Configuration Monitor Menu The Monitor menu allows you to configure how the various display features appear ...

Page 45: ...Size Click on the buttons to pan and tilt the lens of selected dome camera Choose a percentage value to determine the opacity of the On Screen Display Selecttheoutputresolutionappropriatefortheconnected display ThissettingwilladjuststhespeedwhichaconnectedUSB mouse cursor will move across the screen Turn the Status Bar on or Off Select the size of the Status Bar ...

Page 46: ...46 D Link DNR 2060 08P User Manual Section 4 Advanced Configuration Camera Menu This section details the options available for connecting and configuring IP cameras ...

Page 47: ...essed IP Camera Name Use this option to enter the name of the IP camera to be shown on the monitor IP Camera Hidden If you want to hide the feed from an IP camera select On Note the display in the remote monitoring software will also be hidden Select Off to restore the live image to be shown on the monitor Device Search Select this option and press ENTER to automatically search for IP cameras inst...

Page 48: ... the connection and data transmission settings for a connected IP Camera Note You will need to set Enable PnP to Off to access all the configuration options Account Password UsethesetwooptionstoenteravalidaccountnameandpasswordoftheconnectedIPcamera Management Port Use this option to set the default port of the IP camera ...

Page 49: ...s in Main Stream Setup Note If the connected device is an IP DomeCamera then select an appropriate IP Dome Protocol from the provided options and setup its Dome ID Main Stream Setup Underthismenu userscansetupconfigurationforthemainstream Firstchoosethestreaming formatfromH264 MJPEG orMPEG4 Ifyouneedtosetupastreamingindex port andprotocol manually set Advance Streaming Options to On and select you...

Page 50: ...e quality and image adjustment Set the item Apply to Yes to apply the changes Note The Device Setup menu may have fewer or more menu items according to different IP camera models Select YestoactivatetheconnectiontotheIPcamera Todeactivatetheconnection select No Note OncetheconnectiontotheIPcameraisactivated menuitemsDeviceSearch Hostname IP Connection Setup and Copy Settings will be grayed out and...

Page 51: ...ers can check the connection status This item allows users to copy the settings set on the currently selected IP camera to any other IP cameras Enter this menu and select one or more cameras to copy the settings to Then select CONFIRM to apply the settings Note If an IP camera is already activated it will be greyed out and cannot be selected ...

Page 52: ...r Manual Section 4 Advanced Configuration The Record setup menu allows users to set the recording quality recording schedules and other recording parameters In the Main menu move the cursor to Record and press ENTER Record Menu ...

Page 53: ...ecording schedule Select Schedule Setup from the Record setup menu and press ENTER to make appropriate changes of the start time of Day and Night Time using Direction keys Press ENTER to confirm the settings or ESC to cancel If a weekend recording is required select On to enable theWeekend Schedule in advance and then set the Weekend Start End time Press ESC to return to previous page ...

Page 54: ...First select the Camera required for configuration The image and recording settings from the selected camera will be shown on the screen Move the cursor using Direction keys and press ENTER to select an item Change the value using UP DOWN keys Press ENTER to confirm the settings or ESC to abort Press ESC to return to Record setup menu If the NVR is required to record only in response to a trigger ...

Page 55: ...e is selected further settings of the other two items below will be grayed out and cannot be accessed Data Lifetime When data lifetime mode is set to General this item will be accessible Press ENTER to select this item and press UP DOWN keys to set the data lifetime The value ranges from 1 to 365 days Alternatively select 0 to disable this function Data Lifetime By Day When data lifetime mode is s...

Page 56: ...ion can be set from 0 to 70 seconds The quality of the pre alarm video is the same as the quality setting for normal record video and the quality of the post alarm video is the same as the quality setting for event record video You can choose to record video in either a circular mode or in a linear mode If circular mode is selected the NVR will store new video overwriting the oldest recordings Alt...

Page 57: ...art To Purge to Yes Purge Event Before Use this option to delete video events from before a specific date Use theLEFT RIGHT keys to move the cursor to next or previous field ENTER to select the item and UP DOWN to adjust the value Start To Purge After the videos to be deleted are selected set this item to Yes to start the deletion or choose No to cancel Audio Recording This option allows you to en...

Page 58: ...equence mode using the Main Monitor The sequence functions can avoid manual backtracking and provides more flexibility while monitoring recordings Automatic sequence functions can be used in any of the viewing modes Select a viewing mode and press SEQ to toggle the automatic sequence Press SEQ again to stop ...

Page 59: ...a pre determined position Use the UP DOWN keys to select a value and press ENTER to confirm the selection Main Monitor Schedule Use this option to determine the order in which the main monitor will display the camera channels The channel at the left of the top row is the first to be displayed The channel on the right of the bottom row is the last ...

Page 60: ...60 D Link DNR 2060 08P User Manual Section 4 Advanced Configuration Event Menu This section outlines the options of for event based recording you can create up to 3 event sets with their own settings ...

Page 61: ... 08P User Manual Section 4 Advanced Configuration Internal Buzzer Use this option to toggle the NVR s internal Buzzer On or Off Event Icon Use this option to toggle the Event Icon notification on the Status Bar On or Off ...

Page 62: ...tion Set Alert Notification Alert IP Alert Port Alive Interval Create up to 3 sets of event which will trigger notification Select the type of events which will trigger notification Enter the IP address which will receive the event notification alert Enter the Port at the IP address which will receive the event notification alert Use this option to determine how long a notification should remain a...

Page 63: ... the Main Display Per Channel Config This option enables a user to specify parameters for event notifications in a granular fashion on an individual channel basis Event Duration Use this option to determine how long an event should be recorded Copy Event Settings This option to enables a user to copy the settings previously configured to another ...

Page 64: ...Setup Use this option to configure the Event Back up parameters Backup Location This feature enables you to configure automatic back up of recorded video to an FTP site Event Alarm Selection This option to enables a user to which type of events and alarms will be recorded to back up ...

Page 65: ...er Manual Section 4 Advanced Configuration E mail Management This feature enables you to configure the parameters for automatic E mail notification SMTP Server Setup Enter the configuration for the target e mail server account ...

Page 66: ...66 D Link DNR 2060 08P User Manual Section 4 Advanced Configuration Database Menu This section outlines the user configurable options for the NVR s Disk and Data management ...

Page 67: ...ng and the recording mode Displays the amount of time left in the space available for recording This is an estimate of the total amount time that can be recorded on the space given This option allows the user to add remove format repair and low level format internally installed disks Thisoptionallowstheusertomanageexternallyattached disks This option enables the user to manage the stored data reco...

Page 68: ... the scanning process users can press any key to skip the process If the scanning exceeds a predetermined period of time 3hrs for 1TB HDD 6hrs for 2TB HDD etc the scanning process is treated as failed and is automatically terminated The NVR will reboot If the scanning process has failed users will be prompted to confirm a format of the HDD marking the bad sectors After confirmation login of an aut...

Page 69: ... D Link DNR 2060 08P User Manual Section 4 Advanced Configuration The Configuration setup menu enables you to review you current configuration and import or export settings as required Configuration Menu ...

Page 70: ... Log or Operation Log and a list of system operation logs will be displayed on the screen You can export the log as a data file to an external storage device Connect a USB storage device and click on Export or press COPY key to export the system log file to the USB storage device Note a digital signature file will also be exported Also under the Configuration setup menu set Operation Log to On and...

Page 71: ...on Export Menu The following section will explain how to export video through the OSD setup menu and through the function keys on the front panel respectively Note that the system log will keep records of all video exported including duration start time and end time ...

Page 72: ...es if a digital signature is required gpg avi or drv sig and readme txt Note The Video Export menu will only allow authorized accounts to export video with a digital signature The available external devices for exporting video will be listed by name and free size in the Select Device menu The NVR only supports the EXT3 file system If an external HDD will be connected to the unit ensure the format ...

Page 73: ...ct this item to display the event list Move the cursor to scroll through the event list and press ENTER to select event s to be exported Data Type The item is used to select exporting video type The options are Normal export normal video only Event export event video only and Both export both normal and event video Export Format This item is for selecting exporting video format The options are DRV...

Page 74: ...he gpg file name is as the last eight MAC Media Access Control address of the unit Make sure that an external storage device such as a USB Hard Drive is available and connected to the appropriate port for export For more information on verifying a digital signature see Verify Digital Signature on page 91 Erase Disc This function is used to remove data found on a DVD RW disk prior to exporting new ...

Page 75: ...75 D Link DNR 2060 08P User Manual Section 4 Advanced Configuration Aux Menu The Aux menu enables user to configure PoE and UPS settings ...

Page 76: ...dvanced Configuration PoE Setup Use this option to view and configure the NVR s PoE settings Note Setting the PoE Limitation too high or too low will result in unreliable performance UPS Setup Use this option to configure the settings for your UPS ...

Page 77: ...D Link DNR 2060 08P User Manual Section 4 Advanced Configuration Shutdown Menu If the NVR must be shutdown for any reason please follow the proper shutdown and power on procedures to avoid damaging the NVR ...

Page 78: ...unit Do not remove the power during shut down until the message You can safely turn off NVR now displays Reboot Selectthisitemtoreboottheunit Thecolorbarandsystemcheckinginformationaredisplayed on the monitor until the unit is completely restarted Power Key Privilege This option allows users to define quick shutdown actions following a long press of the Power key Auth will require login of authori...

Page 79: ...napshots or video Setup Contains the NVR setup wizard as well as the LAN configuration settings camera search camera settings recording schedule auto backup event settings time and system settings and device settings Maintenance Contains the Administrator account configuration options Hard Disk management options and RAID configuration options System configuration backup and restore functions are ...

Page 80: ... the IP Start Internet Explorer by clicking on the desktop icon or by using the Start menu to access it The PC needs to be set to accept ActiveX plug ins Please follow the steps to set the Internet security settings appropriately Note Internet Explorer provides the ActiveX component that is required when using the remote monitoring software Select Tools from the main menu of the browser then Inter...

Page 81: ...e configured and click Add to add this web site to the zone Click OK to confirm the setting and close Trusted sites dialog In the Security Level area click Custom Level Under ActiveX controls and plug ins set all items to Enable or Prompt Click OK to apply the setting and close the Security Settings screen Click OK to close Internet Options dialog Now the installation can continue to the next step...

Page 82: ...for confirmation click Yes to accept ActiveX plug ins The Web UI plug ins will be downloaded and installed on the PC automatically when the connection is successfully made Note Do not enter any leading 0 characters in the address for example 192 068 080 006 should be entered as 192 68 80 6 If the default trigger port 80 is changed into another one take port 81 for example the IP address should be ...

Page 83: ...ollowing steps demonstrate procedures to connect and login to the NVR Start the remote monitoring software by entering the IP Address of the NVR in the Address bar of the browser Alternatively click on the Favorite entry for the unit if the IP address of the unit has been set Enter the Username and password The login username and password can be saved to ease future logins The default username and...

Page 84: ...willbedisplayed When a NVR is successfully connected the main window of the Web UI will be displayed Please reference Basic Operation on page 20 for an overview of the features available Functions specific to the Web UI will be described in the following sections View live video from the cameras attached to the NVR by clicking the Live button on the main window toolbar Choose a desired display mod...

Page 85: ...f the display buttons in the MODE section of the left toolbar Available selections are 4 and 8 9 1 camera display grids To view a specific feed in full screen either double click on the preferred grid or click on the corresponding CAMERA button in the left toolbar Note To maximize the video viewing area the main top toolbar and the left side tool bar can be hidden ...

Page 86: ...er Click this button select Go Preset and choose a preferred number from the pull down list to call the preset point for viewing Click this button select Run Tour and the dome camera will start the tour set previously at the dome camera side Click for changing the dome ID and protocol Proper authority is required to access this function Use to adjust the camera lens to focus on objects for a clear...

Page 87: ...wheel away from users to zoom in and move toward the users to zoom out On the upper left hand corner will show zoom in magnification Themaximummagnificationisx7 AlsoonthelowerRight handcornerwilldisplaytheposition ofcurrentviewingarea shownasaninnerwhiterectangle comparingwiththeoriginalscreen shown as an outer rectangle frame In addition the viewing area can be dragged and moved by LEFT clicking ...

Page 88: ...hile monitoring at the remote site Instant Recording function allows users to record video to the PC by one click Note The Audio function is set to OFF as the default setting Follow the steps to start recording instantly Click on the Instant Recording button Select the destination folder to save the video Click on the Instant Recording button again to stop recording Note The instant recording vide...

Page 89: ...and the Verify tab Remote Playback allows users to playback from the NVR Local Playback enables users to playback a recorded video file stored on the hard disk drive of the PC Verify is provided for users to authenticate if the exported video is altered During either remote playback or local playback the NVR can simultaneously record while displaying from the PC The remote monitoring software allo...

Page 90: ...ction screen is displayed Select the drv video file for playback and click OK Click OK in the Local Playback Screen to start the playback or click Cancel to abort View the video playback using the Playback controls To end the playback click Live to return to live video When the local or remote video is being played theWeb UI is in Playback Mode The playback controls toolbar will appear in the main...

Page 91: ... Log field as a GOOD or BAD signature result A GOOD signature indicates the exported clip has not been altered Click SEARCH the Event List appears The list contains information about the alarm events that the unit recorded and saved Up to 1024 events can be listed in the Event List The Event List displays each event by its number the date and time of the event the type of the event including Alarm...

Page 92: ... JPEG file on the desktop The snapshot file will be named as Snapshot This function verifies HDD status of the NVR The information items shown in the chart are described as below Device Name Int Ext Total Size State Temperature This item shows the model name of the HDD This item indicates whether the HDD is an internal or external device This item indicates the total size of the HDD This item indi...

Page 93: ...epending on the HDD capacity and network usage set the remote monitoring software to occupy high or low bandwidths For networks with limited bandwidth dual streaming will be a better choice It enables coexistence of high quality streaming at local NVR site and lower quality streaming but fastertransmission for the remote monitoring site To select dual streaming click on the bandwidth icon and the ...

Page 94: ...is as shown below Then click on the Execute button and locate the upgrade file tar or files tgz md5 to start remote software upgrade Remotely Reboot Also from the Configuration window access the Shutdown menu as shown below Then click on the Execute button to remotely reboot the NVR Web UI Advanced Operation UserscanremotelyaccessthefullfunctionalityoftheNVRusingthe MenubuttonontheWebUI Click on t...

Page 95: ...steps below to delete the temporary internet files Select Tools from the main menu of the web browser then Internet Options and then click the General tab Click the Delete Files button in the Temporary Internet Files field the Delete Files screen displays as below Check the Delete all offline content box and click OK Enter the IP address of the NVR to make the connection again ...

Page 96: ...HDD is successfully installed users will see a number shown in front of the device name when retrieving internal disks information in the OSD setup menu via Database Internal Disks The number represents the SATA port that the HDD is connected to Brand Model Name Model Number Size WD Caviar Blue WD10EALX 1 0TB ...

Page 97: ...97 D Link DNR 2060 08P User Manual Appendix A DI DO Specifications DI DO Specifications ...

Page 98: ...nt panorama Front panel keyboard and mouse via usb port remote control handset Video Compression H 264 MJPEG codec JPEG for still image Multicast streaming Simultaneous playback record live view StandaloneVideo Output HDMI andVGA at 1024 x 768 1280 x 1024 720p 1080p Audio Support PCM G 711 External Device Interface RJ45 port auto MDI MDIX Gigabit Lan Eight RJ45 port with PoE IEEE 802 3at VGA HDMI ...

Page 99: ...ultiple event notification System Requirements Operating System MicrosoftWindows 7 Vista XP Web Browser Internet Explorer 7 or higher Mobile Support iOS Android Physical Weight 9 02 kilograms 19 9 lbs Power Input AC 100 to 240V at 50 60 Hz Output 5V DC 750 mA via USB port Temperature Operating 0 to 40 C 32 to 104 F Storage 20 to 70 C 4 to 158 F Humidity Operating 10 to 90 non condensing Storage 5 ...

Reviews: