background image

10 

Using the Configuration Wizard   


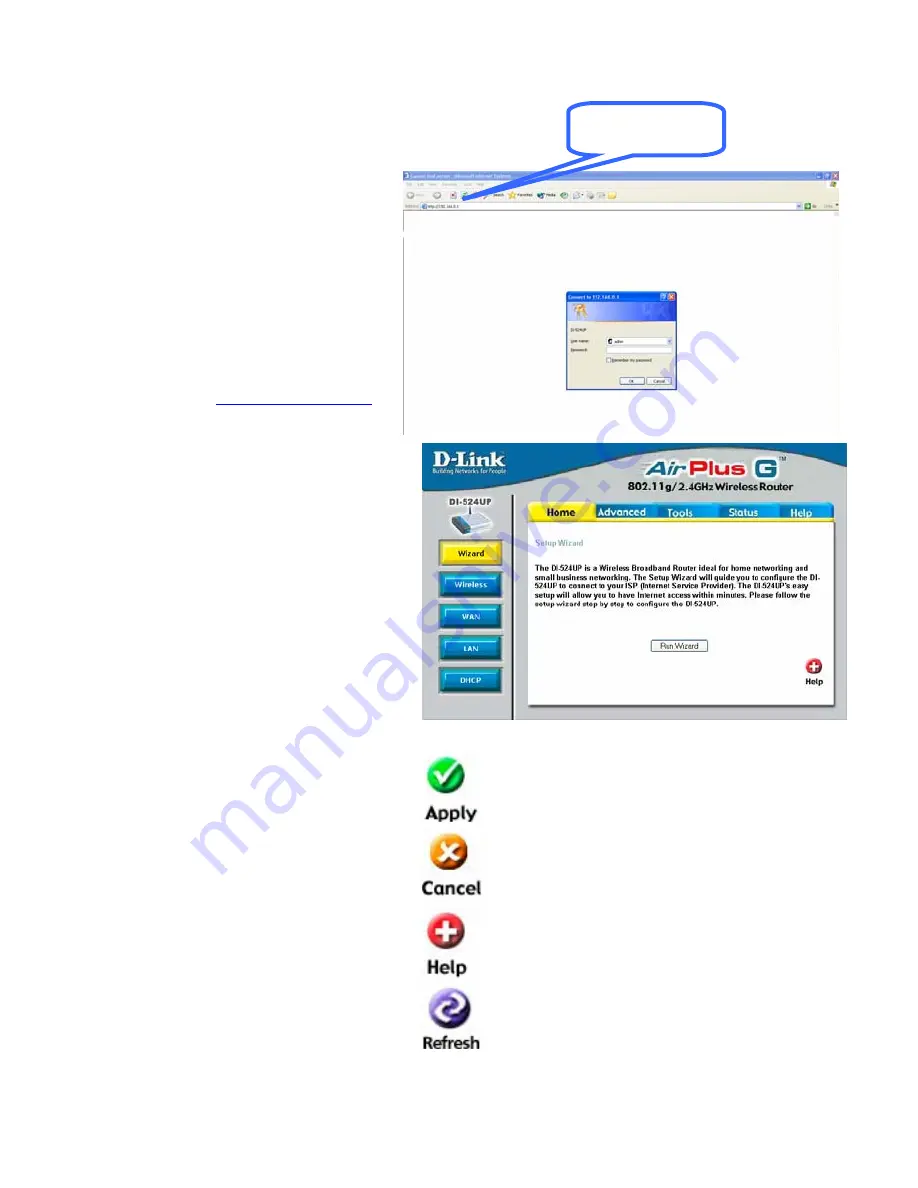
Whenever you want to configure 
your network or the DI-524UP, you 
can access the Configuration Menu 
by opening the web-browser and 
typing in the IP Address of the 
DI-524UP. The DI-524UP default IP 
Address is shown to the right: 


Open the web browser. 


Type in the IP Address of the 
Router   (

http://192.168.0.1

). 


Type “admin” in the User 
Name field. 


Leave the Password blank. 


Click 

OK

.


The 

Home > Wizard

 window will 

appear. Please refer to the Quick 
Installation Guide for more in-
formation regarding the Setup 
Wizard. 


These buttons appear on most of the 
configuration windows in this 
section. Please click on the 
appropriate button at the bottom of 
each window after you have made a 
configuration change. 

NOTE: If you have changed the 
default IP Address assigned to the 
DI-524UP, make sure to enter the 
correct IP Address. 


192.168.0.1 

Clicking 

Apply

 will save configured 

settings to the router. 

Clicking 

Cancel

 will clear changes 

made to the current page. 

Clicking 

Help

 will provide the user with 

helpful information about the current 
window.  

Clicking 

Refresh

 will refresh the 

statistics of the current window.


Summary of Contents for DI-524UP

Page 1: ......

Page 2: ...chnology 7 Installation Considerations 7 Getting Started 8 Using the Configuration Wizard 10 Home Wireless 11 Home WAN 16 Home LAN 24 Home DHCP 25 Advanced Virtual Server 26 Advanced Applications 29 Advanced Filters 30 Advanced Parental Control 33 Advanced Firewall 36 Advanced DMZ 38 Advanced DDNS 39 Advanced QoS 41 ...

Page 3: ...Status Device Info 61 Status Log 63 Status Statistics 65 Status Wireless Info 66 Status Printer Info 67 Status Active Session 68 Help 70 Technical Specifications 71 Appendix 75 WCN and the Wireless Setup Wizard 75 Installing a Printer on your DI 524UP for Windows XP 78 Installing a Printer on your DI 524UP for Windows 2000 84 ...

Page 4: ... on CD Quick Installation Guide Ethernet Cable All the DI 524UP s Ethernet ports are Auto MDIX Note Using a power supply with a different voltage rating than the one included with the DI 524UP will cause damage and void the warranty for this product If any of the above items are missing please contact your reseller ...

Page 5: ...s a kind of message transmitted over a network This insures much greater security than the standard WEP security By contrast the older WEP encryption required the keys to be changed manually WPA2 based on the IEEE 802 1i Wi Fi certified standard goes a level beyond the previous WPA by enhancing security with a new encryption code Employing AES Advanced Encryption Standard and yet still backwards c...

Page 6: ...raight through or a crossover Ethernet cable Auto MDI MDIX LAN Ports Connect the Ethernet cable from computers on your LAN to these ports WAN Port Connect the Ethernet cable from your ADSL modem to this port Factory Reset Button Pressing this button will restore the router to its factory default settings Power Adapter Connect your 5V 2A power adapter here ...

Page 7: ...een established A blinking LED indicates activity on the WAN port WLAN LED An active LED indicates a link has been established A blinking LED indicates activity on the WLAN port USB LED An active LED indicates a link has been established A blinking LED indicates activity on the USB port LAN LEDs An active LED indicates a link has been established A blinking LED indicates activity on the LAN port ...

Page 8: ...nects to the network vastly improving the safety of communications on the network New WPA2 enhanced wireless security authenticates using 802 1X and a Pre Shared key and encrypts the data with the AES encryption standard Wi Fi certified WPA2 is also compatible with WPA and can be used for a large network or for the SOHO environment 802 1x Authentication in conjunction with the RADIUS server verifi...

Page 9: ...AN port Auto MDI MDIX Equipped with one USB 1 1 port at the rear of the router used to connect with a USB printer VPN Pass Through DMZ and DDNS functions Stateful Packet Inspection for protection against unwanted packets Quality of Service QoS for prioritizing ports and IP addresses Supports IGMP Multiple users and administrators with configurable privileges for each Intrusion detection for ICMP S...

Page 10: ...wireless LAN technology for many different purposes Mobility Productivity increases when people have access to data in any location within the operating range of the WLAN Management decisions based on real time information can significantly improve worker efficiency Low Implementation Costs WLANs are easy to set up manage change and relocate Networks that frequently change can benefit from WLANs e...

Page 11: ...e within its operating range Keep in mind however that the number thickness and location of walls ceilings or other objects that the wireless signals must pass through may limit the range Typical ranges vary depending on the types of materials and background RF radio frequency noise in your home or business The key to maximizing wireless range is to follow these basic guidelines 1 Keep the number ...

Page 12: ...k AirPlus G wireless devices are pre configured to connect together right out of the box with their default settings For a typical wireless setup at home as shown above please do the following 1 You will need broadband Internet access a Cable or DSL subscriber line into your home or office ...

Page 13: ... See the printed Quick Installation Guide included with the network adapter 5 Install the D Link DWL G650 wireless Cardbus adapter into a laptop computer See the printed Quick Installation Guide included with the DWL G650 6 Install the D Link DFE 530TX adapter into a desktop computer The four Ethernet LAN ports of the DI 524UP are Auto MDI MDIX and will work with both Straight Through and Cross Ov...

Page 14: ...Quick Installation Guide for more in formation regarding the Setup Wizard These buttons appear on most of the configuration windows in this section Please click on the appropriate button at the bottom of each window after you have made a configuration change NOTE If you have changed the default IP Address assigned to the DI 524UP make sure to enter the correct IP Address 192 168 0 1 Clicking Apply...

Page 15: ...n completed by running the Wireless Network Setup Wizard it must be saved to a USB enabled memory device and then uploaded automatically to the router and any other device to be put on this wireless network using this method No configuration will be necessary except for ensuring that this WCN radio button is enabled before connecting the memory drive to the router For a concise explanation on conf...

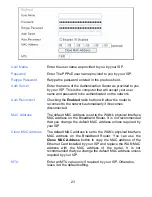
Page 16: ...s LAN Authentication This router employs three basic types of Authentication for access to the router s wireless network Open System Shared Key 802 1X RADIUS and PSK Pre Shared Key which can be selected by clicking the corresponding radio button Each selection will alter the window to accommodate the entry of the selected Authentication See the explanation below for more information Open System Sh...

Page 17: ...5 13 inputted characters in length and 256 bit keys must be from 10 26 inputted characters in length Failing to have the same key on the server and its clients will result in the clients not receiving any information from the router or its connected devices Key Type Use the pull down menu to select the type of Key to be used for encryption The user may choose HEX Hexidecimal or ASCII American Stan...

Page 18: ...remote RADIUS server through which you will be authenticated Port Enter the virtual port number to which to connect through the RADIUS server Common port numbers for RADIUS are 1812 and 1813 Shared Secret Enter the password that will be used to authenticate you on the wireless network This password must be the same on the RADIUS server in order for you to be authorized NOTE For the client implemen...

Page 19: ...matic option for both WPA and WPA PSK In order to use the WPA Auto function a RADIUS server must be established on a computer on the LAN This RADIUS server must be configured to have the same key as the users on the LAN accessing it To utilize the WPA PSK Auto function select one of the previous choices enter the Passphrase confirm it in the second field and then click Apply NOTE For the client im...

Page 20: ...outer and may be changed MAC Address The default MAC Address is set to the WAN s physical interface MAC address on the Broadband Router It is not recommended that you change the default MAC address unless required by your ISP Clone MAC Address The default MAC address is set to the WAN s physical interface MAC address on the Broadband Router You can use the Clone MAC Address button to copy the MAC ...

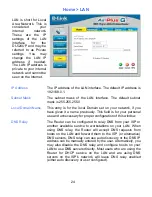
Page 21: ... provided to you by your ISP Each IP address entered in the fields must be in the appropriate IP form which are four octets separated by a dot x x x x The Router will not accept the IP address if it is not in this format IP Address Input the public IP Address provided by your ISP Subnet Mask Input your Subnet mask All devices in the network must have the same subnet mask ISP Gateway Address Input ...

Page 22: ...y if required by your ISP Otherwise leave it at the default setting Home WAN PPPoE Choose PPPoE Point to Point Protocol over Ethernet if your ISP uses a PPPoE connection Your ISP will provide you with a username and password This option is typically used for DSL services Select Dynamic PPPoE to obtain an IP address automatically for your PPPoE connection Select Static PPPoE to use a static IP addr...

Page 23: ...C address is set to the WAN s physical interface MAC address on the Broadband Router You can use the Clone MAC Address button to copy the MAC address of the Ethernet Card installed by your ISP and replace the WAN MAC address with the MAC address of the router It is not recommended that you change the default MAC address unless required by your ISP Primary DNS Address Input the primary DNS Domain N...

Page 24: ...r the Subnet Mask address of the router for a static IP entry Dynamic IP requires no input here Gateway Enter the gateway address here This is the IP address of the ISP server Server IP Enter the IP address of the PPTP s server computer This is how the user will become authenticated to use PPTP PPTP Account Enter the name of the PPTP account as provided to you by your ISP PPTP Password Enter the P...

Page 25: ...or the workstation on the LAN to manually connect to the Internet through this router Home WAN Others L2TP L2PT Choose between Dynamic and Static IP Using Dynamic IP the router will set your basic IP parameters such as the IP Address Subnet Mask and Gateway For Static IP this information must be set manually by the user IP Address The IP address that will be assigned to your router for this connec...

Page 26: ...twork account is billed according to the amount of time the Router is actually connected to the Internet enter an appropriate Idle Time value in seconds This will disconnect the Router after the WAN connection has been idle for the amount of time specified The default value 5 MTU Enter an MTU value only if required by your ISP Otherwise leave it at the default setting Connect Mode If Connect on de...

Page 27: ...t becomes disconnected MAC Address The default MAC Address is set to the WAN s physical interface MAC address on the Broadband Router It is not recommended that you change the default MAC address unless required by your ISP Clone MAC Address The default MAC address is set to the WAN s physical interface MAC address on the Broadband Router You can use the Clone MAC Address button to copy the MAC ad...

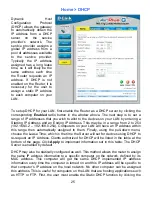
Page 28: ...rom hosts on the LAN and forward them to the ISP or alternative DNS servers DNS relay can use auto discovery or the DNS IP address can be manually entered by the user Alternatively you may also disable the DNS relay and configure hosts on your LAN to use DNS servers directly Most users who are using the Router for DHCP service on the LAN and are using DNS servers on the ISP s network will leave DN...

Page 29: ... allows the router to assign the same IP address information to a specific computer on the network defined by its MAC address This computer will get the same DHCP implemented IP address information every time the computer is turned on and this IP address will be specific to that computer s IP address on the local network No other computer can be assigned this address This is useful for computers o...

Page 30: ...rom this computer will be implemented in the Static DHCP configuration area Click Apply to implement these static settings Advanced Virtual Server To view the following window click on the Advanced tab at the top of the window and then click the Virtual Server button to the left The Virtual Server will allow remote users access to various services outside of their LAN through a public IP address s...

Page 31: ... to transfer information securely between VPNs Virtual Private Routers NetMeeting An application that allows teleconferences over the Internet DCS 1000 A D Link internet camera used for security monitoring DCS 2000 A D Link internet camera used for security monitoring DVC 1000 A D Link VideoPhone used for video conferencing External services may be modified by clicking the corresponding edit icon ...

Page 32: ...er listed yet this may need to be changed in certain circumstances Public Port Enter the port number of the device on the WAN side of the network that will be accessing the Virtual Server currently being configured Commonly this port number is identical to the Private Port number Existing Virtual Servers listed already have their well known port number listed yet this may need to be changed in cer...

Page 33: ... multiple ports which are to be separated by a comma upon entry or a range of ports which are to be separated by a dash This window is used to configure applications that require multiple connections such as Internet Telephony video conferencing and Internet gaming The following window lists six Special Applications that commonly use more than one connection To configure one of these applications ...

Page 34: ... data packets and scrutinizes them in order to control network access Filtering rules determine whether packets are passed through the Router from either side of the gateway The rules are created and controlled by the network administrator and can be precisely defined These rules are used to block access to the LAN from outside the network and or to deny access to the WAN from within the network T...

Page 35: ...ther to enable or disable this configuration for IP filtering IP Address An IP address or range of IP addresses that will be denied access to the Internet This window will aid the use in configuring filters for IP addresses This will deny specified LAN IP addresses or specific ports associated with these LAN IP address from accessing the Internet Well known ports have already been previously set i...

Page 36: ...ime period to deny these IP addresses from accessing the Internet Advanced Filters MAC Filters Disabled MAC Filters Click this radio button to disable MAC filtering on the Router Only Allow Click this radio button if you wish to allow specific computers access to the network based on MAC address All computers are uniquely identified by their MAC Media Access Control address The following window wi...

Page 37: ...ss to be filtered DHCP Client This field will display the DHCP client s host name and MAC address here You may clone this MAC address by simply clicking the Clone button The cloned entry will be displayed in the MAC Filters List Advanced Parental Control Parental Control is used to deny access to certain websites and domains on the Internet This is beneficial for users who want to deny computers o...

Page 38: ...ss to users on the LAN For example if you wish to block users from accessing shopping websites enter the keyword shopping into the URL Keyword field Websites having shopping in their URL such as http www yahoo com shopping stores html or http www msn search shopping spree html will now be denied access from computers on the LAN This feature may be beneficial to parents wanting to stop their kids f...

Page 39: ...the Domain s URL ex yahoo com google com into the Blocked Domains field and then click Apply The blocked entry will appear in the Blocked Domains List at the bottom of the screen To modify an entry in this list click its corresponding edit icon To delete an entry from this list click its corresponding delete icon For users wishing to allow computers on the LAN access to only specified domains choo...

Page 40: ... comes equipped with a firewall The Firewall Rules window allows the Router to enforce specific predefined policies intended to protect against certain common types of attacks To configure the Router s firewall click the Advanced tab at the top of the window and then the Firewall tab to the left To configure rules for the firewall modify the following fields and click Apply to set the rule in the ...

Page 41: ...es that you wish to block or allow to pass through the router The Source may be identified on the LAN side the WAN side or both by using the pull down menu for the Interface heading Dest Enter the IP address or range of IP addresses that you wish to deny or allow access to the Internet The Destination may be identified on the LAN side the WAN side or Both by using the pull down menu for the Interf...

Page 42: ...N It may be wise to use isolate the device with the DMZ IP address from the rest of the LAN For example if you want to use video conferencing and still use a firewall you can use the DMZ IP address function In this case you must have a PC or server through which video conferencing will take place The IP address of this PC or server will then be the DMZ IP address You can designate the server s IP ...

Page 43: ...S allows a dynamic public IP address to be associated with a static host name in any of the many domains allowing access to a specific host from various locations on the Internet With this function enabled remote access to a host will be allowed by choosing a URL by using the pull down menu Because many ISPs assign public IP addresses using DHCP it can be difficult to locate a specific host on the...

Page 44: ...abled button to enable the DDNS feature on the router Server Address Choose the DDNS server address from the pull down menu Available servers include DynDns org No IP com hn org and zoneedit com Host name Enter the host name of the DDNS server Username Enter the username given to you by your DDNS server Password Enter the password given to you by your DDNS server Click Apply to set this informatio...

Page 45: ...router To allot bandwidth per port on the router click the appropriate QoS radio button and configure the parameters QoS may be configured per Physical Port MAC address IP address or specified application See the following explanation for more detailed information on each type of QoS setting ...

Page 46: ... Simply click the Enable check box of the corresponding port to enable QoS You may also set the bandwidth for that port by using that corresponding pull down menu The user may choose a bandwidth between 128 Kbps to 32 Mbps FULL denotes that the port will have the maximum transfer speed allowed at any given time up to 100Mbps Click Apply to confirm your settings ...

Page 47: ...ed the incoming bandwidth from the ISP or it will cause other devices on the LAN to slow down due to decreased bandwidth Check with your ISP for more information on the bandwidth allotted to your account WAN Uplink Bandwidth Use the pull down menu to set the WAN Uplink Bandwidth The user may choose a speed from 64kbps to Full 100Mbps Ensure that the Bandwidth does not exceed the incoming bandwidth...

Page 48: ...ent The user may use the DHCP client to aid in choosing the MAC address to be implemented for QoS All devices connected to the router will be listed in the pull down menu Simply choose the correct device and click the Clone button which will produce that devices MAC address in the Source MAC field Bandwidth Use the pull down menu to select the best bandwidth for the QoS Setting on this router The ...

Page 49: ...dio button which will reveal the preceeding window for the user to configure Ensure that the bandwidth does not exceed the incoming bandwidth from the ISP or it will cause other devices on the LAN to slow down due to decreased bandwidth Check with your ISP for more information on the bandwidth allotted to your account ...

Page 50: ...is device will be sent to other devices on the LAN requesting it first Other devices will have a lower priority in sending information through the router Source IP Address Enter the source IP address or range of IP addresses that will be set for high priority QoS in the router Reserved Bandwidth Use the pull down menu to select the best bandwidth for the QoS setting on this router The user may set...

Page 51: ...ming bandwidth from the ISP or it will cause other devices on the LAN to slow down due to decreased bandwidth Check with your ISP for more information on the bandwidth allotted to your account QoS Control by ProtocolClick the Enabled radio button to enable QoS priority by application Information coming from this application will have the highest priority on the LAN This means that information orig...

Page 52: ...emember these are virtual ports and not physical ports on the router Bandwidth Use the pull down menu to select the best bandwidth for the QoS setting on this router The user may set a bandwidth between 1Kbps to 32Mbps Choosing Best Effort will set the router to allow the first user to access the set application to have the total bandwidth needed for the file being transferred Choosing Full will d...

Page 53: ...ot familiar with networking devices and protocols this section should be left at its default settings Below is a list of the functions associated with the Access Point feature of the router Click Apply when you have completed your changes TX Rate Use the pull down menu to select the transfer data rate in Mbps The default setting of Auto will automatically adjust the transfer rate to the highest po...

Page 54: ...it will be fragmented before transmission 2346 is the default setting DTIM Interval DTIM Delivery Traffic Indication Message is a countdown informing clients of the next window for listening to broadcast and multicast messages The default setting is 3 Preamble Type Select Short or Long Preamble The Preamble defines the length of the CRC block Cyclic Redundancy Check is a common technique for detec...

Page 55: ...rhead and may lower wireless throughput Auto CTS will monitor the wireless network and automatically decide whether to implement CTS based on the amount of traffic and collisions that occurs on the wireless network Always CTS will always be used to make sure the wireless LAN is clear before sending data None CTS is typically used in a pure 802 11g environment If CTS is set to None in a mixed mode ...

Page 56: ...access User can only view the settings but cannot make any changes Administrator admin is the Administrator login name Password Enter the password here and the same password in the Confirm Password field This will be the password that the administrator will use to gain access to the configuration menu of the device There is no default password for this device User user is the User login name Passw...

Page 57: ... Management interface In general only a member of your network can browse the built in web pages to perform Administrator tasks This feature enables you to perform Administrator tasks from the remote Internet host IP Address The Internet IP address of the computer that has access to the Broadband Router If you input an asterisk into this field then any computer will be able to access the Router Pu...

Page 58: ...ly need to set the time zone and the update Interval You may also set the time from the clock on your computer by checking the corresponding radio button To manually set the time you will need to input the value into the fields provided If you manually set the time you may also set the Daylight Saving Time by clicking the corresponding Enabled radio button and the system time will automatically ad...

Page 59: ...onfiguration settings saved to a local hard drive by entering the path into the open field or by clicking the Browse button and searching for its location the computer Once found click Load to upload these settings to the DI 524UP The administrator may also restore the router back to its default configurations by clicking the Restore button Save Click Save to save the current settings to the local...

Page 60: ...es at http support dlink com You can download firmware upgrades to your hard drive from the D Link support site Firmware Upgrade Click on the link in this window to find out if there is an updated firmware if so download the new firmware to your hard drive Browse After you have downloaded the new firmware click Browse in this window to locate the firmware update on your hard drive Click Apply to c...

Page 61: ...57 Click Continue to proceed NOTE Please avoid turning off the DI 524UP when it is in the middle of updating firmware as this action may cause serious damage to the device ...

Page 62: ...58 Tools Misc ...

Page 63: ...ts sent between PCs on your LAN and an IGMP host When the IGMP Proxy is enabled the Router can open or close a port to a specific PC based on IGMP messages passing through the Router UPNP Settings You may enable the Universal Plug n Play function here by clicking the Enabled radio button VPN Pass Through The DI 524UP supports VPN Virtual Private Network pass through for both PPTP Point to Point Tu...

Page 64: ... Test The above window is a Virtual Cable Tester and it shows the user the current status of the ports of the Router In this window we can see that LAN 3 port is connected at a speed of 100Mbps Full duplex and all the other connections do not have a valid link Clicking the More Info button will open an additional window with more information about this connection as shown below ...

Page 65: ...N and Wireless 802 11g statistics If your WAN connection is set up for a Dynamic IP address then a Release button and a Renew button will be displayed Use Release to disconnect from your ISP and use Renew to connect to your ISP If your WAN connection is set up for PPPoE a Connect button and a Disconnect button ...

Page 66: ...r resetting the DHCP server on the Router DHCP Release Clicking this button will release and reset the DHCP server All settings configured by DHCP will be lost DHCP Renew Clicking this button will allow the router to renew the DHCP server and automatically configure new DHCP settings for the connection IP Address WAN Public IP Address Subnet Mask WAN Public Subnet Mask Default Gateway WAN Public G...

Page 67: ...utomatically cleared You may save the log files under Log Settings View Log First Page The first page of the log Last Page The last page of the log Previous Moves back one log page Next Moves forward one log page Clear Clears the logs completely Log Settings Brings up the page to configure the log Refresh Refreshes the View Log window ...

Page 68: ...t to either an admin e mail address or a Syslog server Once you have completed your settings click Apply to let your changes take effect Log Type Choices include System Activity Debug Information Attacks Dropped Packets and Notice E Mail Alert Enter the appropriate e mail information in this section ...

Page 69: ...tus Statistics The window above displays the Traffic Statistics Here you can view the amount of pack ets that pass through the DI 524UP on the WAN LAN and Wireless ports The traffic counter will reset if the device is rebooted or can be reset by clicking the Reset button To refresh current statistics click the Refresh button ...

Page 70: ...ss Info The wireless client table displays a list of current connected wireless clients This table also displays the MAC address and mode of the connected wireless client Click on Help at any time for more information ...

Page 71: ...the right under the heading Printer Server Status To use this window simply plug your USB printer into the DI 524UP The USB LED on the front of the DI 524UP will light up and the printer will automatically appear in the window above The default Printer Name is lp1 If you have not done so already it is necessary to add the printer before you can start using it Please see the Installing a Printer on...

Page 72: ...ts in the NAPT Session section This is a total of the Active Session section on the bottom of the screen The Active Session section will sub divide the NAPT session section into separate IP addresses and their TCP and UDP packets For more details regarding a separate IP address on the LAN click the detail button of the corresponding IP address which will display the following window for the user t...

Page 73: ...ether it be TCP or UDP Source IP Displays the IP address of the device sending information Source Port Displays the virtual port used by the source IP address Dest IP Displays the IP address of the destination of the packets sent from the Source IP Dest Port Displays the virtual port receiving information for the Destination IP Age Time Displays the total time the particular UDP session was ongoin...

Page 74: ...70 Help The Help tab will give basic information referring to various windows located in the Router To view a specific section click on its hyperlinked name A new window of information will appear ...

Page 75: ...t Explorer v6 or later Netscape Navigator v6 or later DHCP Server and Client Advanced Firewall Features NAT with VPN Passthrough Network Address Translation MAC Filtering IP Filtering URL Filtering Domain Blocking Scheduling Wireless Operating Range Indoors up to 328 feet 100 meters Outdoors up to 1312 feet 400 meters Operating Temperature 32º F to 113 º F 0º C to 45º C ...

Page 76: ...s Power Status WAN WLAN Wireless Connection LAN 10 100 USB Status Physical Dimensions L 5 59 inches 142 mm W 4 29 inches 109 mm H 1 22 inches 31 mm Wireless Transmit Power 11g 13dBm Typical 11b 17dBm Typical Security 802 1 x WPA WiFi Protected Access WPA2 WiFi Certified Security with AES encryption 64 128 bit WEP with TKIP MIC IV Expansion Shared Key Authentication ...

Page 77: ... 5V 2A Weight 7 83 ounces 222 grams Warranty 3 year depends on D Link global warranty policy Wireless Data Rates with Automatic Fallback 54 Mbps 48 Mbps 36 Mbps 24 Mbps 22 Mbps 18 Mbps 12 Mbps 11 Mbps 9 Mbps 6 Mbps 5 5 Mbps 2 Mbps 1 Mbps Receiver Sensitivity 54Mbps OFDM 10 PER 72dBm 48Mbps OFDM 10 PER 74dBm 36Mbps OFDM 10 PER 78dBm 24Mbps OFDM 10 PER 80dBm ...

Page 78: ...74 18Mbps OFDM 10 PER 83dBm 12Mbps OFDM 10 PER 84dBm 11Mbps CCK 8 PER 85dBm 9Mbps OFDM 10 PER 84dBm 6Mbps OFDM 10 PER 84dBm 5 5Mbps CCK 8 PER 88dBm 2Mbps QPSK 8 PER 89dBm 1Mbps BPSK 8 PER 92dBm ...

Page 79: ...tings only once and then save it to a USB flash drive Once saved the user may insert this flash drive into any device on the network that is running wirelessly and the settings will automatically upload to that device No more configurations are necessary and all devices will have the identical access information and wireless information necessary to work smoothly over your internal LAN See the exp...

Page 80: ... to all users on the wireless LAN Choose Manually assign a network key which will be configured in the next window Click Next Choose a key that will be shared among users on your LAN There are certain guidelines to choosing this key as stated on the screen to the left Confirm the network key by retyping it in the following field Once entered click Next ...

Page 81: ...vice in the proper method and then plug that USB flash drive into all devices that will be accessing the wireless LAN Each device will upload the configurations automatically and be instantly accessible on the wireless LAN Insert the USB drive into a USB port on the computer choose Use a USB flash drive Click Next ...

Page 82: ...SB printer through the router the user must set up the computer on the LAN for the printer as well The following explanation will guide you through the steps needed to do this Remember to enter the same Queue Name on the PC as your router displays or the printer will not function properly Click on Add a printer Go to Start Printers and Faxes Click Next ...

Page 83: ...and Play printer if it has been selected Click Next Select Create a port and from the pull down menu select the correct port for your printer Most users will want to select Standard TCP IP Port as shown in the illustration Click Next The Add Standard TCP IP Printer Port Wizard window opens Click Next ...

Page 84: ...evices in the Port Name field Click Next The Wizard requires additional information to complete the process In the Additional Port Information Required window select the Custom radio dial and click the Settings button In the Configure Standard TCP IP Port Monitor window first select the LPR radio dial in the Protocol section Next add a Queue Name such as lp1 Click OK ...

Page 85: ...y disk that came with your printer and click Have Disk Click Next The Wizard will return to the Additional Port Information Required window after the settings have been entered in the Port Settings tab on the Configure Standard TCP IP Port Monitor window Click Next Please confirm the printer port information Click Finish ...

Page 86: ... the printer optional Click Next At this screen you must enter a share name if you want to share the printer with other network users Click Next At this screen you have the option of entering a location and description of your printer Click Next ...

Page 87: ...chosen the correct driver Click Next This screen gives you information about your printer Click Finish When the test page has printed click OK You have successfully added a printer Go to Start Printers and Faxes A successful installation will display the printer icon as shown at right ...

Page 88: ...or the printer as well The following explanation will guide you through the steps needed to do this Remember to enter the same Queue Name on the PC as your router displays or the printer will not function properly To begin the process open the Printer window on your PC by clicking Start Settings Printers which will open the following window Double click Add Printer which will open the Welcome to t...

Page 89: ... choose the type of installation for the wizard Choose Create a new port and use the pull down menu to select Standard TCP IP Port Click Next The next window to appear is the Welcome to the Add Standard TCP IP Printer Port Wizard Make sure that the printer is turned on and the network is properly configured Click Next ...

Page 90: ...k Next After clicking Next the Wizard requires additional information to complete the process In the Additional Port Information Required window click Custom Settings In the following window the user will add the Queue Name In the Configure Standard TCP IP Port Monitor window first select LPR in the Protocol section Next add the Queue Name that was automatically generated for you by your DI 524UP ...

Page 91: ...e the Completing the Add Standard TCP IP Printer Port Wizard window as shown to the left Here you can view the properties of the added printer including the IP address protocol and queue name Click Finish to complete the wizard ...

Page 92: ...n of the warranty period on this product U S and Canadian customers can contact D Link technical support through our website or by phone Tech Support for customers within the United States D Link Technical Support over the Telephone 877 453 5465 24 hours a day seven days a week D Link Technical Support over the Internet http support dlink com email support dlink com Tech Support for customers with...

Reviews: