background image


FAILURE TO READ AND FOLLOW ALL INSTRUCTIONS MAY RESULT IN SERIOUS INJURY

50

5 DRIVING


 Before driving, please check your local laws and regulations. It is your responsibility 

to adhere to any applicable laws when driving. D-Fly Group Ltd cannot be held liable for 
your breach of the laws.

5.1


UNLOCKING / LOCKING

5.1.1 ALARM

The motion sensing alarm has two stages: If your alarmed Dragonfly is moved there will 
be an audible sound to indicate an activated alarm. Should movement continue the alarm 
volume will increase. 

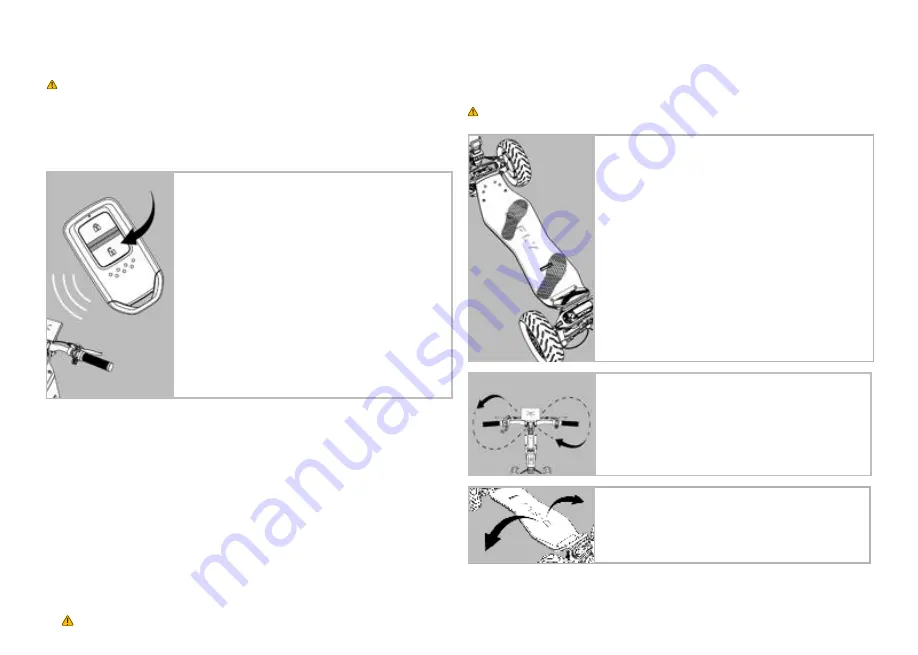
To stop the alarm press the 

Unlock

 button.

5.2 GETTING ON

 Keep your Dragonfly switched off while you familiarize yourself with it.

1. Getting on and standing
First put a foot on the deck and get a feel for it. Once you 
are comfortable, place your second foot on the deck. 
Practice getting on and off several times.

2. Finding your stance
Grab the handlebars. Pick a stance based on which 
foot you are most comfortable placing forward. Place 
your opposite foot to the rear of the deck at an angle 
which enables you to stay balanced, in control and safe. 
Familiarize yourself with your weight distribution on the 
deck, shifting all your weight to your front foot and then 
to your rear foot, feeling the weight on your front foot roll 
from your heel to your toes. Become familiar with the deck 
movement underneath your feet until you are totally at 
ease and comfortable with it.


3. Leaning the tiller
Start to engage the tiller, tilting left and right, twisting the 
handlebars and feeling the motions of steering. You will 
notice the possibility to draw a figure 8 with the handlebars 
and tiller, and that will guide the natural flow of your body 
movement when steering. Get familiar with the turning 
angles of the front wheels as you turn the handlebars.


To unlock your Dragonfly, simply press the unlock button 
twice on your fob (both presses must be within three 
seconds of each other) and your Dragonfly will come to life. 
You will hear the power on sound.

Note: The 10m activation range can be affected by other 
electrical interference.

To switch off and lock:

1 x Press Lock Button

 = Switches Dragonfly off but still 

allows movement of the vehicle. You will hear the power off 
sound.
 

2 x Press Lock


Button

 = Switches Dragonfly off. The double 

click activates the alarm, locking the front wheels. You will 
hear the alarm on sound.

4. Tilting the deck
Your Dragonfly deck tilts left and right which enables you 
to turn in your chosen direction. Practise tilting the deck 
left and right while stationary and observe how the deck 
tilting also changes the direction of the back wheels.  

Summary of Contents for DRAGONFLY

Page 1: ...D R A G O N F L Y WARNING READ THIS DRIVER S MANUAL IT CONTAINS IMPORTANT SAFETY INFORMATION KEEP FOR FUTURE REFERENCE...

Page 2: ...FAILURE TO READ AND FOLLOW ALL INSTRUCTIONS MAY RESULT IN SERIOUS INJURY E L E C T R I C A D V E N T U R E V E H I C L E D R I V E R S M A N U A L...

Page 3: ...1 D FLY GLOBAL LT D 1...

Page 4: ...Ensure all connection elements such as the folding system are correctly tightened and not broken Check that your brakes function effectively Confirm that you have not exceeded the maximum permissible...

Page 5: ...injury or death This publication includes the latest product information Please visit the D Fly website at d fly com for the latest user manual and instructions D Fly reserves the right to make change...

Page 6: ...INSTRUCTIONS MAY RESULT IN SERIOUS INJURY 4 C O N TAC T I N F O R M AT I O N Regardless of the problem we re here to help Get in touch via WEBSITE www d fly com HELPLINES USA 1 213 376 5572 UK 44 204...

Page 7: ...nd built on cutting edge technology using the highest quality materials The unique Dragonfly 3D full tilt steering system draws inspiration from the racetrack but goes so much further It combines four...

Page 8: ...Brake Lever 02 Display 03 Left Rear Brake Lever 04 Mode Selection 05 Accelerator 06 Headlight 07 Battery Lock 08 Battery 09 Motors 10 Rear Light 11 Deck 12 Lights Horn and Turn Signals 13 Offset 14 Ti...

Page 9: ...ction 05 Accelerator 06 Headlight 07 Battery Lock 08 Battery 09 Motors 10 Rear Light 11 Deck 12 Lights Horn and Turn Signals 13 Offset 14 Tiller 15 Folding Mechanism 16 Mudguards 17 Handguard Turn Sig...

Page 10: ...AP6001100 2022 AU2020399185 CA3 161 343 CN2020800960584 EP20828821 7 JP2022 535622 KR10 2022 7023473 MYPI2022003036 NZ789896 SA522432926 SG11202250304K US17 784 540 The Dragonfly vehicles are covered...

Page 11: ...7 Your Digital Dashboard HMI 26 4 8 Dragonfly App 49 4 9 Phone Mount Adapter 49 5 DRIVING 50 5 1 Unlocking 50 5 1 1 Alarm 50 5 2 Getting On 50 5 3 Driving 51 5 4 Driving Modes 51 5 5 Accelerating 52 5...

Page 12: ...arge your battery for the first time could invalidate your warranty See section 4 5 1 of your Driver s Manual STEP 4 If you didn t follow step 1 please read the manual in full It s important and this...

Page 13: ...11 11...

Page 14: ...the same box If any of these items are missing when you open the box contact Customer Service 2 1 YOUR DRAGONFLY Thank you for purchasing your new Dragonfly Use great caution when unpacking Handle al...

Page 15: ...Fly Group the manufacturer and distributor of the Dragonfly and its components shall not be liable for any damages arising from the use or inability to use the Dragonfly The user is solely responsible...

Page 16: ...is important to anticipate and adapt your trajectory and speed to those of a pedestrian when approaching these kinds of obstacles Always dismount your vehicle when obstacles become dangerous due to th...

Page 17: ...with all the hand controls components and your Dragonfly s performance acceleration braking turning Start driving with your vehicle in Driving Mode 1 D1 Practice in a safe zone avoid moving vehicles a...

Page 18: ...at least twice your drive duration before trying to touch the brakes REGULAR CHECKS Regularly check the tightening of the various bolted elements In particular the wheel axles the folding system the...

Page 19: ...17 17...

Page 20: ...eck to unfold your vehicle 2 To lock your Dragonfly into position hold the tiller in the upright position and use your other hand to pull up the lower latch into position until you hear the secondary...

Page 21: ...rized Before driving you must put pressure in your tires Follow these instructions to inflate your tires WARNING Always deflate your tire s completely before removing the wheel bolts to change them or...

Page 22: ...el Waterproof Rating IPX 4 Household Voltage 110V 240V 50760HZ Extras n a For Max Speed you must observe all local state and federal laws Unlock Max Speed by agreeing to the Driver s Obligations discl...

Page 23: ...d Rear Cover Mudguards x4 Handguards with turn signals For Max Speed you must observe all local state and federal laws Unlock Max Speed by agreeing to the Driver s Obligations disclaimer when engaging...

Page 24: ...ively charges 3 Close the cap once charging is complete 4 5 2 INSERTING YOUR BATTERY 4 5 3 ON VEHICLE CHARGING 1 Place the tiller in the folded position and open the lock cover 2 Using your battery or...

Page 25: ...condensation from building inside the battery unit Stop using your charger if the charging light does not switch on when you plug your charging cable into the unit or the battery takes an unusually l...

Page 26: ...elps maintain optimal battery performance to achieve the best range Driving in temperatures below our recommended temperature range reduces range and battery performance DRIVING CONDITIONS The weather...

Page 27: ...25 25...

Page 28: ...l 02 Current 03 Speed 04 Battery fault 05 Battery temperature warning 06 Motor fault 07 Charging 08 Battery 09 Weather 10 Temperature 11 Time 12 Turn Signal 13 Driving Mode 14 Electronic Front Parking...

Page 29: ...ing the accelerator the brakes will auto engage NOTE At slow speeds the auto brakes will need to be supplemented by applying the mechanical rear brakes Torque Level Adjust the torque power level deliv...

Page 30: ...me screen approx 4 seconds Once at the home screen you will see your speed at 0 kmh mph on the left hand side the Amps output at 0 A in the centre your trip data at 0 km and your odometer at 0 km You...

Page 31: ...ill automatically connect you to either Bluetooth or Wifi connection depending on the option you have selected You will need to select the device code in your smart phone Bluetooth settings or Select...

Page 32: ...URY 30 5 While your mobile device is connected to the D Fly App you will be able to keep up to date with your social media notifications 7 And recieve message alerts to your digital dashboard 6 Take c...

Page 33: ...ice connected section will show your paired device 10 Scan the QR code and if you haven t already downloaded the D FLY app Once installed select the wifi hotspot from your phone Select the matching co...

Page 34: ...he Bluetooth connection with a paired device 14 RToggle down and select Reset Wifi if there appears to be a fault or you have a new mobile device DASHCAM 1 Select Dashcam and your HMI will display the...

Page 35: ...the main menu 2 Select Screen Mode AUTO Day or Night The HMI will adjust to the typical light conditions or automatically recognise conditions for optimal contrast during your drive 3 Toggle down to s...

Page 36: ...T IN SERIOUS INJURY 34 BRIGHTNESS 1 Select Brightness on the main menu 2 Select AUTO Low or High The HMI will adjust the brightness or automatically recognise the optimal brightness for your Drive 3 T...

Page 37: ...35 UNIT SETTINGS 1 Select Unit Settings on the main menu 2 Select Speed unit 3 Toggle between Metric km Imperial miles 4 The display will auto adjust the speedometer trip data and odometer readings...

Page 38: ...FAILURE TO READ AND FOLLOW ALL INSTRUCTIONS MAY RESULT IN SERIOUS INJURY 36 5 At the Unit Settings menu toggle down and select Temperature unit 6 Select Celsius 7 Or toggle down and select Fahrenheit...

Page 39: ...ange the language of your dashboard go to the main menu toggle down and select Language 2 The default language setting is English 3 Toggle down to choose your preferred language NOTE Not all languages...

Page 40: ...TTINGS 1 Toggle down to Vehicle Settings at the main menu and press select This opens up several subsections for you to personalise Drive options 2 Select Kickstart 3 Choose between having Kickstart O...

Page 41: ...nu toggle down to E ABS Power and press select 6 The default is set to OFF 7 Toggle down and select ON to switch on E ABS Power and your ONE DRIVE FEATURE 8 At the Vehicle Settings menu toggle down to...

Page 42: ...nfly for the first time in complete safety 10 Toggle down through each setting 11 As you increase the torque level from 25 up to 100 the amount of power delivered to the wheels will increase The torqu...

Page 43: ...tting Toggle down through the settings 15 The higher the level the greater the amount of braking is applied when you release the accelerator ONE DRIVE is a new feature and unique to Dragonfly We recom...

Page 44: ...ter the amount of battery charging will occur during your drive 18 At the Vehicle Settings menu toggle down to Shutdown 19 Press select to activate the automatic shutdown 20 Toggle through the various...

Page 45: ...OFF ROAD to unlock enhanced performance and full power output to tackle challenging terrain 22 In order to enable OFF ROAD mode you must accept the disclaimer on your digital display unit DASHCAM SET...

Page 46: ...ra back on itself and want the image to remain the correct way up 4 Toggle down to Camera Mirror Camera Mirror flips the view of your camera feed horizontally This can be useful to avoid a confusing f...

Page 47: ...only with H264 and this setting can be more appropriate for streaming 8 Select Loop Recording from the Dashcam Settings menu 9 Toggle through the options and activate your desired loop recording time...

Page 48: ...US INJURY 46 11 Select ON default to turn the sound of your dashcam mic on 12 Toggle down and select OFF to turn the sound of your dashcam mic off 13 Select Video Quality from the Dashcam Settings men...

Page 49: ...wn and select Balanced to record in equal balance between quality and space efficiency 17 Select Format from the Dashcam Settings menu 18 Select Yes to format the dashcam unit WARNING Formating the da...

Page 50: ...RESULT IN SERIOUS INJURY 48 19 If you do not want to format the unit toggle down and select NO DEVICE INFORMATION 1 Toggle down to Device Information from the main menu and press select 2 The vehicle...

Page 51: ...thin your charger case is a small adapter ring This is to be used with the Quad Lock mount system Quad Lock USA Official Store https quadlockcase com Carefully remove the rubber cap from the stem and...

Page 52: ...rear foot feeling the weight on your front foot roll from your heel to your toes Become familiar with the deck movement underneath your feet until you are totally at ease and comfortable with it 3 Le...

Page 53: ...accepted or switched to Always ON See page 43 4 Lights horn and turn signals Familiarize yourself with all safety components Lights The lights and can be operated with the press of a button on the lef...

Page 54: ...f the ONE DRIVE technology can add up to 10 battery efficiency 5 6 1 MECHANICAL PARKING BRAKE 5 6 2 E PARKING P BRAKE Your Dragonfly s acceleration is controlled by an accelerator The button is locate...

Page 55: ...on or introduce a payload to your vehicle as there is a risk of rolling downhill Regular rear brake maintenance is required to ensure the operation of the mechanical brake 5 6 3 2 STARTING WARNING Alw...

Page 56: ...will find 4 location points that enable you to modify the tightness of the springs which in turn control the stiffness of the deck tilt Looser springs mean more tilt and therefore a tighter turn radi...

Page 57: ...te ONE DRIVE MODE You can then adjust the amount of power delivered to that system E ABS Power This setting enables you to choose how much braking force is generated on the front wheels when you relea...

Page 58: ...r good visibility on your drive and any reflective materials free from dirt WARNING Never use a power washer to clean your vehicle 6 3 REPAIR Any issue with the following components can be repaired fo...

Page 59: ...see one of these lights please follow the relevant advice below Battery Temperature Warning Switch your vehicle off Find a cool place to let your vehicle rest and reduce in temperature The time for t...

Page 60: ...s of the vehicle This allows you to personalize your driving experience for different types of roads and conditions by adjusting the stiffness of the suspension struts There s a tool provided in each...

Page 61: ...59...

Page 62: ...use or maintenance according to the Driver s Manual alteration modification installation of unauthorised parts corrosion an accident or other abnormal excessive or improper use b Your Dragonfly is us...

Page 63: ...refund you this amount net of any transaction fees incurred to the original method of payment This refund can take 5 7 business days Refund Values Should you have purchased product using foreign exch...

Page 64: ...conditions 10 DRIVER S OBLIGATIONS PLEASE READ THESE TERMS AND CONDITIONS CAREFULLY THIS DOCUMENT SETS FORTH LEGALLY BINDING TERMS AND CONDITIONS FOR YOUR USE OF THE DRAGONFLY THESE TERMS AND CONDITON...

Page 65: ...sidewalks Driver acknowledges and agrees that certain states may require a driver s license and may require certain safety equipment for use of the Dragonfly and that additional vehicle code requirem...

Page 66: ...mechanical problem maintenance need Driver agrees not to drive the Dragonfly if there are any noticeable issues and to immediately notify customer service to alert D Fly of any problems 2 2 Helmets Sa...

Page 67: ...ased Persons gross negligence or willful misconduct This release is intended to be a general and complete release of all Claims Claims means collectively any and all claims injuries demands liabilitie...

Page 68: ...ny person other than You We may provide any notice to You hereunder by i sending a message to the email address You provide or ii by posting to the website Notices sent by email will be effective when...

Page 69: ...67...

Page 70: ...ice complies with Part 15 of the FCC Rules Operation is subject to the following two conditions 1 this device may not cause harmful interference and 2 this device must accept any interference received...

Page 71: ...D FLY GLOBAL LT D...

Page 72: ...atural curiosity and eager to try new things People with a fascinating array of passions and interests An exploratory spirit and insatiable appetite to find joy in everyday life Adventurists are among...

Reviews: