CYP CLUX-1HLR Operation Manual Download Page 8

3

6. OPERATION CONTROLS AND FUNCTIONS
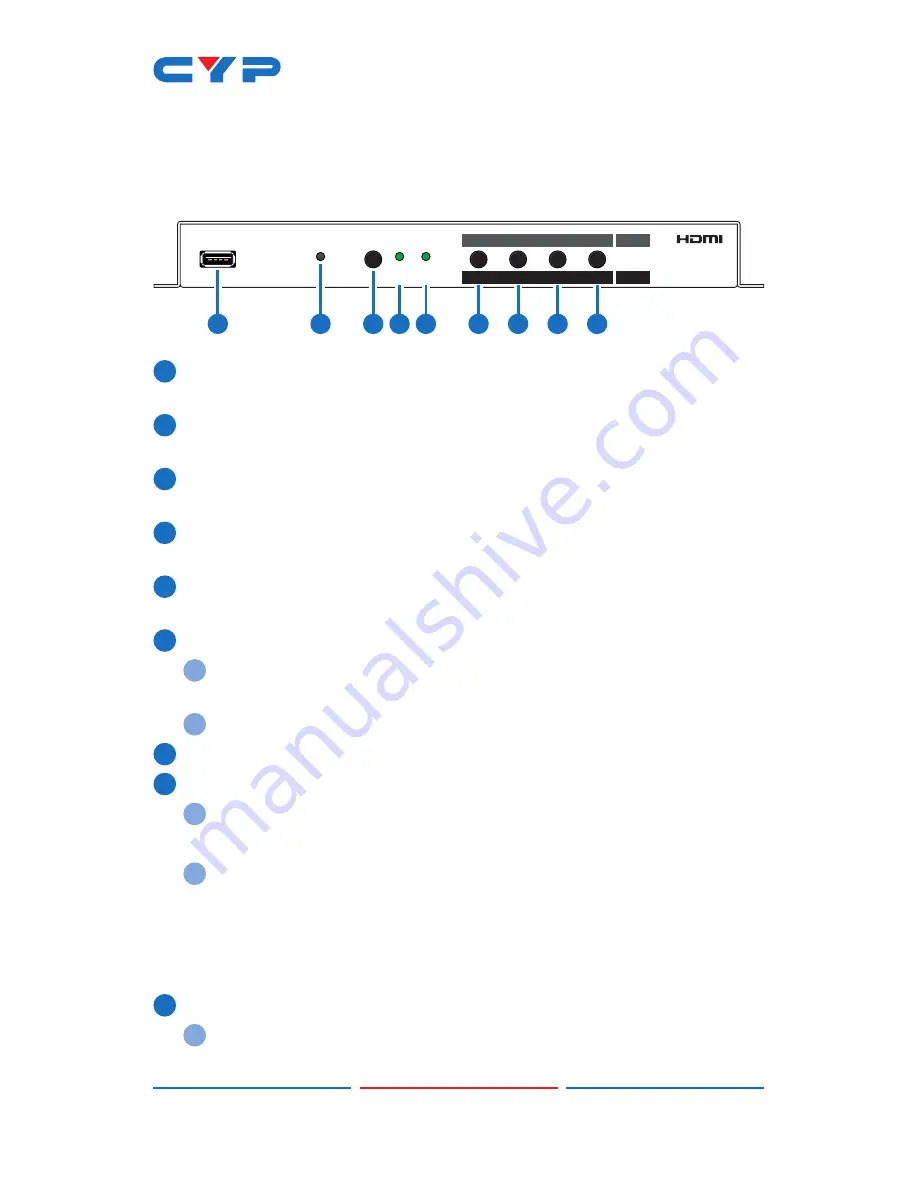
6.1 Front Panel

SERVICE

POWER

MODE

SCALE ROTATE

HDMI VIDEO PROCESSOR

ASPECT

RATIO

AUDIO

MUTE

VIDEO

STILL

OSD

INFO.

SCALE

WARPING

ON/OFF

AUDIO

MUTE

360º

ROTATE

45º

ROTATE

ROTATE

1

2

3 4 5

6

7

8

9

1

 SERVICE PORT: 

This port is used for logo upload, EDID upload and 

firmware updates.

2

 POWER LED: 

This LED will illuminate to indicate the unit is on and 

receiving power.

3

 MODE BUTTON: 

Press the button to toggle between Scaler Mode 

and Rotation Mode.

4

 SCALE LED: 

This LED will be illuminated when the unit is in Scaler 

Mode.

5

 ROTATE LED: 

This LED will be illuminated when the unit is in Rotation 

Mode.

6

 ASPECT RATIO & WARPING ON/OFF BUTTON

A

 Scaler Mode: 

Press to switch between the available output 

aspect ratios (Full, 4:3, 16:9, 16:10).

B

 Rotation Mode: 

Press to turn Warping Mode on or off.

7

 AUDIO MUTE BUTTON: 

Press to mute or unmute the audio output.

8

 VIDEO STILL & 360° ROTATE BUTTON

A

 Scaler Mode: 

Press to freeze the video output.


Note: Audio will continue to play while the video is frozen.

B

 Rotation Mode: 

Press to enter automatic 360° rotation mode 

and toggle through the available rotation directions and speeds 

(slow counterclockwise, slow clockwise, fast counterclockwise, 

fast clockwise, stop).


Note: Activating 360° rotation will disable Warping Mode.

9

 OSD INFO. & 45° ROTATE BUTTON

A

 Scaler Mode: 

Press to display information about the unit on the 

OSD including details about video, audio and Ethernet.

Summary of Contents for CLUX-1HLR

Page 1: ...CLUX 1HLR HDMI Video Wall Rotation Processor Operation Manual Operation Manual...

Page 2: ......

Page 3: ...echnology reserves the right to make improvements to this document and or product at any time and without notice COPYRIGHT NOTICE No part of this document may be reproduced transmitted transcribed sto...

Page 4: ...ny openings or empty slots in the unit as you may damage parts inside the unit Do not attach the power supply cabling to building surfaces Use only the supplied power supply unit PSU Do not use the PS...

Page 5: ...4 Pre Defined Video Wall Layouts 14 6 3 5 Customized Video Wall Layouts 16 6 3 6 Multi Zone Video Wall Layouts 20 6 3 7 Configuration Export Import 22 6 4 RS 232 Control 24 6 5 Telnet Control 24 6 6 R...

Page 6: ...By combining multiple units with an HDMI splitter or matrix it is possible to create fantastically varied arrangements of rotated displays for large video wall applications This is perfect for creatin...

Page 7: ...up to 1080p 60Hz Supports pass through of audio formats including LPCM 2 0 5 1 7 1 Bitstream and HD Bitstream Only 1 to 2 frames of video latency Supports horizontal vertical video warping with zoomin...

Page 8: ...s in Rotation Mode 6 ASPECT RATIO WARPING ON OFF BUTTON A Scaler Mode Press to switch between the available output aspect ratios Full 4 3 16 9 16 10 B Rotation Mode Press to turn Warping Mode on or of...

Page 9: ...ier for digital video and audio output 2 IN PORT Connect to HDMI source equipment such as a media player game console or set top box 3 RS 232 PORT Connect directly to a PC laptop or other serial contr...

Page 10: ...e of the unit if needed 6 3 1 Software Operation Please obtain the Video Wall Control software from your authorized dealer and save it in a directory where you can easily find it Ensure that all the u...

Page 11: ...connected via RS 232 can t be directly detected so all available serial ports will be listed even if they do not currently have a connected unit All Units List All detected units on the local network...

Page 12: ...ect button will activate the software s connection to all discovered units allowing control and configuration of those units To connect to only a single unit right click on the unit s number and selec...

Page 13: ...b provides control over the network configuration and provides a way to initiate a firmware update or perform a factory reset This tab provides the same options in both operational modes 1 System Setu...

Page 14: ...button 1 EDID Mode Select the preferred EDID for the unit to use from the dropdown menu FHD 2CH FHD MCH User and Sink 2 EDID Update To upload a custom User EDID insert a USB thumb drive with a valid E...

Page 15: ...ate button 9 Image Overlay Positioning Set the horizontal and vertical position of the upper left corner of the custom overlay image The Image tab in Rotation Mode provides control over the automatic...

Page 16: ...k the Update button 3 AV Mute Enables or disables the audio video mute function When enabled video output will be black and audio will be muted 4 Audio Mute Enabled or disables the audio mute function...

Page 17: ...y into the unit s USB service port then click the Update button 11 Image Overlay Positioning Set the horizontal and vertical position of the upper left corner of the custom overlay image The Image tab...

Page 18: ...Note While the output is frozen audio will continue to play normally 5 Color Temperature Provides control over the color temperature of the scaled output image 6 Brightness Provides control over the...

Page 19: ...and the size position of each display listed to the left is measured in pixels relative to its size position within the layout space Pre defined layouts do not include bezel compensation Note Video w...

Page 20: ...e preferred layout select all of the units involved in the video wall from the Unit section at the top of the window and then click on the Set button in the bottom right corner of the window to upload...

Page 21: ...at is connected to it and the size position of each display listed to the left is measured in pixels relative to its size position within the layout space When a bezel measurement is used the display...

Page 22: ...the Unit section at the top of the window and then click on the Set button in the Unit information section to upload the new layout configuration to all selected units After clicking Set the units wil...

Page 23: ...to 0 the height and width values should only be the measurement of the video panel within the display However if bezel values are being used these dimensions represent the size of the entire physical...

Page 24: ...yout to all selected unit s 4 Warping On Off Buttons Enables or disables warping on the currently selected unit s When warping is disabled the complete source video will display normally filling the d...

Page 25: ...asier Simply click on the Zone button to launch the Zone Source Setup window Select the number of horizontal and vertical zones needed The total effective resolution of all zones together is displayed...

Page 26: ...in the full layout 5 Background Load Click this button to load a graphic image to use as a background for the video wall s to help visualize the effect of the whole layout on the source video 6 Backgr...

Page 27: ...is section provides a way to load save or clear populated layout configurations New Button Completely clears all displays from the currently viewed layout edit window Note Only displays and their unit...

Page 28: ...guration from a file zip format located on the local PC Export Button Click this button to open the export dropdown Export Current Layout Exports the currently viewed layout to a file on the local PC...

Page 29: ...ws 7 Click Start type cmd in the search field and press Enter Windows XP Click Start Run type cmd and press Enter Mac OS X Click Go Applications Utilities Terminal Once in the Command Line Interface C...

Page 30: ...nk EDID get in a edid Show the EDID currently being used by the HDMI input set out a mute N1 Enable or disable audio video mute on the HDMI output Available values for N1 on A V Mute enabled off A V M...

Page 31: ...in seconds N1 0 100 Timeout length get out a osd info timeout Show the current info OSD s timeout value for the HDMI output set out a osd info vposition N1 Set the vertical position of the OSD on the...

Page 32: ...formation set ip addr N1 Set the unit s static IP address N1 x x x x x 0 255 IP address get ip addr Show the unit s current IP address set netmask N1 Set the unit s netmask address N1 x x x x x 0 255...

Page 33: ...ust be USEREDID BIN usb update bmp Upload a new User Bitmap from a thumb drive in the USB port Note The logo filename must be LOGO BMP and the resolution must be 1920 1080 or less with 256 colors set...

Page 34: ...isables Warping get rot360 a mode Show the 360 automated rotation demonstration mode s current state set rot45n a mode N1 Set a fixed rotation angle for the output image Available values for N1 0 Rota...

Page 35: ...1366 768 60Hz 423 1440 900 60Hz 424 1600 900 60Hz RB 425 1600 1200 60Hz 426 1680 1050 60Hz 430 1920 1200 60Hz Note Scaler Mode only get out a timing Show the universal timing number of the current res...

Page 36: ...f the video source set in a hue N1 Set the hue value of the video source N1 0 100 Hue value Note Scaler Mode only get in a hue Show the current hue value of the video source set in a sharpness N1 Set...

Page 37: ...olor temperature setting for the video source set in a flip N1 Enable or disable horizontally flipping the video source Available values for N1 on Enable horizontal flip off Disable horizontal flip No...

Page 38: ...y Note Scaler Mode only get out a text overlay Show the current state of the custom text overlay display set out a overlay hpos N1 Set the horizontal position of the custom text overlay on the HDMI ou...

Page 39: ...N1 Set the horizontal position of the User Bitmap on the HDMI output N1 0 100 Horizontal position get out a bitmap hpos Show the current horizontal position of the User Bitmap on the HDMI output set o...

Page 40: ...SSOR ASPECT RATIO AUDIO MUTE VIDEO STILL OSD INFO SCALE WARPING ON OFF AUDIO MUTE 360 ROTATE 45 ROTATE ROTATE SERVICE POWER MODE SCALE ROTATE HDMI VIDEO PROCESSOR ASPECT RATIO AUDIO MUTE VIDEO STILL O...

Page 41: ...AUDIO MUTE VIDEO STILL OSD INFO SCALE WARPING ON OFF AUDIO MUTE 360 ROTATE 45 ROTATE ROTATE SERVICE POWER MODE SCALE ROTATE HDMI VIDEO PROCESSOR ASPECT RATIO AUDIO MUTE VIDEO STILL OSD INFO SCALE WAR...

Page 42: ...C HDCP 3G IN OUT 1 OUT 2 OUT 3 OUT 4 SERVICE POWER MODE SCALE ROTATE HDMI VIDEO PROCESSOR ASPECT RATIO AUDIO MUTE VIDEO STILL OSD INFO SCALE WARPING ON OFF AUDIO MUTE 360 ROTATE 45 ROTATE ROTATE SERVI...

Page 43: ...US EU standards CE FCC UL certified ESD Protection Human Body Model 8kV Air Discharge 4kV Contact Discharge Dimensions 231 5mm 25mm 108mm W H D Case Only 231 5mm 25mm 117mm W H D All Inclusive Weight...

Page 44: ...366 768 60 1400 1050 60 1440 900 60 60 1600 900 60 RB 1600 1200 60 1680 1050 60 1920 1200 60 RB 60 720 480i 59 94 60 720 480p 59 94 60 60 720 576i 50 720 576p 50 50 1280 720p 50 59 94 60 50 60 1920 10...

Page 45: ...I Input Output LPCM Max Channels 8 Channels Sampling Rate kHz 32 44 1 48 88 2 96 176 4 192 Bitstream Supported Formats Standard High Definition 8 4 Cable Specifications HDMI Cable Length 1080p 8 bit 1...

Page 46: ...Interface HD High Definition HDCP High bandwidth Digital Content Protection HDMI High Definition Multimedia Interface HDTV High Definition Television IP Internet Protocol LAN Local Area Network LPCM...

Page 47: ......

Page 48: ...CYPRESS TECHNOLOGY CO LTD www cypress com tw...

Reviews: