background image

87

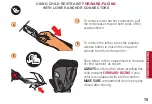
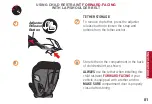
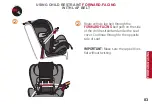
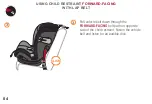
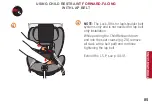
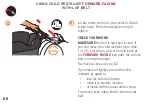
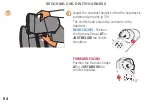
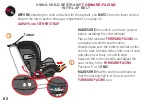
USING CHILD RESTRAINT

 FORWARD-FACING  

WITH LAP BELT

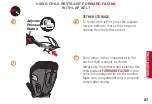
TETHER STORAGE:

To remove the tether, press the adjuster 

release button to loosen the strap and 

unhook from the tether anchor.


Store tether in the compartment in the 

back of child restraint, as shown. 

Always use the tether when installing this 

child restraint 

FORWARD-FACING

 if your 

vehicle is equipped with a tether anchor. 

Make sure compartment door is properly  

closed after storing.

 6

 7

 6

 7

Adjuster 

Release 

Button

FOR

W

ARD-F

ACING

Summary of Contents for ETERNIS S

Page 1: ...us injury or death read this owner s manual prior to installing and using this child restraint WARNING Para reducir el riesgo de lesiones graves o muerte lea este manual del propietario antes de insta...

Page 2: ...P System The L S P System allows the forces from a side impact collision to be reduced gradually to minimize injuries An adjustable head rest deep side wings lined with thick energy absorbing EPS foa...

Page 3: ...more information on the Academy s recommendation No car seat can guarantee protection from injury in every situation but proper use helps reduce the risk of death or serious injury If you have any que...

Page 4: ...ETY INFORMATION 8 27 OVERVIEW OF THE ETERNIS S CHILD RESTRAINT 28 29 CHILD USAGE GUIDELINES 30 35 CHILD RESTRAINT FEATURES 36 45 CUPHOLDER 36 HARNESS COVERS 37 NEWBORN INSERT 37 CROTCH STRAP 38 HEIGHT...

Page 5: ...NG WITH LOWER ANCHOR CONNECTORS 66 75 USING CHILD RESTRAINT FORWARD FACING WITH LAP SHOULDER BELT 76 81 USING CHILD RESTRAINT FORWARD FACING WITH LAP BELT 82 87 USING CHILD RESTRAINT IN BOOSTER MODE 8...

Page 6: ...lap shoulder belt systems and for use in aircraft When used WITHOUT the internal harness system in BOOSTER MODE and properly installed pursuant to these instructions this restraint is certified for us...

Page 7: ...ild restraint please contact us at Columbus Trading Partners USA Inc Attn ParentLink 1801 Commerce Drive Piqua Ohio 45356 USA 1 877 242 5676 For helpful information regarding child restraints www safe...

Page 8: ...8 AIRBAG WARNING WARNING DEATH or SERIOUS INJURY can occur WARNINGS AND IMPORTANT INFORMATION...

Page 9: ...formation for proper usage Vehicles built prior to the 2002 model year DO NOT use this restraint in a vehicle seating position equipped with a side air bag unless authorized by the vehicle manufacture...

Page 10: ...straint and in the written instructions stored in the compartment on the back of the child restraint NEVER leave child unattended DO NOT use a used child restraint whose history you do not know DO NOT...

Page 11: ...child restraint without also passing along this manual to them WARNING DEATH or SERIOUS INJURY can occur The primary protection for occupants of a vehicle in a collision is the structure of the vehic...

Page 12: ...d restraint within a vehicle will increase the risk of death or serious injury NEVER use this child restraint in a vehicle seating position where it cannot be secured tightly A loosely installed child...

Page 13: ...e child restraint immediately adjacent to a vehicle door or panel NEVER extend a Linear Side impact Protection L S P device toward a passenger or another child restraint ONLY use this child restraint...

Page 14: ...the REAR FACING mode should be placed in the lowest position The vehicle seat back that the child faces must be fully padded and free of any hard objects IMPORTANT Infants may have difficulty breathi...

Page 15: ...on the child s flesh or push the child s body into an unnatural position FORWARD FACING WARNINGS If your child weighs more than 65 lbs 29 4 kg or their shoulders are above the highest harness level y...

Page 16: ...shoulder belt guide DO NOT use this booster seat if the tops of the child s ears are above the back of the booster seat headrest The shoulder belt MUST NOT cross the child s neck or fall off the child...

Page 17: ...traint with the manufacturer This is the best way to reach you in the event of a recall DO NOT allow children to play with this child restraint DO NOT allow children to play with vehicle seat belts Th...

Page 18: ...cm side to side or front to back at either the REAR FACING or FORWARD FACING belt path on the child restraint Serious injury or death may result from poor installation If you cannot tightly secure the...

Page 19: ...y locking retractor ELR You must use a seating location with a locking seat belt Check your vehicle owner s manual to see if you have lap belts with ELRs SEAT BELT WARNINGS DO NOT use on vehicle seats...

Page 20: ...ental contact may cause the seat belt to release If necessary turn the seat belt release button away from the child restraint or move the child restraint to a different location Failure to adjust the...

Page 21: ...be locked when tightened and will not require use of a Locking Clip Consult your vehicle owner s manual before installing a locking clip If your vehicle requires a Locking Clip please call ParentLink...

Page 22: ...eight limits on LATCH use on pg 31 and 33 Refer to your vehicle owner s manual for LATCH locations Lap Belt with Automatic Locking Retractor ALR The automatic locking retractor does not allow the lap...

Page 23: ...ng all of the webbing out slowly to switch the retractor Check vehicle owner s manual for specific instructions The vehicle belt is tightened after switching the retractor by pulling up on shoulder be...

Page 24: ...cally offers an easier and more consistent installation However this child restraint can be safely installed using either LATCH or vehicle belts and meets the requirements of Federal Motor Vehicle Saf...

Page 25: ...llowed to use the two inner Lower Anchors from the outboard seating positions to install a Child Restraint CYBEX allows this child restraint to be installed using the two inner Lower Anchors from the...

Page 26: ...s manual ONLY use for securing child restraint to vehicle lower anchor bars NEVER attach two lower anchor connectors to one vehicle lower anchor bar NEVER use the vehicle seat belts when using the low...

Page 27: ...ccur To avoid a strangulation hazard you MUST store the tether inside the tether storage compartment on the back of the child restraint Attach the tether hook to the storage clip when not in use This...

Page 28: ...Harness Straps Newborn Insert L S P device fully extended Magnetic Buckle Tongue Holders Recline Position Indicator REAR FACING Belt Path Each Side REAR FACING Lock Off Each Side Level Indicator Headr...

Page 29: ...Button Tether Strap Stored FORWARD FACING Lock Off Each Side FORWARD FACING Belt Path Each Side Owner s Manual Stored inside compartment Lower Anchor Release Strap Lower Anchor Strap Tether Strap not...

Page 30: ...thin these requirements because they are too small select a different child seat such as a REAR FACING infant car seat If the child is NOT within these requirements because the child is too large revi...

Page 31: ...AR FACING only use Recline Positions 1 2 3 and 4 as shown DO NOT use LATCH in REAR FACING mode if child weighs more than 35 lbs 15 9 kg CHILD USAGE GUIDELINES REAR FACING 1 through 4 RECLINE POSITIONS...

Page 32: ...ALL of the requirements shown here If the child is not within these requirements because they are too large refer to booster mode instructions to see if child is appropriate for that usage The America...

Page 33: ...use Recline Positions 5 and 6 as shown DO NOT use LATCH in FORWARD FACING mode if child weighs more than 40 lbs 18 1 kg 6 5 4 3 2 1 6 5 CHILD USAGE GUIDELINES FORWARD FACING NO LATCH 10 kg 22 lbs 18...

Page 34: ...etched low and snug across the child s hips within the lower belt guides and fastened into the buckle BOOSTER MODE use of this child restraint is ONLY for children who meet ALL of the requirements sho...

Page 35: ...o be used in BOOSTER MODE ONLY to secure the booster seat to the vehicle seat The vehicle lap shoulder belt is required to be used in booster mode when child is in the booster seat 6 5 4 3 2 1 6 CHILD...

Page 36: ...with a capacity of 12 oz 355ml or less NEVER use any containers which are made of brittle material e g glass This could lead to injuries in the event of an crash NEVER leave open containers in the cup...

Page 37: ...Harness Straps over the side panels of Newborn Insert Push Newborn Insert firmly into Child Restraint to make sure it is properly positioned When positioning the headrest make sure the bottom of the...

Page 38: ...ckle pad Unfasten snaps on seat cover behind headrest pad and lift cover up Pull the seat cover forward Slide the harness buckle through the pad opening Grasp the bottom of the Crotch Strap and twist...

Page 39: ...of head rest and adjust to desired position HEIGHT ADJUSTABLE HEADREST The seat has a headrest that automatically adjusts the harness height without the need to re thread it The headrest may be adjust...

Page 40: ...vice when the child restraint is installed in an outer seating position ALWAYS USE an L S P device on the side of the child restraint immediately adjacent to a vehicle door or panel NEVER USE the L S...

Page 41: ...f extension 3 Full extension To push the L S P into the second position once fully extended press the L S P button and push the L S P into the housing halfway then release the L S P button Pressing th...

Page 42: ...ompartment to access the lower anchor strap 1 LOWER ANCHOR STRAP 2 1 2 REMOVING THE LOWER ANCHOR STRAP To store the strap remove from the belt path unfasten the snaps on seat pad open storage compartm...

Page 43: ...ght installation Tether anchor locations vary from vehicle to vehicle Some of the typical locations are shown here Refer to your vehicle owner s manual for exact locations anchor identification and re...

Page 44: ...rior Owners Manuals Installation Videos Customer care contact information SensorSafe Technology Questions Comments Visit us at http cybex online com us contact html or call CYBEX at 1 877 242 5676 Tra...

Page 45: ...45 NOTES...

Page 46: ...e lower anchor strap from storage compartment 1 2 Raise Headrest to its highest position and unbuckle chest clip and harness Unfasten the snaps on the seat cover and push crotch buckle through pad to...

Page 47: ...47 Push tabs in on the storage door as shown Open the lower anchor storage compart ment and pull the strap out 3 4 USING CHILD RESTRAINT REAR FACING WITH LOWER ANCHOR CONNECTORS 3 4 REAR FACING...

Page 48: ...ths marked REAR FACING MAKE SURE the strap lies flat across the storage compartment in front of the buckle strap CHECK to make sure the strap is not twisted in the plastic retention strap 5 6 USING CH...

Page 49: ...the strap between the connectors using the lower anchor adjuster buttons located next to the connectors Push down on the adjuster button while lengthening strap 7 8 USING CHILD RESTRAINT REAR FACING W...

Page 50: ...breathing when in an upright seated position Make sure they recline enough for their head to lie back comfortably and safely Squeeze the recline handle and adjust the seat recline to the REAR FACING P...

Page 51: ...hicle seat MAKE SURE that the seat is positioned so that the leveling ball is in the blue zone for REAR FACING use 10 10 USING CHILD RESTRAINT REAR FACING WITH LOWER ANCHOR CONNECTORS Locate the lower...

Page 52: ...the REAR FACING belt path on the inside of the child restraint 12 13 13 USING CHILD RESTRAINT REAR FACING WITH LOWER ANCHOR CONNECTORS While pushing down on the child restraint pull up on the end of t...

Page 53: ...e blue zone for REAR FACING use CHECK YOUR WORK Hold child restraint at each side near REAR FACING belt paths and pull side to side and forward Child restraint should not move more than 1 in 2 5 cm fr...

Page 54: ...nd safely Squeeze the recline handle and adjust the seat recline to the REAR FACING Positions 1 2 3 or 4 ONLY 1 2 3 4 1 USING CHILD RESTRAINT REAR FACING WITH LAP SHOULDER BELT BEFORE installing the c...

Page 55: ...ace child restraint REAR FACING on an approved vehicle seat location Always make sure the bottom sits flat on the vehicle seat MAKE SURE that the seat is positioned so that the leveling ball is in the...

Page 56: ...icle lap shoulder belt through the REAR FACING Belt Path on the side of the Child Restraint and under the seat cover Continue through to the opposite side of seat USING CHILD RESTRAINT REAR FACING WIT...

Page 57: ...vehicle belt in FRONT of the buckle MAKE SURE belt lies flat without twisting as shown NOTE See page 38 for proper Crotch Strap adjustment The Crotch Strap should ALWAYS be as close as possible to bu...

Page 58: ...le belt route the shoulder belt through the Lock Off While pushing the Child Restraint down and into the seat crease pg 24 pull the shoulder belt at the Belt Path to remove all slack Continue to pull...

Page 59: ...d the child restraint try again or lock the vehicle retractor move it to another location or install with the lower anchor strap If your shoulder belt still needs to be tightened you may need to refer...

Page 60: ...ortably and safely Squeeze the recline handle and adjust the seat recline to the REAR FACING Positions 1 2 3 or 4 ONLY 1 2 3 4 1 USING CHILD RESTRAINT REAR FACING WITH LAP BELT BEFORE installing the c...

Page 61: ...nt Place child restraint REAR FACING on an approved vehicle seat location Always make sure the bottom sits flat on the vehicle seat MAKE SURE that the seat is positioned so that the leveling ball is i...

Page 62: ...Route vehicle lap belt through the REAR FACING Belt Path on the side of the Child Restraint and under the seat cover Continue through to the opposite side of seat USING CHILD RESTRAINT REAR FACING WIT...

Page 63: ...icle belt in FRONT of the buckle MAKE SURE belt lies flat without twisting as shown NOTE See page 38 for proper Crotch Strap adjustment The Crotch Strap should ALWAYS be as close as possible to but NE...

Page 64: ...belt down through the REAR FACING Belt Path on opposite side of the Child Restraint Fasten the vehicle belt and listen for an audible click Extend the L S P see p 40 41 USING CHILD RESTRAINT REAR FAC...

Page 65: ...INT REAR FACING WITH LAP BELT 6 6 REAR FACING CHECK YOUR WORK MAKE SURE the belt is tight and locked If you can move the child restraint more than 1 in 2 5 cm side to side or front to back at the REAR...

Page 66: ...drest to its highest position and unbuckle chest clip and harness Unfasten the snaps on the seat cover and push crotch buckle through pad to expose the lower anchor storage compartment LEVEL 1 2 DO NO...

Page 67: ...67 Push tabs in on the storage door as shown Open the lower anchor storage compartment and pull the strap out 3 4 USING CHILD RESTRAINT FORWARD FACING WITH LOWER ANCHOR CONNECTORS 3 4 FORWARD FACING...

Page 68: ...h the belt paths marked FORWARD FACING MAKE SURE the lower anchor strap lies flat across the seat CHECK to make sure the strap is not twisted in the plastic retention strap 5 6 USING CHILD RESTRAINT F...

Page 69: ...strap between the connectors using the lower anchor adjuster buttons located next to the connectors Push down on the adjuster button while lengthening strap 7 8 USING CHILD RESTRAINT FORWARD FACING W...

Page 70: ...ions vary from vehicle to vehicle Refer to your vehicle owner s manual for exact locations anchor identification and requirements IF TETHER ANCHOR IS AVAILABLE IN YOUR VEHICLE Before placing the child...

Page 71: ...FORWARD FACING on an approved LATCH vehicle seat location Always make sure the bottom sits flat on the vehicle seat Unhook tether from rear of seat and place over back of vehicle seat 10 10 6 5 4 3 2...

Page 72: ...of the child restraint CHECK YOUR WORK HOLD child restraint at each side near FORWARD FACING belt paths Pull side to side and forward Child restraint should not move more than 1 in 2 5 cm from vehicle...

Page 73: ...Locate tether anchor in your vehicle Attach tether hook Pull tether adjuster strap to tighten Extend the L S P see p 40 41 USING CHILD RESTRAINT FORWARD FACING WITH LOWER ANCHOR CONNECTORS CLICK FORWA...

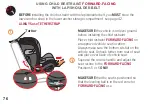
Page 74: ...forward Child restraint should not move more than 1 in 2 5 cm from the vehicle seatback or side to side MAKE SURE child restraint is level for FORWARD FACING use If necessary loosen the lower anchor...

Page 75: ...unhook from the tether anchor Store tether in the compartment in the back of child restraint as shown ALWAYS use the tether when installing this child restraint FORWARD FACING if your vehicle is equip...

Page 76: ...seat Squeeze the recline handle and adjust the seat recline to the FORWARD FACING Positions 5 or 6 ONLY MAKE SURE that the seat is positioned so that the leveling ball is in the red zone for FORWARD...

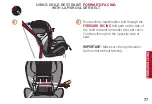
Page 77: ...4 3 2 1 Route vehicle lap shoulder belt through the FORWARD FACING belt path on the side of the child restraint and under the seat cover Continue through to the opposite side of seat IMPORTANT Make su...

Page 78: ...AINT FORWARD FACING WITH LAP SHOULDER BELT 6 5 4 3 2 1 Pull vehicle belt down through the FORWARD FACING belt path on opposite side of the child restraint Fasten the vehicle belt and listen for an aud...

Page 79: ...Child Restraint down and into the seat crease pg 24 pull the shoulder belt at the Belt Path to remove all slack Continue to pull on the shoulder belt while positioning the shoulder belt in the middle...

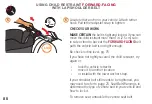
Page 80: ...ont to back at the FORWARD FACING belt path the vehicle belt is not tight enough Re check recline level pg 76 If you have not tightly secured the child restraint try again or lock the vehicle retracto...

Page 81: ...he strap and unhook from the tether anchor Store tether in the compartment in the back of child restraint as shown ALWAYS use the tether when installing this child restraint FORWARD FACING if your veh...

Page 82: ...hook tether from rear of seat and place over back of vehicle seat Squeeze the recline handle and adjust the seat recline to the FORWARD FACING Positions 5 or 6 ONLY MAKE SURE that the seat is position...

Page 83: ...5 4 3 2 1 2 Route vehicle lap belt through the FORWARD FACING belt path on the side of the child restraint and under the seat cover Continue through to the opposite side of seat IMPORTANT Make sure t...

Page 84: ...SING CHILD RESTRAINT FORWARD FACING WITH LAP BELT Pull vehicle belt down through the FORWARD FACING belt path on opposite side of the child restraint Fasten the vehicle belt and listen for an audible...

Page 85: ...for lap shoulder belt systems only and is not needed for lap belt only installation While pushing the Child Restraint down and into the seat crease pg 24 remove all slack at the belt path and continu...

Page 86: ...cked If you can move the child restraint more than 1 in 2 5 cm side to side or front to back at the FORWARD FACING belt path the vehicle belt is not tight enough Re check recline level pg 82 If you ha...

Page 87: ...rap and unhook from the tether anchor Store tether in the compartment in the back of child restraint as shown Always use the tether when installing this child restraint FORWARD FACING if your vehicle...

Page 88: ...s straps Raise the headrest to the highest position p 39 Unfasten chest clip and buckle Unfasten the seat pad p 46 then open the lower anchor storage compartment Move the crotch buckle to the front sl...

Page 89: ...89 USING CHILD RESTRAINT IN BOOSTER MODE 3 Place the harness straps chest clip and buckle tongues into the seat back compartment behind the seat pad as shown 3 BOOSTER MODE...

Page 90: ...MODE 4 Raise the seat pad and re fasten the snaps at the shoulder strap openings Adjust booster seat to position 6 Conversion to BOOSTER MODE is complete Reverse steps to convert back to FORWARD FACI...

Page 91: ...as the position of the booster seat in the vehicle and or the resulting fit of the vehicle seat belt over the child are not affected When installing the booster seat place child in booster seat and fa...

Page 92: ...NG THE CHILD Loosen harness by firmly pressing down on the harness adjustment button while pulling forward on both straps at shoulder level Press red button on harness buckle to release tongues Separa...

Page 93: ...vy clothing can prevent Harness from being properly tightened around the child SECURING CHILD WITH HARNESS Never secure child in child restraint with child wrapped in a blanket To keep child warm plac...

Page 94: ...ed properly p 39 The child s head should be centered in the headrest REAR FACING Position the Harness Straps AT or JUST BELOW the child s shoulders FORWARD FACING Position the Harness Straps AT or JUS...

Page 95: ...95 SECURING CHILD WITH HARNESS NOTE If using the lower headrest harness positions make sure the bottom of the headrest flap is behind the infant insert flap 1 2 4 3 6 5 FORWARD FACING REAR FACING...

Page 96: ...functions properly and is kept free of dirt and debris Make sure harness straps are not twisted Fasten chest clip by snapping both sides together listen for a click and slide to armpit level Push ches...

Page 97: ...snug on the child A snug strap should not allow any slack It lies in a relatively straight line without sagging It does not press on the child s flesh or push the child s body into an unnatural positi...

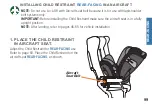
Page 98: ...ing your child in a Child Restraint during the flight will help ensure your family arrives safely at your destination The FAA recommends that a child weighing more than 40 lbs 18 kg use an aircraft se...

Page 99: ...s shown NOTE Do not use Lock Off with Aircraft seat belt because it is for use with lap shoulder belt systems only IMPORTANT Before installing the Child Restraint make sure the aircraft seat is in a f...

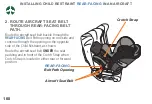
Page 100: ...buckle through the REAR FACING Belt Path opening on one side and continue through the opening on the opposite side of the Child Restraint as shown Route the aircraft seat belt UNDER the seat padding...

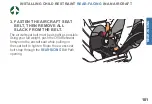
Page 101: ...t be as tight as possible Using your full weight push the Child Restraint firmly onto the aircraft seat while pulling on the seat belt to tighten Route the excess seat belt strap through the REAR FACI...

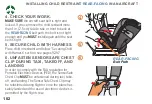
Page 102: ...l again until the seat belt is tight 5 SECURE CHILD WITH HARNESS Place child in restraint and follow Securing Child with Harness section see pages 92 97 6 UNFASTEN SENSORSAFE CHEST CLIP DURING TAXI TA...

Page 103: ...se Lock Off with Aircraft seat belt because it is for use with lap shoulder belt systems only IMPORTANT Before installing the Child Restraint make sure the aircraft seat is in a fully upright position...

Page 104: ...Child Restraint s Harness out of the way and raise the access flap Route the aircraft seat belt buckle through the FORWARD FACING Belt Path opening on one side and continue through the opening on the...

Page 105: ...remove this cushioning when removing from aircraft and installing in your motor vehicle after your flight 3 FASTEN THE AIRCRAFT SEAT BELT THEN REMOVE ALL SLACK FROM THE BELT The aircraft seat belt mu...

Page 106: ...t and locked If you can move the child restraint more than 1 in 2 5 cm side to side or front to back at the FORWARD FACING belt path the belt is not tight enough and you MUST install again until the s...

Page 107: ...SENSORSAFE CHEST CLIP DURING TAXI TAKEOFF AND LANDING In order to comply with the FAA regulation for Portable Electronic Devices PED the SensorSafe Chest Clip MUST be unfastened during taxi take off...

Page 108: ...ER PADS Unsnap and remove Shoulder Pads as shown 2 INSTALLING SHOULDER PADS Re attach Shoulder Pads by folding the snaps over the Harness Strap Secure both snaps Make sure they are oriented as shown 1...

Page 109: ...est cover off the headrest 10 Unsnap each side of the back padding and pull forward 11 Pull seat cover away from harness adjustment cover 12 Starting at the bottom of the seat pull the seat cover away...

Page 110: ...and water WASHING INSTRUCTIONS All seat cover parts can be washed as follows Machine wash separately in COLD water delicate cycle mild detergent Drip Dry TO AVOID SHRINKAGE DO NOT machine wash warm o...

Page 111: ...t if the Buckle Tongues DO NOT click into the buckle Try cleaning the buckle If this does not remedy the problem please call Customer Service 1 877 242 5676 before using the Child Restraint Harness St...

Page 112: ...or JUST BELOW child s shoulders REAR FACING or AT or JUST ABOVE child s shoulders FORWARD FACING Is the Harness snug around the child and secured properly with the Chest Clip positioned at armpit leve...

Page 113: ...113 115 NOTES...

Page 114: ...The Chest Clip Transmitter and 2 The Receiver Plug The system will not work unless both of these components are present in the vehicle with the Receiver installed in the vehicle s OBDII port page 118...

Page 115: ...p cybex online com us contact html BATTERY USAGE TO PRESERVE BATTERY LIFE ALWAYS STORE THE SENSORSAFE CHEST CLIP IN THE UNCLIPPED POSITION The Chest Clip ships with 1 button cell lithium battery insta...

Page 116: ...requirements of SAE J3005 FCC CERTIFIED Chest Clip Model SOSR2 FCC ID 2ABS2 SOSR3 Receiver Plug Model SS2 FCC ID 2ABS2 SS2 This device complies with Part 15 of the FCC Rules Operation is subject to th...

Page 117: ...paration between the equipment and receiver Connect the equipment into an outlet on a circuit different from that to which the receiver is connected Consult the dealer or an experienced radio TV techn...

Page 118: ...to your vehicle Owner s Manual for location Plug in the SensorSafe Receiver If unable to locate your vehicle manual the SensorSafe Application may contain information regarding the location of the 16...

Page 119: ...e has been driven at 5 miles 8 km per hour or more 5 PARK THE VEHICLE AND TURN OFF THE IGNITION Within 2 seconds of parking your vehicle and turning off the ignition you will hear the SensorSafe remin...

Page 120: ...ness Release Button on the front of the Child Restraint and pulling forward on both Harness Straps 2 Unbuckle Harness by pressing the button on the Crotch Buckle and pulling out both Buckle Tongues 3...

Page 121: ...Panasonic CR2032 Lithium button cell Battery as shown 6 Place the Circuit Board with the new Battery in the Chest Clip Replace the Cover and tighten the screws This completes the battery replacement p...

Page 122: ...installation parts mainte nance or warranty information When you contact us please have the Model Number and Manufactured on Date ready so that we may help you efficiently This information can be foun...

Page 123: ...at is installed correctly by using one of the following resources https www nhtsa gov equipment car seats and booster seats www safekids org To find an available CPS Technician in your area go to bit...

Page 124: ...be defective in material or workmanship CYBEX reserves the right to discontinue or change parts fabrics models or products or to substitute this product with a comparable model or product To make a c...

Page 125: ...the use or inability to use this product LIMITATION OF WARRANTIES AND STATE PROVINCIAL LAW RIGHTS The warranty and remedies as set forth above are exclusive and in lieu of all others oral or written e...

Page 126: ...DE CYBEX El sistema L S P permite reducir gradualmente las fuerzas de una colisi n con impacto lateral para minimi zar las lesiones Una cabecera ajustable aletas laterales profundas forradas con espum...

Page 127: ...bre la recomendaci n de la academia Ning n asiento para ni o puede garantizar la protecci n contra lesiones en todos los casos pero el uso adecuado ayuda a reducir el riesgo de lesiones graves o la mu...

Page 128: ...CTER STICAS DEL SISTEMA DE SUJECI N INFANTIL 160 167 PORTAVASOS 160 CUBIERTAS DEL ARN S 161 INSERTO PARA BEB 161 CORREA DE LA ENTREPIERNA 162 CABECERA CON ALTURA AJUSTABLE 163 CABECERA RECLINABLE 163...

Page 129: ...CINTUR N PARA REGAZO Y HOMBRO 200 205 INSTALACI N DEL SISTEMA DE SUJECI N INFANTIL ORIENTADO HACIA ADELANTE CON EL CINTUR N PARA REGAZO 206 211 UTILIZACI N DEL SISTEMA DE SUJECI N INFANTIL EN EL MODO...

Page 130: ...eros y equipados con sistemas de cintur n para regazo o cintur n para regazo y hombro y para usarse en aviones Cuando se usa SIN el sistema de arn s interno en MODO DE ASIENTO ELEVADOR e instalado ade...

Page 131: ...contacto con nosotros Columbus Trading Partners USA Inc Attn ParentLink 1801 Commerce Drive Piqua Ohio 45356 USA 1 877 242 5676 Para obtener informaci n til sobre los sistemas de sujeci n infantil www...

Page 132: ...132 ADVERTENCIAS SOBRE LA BOLSA DE AIRE ADVERTENCIAS E INFORMACI N IMPORTANTE ADVERTENCIA Pueden ocurrir LESIONES GRAVES o la MUERTE...

Page 133: ...aci n a continuaci n para el uso correcto Modelos de veh culos fabricados antes del a o 2002 NO use este sistema de sujeci n en el asiento de un veh culo equipado con bolsa de aire lateral a menos que...

Page 134: ...parte trasera del sistema de sujeci n infantil NUNCA deje al ni o sin supervisi n NO use un sistema de sujeci n infantil con un historial de uso que no conozca NO permita que otras personas instalen o...

Page 135: ...e do este manual La protecci n principal para los ocupantes de un veh culo en un choque es la propia estructura del veh culo Si se usa correctamente este sistema de sujeci n infantil aumentar sustanci...

Page 136: ...de muerte o lesiones graves NUNCA use este sistema de sujeci n infantil en un asiento del veh culo donde no se pueda afianzar firmemente Un sistema de sujeci n infantil que se instale con holgura no...

Page 137: ...a una puerta o panel del veh culo NUNCA extienda el dispositivo de protecci n lineal contra impactos laterales L S P hacia un pasajero u otro sistema de sujeci n infantil Use este sistema de sujeci n...

Page 138: ...e sienta ORIENTADO HACIA ATR S se debe colocar en la posici n m s baja El respaldo del asiento del veh culo que est enfrente del ni o debe estar totalmente acojinado y no debe tener objetos r gidos IM...

Page 139: ...na posici n poco natural ADVERTENCIAS SOBRE EL USO ORIENTADO HACIA ADELANTE Si el ni o pesa m s de 65 lb 29 4 kg o los hombros del ni o quedan encima del nivel m s alto del arn s DEBE usar este sistem...

Page 140: ...l cintur n para el hombro NO use este asiento elevador si las partes superiores de las orejas del ni o quedan por encima de la parte trasera de la cabecera del asiento elevador El cintur n para el hom...

Page 141: ...e con usted en caso de un retiro de productos del mercado NO permita que los ni os jueguen con el sistema de sujeci n infantil NO permita que los ni os jueguen con los cinturones de seguridad del veh...

Page 142: ...trayectoria del cintur n en el sistema de sujeci n infantil ya sea para uso ORIENTADO HACIA ATR S o HACIA ADELANTE La instalaci n incorrecta podr a ocasionar lesiones graves o la muerte Si no puede a...

Page 143: ...ue tenga un cintur n de seguridad con bloqueo Consulte el manual del propietario del veh culo para ver si su autom vil tiene cinturones para regazo con retractores de bloqueo de emergencia ADVERTENCIA...

Page 144: ...bere el cintur n de seguridad Si es necesario voltee el bot n de liberaci n del cintur n de seguridad en direcci n opuesta al sistema de sujeci n infantil o mueva el sistema de sujeci n infantil a otr...

Page 145: ...requerir el uso del clip de bloqueo Consulte el manual del propietario del veh culo antes de instalar el clip de bloqueo Si el veh culo requiere un clip de bloqueo llame a ParentLink al 1 877 242 567...

Page 146: ...TCH en las p ginas 155 y 157 Consulte el manual del propietario del veh culo para obtener informaci n sobre las ubicaciones del sistema LATCH Cintur n para regazo con retractor de bloqueo autom tico A...

Page 147: ...amente para cambiar el retractor Consulte el manual del propietario del veh culo para obtener instrucciones espec ficas El cintur n del veh culo se aprieta despu s de cambiar el retractor jalando haci...

Page 148: ...argo este sistema de sujeci n infantil se puede instalar de forma segura usando tanto el sistema LATCH como los cinturones de seguridad y cumple los requisitos de la norma Est ndar Federal de Segurida...

Page 149: ...ede usar los dos anclajes inferiores internos de los asientos exteriores para instalar un sistema de sujeci n infantil CYBEX permite que este sistema de sujeci n infantil se instale utilizando los dos...

Page 150: ...ma de sujeci n infantil a las barras de anclaje inferior del veh culo NUNCA acople dos conectores de anclaje inferior a una misma barra de anclaje inferior del veh culo NUNCA use los cinturones de seg...

Page 151: ...e almacenamiento de la correa de sujeci n ubicado en la parte trasera del sistema de sujeci n infantil Acople el gancho de la correa de sujeci n al clip de almacenamiento cuando no lo use Esto evitar...

Page 152: ...te extendido Soportes magn ticos para leng eta de hebilla Indicador de la posici n de reclinado Trayectoria del cintur n Cada lado EN LA POSICI N ORIENTADO HACIA ATR S Bloqueo En cada lado EN LA POSIC...

Page 153: ...O HACIA ADELANTE Trayectoria del cintur n En cada lado EN LA POSICI N ORIENTADO HACIA ADELANTE Manual del usuario Guardado en el interior del compartimiento Correa de liberaci n del anclaje inferior C...

Page 154: ...i o no est dentro de estos requisitos porque es demasiado peque o seleccione un asiento infantil diferente como un asientos de seguridad para autom vil ORIENTADO HACIA ATR S Si el ni o no cumple estos...

Page 155: ...lo utilice las posiciones de reclinaci n 1 2 3 y 4 como se muestra NO use el sistema LATCH en modo ORIENTADO HACIA ATR S si el ni o pesa m s de 35 lb 15 9 kg PAUTAS DE USO PARA EL NI O ORIENTADO HACI...

Page 156: ...cumplen TODOS los requisitos que se muestran aqu Si el ni o no cumple estos requisitos debido a que es demasiado grande consulte las instrucciones sobre el modo de asiento elevador para ver si el ni o...

Page 157: ...posiciones de reclinado 5 y 6 como se muestra NO use el sistema LATCH en modo ORIENTADO HACIA ADELANTE si el ni o pesa m s de 40 lb 18 1 kg 6 5 4 3 2 1 6 5 PAUTAS DE USO PARA EL NI O ORIENTADO HACIA...

Page 158: ...ido de un lado a otro de la cadera del ni o dentro de las gu as del cintur n y abrochado en la hebilla El uso en MODO DE ASIENTO ELEVADOR de este sistema de sujeci n infantil es SOLO para ni os que cu...

Page 159: ...ENTE EN MODO DE ASIENTO ELEVADOR para asegurar el asiento elevador al asiento del veh culo El cintur n de seguridad para regazo y hombro del veh culo se debe utilizar en modo de asiento elevador cuand...

Page 160: ...ad de 12 oz 355ml o menos NUNCA use contenedores que est n hechos de materiales fr giles por ejemplo vidrio Esto podr a ocasionar lesiones en caso de un choque NUNCA deje recipientes abiertos en el po...

Page 161: ...aterales del inserto para reci n nacido Empuje el inserto para reci n nacido firmemente en el sistema de sujeci n infantil para asegurarse de que est colocado correctamente Al cambiar la posici n de l...

Page 162: ...etr s del acojinado de la cabecera y levante la cubierta Jale la cubierta del asiento hacia adelante Deslice la hebilla del arn s por la abertura del acojinado Sostenga la parte inferior de la correa...

Page 163: ...da CABECERA CON ALTURA AJUSTABLE El asiento tiene una cabecera que ajusta autom ticamente la altura del arn s sin necesidad de reinsertar las correas La cabecera puede ajustarse hacia arriba y hacia a...

Page 164: ...infantil se instale en un asiento lateral USE SIEMPRE un dispositivo L S P en el lado del sistema de sujeci n infantil inmediatamente adyacente a una puerta o panel del veh culo NUNCA USE el dispositi...

Page 165: ...pletamente Para empujar el sistema L S P a la segunda posici n una vez que est completamente extendido presione el bot n L S P y empuje el L S P en la estructura hasta la mitad luego suelte el bot n L...

Page 166: ...DEL ANCLAJE INFERIOR 2 1 2 C MO RETIRAR LA CORREA DE ANCLAJE INFERIOR Para guardar la correa ret rela de la trayectoria del cintur n afloje los broches de presi n del acojinado del asiento abra el com...

Page 167: ...correa de sujeci n var a de un veh culo a otro Aqu se muestran algunas de las ubicaciones t picas Consulte el manual del propietario del veh culo para obtener informaci n sobre las ubicaciones exactas...

Page 168: ...nstalaci n Informaci n de contacto para atenci n al cliente Tecnolog a SensorSafe Preguntas Comentarios Vis tenos en http cybex online com us contact html O llame a CYBEX al 1 877 242 5676 Las marcas...

Page 169: ...169 NOTAS...

Page 170: ...de anclaje inferior del compartimiento de almacenamiento 1 2 Ajuste la cabecera a la posici n m s alta y desabroche el clip para el pecho y el arn s Desabroche los broches de la cubierta del asiento y...

Page 171: ...lmacenamiento como se muestra Abra el compartimento de almacenamiento del anclaje inferior y tire de la correa 3 4 INSTALACI N DEL SISTEMA DE SUJECI N INFANTIL ORIENTADO HACIA ATR S CON LOS CONECTORES...

Page 172: ...RIFIQUE que la correa quede plana a trav s del compartimiento de almacenamiento en frente de la correa de la hebilla VERIFIQUE para asegurarse de que la correa no est torcida en la correa de retenci n...

Page 173: ...ilizando los botones de ajuste del anclaje inferior situados junto a los conectores Presione hacia abajo el bot n de liberaci n del ajustador mientras alarga la correa 7 8 INSTALACI N DEL SISTEMA DE S...

Page 174: ...Aseg rese de que el beb se recline lo suficiente para mantener la cabeza descansando hacia atr s c modamente y de manera segura Apriete el asa de la posici n de reclinado y ajuste la inclinaci n del a...

Page 175: ...e el asiento est colocado de tal manera que la burbuja de nivel est en la zona azul para el uso en la posici n ORIENTADO HACIA ATR S 10 10 INSTALACI N DEL SISTEMA DE SUJECI N INFANTIL ORIENTADO HACIA...

Page 176: ...l sistema de sujeci n infantil 12 13 13 INSTALACI N DEL SISTEMA DE SUJECI N INFANTIL ORIENTADO HACIA ATR S CON LOS CONECTORES DE ANCLAJE INFERIOR Mientras empuja hacia abajo el sistema de sujeci n inf...

Page 177: ...sistema de sujeci n infantil a cada lado cerca de las trayectorias del cintur n en la posici n ORIENTADO HACIA ATR S y hale de lado a lado y hacia adelante El sistema de sujeci n infantil no debe mov...

Page 178: ...nado y ajuste la inclinaci n del asiento a las posiciones ORIENTADO HACIA ATR S 1 2 3 o 4 SOLAMENTE 1 2 3 4 1 INSTALACI N DEL SISTEMA DE SUJECI N INFANTIL ORIENTADO HACIA ATR S CON EL CINTUR N PARA RE...

Page 179: ...icaci n del asiento del veh culo aprobado Aseg rese siempre de que la parte inferior quede plana en el asiento del veh culo ASEG RESE de que el asiento est colocado de tal manera que la burbuja de niv...

Page 180: ...n para regazo y hombro en la posici n ORIENTADO HACIA ATR S a un lado del sistema de sujeci n infantil y por debajo del acojinado del asiento Contin e por el lado opuesto del asiento INSTALACI N DEL S...

Page 181: ...TE DELANTERA de la hebilla ASEG RESE de que el cintur n quede plano sin torcerse como se muestra NOTA vea la p gina 162 para el ajuste adecuado de la correa de entrepierna La correa para la entrepiern...

Page 182: ...pase el cintur n del hombro a trav s del bloqueo Mientras empuja el sistema de sujeci n infantil hacia abajo y dentro del pliegue del asiento p g 148 jale el cintur n de hombro de la trayectoria del c...

Page 183: ...telo de nuevo o bloquee el retractor del cintur n del veh culo mu valo a otro asiento del veh culo o instale con la correa de anclaje inferior Si a n necesita apretar el cintur n de hombro es posible...

Page 184: ...de reclinado y ajuste la inclinaci n del asiento a las posiciones 1 2 3 o 4 ORIENTADO HACIA ATR S SOLAMENTE 1 2 3 4 1 INSTALACI N DEL SISTEMA DE SUJECI N INFANTIL ORIENTADO HACIA ATR S CON EL CINTUR...

Page 185: ...a ubicaci n del asiento del veh culo aprobado Aseg rese siempre de que la parte inferior quede plana en el asiento del veh culo ASEG RESE de que el asiento est colocado de tal manera que la burbuja de...

Page 186: ...el cintur n para regazo y hombro ORIENTADO HACIA ATR S a un lado del sistema de sujeci n infantil y por debajo del acojinado del asiento Contin e por el lado opuesto del asiento INSTALACI N DEL SISTEM...

Page 187: ...ELANTERA de la hebilla ASEG RESE de que el cintur n quede plano sin torcerse como se muestra NOTA vea la p gina 162 para el ajuste adecuado de la correa de entrepierna La correa para la entrepierna de...

Page 188: ...n la posici n ORIENTADO HACIA ATR S en el lado opuesto del sistema de sujeci n infantil Abr chese el cintur n del veh culo y escuche un clic Para la extensi n del sistema L S P vea la p g 164 165 INST...

Page 189: ...UEBE SU TRABAJO ASEG RESE de que el cintur n est apretado y bloqueado Si puede mover el sistema de sujeci n infantil m s de 1 in 2 5 cm de lado a lado o de adelante hacia atr s en la trayectoria del c...

Page 190: ...alta y desabroche el clip para el pecho y el arn s Desabroche los broches de la cubierta del asiento y empuje la hebilla de la entrepierna a trav s del acojinado para exponer el compartimiento de alm...

Page 191: ...cenamiento como se muestra Abra el compartimento de almacenamiento del anclaje inferior y tire de la correa 3 4 INSTALACI N DEL SISTEMA DE SUJECI N INFANTIL ORIENTADO HACIA ADELANTE CON LOS CONECTORES...

Page 192: ...HACIA ADELANTE ASEG RESE de que la correa de anclaje inferior quede plana a lo largo del asiento VERIFIQUE para asegurarse de que la correa no est torcida en la correa de retenci n de pl stico 5 6 IN...

Page 193: ...zando los botones de ajuste del anclaje inferior situados junto a los conectores Presione hacia abajo el bot n de liberaci n del ajustador mientras alarga la correa 7 8 INSTALACI N DEL SISTEMA DE SUJE...

Page 194: ...otro Consulte el manual del propietario del veh culo para obtener informaci n sobre las ubicaciones exactas la identificaci n del anclaje y los requisitos SI EL ANCLAJE DE LA CORREA DE SUJECI N EST D...

Page 195: ...o con el sistema LATCH Aseg rese siempre de que la parte inferior quede plana en el asiento del veh culo Desenganche la correa de sujeci n de la parte trasera del asiento y col quela sobre el respaldo...

Page 196: ...fantil a cada lado cerca de las trayectorias del cintur n en la posici n ORIENTADO HACIA ADELANTE Tire de lado a lado y hacia adelante El sistema de sujeci n infantil no debe moverse m s de 1 in 2 5 c...

Page 197: ...e la correa de sujeci n Jale la correa del ajustador de la correa de sujeci n para apretarla Para la extensi n del sistema L S P vea la p g 164 165 INSTALACI N DEL SISTEMA DE SUJECI N INFANTIL ORIENTA...

Page 198: ...infantil no debe moverse m s de 1 in 2 5 cm del respaldo del asiento del veh culo ni de lado a lado ASEG RESE de que el sistema de sujeci n infantil est nivelado para el uso ORIENTADO HACIA ADELANTE...

Page 199: ...jeci n en el compartimiento en la parte trasera del sistema de sujeci n infantil como se muestra SIEMPRE use la correa de sujeci n al instalar este sistema de sujeci n infantil ORIENTADO HACIA ADELANT...

Page 200: ...de reclinado y ajuste la inclinaci n del asiento a las posiciones ORIENTADO HACIA ADELANTE 5 o 6 SOLAMENTE ASEG RESE de que el asiento est colocado de tal manera que la burbuja de nivel est en la zon...

Page 201: ...o hombro del veh culo por la trayectoria del cintur n para regazo y hombro en la posici n ORIENTADO HACIA ADELANTE a un lado del sistema de sujeci n infantil y por debajo del acojinado del asiento Con...

Page 202: ...CINTUR N PARA REGAZO Y HOMBRO 6 5 4 3 2 1 Tire del cintur n del veh culo hacia abajo a trav s de la trayectoria del cintur n en la posici n ORIENTADO HACIA ADELANTE en el lado opuesto del sistema de...

Page 203: ...fantil hacia abajo y dentro del pliegue del asiento p g 148 jale el cintur n de hombro de la trayectoria del cintur n para quitar toda holgura Contin e tirando del cintur n de hombro mientras coloca e...

Page 204: ...yectoria del cintur n del veh culo al estar ORIENTADO HACIA ADELANTE el cintur n del veh culo no est bien apretado Vuelva a comprobar el nivel de la posici n de reclinado p g 200 Si no ha asegurado bi...

Page 205: ...e de la correa de sujeci n Guarde la correa de sujeci n en el compartimiento en la parte trasera del sistema de sujeci n infantil como se muestra SIEMPRE use la correa de sujeci n al instalar este sis...

Page 206: ...la parte trasera del asiento y col quela sobre el respaldo del asiento del veh culo Apriete el asa de la posici n de reclinado y ajuste la inclinaci n del asiento a las posiciones ORIENTADO HACIA ADEL...

Page 207: ...n de regazo del veh culo por la trayectoria del cintur n para regazo y hombro ORIENTADO HACIA ADELANTE a un lado del sistema de sujeci n infantil y por debajo del acojinado del asiento Contin e por e...

Page 208: ...A ADELANTE CON EL CINTUR N PARA REGAZO Tire del cintur n del veh culo hacia abajo a trav s de la trayectoria del cintur n en la posici n ORIENTADO HACIA ADELANTE en el lado opuesto del sistema de suje...

Page 209: ...regazo hombro y NO es necesario para la instalaci n de cinturones de regazo Mientras empuja el sistema de sujeci n infantil hacia abajo y dentro del pliegue del asiento p g 148 retire toda la holgura...

Page 210: ...er el sistema de sujeci n infantil m s de 1 in 2 5 cm de lado a lado o de adelante hacia atr s en la trayectoria del cintur n del veh culo al estar ORIENTADO HACIA ADELANTE el cintur n del veh culo no...

Page 211: ...la correa de sujeci n Guarde la correa de sujeci n en el compartimiento en la parte trasera del sistema de sujeci n infantil como se muestra Siempre use la correa de sujeci n al instalar este sistema...

Page 212: ...a la posici n m s alta p g 163 Desabroche el clip para el pecho y abroche Suelte el acojinado del asiento p g 168 y abra el compartimiento de almacenamiento del anclaje inferior Mueva la hebilla de l...

Page 213: ...INFANTIL EN EL MODO DE ASIENTO ELEVADOR 3 Coloque las correas del arn s el clip de pecho y las leng etas de la hebilla en el compartimiento del respaldo del asiento detr s del acojinado del asiento co...

Page 214: ...jinado del asiento y vuelva a abrochar los broches en las aberturas de las correas de los hombros Ajuste el asiento elevador a la posici n 6 Ya ha finalizado la transici n al MODO DE ASIENTO ELEVADOR...

Page 215: ...el asiento elevador en el veh culo y o el ajuste resultante del cintur n de seguridad del veh culo sobre el ni o no se afectan Cuando instale el asiento elevador coloque al ni o en el asiento elevador...

Page 216: ...oje el arn s presionando firmemente hacia abajo el bot n de ajuste del arn s mientras jala hacia adelante ambas correas al nivel del hombro Presione el bot n rojo en la hebilla del arn s para liberar...

Page 217: ...dir que el arn s quede ce ido correctamente alrededor del ni o C MO ASEGURAR AL NI O CON EL ARN S Nunca sujete al ni o en el sistema de sujeci n infantil con el ni o envuelto en una manta Para mantene...

Page 218: ...abeza del ni o debe estar centrada en la cabecera ORIENTADO HACIA ATR S Coloque las correas del arn s EN o APENAS POR DEBAJO de los hombros del ni o ORIENTADO HACIA ADELANTE Coloque las correas del ar...

Page 219: ...S NOTA si se utilizan las posiciones inferiores de la cabecera arn s aseg rese de que la parte inferior de la solapa de la cabecera est detr s de la solapa del inserto para beb 1 2 4 3 6 5 ORIENTADO...

Page 220: ...se mantenga libre de suciedad y residuos Aseg rese de que las correas del arn s no est n torcidas Abroche el clip para el pecho abrochando ambos lados escuche un clic y desl celo hasta el nivel de la...

Page 221: ...e ido al ni o Una correa ce ida no debe tener holgura Queda en una l nea relativamente recta sin estar floja No presiona la piel del ni o ni empuja el cuerpo del ni o a una posici n poco natural Para...

Page 222: ...sujeci n infantil durante el vuelo ayudar a asegurar que la familia llegue a salvo a su destino La FAA recomienda que un ni o que pesa m s de 40 lb 18 kg use el cintur n de seguridad del asiento del...

Page 223: ...estra NOTA no utilice el bloqueo con el cintur n de seguridad del avi n ya que s lo se puede utilizar con los sistemas de cintur n para regazo y hombro IMPORTANTE antes de instalar el sistema de sujec...

Page 224: ...abertura de la trayectoria del cintur n de seguridad en la posici n ORIENTADO HACIA ATR S en un lado y contin e a trav s de la abertura en el lado opuesto del sistema de sujeci n infantil como se mues...

Page 225: ...je el sistema de sujeci n infantil firmemente contra el asiento del avi n mientras jala del cintur n de seguridad para apretarlo Pase el exceso de la correa del cintur n de seguridad a trav s de la ab...

Page 226: ...alarlo de nuevo hasta que el cintur n est apretado 5 ASEGURE AL NI O CON ARN S Coloque al ni o en el sistema de sujeci n y siga la secci n C mo asegurar al ni o con el arn s vea las p ginas 216 221 6...

Page 227: ...ya que s lo se puede utilizar con los sistemas de cintur n para regazo y hombro IMPORTANTE antes de instalar el sistema de sujeci n infantil aseg rese de que el asiento del avi n est por completo en l...

Page 228: ...nfantil a un lado y levante la solapa de acceso Pase la hebilla del cintur n de seguridad del avi n a trav s de la abertura de la trayectoria del cintur n de seguridad en posici n ORIENTADO HACIA ADEL...

Page 229: ...n su veh culo automotor despu s de su vuelo 3 ABROCHE EL CINTUR N DE SEGURIDAD DEL AVI N Y LUEGO ELIMINE TODA LA HOLGURA DEL CINTUR N El cintur n de seguridad del avi n debe estar lo m s apretado posi...

Page 230: ...Si puede mover el sistema de sujeci n infantil m s de 1 in 2 5 cm de lado a lado o de adelante hacia atr s en la trayectoria del cintur n en la posici n ORIENTADO HACIA ADELANTE el cintur n no est bie...

Page 231: ...SENSORSAFE DURANTE EL RODAJE EL DESPEGUE Y EL ATERRIZAJE Para cumplir con la regulaci n de la FAA para disposi tivos electr nicos port tiles PED el clip para el pecho SensorSafe DEBE estar desabrochad...

Page 232: ...y retire las hombreras como se muestra 2 INSTALACI N DE LAS HOMBRERAS Vuelva a colocar las hombreras plegando los broches sobre la correa del arn s Asegure ambos broches Aseg rese de que est n orient...

Page 233: ...enganche cada lado del acojinado trasero y tire hacia adelante 11 Tire del acojinado del asiento hacia fuera de la cubierta de ajuste del arn s 12 Comenzando por la parte inferior del asiento tire del...

Page 234: ...DO Todas las partes de la cubierta del asiento se pueden lavar de la siguiente manera Lavar en lavadora por separado con agua FR A ciclo para ropa delicada detergente suave Dejar escurrir PARA EVITAR...

Page 235: ...leng etas de la hebilla NO hacen clic en la hebilla Intente limpiar la hebilla Si esto no soluciona el problema llame a servicio al cliente al 1 877 242 5676 antes de usar el sistema de sujeci n infa...

Page 236: ...ni o ORIENTADO HACIA ATR S o EN o APENAS POR ARRIBA de los hombros del ni o ORIENTADO HACIA ADELANTE Est el arn s ce ido alrededor del ni o y afianzado correctamente con el clip para el pecho colocado...

Page 237: ...237 NOTAS...
Page 238: ...para el pecho y 2 el enchufe receptor El sistema no funcionar a menos que ambos componentes est n presentes en el veh culo con el receptor instalado en el puerto OBDII del veh culo p gina 242 Este si...

Page 239: ...html USO DE LA BATER A PARA CONSERVAR LA VIDA TIL DE LA BATER A SIEMPRE ALMACENE EL CLIP PARA EL PECHO SENSORSAFE EN LA POSICI N DESABROCHADA El clip para el pecho se env a con una bater a de bot n de...

Page 240: ...IFICADO POR LA FCC Clip para el pecho modelo SOSR2 ID de la FCC 2ABS2 SOSR3 Enchufe receptor modelo SS2 ID de la FCC 2ABS2 SS2 Este dispositivo cumple la parte 15 de las reglas de la FCC Su operaci n...

Page 241: ...diferente al cual est conectado el receptor Solicitar ayuda al distribuidor o a un t cnico experimentado en radio y televisi n Clip para el pecho Declaraci n de advertencia de RF El dispositivo se ev...

Page 242: ...propietario del veh culo para obtener informaci n sobre la ubicaci n Enchufe el receptor SensorSafe Si no puede localizar el manual del veh culo la aplicaci n SensorSafe puede contener informaci n so...

Page 243: ...nder despu s de que el veh culo se conduzca a una velocidad de 8 km 5 mi por hora o m s 5 ESTACIONE EL VEH CULO Y APAGUE EL ENCENDIDO 2 segundos despu s de estacionar el veh culo y apagar el encendido...

Page 244: ...a parte delantera del sistema de sujeci n infantil y jale ambas correas del arn s hacia adelante para aflojarlo 2 Presione el bot n en la hebilla de la entrepierna y jale hacia afuera ambas leng etas...

Page 245: ...de bot n de litio Panasonic CR2032 nueva como se muestra 6 Coloque la placa de circuitos con la nueva bater a en el clip para el pecho Vuelva a colocar la cubierta y apriete los tornillos Esto comple...

Page 246: ...nstalaci n partes mantenimiento o informaci n sobre la garant a Cuando se comunique con nosotros tenga a mano el n mero de modelo del producto y la fecha de fabricaci n para que podamos ayudarlo efica...

Page 247: ...e correctamente usando uno de los recursos siguientes https www nhtsa gov equipment car seats and booster seats www safekids org Para encontrar un t cnico de CPS disponible en su rea visite bit ly Fin...

Page 248: ...defectos de material o mano de obra CYBEX se reserva el derecho de descontinuar o cambiar partes telas modelos o productos o de sustituir este producto con un modelo o producto comparable Para present...

Page 249: ...e usar este producto LIMITACI N DE GARANT AS Y DERECHOS LEGALES ESTATALES O PROVINCIALES La garant a y los recursos especificados anteriormente son exclusivos y sustituyen a cualquier otro ya sea oral...

Page 250: ...e United States by Columbus Trading Partners USA Inc 1801 Commerce Drive Piqua OH 45356 USA Tel 1 877 242 5676 e mail support americas goodbabyint com www cybex online com 2019 CYBEX Industrial Limite...

Reviews: