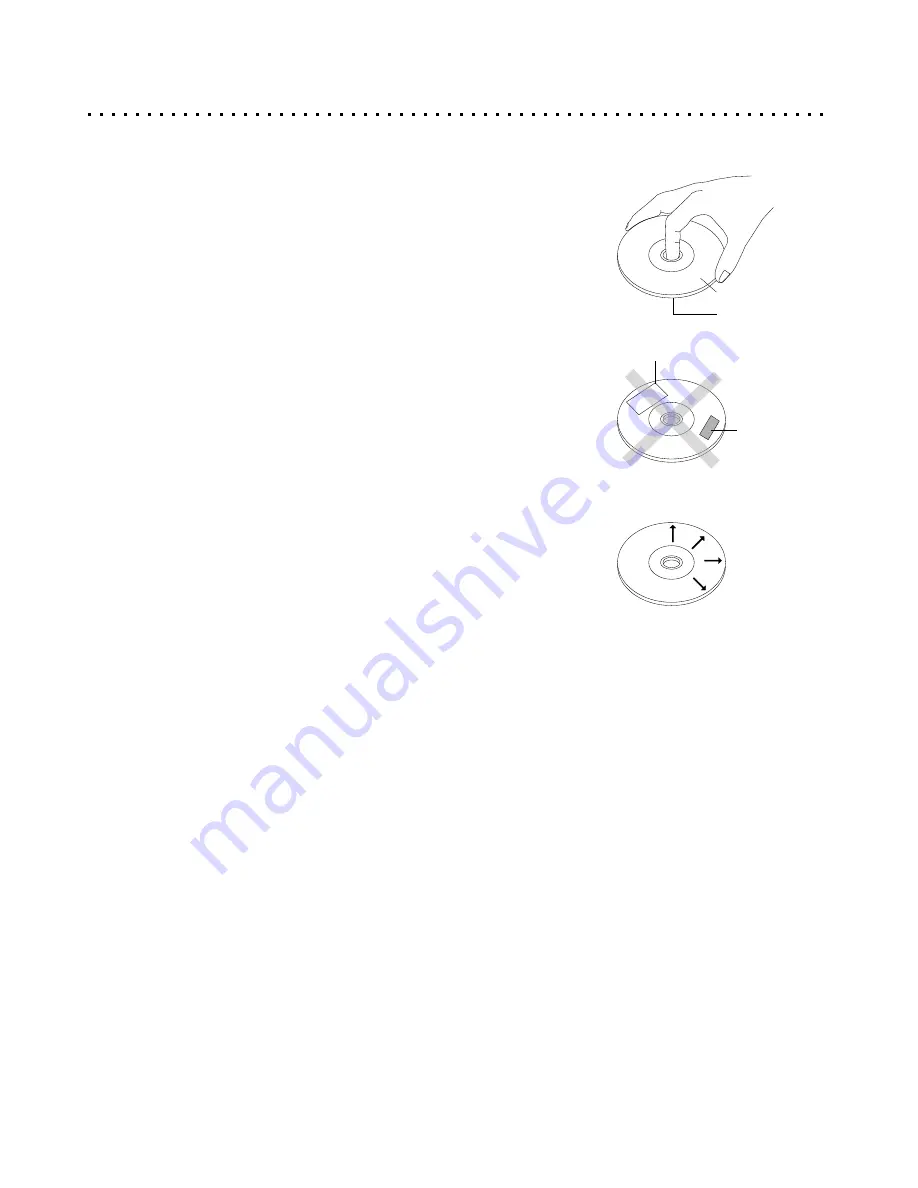
background image

Labels

Tapes

Labeling Side

Surface

Handling of Discs:

Please hold the disc by gripping the rim or by placing the index finger in the 
central hole. Never touch the signal surface, which is shiny. This applies to 
both sides of double sided discs.

Cleaning of Discs:

Finger prints or stains on the surface of the disc may cause signal loss. 
Depending on the degree of the stain, the reflected luminosity from the signal 
surface may be weakened, resulting in degraded  picture quality. Therefore, 
please use a soft cloth and wipe in a radiating manner from the center of the 
disc to the outer rims when cleaning the disc surface.

If the surface of your disc is very dirty, please wipe the disc with a moist cloth, 
followed by a dry soft cloth to remove all water stains.

Never use electrostatic prevention products or solutions which contain 
benzene, thinner or any other vaporizing substances, as they may damage 
the disc surface.

Never add labels or adhesive tapes on the discs and be careful not to  
scratch or damage the disc surface.

Storage of Discs:

To prevent discs from becoming bent or deformed, they should be vertically 
kept in the disc storage case. To prevent damage, avoid leaving discs in your 
car, where they may be subject to direct sunlight and high temperature. 

Please thoroughly read the "Instruction Points for Attention" on the discs. 

Cleaning the DVD Player:

The control panel and the case of the player will only require occasional wiping with a soft cloth. Areas with 
stubborn stains can be cleaned with a soft cloth dipped in a neutral detergent. To prevent damaging the player, 
never use vaporizing solutions.

Disc Accessories:

Do not use any disc accessory to improve the audio quality, disc protective solutions or lens cleaner. These 
products may cause problems.

Caring for Optical Discs

5

Summary of Contents for CH-DVD 500

Page 1: ...yer is designed to provide a great Home Theater experience with super crisp Video and thundering Digital Sound Please retain this User Manual for future reference Remember to read the manual carefully...

Page 2: ...nside Touching internal parts of this unit is dangerous and may cause Use only with the cart stand tripod bracket or table specified by the serious damage to the unit Do not attempt to disassemble the...

Page 3: ...ack Functions Fast Forward Reverse Slow Motion Scanning 19 Skip Forward and Skip Back 19 Jumping to a Specific Chapter Track or Time Position 20 Previewing Titles Chapters or Tracks Before Playback 21...

Page 4: ...guage Display Usage mode can be functions can be controlled by the Remote Control displayed on the screen in different languages in the most convenient way On Screen Display and Setup On Screen Interf...

Page 5: ...ducts or solutions which contain benzene thinner or any other vaporizing substances as they may damage the disc surface Never add labels or adhesive tapes on the discs and be careful not to scratch or...

Page 6: ...e unit will not be used for an extended length of time it s wise to remove the batteries before storage The life of the batteries depends on the amount of usage With typical use a battery life of appr...

Page 7: ...resume playback Audio CD POWER Press the power button to put player into Standby mode Press again to power unit on TITLE Used to enter the Title Menu supported on some VCD and DVD discs MENU Press to...

Page 8: ...ter on VCD discs EFFECT Use with VCDs and CD Audio discs to adjust Bass Treble and Surround Effects ZOOM Press to zoom in on picture during playback or on a still frame NUMBER BUTTONS Use the number b...

Page 9: ...ayback Press repeatedly to step through one frame at a time To continue normal playback press Play Previous Track Fast Reverse Next Track Fast Forward The front Function Knob allows the control of ski...

Page 10: ...d other useful information Some functions require specific disc formats or features DVD Display Functions 10 Dimming the Front VFD Display Adjusting the Brightness of the Front Display With NO DISC in...

Page 11: ...Use special CoAxial Digital Audio Cable to connect to Digital Receiver s CoAxial Input Optical Digital Audio Connector Use special Optical Digital Audio Cable to connect to Digital Receiver s Optical...

Page 12: ...sion Connections One Required In order to use your DVD Player your TV must support at least one of the Video Input types shown below To get started identify the best Video Connection shown below that...

Page 13: ...DVD Player s Setup Menu to 2CH See pg 32 S Video Connector Typical Connection Connecting to a TV with Composite Video In and Stereo Audio In If your TV has only a single Video Input jack typically a y...

Page 14: ...3 Connect the DVD Player using the Component Video Cables At this point turn off the TV and DVD Player and unhook the Composite or S Video cable used so far Connect the separate Component Video Cable...

Page 15: ...UB WOOFER CENTER SURROUND FRONT R L COAXIAL DOLBY 5 1 CHANNELAUDIO IN SUB RR FR CTR RL FL RECEIVER 4 Using the Optical and CoAxial Digital Audio Output Connections Your DVD Player features two Digital...

Page 16: ...mode where it can be quickly awakened by pressing POWER again 2 POWER 3 OPEN CLOSE Powering on from the Remote Once the back power switch is in the ON position the unit can be turned off and on by the...

Page 17: ...ENTER PLAY STOP MUTE 1 2 2 Pausing Disc Play With DVDs and VCDs you can pause playback on a still frame with the PAUSE button Pressing the PAUSE button repeatedly allows you to step through the video...

Page 18: ...ng this button will Enable Disable the PBC Play Back Control menu system With PBC enabled the disc menu will be shown The disc will simply play all tracks in sequence with PBC disabled Entering the Ti...

Page 19: ...wing Slow Motion Scanning With DVDs and Video CDs you can slow the speed of playback to a mere fraction of the normal speed While the video is playing press the SLOW button The playback speed will slo...

Page 20: ...ect the Title Chapter or Time Hours Minutes and Seconds of the position on the disc you wish to begin playback Also use the GOTO menu to view the Elapsed and Remaining Time for the current Disc Title...

Page 21: ...cks to choose from Mark Points on the Disc for Quick Play with the BOOKMARK Button While you re watching a DVD you can easily mark points on the disc that you would like quick access to later on You c...

Page 22: ...segment must be no longer than a single Title Using the REPEAT A B Button While viewing or listening to a disc when you get to the point that you would like to mark as the Beginning of your repeating...

Page 23: ...Program sequence has been completed To Clear tracks from the Program select the C function To Erase the current program navigate to AC Press ENTER Program Mode does not work with DVDs Add a Track to...

Page 24: ...epeat mode if selected Navigate to a File or Folder Use the arrow keys to select the File you wish to play or the Folder you want to open To go back up the directory tree and return to a previous fold...

Page 25: ...RIGHT ARROW keys to Rotate the picture and the SLOW button to see a Negative of the image MENU 2 PBC File Listing List of files in current directory with selected file highlighted At the beach Nightl...

Page 26: ...onal Zoom is most effective if you Pause the video on a single frame to examine However Zoom will work while playing a movie as well If you wish to Pause the action press the PAUSE button 3 Navigate w...

Page 27: ...DTS Dolby Digital 5 1 and Stereo Audio Video and Audio CDs offer fewer audio options usually including Mono Left Right Mix Mono and Stereo ANGLE 4 Multi Angle Support ANGLE BUTTON Some DVDs are recor...

Page 28: ...Bookmarks 21 1 2 3 4 5 6 7 8 1 2 3 4 5 6 7 8 Tr OFF PBC ON A B OFF OFF A B 00 00 00 Jump to Track 20 Repeat Playback 22 Jump to Time 20 A B Repeat Mode 22 Program Random Play 23 Bookmarks 21 1 2 3 4...

Page 29: ...io CDs VCDs and DVDs after the STOP button is pressed once the message HOLD will be displayed on front of the Player After exiting the Setup Menu you can resume playback where you left off 1 3 4 ENTER...

Page 30: ...e CHILD option You can choose from 8 levels of Parental Control corresponding to the standard rating system in the USA The available levels and their equivalent ratings are listed to the right CHANGE...

Page 31: ...r TVs Computer Monitors and Projectors that support three video inputs one for a color channel Yellow Blue Red This setting is also used for Progressive Scan TVs LANG VIDEO AUDIO CHILD OTHERS EXIT SYS...

Page 32: ...s is known as compression You can adjust the level of this compression in three levels MAXIMUM Highest compression STANDARD Normal compression and TV MODE Optimized for smaller speakers LANG VIDEO AUD...

Page 33: ...frikaans 7176 Galician 7778 Mongolian 8469 Tegulu 6577 Amharic 7178 Guarani 7779 Moldavian 8471 Tajik 6582 Arabic 7185 Gujarati 7782 Marathi 8472 Thai 6583 Assamese 7265 Hausa 7783 Malay 8473 Tigrinya...

Page 34: ...c may not match that of the player In this case the disc cannot be used The Disc Doesn t Eject If the player is in Standby Mode the disc will not eject Turn the player on with the Remote Control and t...

Page 35: ...onic Distortion Digital Audio Less than 0 015 Wow and Flutter Less than 0 001 W PEAK Connections Component Video Out Y 1 0Vpp 75 Ohm Negative Sync Pb Pr 7 Vpp 75 Ohm S Video Out Mini DIN 4 Pin 75 Ohm...

Page 36: ...most DVD discs DTS Digital Theater System Another digital surround sound system with 5 1 channels DTS is supported on some newer DVD discs Dual Layer DVD A DVD disc that has two layers on each side A...

Page 37: ...s To play back a DVD title with a specific region code you will need a DVD player with the same region code S Video S Video offers significantly improved video signal performance over a basic composit...

Page 38: ...ns 8 dimmer 10 repeat playback 22 discs 4 5 resetting player display button 7 10 28 video output 31 display panel 10 factory defaults 30 return button 8 effect button 8 reverse button 7 effects 27 ent...

Reviews: