


CC650
Production / Industrial Hose Crimper
6
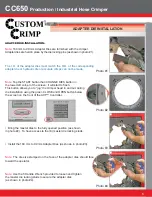
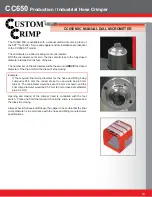
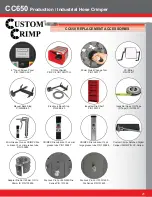
ADAPTER DIE INSTALLATION
Photo #3
Photo #4
Photo #1
Photo #2
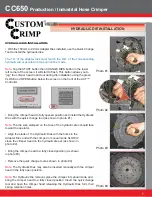
ADAPTER DIE INSTALLATION:
Note:
160 mm to 99 mm Adapter Dies are furnished with the crimper.
Adapter dies are held in place by the die locking pins (as shown in photo #1).
The I.D. of the adapter dies must match the O.D. of the corresponding
adapter die or hydraulic die or accurate crimps can not be made.
Note:
Tap the START button then CHANGE DIES button in
the lower left corner of the screen; it will start to fl ash.
This button allows you to “jog” the crimper head in and out during
die installation using the green CLOSE and OPEN button below
the screen on the front of the ACT™ Controller.
• Bring the master dies to the fully opened position (as shown
in photo #2). To have access to the (8) master die locking studs.
• Install the 160 mm to 99 mm Adapter Dies (as shown in photo #3).
Note:
The die size stamped on the face of the adapter dies should face
toward the operator.
Note:
Use the T-Handle Wrench provided to loosen and tighten
the master die locking studs to secure the adapter dies
(as shown in photo #4).


