9
1
2
7
9
4
4A
5A
3
5
6
8
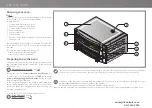
Fig.4.
Ed. 0219 - 70702522 REV00 Michelangelo - Use and maintenance
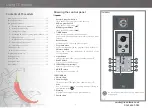
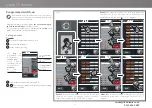
Knowing the control panel
Fig.4.
1
Main display
Displays alternatively:
• the current temperature in the chamber
• the set temperature
• the intervention time of the end-of-cooking sound warning
• the countdown time (time to the oven switching on if
programmed switch-on is used)
2
Keys + e -
Allow increasing or decreasing:
• the temperature values in the chamber,
• the intervention time of the end-of-cooking sound warning
• the countdown time (time to the oven switching on if
programmed switch-on is used)
3
elements LED
:
with the oven ON, if lit, it means the resistances
are heating; with the oven OFF, if flashing, it shows a countdown
is in progress (active programmed switch-on).
4
Top power check
Allows checking the power of the elements in the top, o
ff
ering
three adjustments:
• OFF
• MIN = 33%
• MAX = 100%
4A
Top LEDs:
show the selection made
5
Bottom power check
Allows checking the power of the elements in the bottom,
o
ff
ering three adjustments:
• OFF,
• MIN = 33%
• MAX = 100%
5A
Bottom LEDs:
show the selection made
6
ON/OFF switch
Switches the display on and o
ff
7
Light button
Switches the light in the cooking chamber on and o
ff
8
Clock button
With the oven on: activates an end-of-cooking acoustic signal
With the oven o
ff
: sets the programmed switch-on
9
Chimney button
Opens and closes the steam holes in the back of the cooking
chamber
Using CD models
The control panel must be used only with dry and
clean fingers.
Continuous and prolonged pressing of the
2
“+”
and “-” keys increases or decreases the value quicker.
CD MODELS
Contents of CD models
Knowing the control panel ............................................................9
Use guided procedure ......................................................................10
A - Turning the oven on manually .......................................10
B - Setting the preheating ........................................................10
C - Setting the cooking ...............................................................10
D - Filling the oven ........................................................................11
E - Switching the light on (optional) ..................................11
F - Adjusting the steam holes .................................................11
G - Activating an end-of-cooking signal (buzzer) ......11
H - Switching the oven o
ff
........................................................11
Programmed switch-on ...................................................................12
0161 696 0052


