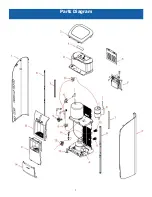
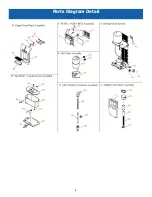
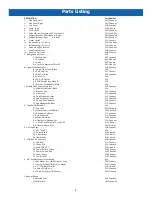
Crystal Mountain Crystal Pro Installation, Operation & Maintenance Manual Download Page 9

9


Parts Listing


DESCRIPTION


Part Number


1


Side Panel, Left


SMT

-

C400002


2


Side Panel, Right


SMT

-

C400003


3


Top Cover


SUB

-

C400007


4


Lamp, Logo


ELE

-

C100419


5


Cover, Back


SMT

-

C400005


6


Solenoid, Low Pressure 24V DC (3 in unit)


POU

-

C400001


7


Support Bracket, Rear Upper (2 in unit)


SMT

-

C400008


8


Support Bracket, Front


 (2 in unit)


SMT

-

C400007


9


Water Outlet


PLC

-

C400015


10


Bulkhead Ftg, JG 1/4 x 1/4


POU

-

C000003


11


Bulkhead Ftg, JG 1/4 x 1/4


POU

-

C400012


12


Solenoid, High Pressure


POU

-

C400002


13


Leak Detector Assy


SUB

-

C400014


14


Panel, Lower Front


SUB

-

C400035


A  Refrigeration System


N/A


A1  Cold Control


REF

-

C400004


A2  Overload


REF

-

C100300


A3  Relay


REF

-

C100229


A4  Cover, Compressor PW2.5DV


REF

-

C100301


B  Upper Front Panel Assy


SUB

-

C400033


B1  Upper Front Panel, Black


N/A


B2  Grill, Drip Tray


PLC

-

C400011


B3  Drip Tray Base


PLC

-

C400009


B4  Cover, UV 


N/A


B5  PCB, UV Display


N/A


B6  PCB, Push Button Module


N/A


B7  Bracket, Push Button, Black


N/A


C  Middle Front Panel Assy, Black


SUB

-

C400034


C1  Middle Front Panel, Black


N/A


C2  Bracket, Cup


PLC

-

C400007


C3  Door Lock


PLC

-

C400008


C4  Cup Dispenser, Outer


PLC

-

C400023


C5  Cup Dispenser, Inner


PLC

-

C400024


C6  Spring, Cup Dispenser


FAS

-

C400011


C7 Cup Dispenser Bottom


PLC

-

C400022


D  Top Shelf & Reservoir 


N/A


D1  Top Shelf


SMT

-

C400013


D2  Transformer (120V/18V/1A)


ELE

-

C400033


D3  Reservoir, Ambient


PLC

-

C400001


D4  Lid, Reservoir


PLC

-

C400002


D5  Float, Electronic


ELE

-

C400026


D6  Float Valve, Mechanical


POU

-

C400005


D7  UVC LED Module, 0.8W, 12

-

24 VDC


ELE

-

C100401


D8  Water Outlet, SS, UV


SMT

-

C100235


E  Hot Tank Assy 


SUB

-

C400001


E1  Hot Tank, SS


N/A


E2  Heater Band


ELE

-

C100298


E3  Heat Limiter


ELE

-

C100170


E4  Thermostat


ELE

-

C100109


F   PCB, Box & Cover Assy


SUB

-

C400037


F1  PCB Box


PLC

-

C400017


F2  Cover, PCB


PLC

-

C400018


F3  Main PCB, UVC


ELE

-

C100416


F4  Power Switch, Green


ELE

-

C400007


F5  Power Switch, Red


ELE

-

C400006


F6  Fuse, 10Amp


ELE

-

C400032


F7  Power Cord


ELE

-

C400029


G  

3/8” 

Pushfit Connector Assembly


N/A


G1  DM Elbow, 1/4 x 3/8(AEU0604), Gray


POU

-

C100071


G2  In

-

Line, Screen Filter, 3/8 (70 Mesh)


POU

-

C100063


G3  

C

” 

Clip, 8mm, Plastic


MIS

-

C100222


G4  Union, JG 3/8 x 1/4


POU

-

C100026


G5  Tube, SS, 9.5mm OD x 95mm


SMT

-

C100220


Parts Not Shown


Adjustable Foot


MIS

-

C400006


Filter Bracket


SMT

-

C400006


Summary of Contents for Crystal Pro

Page 1: ...1 Installation Operation Maintenance Manual Crystal Pro Water Dispenser www crystalcoolers com 2020 Crystal Mountain Products Inc ...

Page 2: ...2 Notes ...

Page 3: ...t 7 Installation 10 Operating Crystal Pro Water Dispenser 14 Service and Maintenance 15 General Maintenance 15 Sanitizing Reservoirs 15 Draining Reservoirs 16 Resetting Leak Detection System 18 Troubleshooting 19 Technical Specifications 20 Flow Diagram 21 Electrical Diagram 22 Warranty 23 Table of Contents ...

Page 4: ...e water supply before the inlet connection Failure to use an appropriate anti flood device for any reason will not obligate or make Crystal Moun tain responsible in any wayfor Product Liability issues relating to any claims including water damage claims Regularly inspect the filters filter housings and the plumbing fittings and connections for water leaks Water leaks may cause damage to your offic...

Page 5: ...g and built into the ambient reservoir lid This system is used to inhibit the growth of bacteria When dispensing Ambient or Cold water you will notice a pulsating UV INSIDE light which indicates the UV light system activation Leak Detection System All models of the Crystal Pro are fitted with a leak detector This system will generate an audible alarm and front panel light alert upon detecting wate...

Page 6: ...ed during shipment 1 To inspect the interior remove the filtration service panel 2 Visually inspect for any wires tubing or fittings which may have come loose during shipment 3 Record the model and serial numbers below for future reference Record your Crystal Pro model number here Serial Number Date purchased Date installed Products offered and marketed by Crystal Mountain and its affiliates are p...

Page 7: ...7 Parts Diagram ...

Page 8: ...8 Parts Diagram Detail ...

Page 9: ...el Black N A C2 Bracket Cup PLC C400007 C3 Door Lock PLC C400008 C4 Cup Dispenser Outer PLC C400023 C5 Cup Dispenser Inner PLC C400024 C6 Spring Cup Dispenser FAS C400011 C7 Cup Dispenser Bottom PLC C400022 D Top Shelf Reservoir N A D1 Top Shelf SMT C400013 D2 Transformer 120V 18V 1A ELE C400033 D3 Reservoir Ambient PLC C400001 D4 Lid Reservoir PLC C400002 D5 Float Electronic ELE C400026 D6 Float ...

Page 10: ...nit to the floor with an M6x60 expansion bolt A Locate and drill a 43 mm deep hole using an alloy drill bit with 9 mm diameter B Install the flat pad the spring washer and the nut to the bolt and then insert into the hole C Remove the filtration service panel and locate the alignment hole on the base plate D Align the dispenser with the expansion bolt using the hole in the base plate E Using a wre...

Page 11: ...cur This water dispenser has a maximum pressure rating of 80 psi 5 5 bar A pressure regulator must be used for all installations This will prevent internal structural damage to the unit and potential water leaks This should be installed on the water supply before the dispenser water inlet 4 Plug the dispenser into the wall outlet and verify that the green power status indicator is on A fuse locate...

Page 12: ...for proper sanitization of your filtration system 7 Slowly turn on the water supply until the main storage tank is full then turn off 8 Carry out a visual inspection for any water leaks 9 Lift the main storage tank lid taking care not to damage the float sensor or UV light 10 Wearing sterile gloves and using a clean lint free cloth thoroughly wipe down the inside of the main storage tank with the ...

Page 13: ...ispenser should be turned on It will take approximately twenty minutes for the hot water and two hours for the cold water to reach their temperature presets 2 Record the service date on the inside filtration panel for future reference This will ensure that maintenance intervals are recorded and scheduled 3 Reinstall the filtration service panel ...

Page 14: ...spenser Unpowered N A AmbientButton N A N A N A Cold Button AlwaysOn Dispenser Unpowered N A UV Activation Light UV System Ready UV System Ready UV System Active System Fault Indicator UV Bulb Needs Replacement UV System Ready SystemFault i e Leak Short Circuit Night Light Dark Environment Light Conditions n a On only when user is in front of the unit Note To prevent the inadvertent dispensing of ...

Page 15: ...ly stained it should be replaced 3 Wipe away any dust which may have accumulated on the condenser grill 4 Drain both tanks after long periods of non use 5 On R O models periodically inspect the flow restrictor to ensure it is clean and unrestricted Caution Use only factory authorized replacement parts Using unauthorized parts or accessories may cause damage or affect performance Any damage diminis...

Page 16: ...ns If you do not re move your filtration system then bypass it with a polyethylene tubing and 2 union quick con nect fittings Refer to the service manual of the filtration system being used for proper sanitization of your system 5 Begin the sanitization process 6 Plug in the dispenser 7 Slowly turn on the water supply 8 Check for leaks or spills which may cause the leak detection system to activat...

Page 17: ...om the wall socket 4 Remove the top panel to gain access to the UV assembly either on the reservoir lid or in the water outlet tube If replacing the UV on the reservoir lid remove the lid from the reservoir Warning Do not remove the lamp from holder while illuminated and never look directly at the UV light as UV ra diation is dangerous for the eyes and skin 5 Unplug the UV wire connector 6 Remove ...

Page 18: ...g water supply valve to prevent further damage The leak de tection warning will stop once the leak is stopped and the affected area is dried out Service notes If an audible click is heard within 5 minutes of turning on the red power switch the hot tank is likely empty and has overheated The hot tank limiter will need to be reset Caution Turn off the hot tank and unplug the unit s power cord before...

Page 19: ...tankfrozen Turnoffthecoldswitchfor4hourstomeltice insidetank No orlow flowfromhot Hottankneedstobedescaled De scalehotwatertank No orlow flowfrombothhot andcold Filtercartridgesmayneedchanged Lowpressurefromwatersupply Changefiltercartridge s Checkwatersupplypressure Hottanklimiterhastripped Resetthehottanklimiter Coldswitchisoff Unitisnotinstalledcorrectly RefrigerationLeak Checkthatthecoldswitch...

Page 20: ...20 Specifications Water Dispenser Safety Features Failure to use an appropriate anti flood device for any reason will not obligate or make Crystal Mountain responsible in any way for Product 1 0 KWH ...

Page 21: ...nser Nozzle Ambient Solenoid Cold Solenoid Cold Water Reservoir Drain Drain Filtration or R O System Not Supplied Vent Hot Tank UV Lamp Ambient Storage Tank w Mech Safety Float UV Lamp Inlet Solenoid Strainer Pressure Reducing Valve Not Supplied Inlet Anti Flood Device not Supplied ...

Page 22: ...id Fuse Link with Top Shelf Power Cord Cold Control Cold Switch Compressor Hot Switch Hot Tank Limiter Thermostat N L L UV Module UV Module To Relay To Overload Heater Main PCBA Transformer Input Output Hot Cold Switch LED LED UV Pushbutton L Input fromFuse W W Link w Cook Solenoid B B Link w Cold Solenoid R R Link w Hot Solenoid R B Link w Inlet Solenoid ...

Page 23: ...mponents that become inoperable because of a failure to satisfy standards or regulations adopted by any government or agency thereof subsequent to the date of ship ment from the factory Crystal Mountain will not be liable for damage or wear to products caused by abnormal operating conditions accident abuse misuse unauthorized alteration or repair or if the products were not installed in accordance...

Page 24: ...454 4545 Fax 780 454 9816 E mail sales crystalcoolers com European Office Fence House Fence Avenue Macclesfield Cheshire United Kingdom SK10 1LT Tel 44 0 1625 439 111 Fax 44 0 1625 502 527 E mail cmeurope crystalcoolers com Crystal Mountain International Limited Hong Kong Office Room 610 Winfield Commercial Building 6 8a Prat Avenue Tsimshatsui Kowloon Hong Kong Tel 852 2368 1989 Fax 852 3017 6727...

Reviews: