


16
Caution:
Take care to prevent burns when draining the hot tank.
7)
Remove the existing filtration cartridges
8)
Open the front panel to gain access to the filtration compartment.
9)
Remove all cartridges from the filter compartment.
10)
For R/O systems, ensure that the drain line with flow restrictor between the R/O cartridge and drain
port is removed first.
Install the Sanitization Cartridges
1)
Place a sanitization cartridge (this can be an empty filter cartridge or one supplied by your filter sup-
plier –
not supplied with dispenser) inline before the water inlet of the unit.
2)
Using a small eyedropper, prepare the sanitization cartridge by adding two teaspoons of unscented,
liquid chlorine bleach.
3)
Insert this cartridge inline prior to the system.
4)
If you have empty sanitization cartridges install them in the remaining positions. If you do not, re-
move your filtration system, then bypass it with a ¼
”
polyethylene tubing and 2
-
¼" union quick con-
nect fittings. Refer to the service manual of the filtration system being used for proper sanitization of
your system.
5)
Begin the sanitization process
6)
Plug in the dispenser.
7)
Slowly turn on the water supply.
8)
Check for leaks or spills which may cause the leak detection system to activate.
9)
Once all tanks are filled (approximately 3
-
5 minutes) let stand for 5
-
10 minutes.
10)
Press and hold the hot, ambient and cold dispense buttons until water begins to flow.
11)
Continue for 10 minutes, or until the bleach has been thoroughly flushed from the system.
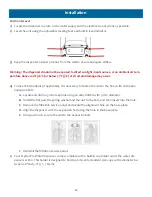
Draining Reservoirs
1)
Unplug the electrical supply to the unit.
2)
Turn off the water supply to the dispenser.
3)
Remove the cold drain plug on the rear to allow water to drain into a bucket.
4)
Tilt the unit backward to facilitate draining of the water.
5)
Repeat this process for the hot tank side.
6)
Reinstall both drain plugs and verify they are secure.
Service & Maintenance


