


12
Installation
Sanitize the Dispenser
You must sanitize your system before using it for the first time. Failure to do so may result in poor water
taste and water quality. This is best accomplished as outlined below.
1)
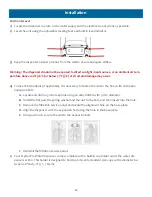
Ensure both water connections –
supply and R/O drain (if applicable) are made at the rear of the
unit.
2)
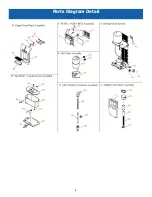
Open top service panel to gain access to the main storage tank.
3)
Open the filtration service panel.
4)
Place a sanitization cartridge (this can be an empty filter cartridge or one supplied by your filter sup-
plier –
not supplied with unit) inline before the water inlet of the unit.
5)
Using a small eyedropper, prepare the sanitization cartridge by adding two teaspoons of unscented,
liquid chlorine bleach.
6)
Insert this cartridge inline prior to the system. If you have empty sanitization cartridges, install them
in the filter positions. If you do not, remove your filtration system, then bypass it with a ¼' polyeth-
ylene tubing and two
-
¼" union quick connect fittings. Refer to the service manual of the filtration
system being used for proper sanitization of your filtration system.
7)
Slowly turn on the water supply until the main storage tank is ½ full then turn off.
8)
Carry out a visual inspection for any water leaks.
9)
Lift the main storage tank lid taking care not to damage the float sensor or UV light.
10)
Wearing sterile gloves, and using a clean, lint
-
free cloth thoroughly wipe down the inside of the main
storage tank with the bleach solution.
11)
Let stand for ten minutes or until completely dry.
12)
Slowly turn on the water supply
.
13)
Depress the dispensing buttons (alternate between hot, ambient and cold spigots) to allow the solu-
tion to run through the spigots and associated lines.
14)
Drain the system until the chlorine bleach is no longer detected at the spigot. Drain the remaining
water through the drain connection at the rear of the unit.
15)
Remove the sanitization cartridge and install the filter and/or R/O cartridges
.
Note:
Remember to connect the R/O drain line to the R/O cartridge. Ensure that the flow restric-
tor is visible inside the R/O drain line
Note:
If R/O is being used, allow several hours to completely fill all tanks
The unit is supplied with a filter access door locking screw. This screw must be installed before
the unit is put into service.


