


10
Position & Level
1)
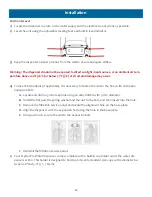
Locate the dispenser as close to the water supply and the electrical connections as possible.
2)
Level the unit using the adjustable leveling feet and built
-
in level indicator.
3)
Keep the dispenser at least 4 inches from the wall to ensure adequate airflow.
Warning: The dispenser should not be exposed to direct sunlight, heat sources, or an ambient air tem-
perature above 100°F (38°C) or below 37°F (3°C) or structural damage may occur.
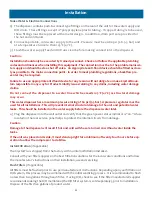
4)
To meet CE standards (if applicable), it is necessary to fasten the unit to the floor with an M6x60
expansion bolt.
A.
Locate and drill a 43 mm deep hole using an alloy drill bit with 9 mm diameter.
B.
Install the flat pad, the spring washer and the nut to the bolt, and then insert into the hole.
C.
Remove the filtration service panel and locate the alignment hole on the base plate.
D.
Align the dispenser with the expansion bolt using the hole in the base plate.
E.
Using a wrench, secure the unit to the expansion bolt.
F.
Reinstall the filtration service panel.
5)
Your Crystal Pro Water Dispenser comes complete with a built
-
in cup holder under the water dis-
penser section. This holder is designed to hold up to twenty standard size cups with a diameter be-
tween 2.8"and 3.0" (71 –
76mm).
Installation


