Crux Interfacing Solutions • 21541 Nordhoff Street, Unit C, Chatsworth, CA 91311
phone: (818) 609-9299 • fax: (818) 996-8188 • www.cruxinterfacing.com
rev.072419
7 of 12
R
INTERFACING SOLUTIONS
ACPBM-77X
OSD Menu
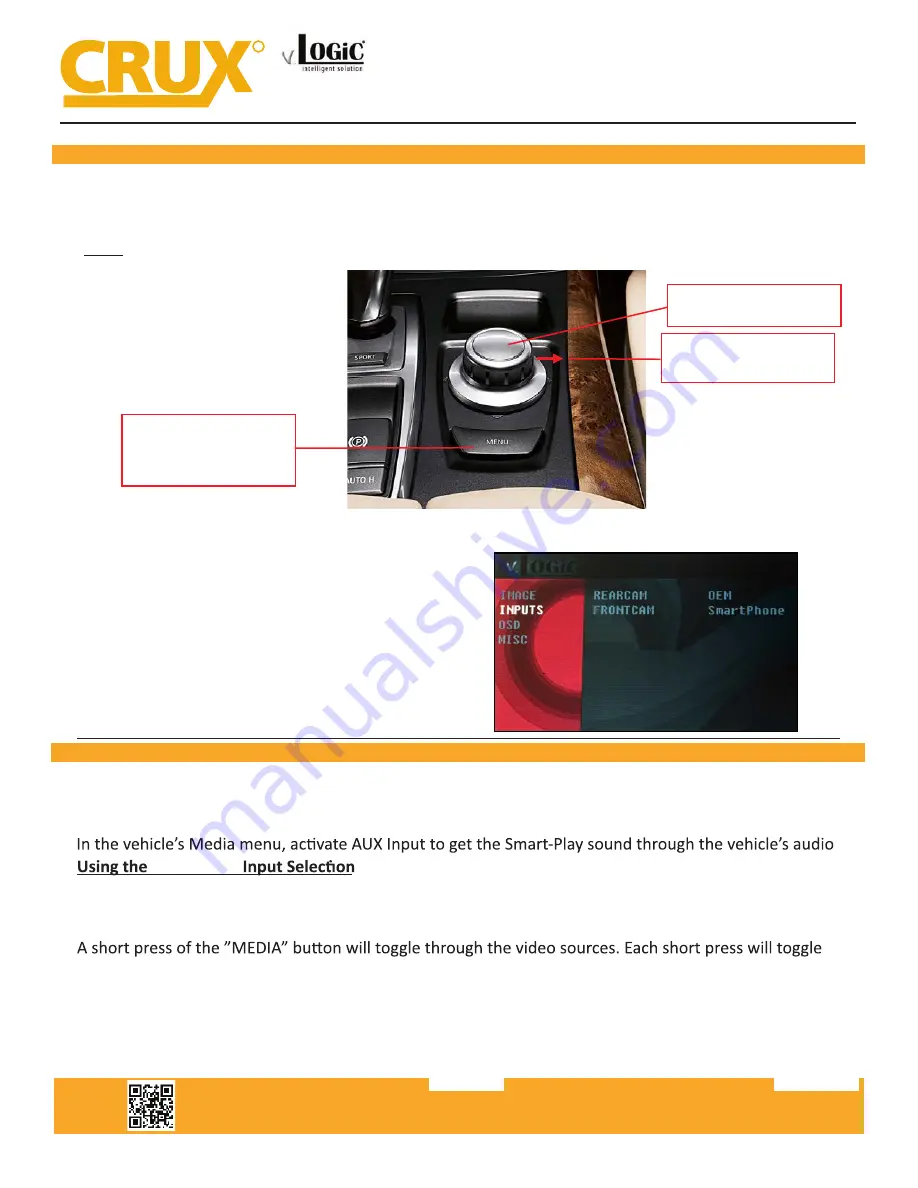
Use the following buttons to enter the ACPBM-77X OSD Menu:
BMW
OSD SETTINGS:
To ensure that Smart-Play works, make sure
these input settings are in effect:
FRONTCAM (
FVC) = SmartPhone
To retain the factory Back-Up Camera:
REARCAM (RVC) = OEM
To activate an aftermarket Back-Up Camera:
REARCAM (RVC) = ON
Shift knob to the right for 10 seconds to
enter OSD Menu Use Knob to navigate
menu and make selections
Use knob to navigate Smartplay/ Android
Auto apps and make selections
Hold the menu button to
change the video sources
Crux Interfacing Solutions • 21541 Nordhoff St., Unit C, Chatsworth, CA 91311
phone: (818) 609-9299 • fax: (818) 996-8188 • www.cruxinterfacing.com
rev.070919
11 of 13
R
INTERFACING SOLUTIONS
ACPAD-81Y
Smart-Play Integration with Multi Camera Inputs & USB Player
for AUDI Vehicles with MMI MIB/MIB2 Systems
OSD Menu Menu Item
OSD
POS. X
0-xxx
POS. Y
0-xxx
Size
Small
Small OSD menu window
Large
Large OSD menu windows
Osd TimeOut 2-20
Info
Version
X.XX.XX
Displays the current SW-version
Factory Reset
CONNECTING THE SMART-PLAY INTERFACE:
plugged in to the USB port using the smartphone’s OEM charger/data cable. The USB port on the
ACPBM-77X can be used to charge the Apple device or play videos or music from a USB thumb drive.
to the next enabled input. If all inputs are enabled the order is:
Rear CAM > Video Input (Smart-Play) > Repeat ...
The ACPBM-77X u�lizes wireless technology for Apple devices. Android devices are required to be
ACPBM-77X
To exit the Smart-Play menu, hold the “Menu” button for 3-5 sec
.
Switch the vehicle’s audio source to the AUX source. This will allow us to hear the Smart-Play audio
through the audio system. Hold the “MENU” bu�on for 3-5 seconds to enter forced view mode.
Smart-Play Integration with Rear-View Camera Input for
E Series BMW with CCC Systems (6.5” or 8.8” Monitor) and 10-Pin LVDS Connector
Note:
To exit the back-up camera image,
push down on the iDrive button


