background image

3

LCD & Touch Panel Keypad Description

The LCD Keypad shows all the information required to operate the system. The User

communicates with the alarm system via the keypad. The Keypad continuously displays

information about the status of the alarm system, and enables the User to operate the system in

different modes, change settings and program User's access code.
The keypad also collects and records events to be displayed afterward on request, to overview

system activities, and to analyze system performance for diagnostics.
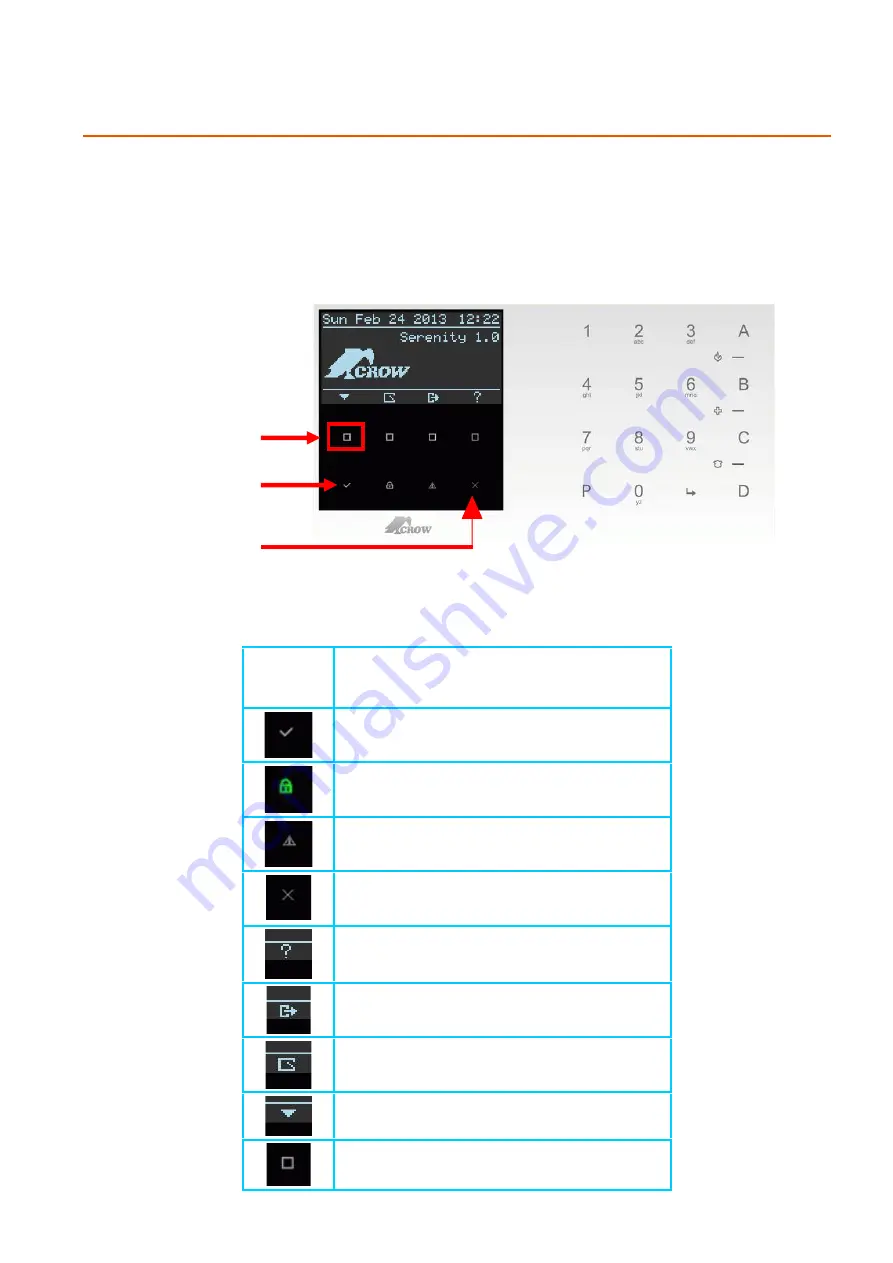
Picture 1

Table 1: Main Screen Buttons & Symbols Description

Button/
Graphic

indication

Description

ENTER

and save action touch button

ARM OR DISARM Touch Button  , and

ARM/Disarm status indication light

Alarm/troubles status display Touch Button , and

Warning alert indication

ESC or EXIT touch button

View of A,B,C, and D keys function

Output Control function and status view

View Open Zones

Main Menu List

Executable Touch button

X

Main Menu

Button

ESC/EXIT

Button

ENTER Button

Summary of Contents for Serenity Series

Page 1: ...ELECTRONIC ENGINEERING LTD Serenity CONTROL PANEL User s Guide Preliminary draft Version ...

Page 2: ...t that this product can not be compromised or circumvented that this product will prevent any person injury or property loss or damage by burglary robbery fire or otherwise or that this product will in all cases provide adequate warning or protection Purchaser understands that a properly installed and maintained product can only reduce the risk of burglary robbery or other events occurring without...

Page 3: ...g the System with a code 12 Quick Arm When enabled at installation by the installer 13 Disarming the System 14 Stopping and Resetting Alarms 14 ARMING THE SYSTEM WHILE STAYING HOME 15 Arming the System in Stay Mode 15 Disarming the System 15 ARMING IN THE LATCHKEY MODE 16 HOW TO ARM PARTITIONS IF ENABLED AT THE INSTALLATION 16 HOW TO BYPASS A ZONE OR BYPASS A ZONES GROUP 17 USING CHIME 18 EMERGENC...

Page 4: ...TIME AND DATE 24 RFID READER FOR ARM DISARM AREAS WITH AN ACCESS CARD TAG 24 USING MAIN MENU CONTROL 25 ENTERING NUMBERS LETTERS AND SYMBOLS 25 LCD KEYPAD DESCRIPTION 26 LOCAL CONFIGURATION 26 ADJUSTING LANGUAGE KEYPAD SOUND BACKLIGHT MICROPHONE AND SPEAKER 27 CUSTOMIZATION CHART 30 ...

Page 5: ...is a highly advanced multifunction alarm control system designed to flawlessly manage your security system at home or at business protects you against burglary and supports the operation of multiple electronic devices The SERENITY SERIES has many incredible program options and additional accessories that can enhance the standard features of the panel from simple Home Automation to Radio control an...

Page 6: ...on The protected premises can be divided up into 32 zones as defined by the installation scheme The protected area can be grouped into four separate partitions 1 2 3 and 4 The system enables you in a business environment to conveniently group separately the offices from the warehouse area or in a private residence the different rooms of the home For example living room bedroom and maybe the baseme...

Page 7: ...s events to be displayed afterward on request to overview system activities and to analyze system performance for diagnostics Picture 1 Table 1 Main Screen Buttons Symbols Description Button Graphic indication Description ENTER and save action touch button ARM OR DISARM Touch Button and ARM Disarm status indication light Alarm troubles status display Touch Button and Warning alert indication ESC o...

Page 8: ...P Program E ENTER ENTER key The A key used for ARM pre programmed The B key used for zone bypass action pre programmed The C key used to enter to memory display pre programmed and can be used to check all boxes for specific parameter by one press The D key used to switch chime on off delete input and deselects all boxes in an open parameter by one press A Fire alarm will be generated if A B keypad...

Page 9: ...larm event has a level of severity known as the alarm s severity An alarm s severity indicates the order in which users should handle that event relative to alarms of other severities Each level of severity has a corresponding alarm graphic which can be used to help users identify alarmed entities For information about alarm graphics see Table 3 on page 8 Severity Level Description Critical An ala...

Page 10: ...cs Logging to Alarms Events Status View The following procedure describes how to login to alarm status view screen and see alarm details in case of an alarm symbol appears on the main display screen Example 1 ZONE Open alarm Press on the Alert touch button to login to the alarm status view screen See pictures 1 and 2 The Alarm status view screen is displaying 2 symbols use the Left Right touch but...

Page 11: ...e Alert touch button to login to the alarm status view screen See pictures 3 and 4 The Alarm status view screen is displaying 2 symbols use the Left Right touch buttons to scroll between alarms and read the alarm s details 3 4 1 Radio Zones battery low To identify the radio zones that are having low battery problem press on the enter button the zone numbers that are having this problem will flash ...

Page 12: ...le Symbol AREA is in STAY Armed state Flashing Symbol indicates Critical Alarm Stable Symbol indicates Trouble alarm Open Zone Zone Tamper Open or Low Battery or zone sensor watch Main Power Fail Fuse Fail Low Battery panel CAN BUS Fail Ethernet Fail GSM GPRS Fail Phone Line Fail Panel Tamper RF Jamming Radio Zones Low Battery Pendant low battery AREA is not ready the number 1 indicate AREA number...

Page 13: ...t functions it emits different audible beeps Their meaning is described in the table 3 Table 3 List of Audible Signals Sound Description Short beep When a key in the keypad has been pressed Triple beeps For ARM DISARM WARNING STAY operations Long beep For alarms warning corresponded configuration parameters Slow beeping At arming start exit delay and warning entry delay Fast beeping At the last 5 ...

Page 14: ... Exit Bypasses a zone s Only if enabled by installer Bypass Option 2 Main menu select Bypass select zone number Enter Exit Bypasses a zone s For main menu button see picture 1 on page 3 of the guide Initiate Panic C D Keys Activates panic alert Only if enabled by installer Initiate Medical B C Keys Activates emergency alert Only if enabled by installer Initiate Fire Alarm A B Keys Activates emerge...

Page 15: ...on 2 select Output number Enter Exit Activates or deactivates outputs and devices This key is Programmed by Default Change or Add Users code Option 1 from installer mode P000000 ENTER Activates program mode to add or change Users codes Only if enabled and provided by installer M CODE Master Code Note 2 If you started an operation incorrectly press ENTER or EXIT ESC to exit and return to the previo...

Page 16: ... and then the Enter Button to review the numbers and names of all open zones as shown in the next picture Flashing zone number 31 is in open zone state Note To arm the panel close open zones or bypass them Note Factory default it is possible to arm the system even if zones 1 2 are not ready P133E Note Bypassed zones are not protected IMPORTANT If you don t know how to fix open zones please consult...

Page 17: ...hat the system is not armed yet and reminds you to vacate the protected area The symbols and light up to indicate that the system is armed See next picture To disarm the system during the exit delay enter your code again and enter or click on ARMED State Symbols Quick Arm If enabled at installation by the installer This arming procedure is based on the assumption that quick arming has been program...

Page 18: ...lay time only otherwise use option 2 Option 2 1 Enter your code 2 Press ENTER The two indicators go off the system is now disarmed Stopping and Resetting Alarms 1 Enter your code 2 Press ENTER This stops the alarm at any time and also turns off any audible sirens ...

Page 19: ... STAY mode user code 2 Press ENTER The indicator is displayed on LCD indicating that the system is now armed in stay mode By Quick Stay From Main Menu This feature must be enabled at installation time Step 1 Press on main menu key button Step 2 Scroll down up button and select Stay level and press the ENTER key 1 2 During exit delay you can leave the premises The indicator is displayed on LCD indi...

Page 20: ...ur code Ask your installer for the latchkey mode user code 2 Press ENTER The indicator displays on LCD indicating that the system is now armed in Arm mode How to Arm Partitions if enabled at the installation The protected area can be grouped into 4 separate partitions 1 2 3 and 4 The system can be grouped for User s convenience to separate in a business environment the offices from the warehouse a...

Page 21: ...ss the ENTER key to enable the bypass zone Step 4 EXIT from bypass level by pressing the ESC EXIT key 1 2 3 4 Bypass a zones group Step 1 Press the main menu button Step 2 scroll down up button and Select the bypass group level and press the ENTER key Step 3 EXIT from bypass level by pressing the ESC EXIT key NOTE 4 Zone group must be created by installer first according user request Reset Bypass ...

Page 22: ...p button and Select the Chime level and press the ENTER key Step 3 Chime is disabled verify a bell icon chime off appears on LCD display 1 2 3 Chime Enable on If the Chime is in disabled mode as shown in previous step 3 please repeat steps 1 2 Step 1 Press the main menu button Step 2 Use scroll down up buttons to get to chime level and press the ENTER key Make sure that the chime off symbol is no ...

Page 23: ...m Press simultaneously on keys A and B To stop the alarm enter a valid user code Generate Threat or Duress If you are forced to disarm the system under threat you must enter the duress digit before the user s code to activate the automatic dialer The duress digit shifts up your usual code by one digit If your code is 345 and 8 is your duress digit than entering 8345 modifies your code The modified...

Page 24: ...istorical memory events list Step 5 To exit display press on either the enter button or the cancel exit button 1 2 3 How to create Event Group Filter An event group filter allows only those events that were enabled to be display in memory With this filter you can create a memory target that display only events for a specific set of event type Step 1 From Memory level press on the Filter Button Ste...

Page 25: ...utton For details ask the installer Entering the User Programming mode There are 2 levels of programming mode User mode and INSTALLER mode Normally the installer gives you access to the User mode by setting user 1 code as master user so you can add delete or change the user codes If you request it your installer can provide you with access to the INSTALLER mode as well To get into user mode provid...

Page 26: ...y mode User code can change his code User can change all codes User can allow access to installer mode User can change phone Number or IP address User can change the clock User can view memory User can learn radio devices How to Change the Master Code There are two ways for the user to change the Master Code the first option being the ordinary way the second one by a shortcut First option Step 1 T...

Page 27: ... Step 5 Use the scroll right left buttons to select and display the required user number and press the ENTER button Step 6 Press the ENTER key Step 7 Use the numeric keypad keys to Add Change the new code enter from 1 to 8 digits Step 8 Press the ENTER to save the code NOTE for all users codes Repeat steps 5 to 8 Step 9 Press the ESC EXIT button till the system asks you to confirm exit and press t...

Page 28: ... are also used for IP addresses ask installer for details How to set Time and Date The alarm system has an internal clock that may be used to automatically Arm or Disarm the alarm or turn Outputs on or off It is also used to identify when events occurred in memory via the LCD keypad If you need to change the Time Date it can be done by default from the User mode by entering master user code and fr...

Page 29: ...lly Arm or Disarm then he can cycle through the various states Using Main Menu Control The Main Menu control is used as standard drop down menus The Serenity s keypads menus are used for programming and configuring the system e g zones users for viewing various information and statues e g alarms open zones and perform actions e g activate output the Serenity s main menu is accessed using the keypa...

Page 30: ...arm LCD Keypad Description Most of the main actions like ARM DISARM ARM STAY and others are the same at the crow LCD keypad But in the LCD keypad the user can change texts like zone name and area names adjust the backlight and buzzer tone Local Configuration The following section describes how to configure the device to guarantee appropriate handling of LCD screen and control panel services such a...

Page 31: ...on level scroll down up select language and press the ENTER key Step 2 Choose the required Language and press the ENTER key 1 2 Keypad Sound The user can adjust the frequency tone of the LCD keypad buzzer within a range of 10 steps By adjusting the frequency the volume of the tone produced at the buzzer varies as well Step 1 From Local Configuration level scroll down up select Keypad Sound and pre...

Page 32: ... on the LCD keypad Step 1 From Local Configuration level scroll down up select Backlight and press the ENTER key Step 2 Scroll Right Left Button to increase decrease illumination and press the ENTER key 1 2 Microphone Sensitivity Step 1 From Local Configuration level scroll down up select Microphone and press the ENTER key Step 2 Scroll Right Left Button to increase decrease Sensitivity and press ...

Page 33: ... 2 Speaker Volume Step 1 From Local Configuration level scroll down up select Speaker and press the ENTER key Step 2 Scroll Right Left Button to increase decrease Speaker Volume and press the ENTER key 1 2 ...

Page 34: ...er Name Zone Zone Name 1 41 1 2 42 2 3 43 3 4 44 4 5 45 5 6 46 6 7 47 7 8 48 8 9 49 9 10 50 10 11 51 11 12 52 12 13 53 13 14 54 14 15 55 15 16 56 16 17 57 17 18 58 18 19 59 19 20 60 20 21 61 21 22 62 22 23 63 23 24 64 24 25 25 26 26 27 27 28 28 29 29 30 30 31 31 32 32 33 34 35 36 37 38 39 40 ...

Reviews: